
Setup & Usage: Petcube Bites 2 Lite User Manual
Content
Petcube Bites 2 Lite
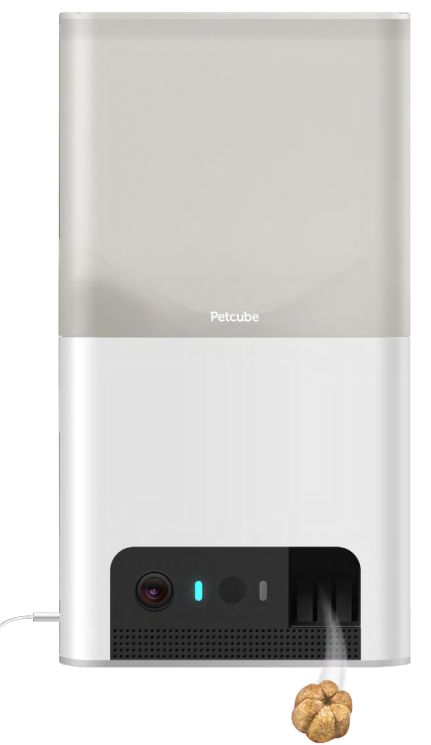
Introduction
The Petcube Bites 2 Lite is a cutting-edge interactive pet camera designed to keep you connected with your furry friends even when you're away. Combining high-quality 1080p HD video streaming with a wide 160° viewing angle, this device allows pet owners to monitor their pets in real-time with crystal-clear visuals. The standout feature is its treat dispenser, which lets you remotely toss delicious,, crunchy treats to your pet, enhancing engagement and rewarding good behavior from anywhere using the intuitive Petcube app.
Key benefits include two-way audio communication for talking and listening to your pet, adjustable treat launching distance, sound and motion notifications, and compatibility with a variety of treat sizes up to 1 inch. ThPetcubebe Bites 2 Lite is made of durable hard plastic, making it pet-proof and suitable for both apartment and home environments. Its compact design (5.7 x 3 x 10.6 inches) ensures easy placement without occupying much space.
Ideal for busy pet parents, working professionals, or anyone who wants to stay engaged with their pets remotely, this device supports iOS and Android smartphones with WiFi connectivity (2.4 GHz only). It is perfect for use cases such as checking pet activity during the day, entertaining pets with treat rewards, or ensuring pet safety via live video monitoring.
The Petcube Bites 2 Lite typically retails around $80 to $90 and is widely available through online retailers and pet specialty stores. Subscription options are available for enhanced cloud video storage and advanced alert features, offering comprehensive pet care management in one sleek package.
PETCUBE BITES 2 LITE SPECS AND SYSTEM REQUIREMENTS
Petcube Bites 2 Lite features:
- 160º wide-angle view;
- 1080p HD video;
- Treat dispenser;
- 2-way audio;
- Night vision;
- 8x digital zoom;
- Sound and motion alerts.
Petcube Bites 2 Lite requires:
- Wi-Fi 802.11b/g/n, 2.4 GHz, password-protected;
- iOS 14 and higher or Android 7.1.2 and higher;
- Min 2 Mbps Upload speed on the Petcube (4 Mbps recommended);
- Min 2 Mbps Download speed on the mobile device (4 Mbps recommended).
Setting up your Petcube Bites 2 Lite on an iOS device
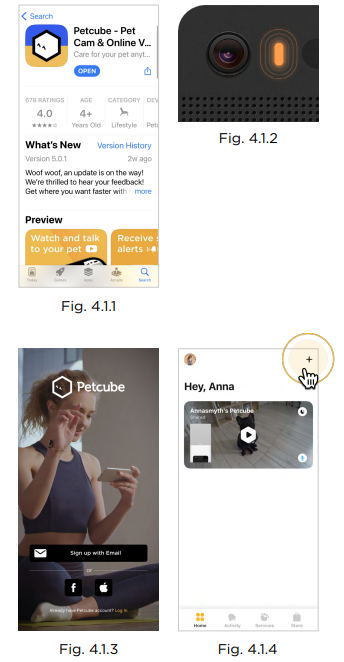
- Step 1. To set up your Petcube, download the Petcube application (fig 4.1.1) to your iOS device. The Petcube app requires iOS 14 or greater and can be downloaded from the App Store..
- Step 2. Connect your Petcu to a power source and wait up to a minute until the LED light starts blinking yellow or blue (fig 4.1.2).
- Step 3. Open the Petcube app on your iOS device, and log in or sign up for a Petcube account (fig 4.1.3).
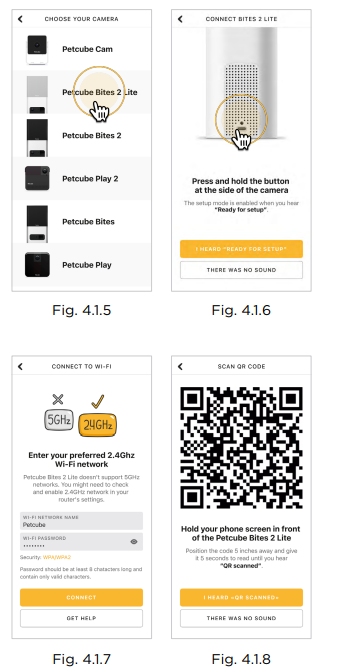
- Step 4. Tap the plus icon in the upper right corner of the screen, and choose the ‘Add a new device’ option. (fig 4.1.4) and pick Petcube Bites 2 Lite from the list of options (fig 4.1.5).
During the setup, the Petcube camera will automatically detect the Wi-Fi network your phone is currently connected to, so it’s a good idea to make sure you’re connected to the same network you want to hook up the camera to, and have the Wi-Fi password handy,, as you’ll be asked to enter it shortly. Make sure it is a 2.4 GHz WI-FI network. - Step 5. As long as the LED light is flashing on your camera, you’re ready to enable the setup mode.
- To do that, press the setup button above the USB-C port on the camera until you hear a short jingle and a message saying «Ready to Connect», and tap ‘I heard «Ready to connect» on the screen.’ (fig 4.1.6).
- Step 6. At the top, you’ll see the network that you’ll be connecting the camera to, so tap ‘Next’ to continue the setup and enter your Wi-Fi password or ‘Change network’ if you wish to connect it to a different network (fig 4.1.7).
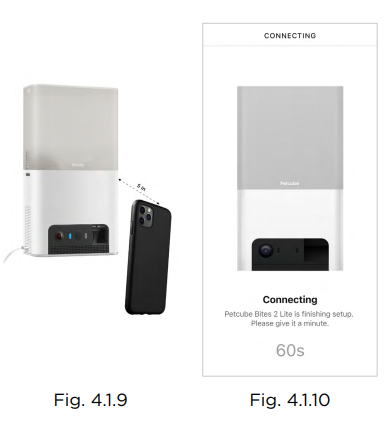
Keep in mind that only 2.4 GHz Wi-Fi networks are supported by Petcube Bites 2 Lite. Please make sure you are connecting to a 2.4 GHz Wi-Fi network. - Step 7. A QR code will be displayed on the on-screen. Hold your camera at a one-inch distance with the lens facing the QR code until you hear a message saying «QR code scanned», check the box, tap ‘Next’ (fig 4.1.8 & 4.1.9).
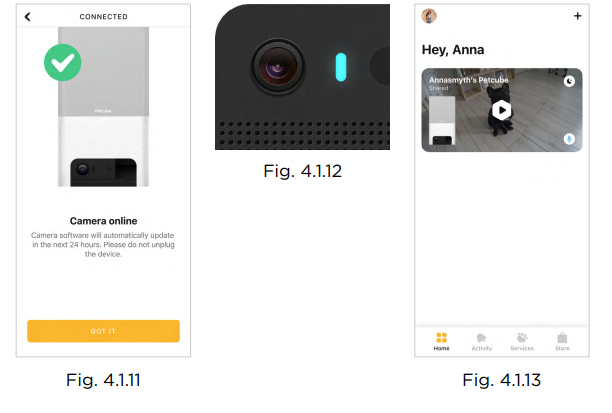
- Step 8. Your Petcube device is almost set! Please wait until it connects (figs 4.1.10 & 4.1.11) and the light on the front panel turns blue.
- Step 9. Once the LED light on your Petcube changes to solid blue (fig 4.1.12), you are ready to play with your Petcube (fig 4.1.13).
Reminder: Your Petcube will likely need a firmware update right after it is connected. The firmware update will be downloaded to your camera within 24 hours.
Setting up your Petcube camera on an Android device
- Step 1. To set up your Petcube, download the Petcube app to your Android device (fig 4.2.1). The Petcube app requires Android 7.1.2 or greater and can be downloaded from the Google Play Store..
- Step 2. Connect your Petcu to a power source and wait up to a minute until the LED light starts pulsing yellow or blue (fig 4.2.2).
- Step 3. Open the Petcube app on your Android device, and log in or sign up for a Petcube account (fig 4.2.3).
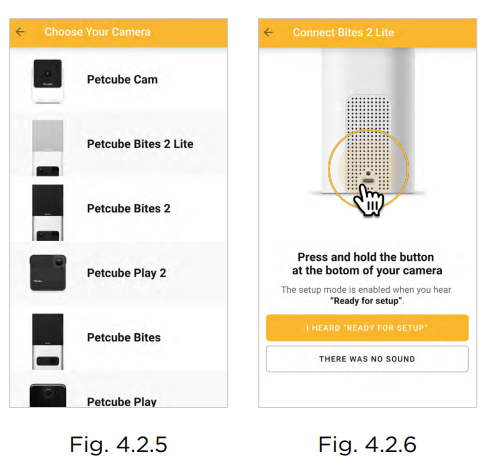
- Step 4. Tap the plus icon in the upper right corner of the screen, and choose the ‘Add a new device’ option. (fig 4.2.4) and pick Petcube Bites 2 Lite from he list of options (fig 4.2.5). During the setup, Petcube Bites 2 Lite will automatically detect the Wi-Fi network your phone is currently connected to, so it’s a good idea to make sure you’re connected to the same network you want to hook up the camera to, and have the Wi-Fi password handy a,, as you’ll be asked to enter it shortly.
- Step 5. As long as the LED lights are flashing on your camera, you’re ready to enable the setup mode. To do that, press the start button at the bottom of the camera until you hear a short jingle and a message saying «Ready to Connect», and tap ‘I heard «Ready to Connect» on the screen.’ (fig 4.2.6).
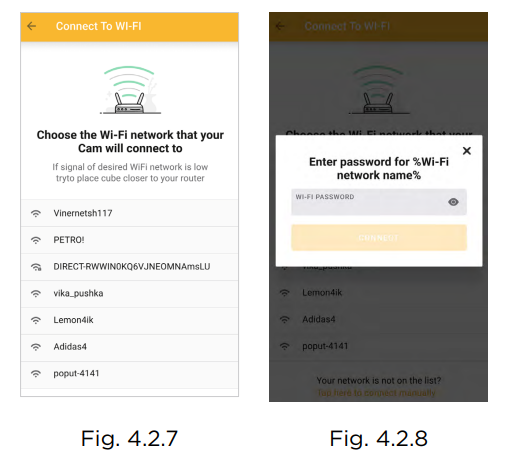
- Step 6. Choose the Wi-Fi network to connect your Petcube to and enter the Wi-Fi password. Keep in mind that only 2.4 GHz Wi-Fi networks are supported by Petcube Bites 2 Lite. Please make sure you are connecting to a 2.4 GHz i-Fi network (figs 4.2.7 & 4.2.8).
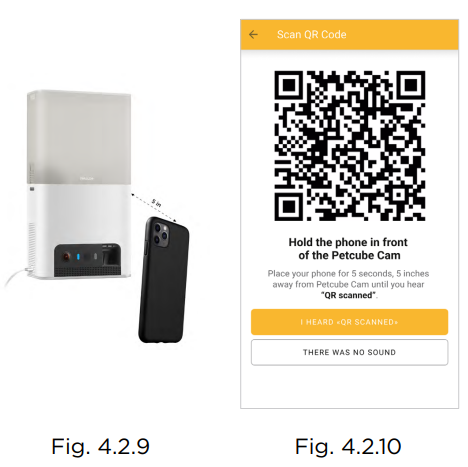
- Step 7. A QR code will be generated ooneee phone screen. Hold your camera ataatdistanceith with the camera facing the QR code until you hear a message saying «QR code scanned», check the box, tap ‘Next’ (figs 4.2.9 & 4.2.10).
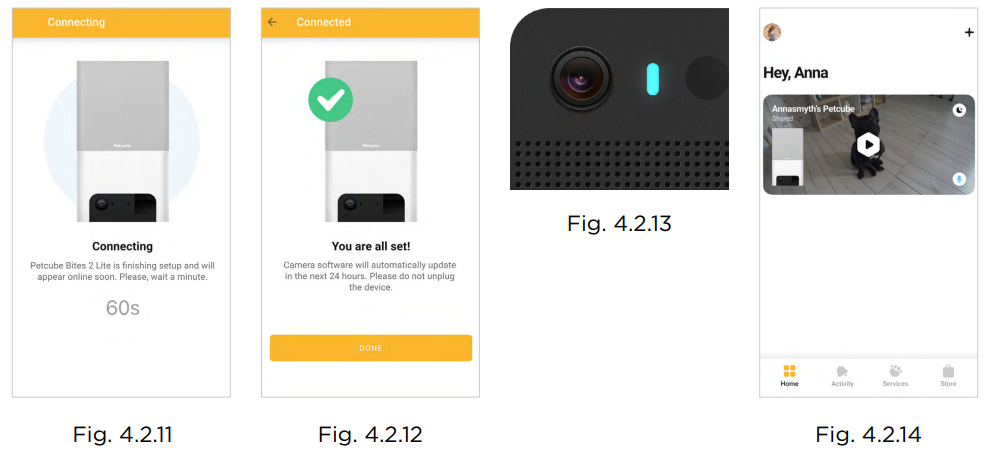
- Step 8. Your Petcube device is almost set! Please wait until it connects and the light on the front panel turns blue (figs 4.2.11 & 4.2.12).
- Step 9. Once the LED light on your Petcube changes to solid blue, you're ready to play with your Petcube (figs 4.2.13 & 4.2.14).
- Reminder: Your Petcube will likely need a firmware update right after it is connected. The firmware update will be downloaded to your camera within 24 hours.
AMAZON ALEXA SKILL
Petcube Alexa skill can be associated with your Petcube Bites 2 Lite,, giving yothe u the ability to ask an Alexa-enabled device to, for instance, treat your pet with Petcube Bites 2 Lite.
Setting up Amazon Alexa to work with Petcube
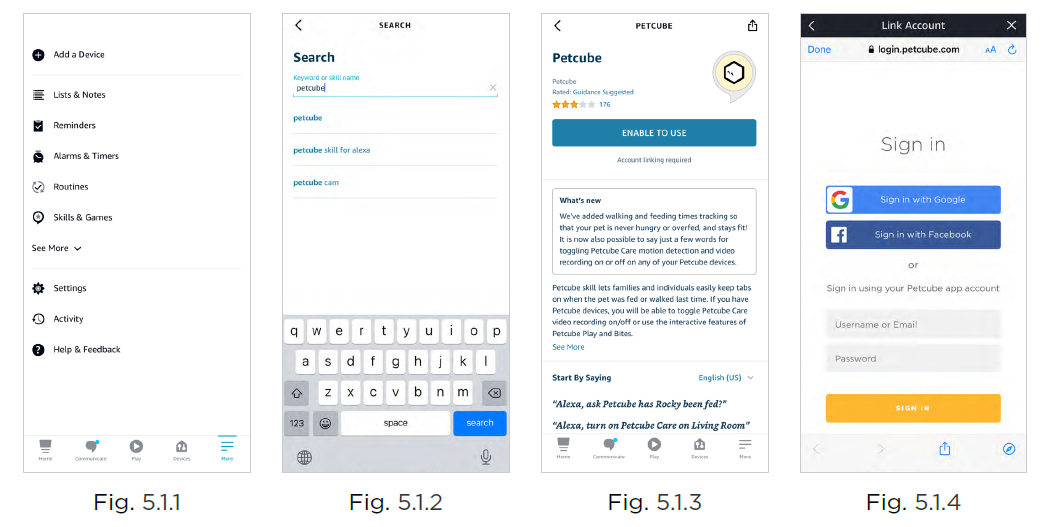
- Sign in to yourto your Amazon Alexa account using the Alexa app on your phone (fig 5.1.1);
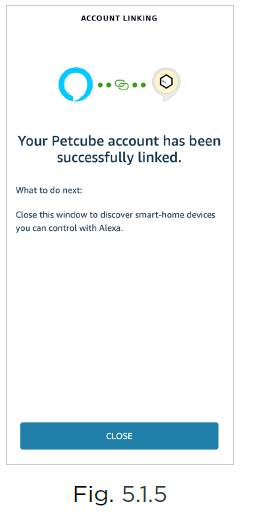
- Search for and download the Petcube Skill for Alexa (fig 5.1.2 and 5.1.3);
- Link your Petcube account using your Petcube username through your Alexa App or Amazon account (fig 5.1.4 and 5.1.5);
- Start using Alexa to give voice commands to Petcube cameras.
Setting up the Petcube Skill for Amazon Alexa is a one-time process. No changes are necessary from within the Petcube app or your Petcube account.
Amazon Alexa voice commands on Petcube..
After you’ve downloaded and installed the skill, use the following voice commands with an Alexa-enabled device to give commands to your Petcube Bites 2 Lite camera:
- Alexa, ask Petcube to treat [your pet’s name];
- Alexa, ask Petcube to treat my pet.
- Alexa, ask Petube to fling treats.
Amazon, Kindle, Echo, Alexa, Dash, Fire,, and all related logos are trademarks of Amazon.com, Inc. or its affiliates.
Moreover, the Petcube skill lets families and individuals easily keep tabs on when their pet was fed or walked last time. You can also toggle Petcube Care video recording on and off.
Walking & Feeding
- Just say «Alexa, ask Petcube has Rocky (your pet’s name) been fed?» or «Alexa, ask Petcube has Rocky been for a walk?» to get the last time when your pet was fed or walked.
- When feeding the pet, say «Alexa, tell Petcube I fed Rocky» or «Alexa, tell Petcube Rocky has been fed».
- When returning from or going for a walk, say «Alexa, tell Petcube I walked Rocky» or «Alexa, tell Petcube Rocky has been walked».
Toggling Petcube Care video recording On/Off
- All Petcube camera owners can pair their devices and switch Petcube Care On and Off, to enable or disable the motion detection alerts and automated video recording.
- For instance, if you have a Petcube camera named «Living Room,,» you may say: «Alexa, turn Petcube Care off on Living Room» when returning home. When leaving, you may say «Alexa, turn video recording on Living Room».
PETCUBE CARE™
What is Petcube Care
Petcube Care is an optional subscription service that adds features to a Petcube camera and gives owners additional peace of mind when it comes to their pets
and their property.
Depending on the subscription plan, Petcube Care provides Petcube users with access to cloud-based video history for 3 or 90 days, 30-second video clips, 10 or unlimited video downloads, and smart alerts.
How much does Petcube Care cost
Petcube Care offers two different subscription plans, Optimal and Premium, to fit the needs of pet owners of all stripes. Choose a monthly or annual rate.
How does Petcube Care work
Petcube Care watches after your pets and home when everyone is away, capturing action videos, triggered by sound or motion. 30-second clips are saved securely in the cloud and are accessible in the interactive timeline in the Petcube app to review and download for 3 or 90 days (depending on the subscription plan). The 3-second look back lets you see what event set off the recording.
Using powerful AI technology, Care understands what pets are doing, registering important events like cat, dog,, or human movements, bar, ks, or meows, and sends you real-time smart alerts.
Without Care, Petcube users only have access to the live video streaming and general sound and motion notifications.
How to activate Petcube Care
To start using Petcube Care, you need to have a Petcube camera and a Petcube Care subscription.
To subscribe:
- Go to petcube. ebsite
- Sign in with your Petcube account or go to the Petcube Care product page and select the most suitable subscription option for you. You will also be able to subscribe from the ‘Home’ page in the Petcube app on both iOS and Android devices.
If you are not a Petcube camera owner yet but wish to buy one, you will also be able to subscribe to Petcube Care when you make your purchase.
How to Turn Off Petcube Care Video History
Petcube Care’s video history feature is turned on by default.
To deactivate it:
- Open the Petcube app.
- Go to the camera profile in the Home menu.
- Move the slider to ‘Sleep’ mode in the lower right corner of the Petcube camera controls.
In Sleep mode, Petcube Care is disabled. It will not detect and record events. Nothing will be added to your video history timeline. You will still have access to recorded videos if any were taken when Care was active,, and your subscription plan allows.
Use Awake mode, when you are not around and want Petcube Care to be active. You will get noise & motion notifications. These moments will be stored on your timeline.
How to view your video history in Petcube Care
- It’s very easy to access your video history with Petcube Care! Launch the Petcube app on your phone. Most recent videos will populate below.
- Tap on ‘Show Older Videos’ to move back or forward in time.
- Tap on the ‘...’ next to each video to get options to Delete, Share, or Save the video.
- You can also access your video history if you log into your Petcube account on petcube.com in the upper right corner.
- The website doesn’t offer live streaming or alerts, but you can scroll through, filter, and play back the recorded Care videos.
- Remember, Petcube Care records videos to the timeline automatically by default. If you would like to deactivate this feature, review these instructions in the article «How to Turn Off Petcube Care Video History».
- If your Petcube Care is currently set to Sleep mode, you will need to change it to Awake mode for videos to be recorded to your timeline. To do this:
- Open the Petcube app.
- Go to the camera profile in the Home menu.
- Move the slider to ‘Awake’ mode.
How to save a video recording to your phone’s internal storage
While you will be able to view video history for the past 3 or 90 days, depending on your subscription plan from the cloud via Petcube Care, you will always be able to store video recordings to your phone’s internal storage. Just pick the necessary video clip, press the three dots ‘…’ located on the left-hand side of the video, and select ‘Save’.
Video recording length
Currently, video recording length can be no longer than 30 seconds. So, for instance,
if there’s a motion that lasts for 2 minutes and 15 seconds, the app will cut it into 5 scenes. However, in the free 4-hour history plan, the video recording length is limited to 10 seconds.
How can I use Petcube Care on multiple Petcube devices
At the moment, Optimal Care plan covers one camera per subscription, while Premium, both monthly and annual plans, are applied on the account level and cover an unlimited number of cameras on the account.
How to add or update your payment information for Petcube Care
If you need to add or update your payment information for the Petcube Care service:
- Logtotoo your Petcube account at petcube.com by clicking on the Home icon in the upper right corner.
- Once logged in, go to the ‘Billing’ tab to update your information.
How do I cancel the Petcube Care subscription??
To cancel your Petcube Care subscription:
- Open the Petcube app.
- Go to the camera profile on which you wish to cancel the subscription.
- Tap the ‘Settings’ wheel in the upper right corner.
- Select Care Settings;
- Click on the current subscription at the top.
- Hit Cancel subscription at the very bottom of the page.
TROUBLESHOOTING
LED light doesn’t light up
If the LED light on your Petcube camera is off while the camera is plugged into he power source, try unplugging it and plugging it back in. Make sure that yoyou'resing the original power adapter that came with your Petcube and that the power cord is undamaged. If you no longer have the original power adapter, make sure to only use the ones that provide 5V/2A power.
Petcube blinks blue/yellow and doesn’t turn blinking blue
It might be that the Petcube camera is located out of reach of the Wi-Fi assigned, or Wi-Fi is not being broadcast, or there is no internet internet internetnternettvailable. Make sure it is in Wi-Fi range and the internet is available.
When you plug in your Petcube before starting the registration process, it should glow solid yellow for a minute. Wait up to 1 minute until it starts blinking blue/yellow.
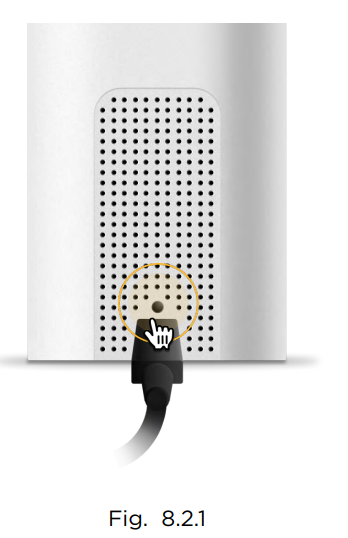
- Find the setup button above the USB port of your Petcube Bites 2 Lite, hold it down with a pin for 1 second until you hear «Ready to connect» (Fig. 8.2.1);
- Open Petcube app, go to the ‘Home’ tab, tap Plus icon in the top right corner of the screen’, pick your Petcube from the list of options,, and follow the steps on the screen.. . screen screen 3. Incorrect Wi-Fi password
If the Petcube app is showing the «Incorrect Wi-Fi password» error message after the setup, here are a few possible reasons behind that:
Incorrect Wi-Fi password
If the Petcube app is showing the «Incorrect Wi-Fi password» error message after the setup, here are a few possible reasons behind that:
- Case sensitivity: check the entered password for uppercase or lowercase characters.
Keep in mind that «Password» and «password» would be two different passwords because the «P» is uppercase in the first example and lowercase in the second example. - Password length: check the entered password length and keep in mind that normally the password length is 8+ characters long.
- Keyboard language: check the onscreen keyboard language and make sure you enter the password in the correct keyboard layout.
To reset the Wi-Fi password:
- Open the Petcube app.
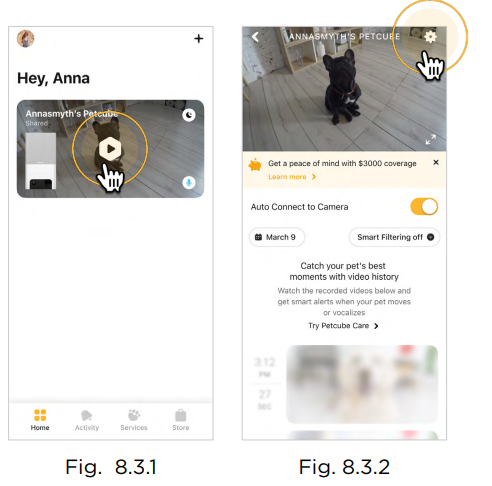
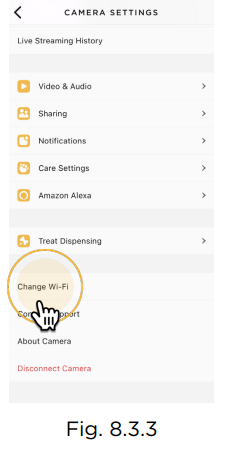
- Go to the camera profile, tap the ‘Settings’ wheel in the upper right corner (fig 8.3.1);
- Tap ‘Change Wi-Fi’ (fig 8.3.4);
- Power up your Petcube, wait 1 minute until it starts up.
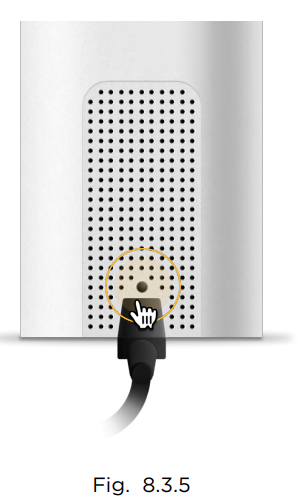
- Find the setup button right above the USB port of your Petcube Bites 2 Lite (fig 8.3.5), hold it down with a pin for 1 second until you hear “Ready to connect”;
- Open the Petcube app, go to the ‘Home’ tab, select ‘connect your device’, pick your Petcube from the list of options,, and follow the steps on the screen.
Petcube can’t register on your Wi-Fi network.
You may see this message when your Petcube cannot receive the IP address automatically using DHCP. Normally, the router should assign the IP address to your Petcube automatically,, but if this didn’t happen, you can enter your router settings and assign the IP address to your Petcube manually. You can also contact your ISP or Petcube Customer Care team for help.
Petcube can’t establish the cloud connection / No Internet connection
If you get this error message, firstly, make sure you have Internet access on your
Wi-Fi by trying to open a few websites on a few devices. If you have Internet access but Petcube still can’t be connected, try to reset the device by following these easy steps:
- First, if you have previously set up your Petcube, open the Petcube app, go to the ‘Home’ tab, then select ‘Settings’ and choose ‘Disconnect Camera’;
- Power up your Petcube, wait 1 minute until it starts up.
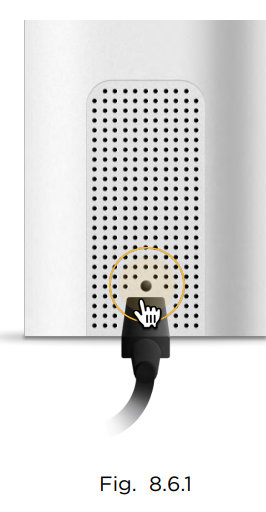
- Find the setup button right above the USB port of your Petcube Bites 2 Lite (fig 8.6.1), hold it down with a pin for 1 second until you hear«Ready to connect»;
- Open the Petcube app, go to the ‘Home’ tab, select ‘connect your device’, pick your Petcube from the list of options ,, and follow the steps on the screen.
If you want to have the firewall on, you need to open the following ports:
- TCP port 3335; 34.194.225.22
- TCP port 443; 35.212.7.2135.207.1.22 (You may not need the UDP ports because they’re rarely blocked, but the UDP range should be from 7000 to 7100). WPS pin code should be disabled (please note that not all the routers have it).
MAC filtering should be disabled. If enabled, a MAC address can be found on the back of the cube.
bummer setup error
If during the setup you’re getting an «Oh Bummer» error message, turn your Petcube Off and baconOn, wait up to 1 minute until it boots up and starts blinking and start the setup process over again.
Poor video quality or poor network conditions
Like with most video streaming services and products, video quality is affected by router performance and/or your Internet connection. This can be improved if you place Petcube closer to your home Wi-Fi router or by arranging it in a way so there aren’t any obstacles between it and your router (i.e. walls, floors, radio interference,,e etc.). Petcube also requires at least a 2 Mbps Internet connection with upload and download speed (4 Mbps is recommended). If your Internet connection speed is less than 2 Mbps, we recommend upgrading for the best experience and highest video quality. To check your Internet speed, we recommend performing an online speed test. If you are not getting the full speed you subscribed to,, contact your Internet Servic Provider.
can’t connect to my Petcube / Petcube is offline in the app
If you cannot connect to your Petcube from your mobile phone, try the following:
Make sure that the LED light on the front of your Petcube is steady blue. If the LED light on the front of your Petcube isn’t steady blue, see section 9 «LED light notificationnotification, ns» to determine the issue. In most cases r,, rebooting the Petcube by unplugging and plugging it back in should helphelp,p, but if you’re facing this issue too often, below are a few ideas why it could be happening:
- Your Petcube needs a firmware update. To get the most recent firmware update, contact our support team..
- Sometimes the issue may be caused by restrictions of the Wi-Fi network your phone is connected to, especially if it’s a public or office Wi-Fi. Try to temporarily disable Wi-Fi on your phone and connect to your Petcube while using mobile data or or try connecting to other Public Petcube cameras in the feed to make sure it’s not a network restriction issue.
- This issue may occur if you’re using a non-original or a less powerful A/C adapter. Please make sure to use only 5V / 2A power adapters.
- You are using a mesh network,, or your 5Ghz and 2.4Ghz channels have the same SSID. It has been observed on multiple occasions that sometimes Petcube cannot maintain a reliable connection on a mesh/merged network or different network channels (5Ghz and 2.4Ghz) with the same network name (SSID). It is recommended to change either of the two channel names connection issues.
Petcube Bites 2 Lite will only work with 2.4 GHz Wi-Fi channels.s; - It’s possible that Petcube doesn’t have a strong Wi-Fi connection. Keep in mind that some connection issues may be caused by a poor Wi-Fi signal, which can depend
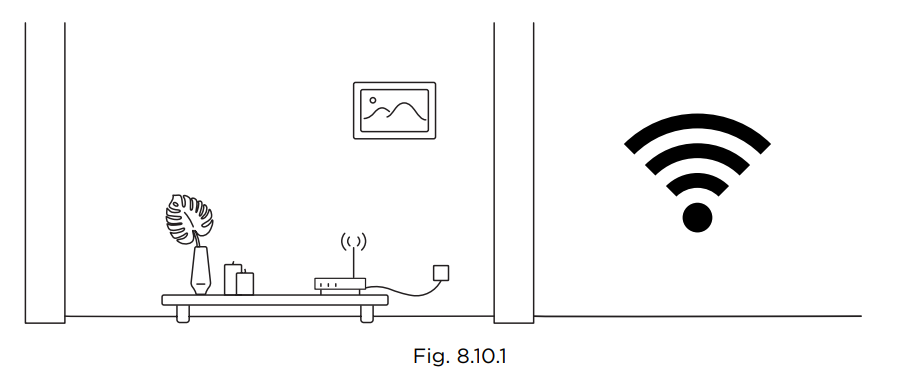
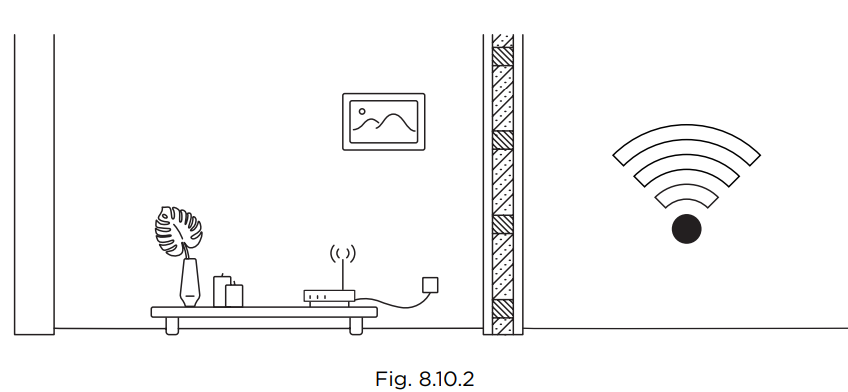
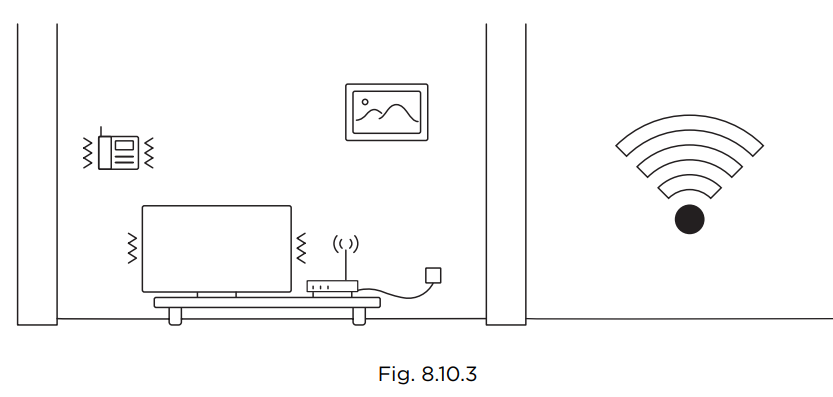
on the router range, distance to the router and obstacles between Petcube and the router, such as walls or radio frequency interferences. Here are a few examples of how electronic appliances or bearing walls can impact your Wi-Fi signal.
Example 1 (fig 8.10.1) shows no electronic or radio devices and no bearing walls between two rooms so the signal in the other room is very good.
Example 2 (fig 8.10.2) shows a bearing wall between two rooms which causes a poor Wi-Fi signal in the other room.
Example 3 (fig 8.10.3) shows interference caused by radio (phone) or electronic appliances (TV). Poor Wi-Fi signal can also be impacted by microwaves, refrigerators, cordless phones, baby monitors,, etc.
Petcube disconnected in the app..
If your Petcube camera status shows as «Disconnected» in the Petcube app, it usually means that your phone is not connected to the Internet at the moment or the network you are connected to has certain restrictions. Try to switch to any other Wi-Fi network or connect to your camera using cellular data (LTE, 3G).
Petcube goes offline / turns off.
- This issue may occur if you’re using a non-original or a less powerful A/C adapter. Please make sure to use only 5V / 2A power adapters.
- If you’re using the original adapter, but the problem persists, contact
- Petcube Customer Care Team to determine the problem.
How to find Petcube’s MAC address
Petcube Cam’s MAC address is specified on the back of the device.
Petcube app shows «no treats» message.
- In case the Petcube app is showing an error message that says your Petcube Bites has no treats despite the container being filled with treats, simply ignore this error message and try to still fling a treat from your phone using the Petcube app.
- In case it doesn’t work, reboot your Petcube by unplugging it from the power source and plugging it back in.
The treat got stuck in the camera..
- If a treat gets jammed in the container, you’ll get a notification via the Petcube app. You can dislodge the treat by removing it or shaking the container to empty it.
- If a treat gets stuck in the flinging mechanism, use the door on the bottom of the device to remove it. Do not unjam the device with sharp instruments or apply too much pressure, both of which can damage the device.
Petcube Bites 2 Lite factory reset instructions
If you have a problem with your Petcube and need to reset it, follow these easy steps: First, if you have previously set up your Petcube:
- Open the Petcube
- Go to ‘Home’ tab;
- Tap the ‘Settings’ wheel in the upper right corner.
- Choose ‘Disconnect Camera
- Power up your Petcube, wait 1 minute until it starts up.
- Find a small button above the USB port on the left side of the Petcube Bites, insert the reset pin into it, until you hear: «Ready for setup»;
- Wait until the LED on the camera starts blinking.
- Open the Petcube app again.
- Go to the ‘Home’ tab and select ‘Connect your device’
- Pick your Petcube from the list of options and follow the steps on the screen.
LED LIGHT NOTIFICATIONS
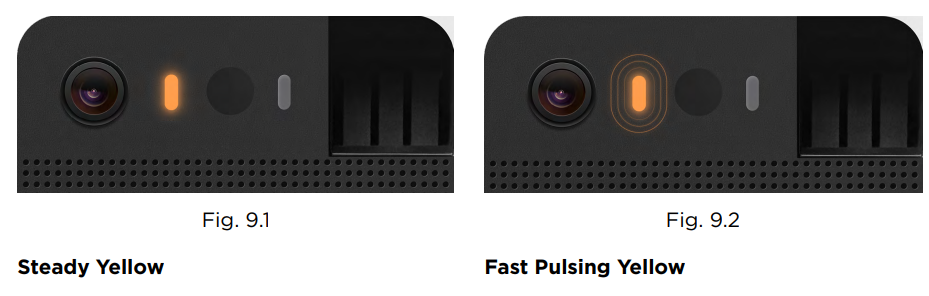
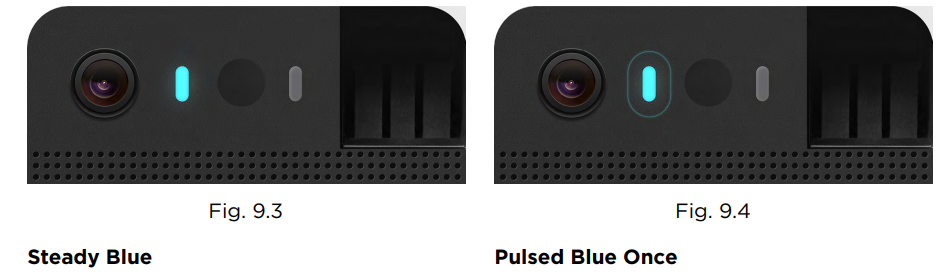
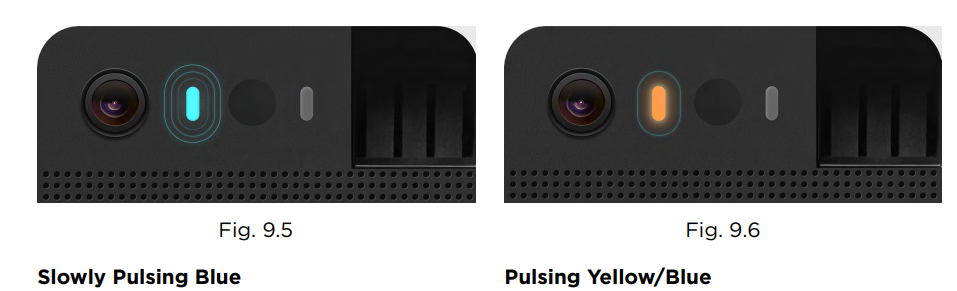
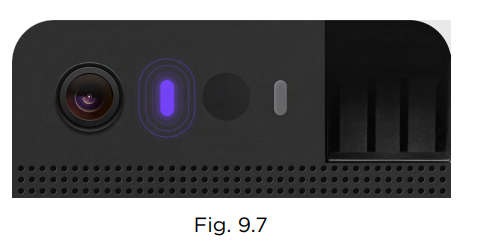
The LED light on the back of your Petcube tells you about its status.
- Steady Yellow
If you just powered your Petcube up, it will show this color while it boots up for up to 30 seconds. - Fast Pulsing Yellow
Setup mode. - Steady Blue
Online, standby mode. - Pulsed Blue Once
Petcube Care™ is active, saving video to your timeline. - Slowly Pulsing Blue
Play mode. Be aware, mind your riprivacycyetcube is streaming live video at the moment. - Pulsing Yellow/Blue
Your Petcube cannot connect to your Wi-Fi network because of an incorrect password, no wifi in range, or no internet connection. - Pulsing Purple
Your Petcube is downloading the most current software update, which usually takes about 5 minutes.
Pros & Cons of Petcube Bites 2 Lite: Honest Assessment for Pet Owners
- Pros:
- High-quality video: Delivers sharp 1080p HD resolution with a wide 160° angle and night vision, ideal for clear pet monitoring at any time.
- Interactive treat dispenser: Supports up to 1.5 lbs of treats, adjustable launch distances, and accommodates various treat shapes, enhancing pet engagement.
- User-friendly app: Easy setup and intuitive treat flinging control with real-time sound and motion alerts.
- Durable design: Made from pet-proof hard plastic, compact and lightweight, suitable for different home environments.
- Two-way audio: Enables clear communication so owners can talk to pets and hear responses.
- Cons:
- WiFi limitation: Only supports 2.4 GHz networks, which might restrict connectivity options compared to
Faqs
How do I set up my petcube Bites 2 Lite with an Android or iOS device?
What should I do if my petcube Bites 2 Lite is not connecting to Wi-Fi during setup?
How can I control the treat portions dispensed by petcube Bites 2 Lite?
Is petcube Bites 2 Lite compatible with all smartphones and Wi-Fi networks?
How can I optimize the placement of my petcube Bites 2 Lite for best performance?
What maintenance is required to keep petcube Bites 2 Lite working properly?
How do I troubleshoot poor video quality or connection lag on petcube Bites 2 Lite?
Can I share access to my petcube Bites 2 Lite with family or friends?
Tags
More petcube manuals
Leave a Comment