Petmate Programmable Food Dispenser | Instruction Manual
Content
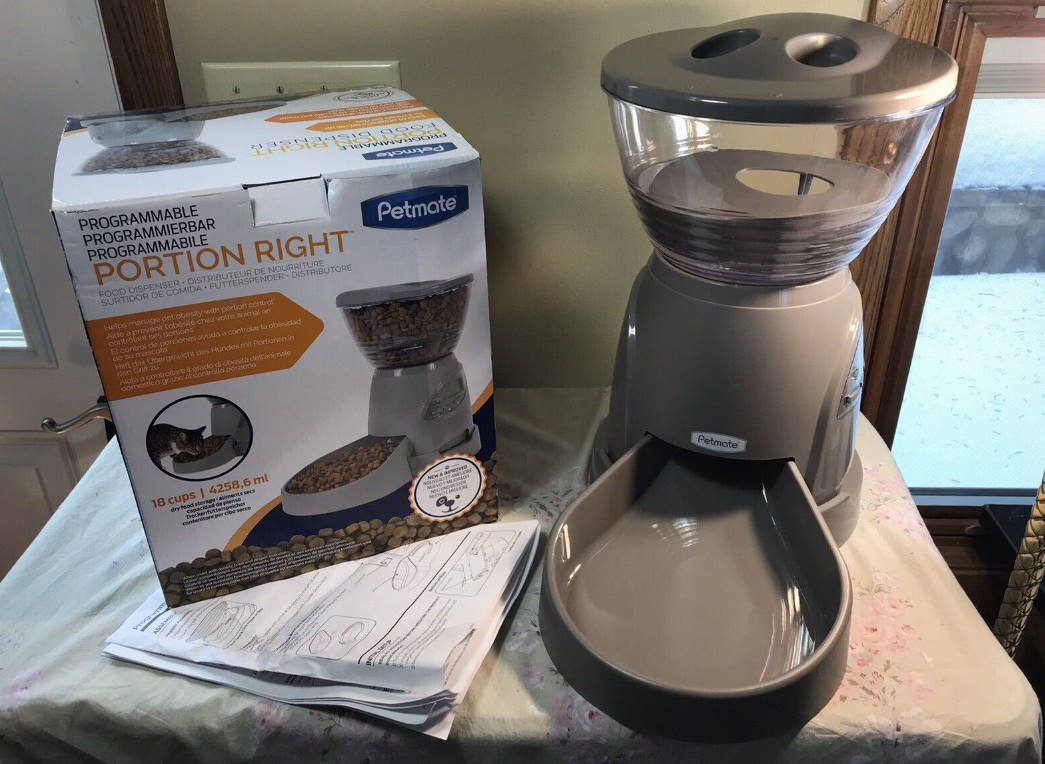
Petmate Programmable Food Dispenser
Introducing the Petmate Food Dispenser, a state-of-the-art pet feeding solution that combines convenience, precision, and flexibility. Designed to cater to the unique needs of pet owners, this innovative dispenser allows you to customize meal times and portions for your furry friends with ease. The Programmable Food Dispenser is expected to launch in Q2 2023, with an estimated price range of $100 to $150, offering great value for its advanced features.
Detailed Specifications
The Programmable Food Dispenser boasts the following key features
- PROGRAMMING
- Up to three different sized Meals per 24 hours.
- Each Meal Serving is adjustable in 1/4 or 1/6 cup increments.
- Both 18 and 30 cup units can be set 1/4 to 3 or 1/6 to 2 cups
- Default Meal Servings are: Breakfast at 6:00 a.m. Lunch at 12:00 p.m. and Dinner at 6:00 p.m.
- DIMENSIONS
- 5lb unit: 16.5"L x 9.75"W x 15.25"H (assembled)
- 10lb unit: 16.5"L x 9.75"W x 18.5"H (assembled)
- CAPACITY
- 18-cup unit: bowl, hopper and base will hold approximately 5 lbs of dry food.
- 30-cup unit: bowl, hopper and base will hold approximately 10 lbs of dry food. depending on kibble size and density
- POWER
- Requires THREE "D" size batteries. Batteries NOT included.
- Use only alkaline batteries.
- TYPES OF FOOD
Dry dog or cat food only. Food Kibble over 0.5” not recommended.- We recommend moisture content be below 12% to prevent 0kibble from sticking together.
- Do NOT use canned food. Do NOT use moist dog or cat food.
- Do NOT use semi-moist food. Do NOT use treats.
Programmable Food Dispenser Instructions
ASSEMBLY
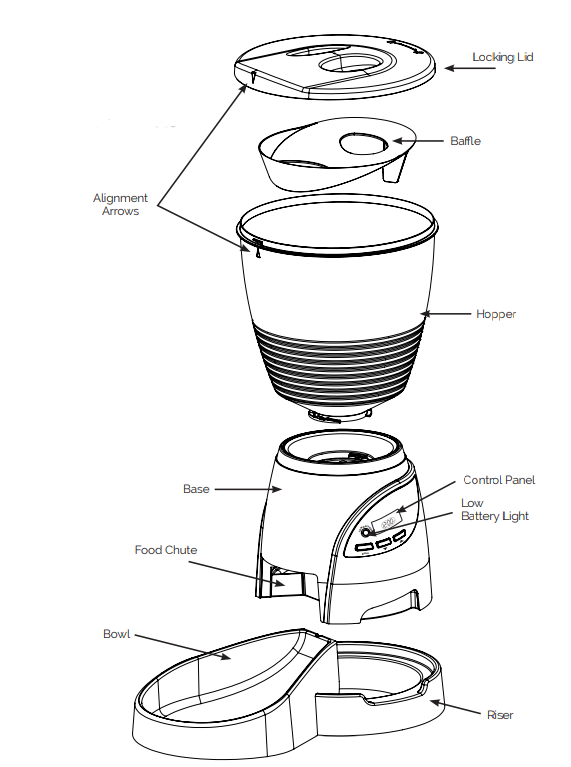
Hopper Assembly
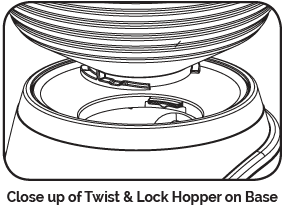
- Align hopper with base on an even surface.
- Insert hopper into base and twist counter clockwise to lock into place
Lid Assembly
- Place lid on hopper with arrow on lid slightly to the left of arrow on hopper
- Once lid is resting flush on hopper twist counter clockwise to lock into place
To Assemble Bowl and Riser to Base
- Place Bowl on Riser (note orientation)
- Lower Base on to Bowl and Riser lining up the food chute with bowl ramp

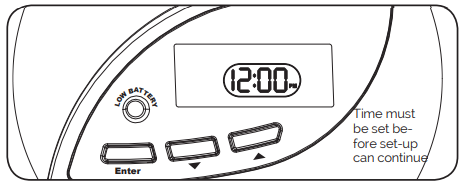
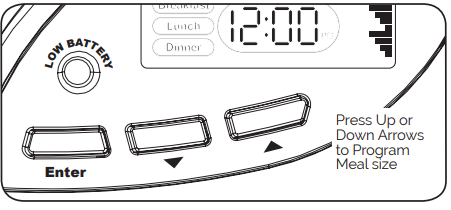
SET CLOCK
- Press the (-) side of the On/Off switch DOWN.
- Set unit right side up with LCD screen facing you.
NOTE: Clock will flash "12:00 A.M." automatically. - Press ENTER button to set current time. First the HOUR will be flashing.
- Use
 or
or buttons to set current HOUR.
 - Press the ENTER button again and the MINUTES will start flashing.
- Use or buttons to set current MINUTES.
- Press ENTER upon completion.
Note: While setting clock during the "Initial Set-up"; if the programming is not completed the Programmable Food Dispenser waits for you to finish.
SETTING MEAL TIME and MEAL SIZE
TO SET MEAL SELECTION
- Press and Hold the ENTER button for 2 seconds. "MEALS" will flash.
- Use or buttons to select the desired Meal to be programmed. (Breakfast, Lunch or Dinner will flash as and buttons are pressed)
- Press the ENTER button to select the Meal.
- “Yes” will Flash. Press the ENTER to confirm meal time.
- If you do not wish to set that meal, press the button to select “No” and press ENTER.
Note: if “No” is selected, press ENTER and the screen returns to“MEALS." Useor buttons to select the desired Meal to be programmed
- Hit ENTER again if no other meal is needed.
- While setting the Meal or Meal Time, if process is not completed and no button is depressed for 2 minutes, the timer abandons the change and goes back into “Automatic Mode”, retaining the previous Meal or Meal Time.
TO SET MEAL TIME
- Use or buttons to set Meal HOUR.
- Press ENTER button again and the MINUTES will start flashing.
- Use or buttons to set Meal MINUTES.
- Press ENTER button when minutes are set. The Menu will automatically take you to the "Meal Size" programming.
TO SET MEAL SIZE
- Use or buttons to increase or decrease amount of food to be dispensed.
- Press ENTER upon completion. NOTE: Each bar equals approximately 1/4 cup. The maximum meal size you may select is 3 cups on either the 5lb unit and 10lb unit.* (see back for details)
- Continue setting remaining meal times and sizes until complete.
- Press ENTER after all meals are set, to complete programming.
MEALS SERVED
"SERVED" will show on screen at all times. This indicates number of meals served. Meals served will go up to 99 and then reset at 00. To re-set the "SERVED" counter; press ![]() and
and![]() buttons simultaneously and it will re-set to 00.
buttons simultaneously and it will re-set to 00.
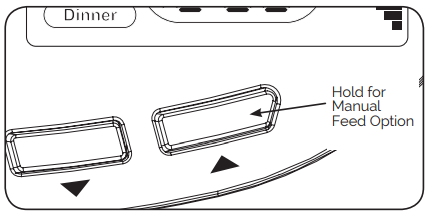
MANUAL FEED OPTION
We recommend manual feed be tested to make sure food flows properly and is feeding desired amount. Press ![]() and hold button for 3 seconds. Food will be dispensed according to first Meal set. Repeat if additional food is desired.
and hold button for 3 seconds. Food will be dispensed according to first Meal set. Repeat if additional food is desired.
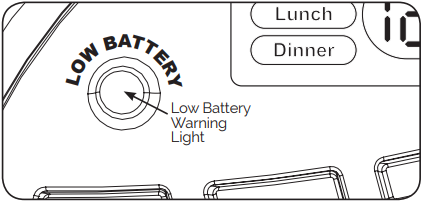
REPLACEMENT OF BATTERIES
- When the “LOW BATTERY” warning light is on OR before leaving for an extended period of time, replace the batteries (See "Install Batteries" section)
- Set clock to current time.
NOTE: Meal Programming is stored and will NOT need to be reprogrammed after batteries are replaced.
CLEANING
BOWL
Remove base unit from Riser. Lift bowl from Riser and wash with soap and water. Allow parts to dry before adding food.
HOPPER/BAFFLE
- Remove food from Hopper.
- Remove Hopper and Baffle from base and wash with soap and water. Allow parts to dry before adding food.
Warning: Base unit should not be submerged in water at any time, this will damage electronic components and void the warranty. Allow parts to dry completely before adding new food.
PET TRAINING TIPS
FOR PETS NEW TO THE AUTOMATIC FEEDER
Some pets may require a special adjustment period to acclimate to their new automatic feeder.
- Place the Programmable Food Dispenser next to your pet's existing bowl or feeder. (Do not turn the power on)
- Place food in the bowl (only for a period of time to allow adjustment).
- Keep food in the pet's current bowl (only for a period of time to allow adjustment).
- Once you have observed your pet eating from the Programmable Food Dispenser, remove their oldfeeding dish.
NOTE: Adjustment time for the pet could be as short as a day or as long as a few weeks, depending on your pet's personality. You can also introduce your pet to the Programmable Food Dispenser by placing small treats in the bowl.
Description of Programmable Food Dispenser
The Programmable Food Dispenser is a game-changer for pet owners who want to provide their pets with a structured feeding routine. With its easy-to-use interface, you can program up to 12 meals per day with customizable portion sizes, ensuring your pets receive the right amount of food at the right time. The dispenser's durable BPA-free plastic construction guarantees long-lasting performance and safe food handling. Its anti-jam design and low battery indicator add to its convenience and reliability. The Petmate Programmable Food Dispenser is suitable for most dry foods, making it an ideal choice for pet owners who want a versatile feeding solution.
CAUTION
SAVE THESE INSTRUCTIONS FOR FUTURE REFERENCE. READ ALL INSTRUCTIONS BEFORE OPERATING PRODUCT.
- For indoor use only.
- For dry food use only. Works best with .5”or smaller diameter food.
- NOT recommended for puppies or kittens less than 7 months old or unable to reach the feeding dish.
- Do NOT use this feeder with puppies, kittens, dogs or cats with any physical disability.
- Do NOT allow small children to play with, in or around feeder.
- Before leaving for extended time, always replace batteries with 3 new, "D" size batteries.
- Do NOT place any foreign object in the feeder.
- Do NOT operate feeder without hopper/baffle and hpper lid securely in place.
ALL INSTRUCTIONS BEFORE OPERATING PRODUCT.
- For indoor use only.
- For dry food use only. Works best with .5”or smaller diameter food.
- NOT recommended for puppies or kittens less than 7 months old or unable to reach the feeding dish.
- Do NOT use this feeder with puppies, kittens, dogs or cats with any physical disability.
- Do NOT allow small children to play with, in or around feeder.
- Before leaving for extended time, always replace batteries with 3 new, "D" size batteries.
- Do NOT place any foreign object in the feeder.
- Do NOT operate feeder without hopper/baffle and hopper lid securely in place.
- Feeder should be placed on a level surface.
- Do NOT disassemble feeder other than bowl, hopper/baffle, hopper lid and battery cover.
- Check the low battery light frequently to be sure the feeder is dispensing properly.
- Dispose of all packaging material properly. Some items may be packed in poly bags; these bags could cause suffocation; keep away from children and pets.
WARNING
- Do NOT place anything on top of feeder.
- Base unit should NOT be submerged in water at any time, this will damage electronic components and void the warranty.
- NOT DISHWASHER SAFE.
TROUBLESHOOTING
- If no display is showing, turn on power.
- If the clock is flashing, the unit has lost its power and current time setting, reset current time.
NOTE: previous meal programming does not need to be reset. - If “MEALS” is flashing, this indicates the unit did not completely deliver the full amount of food programmed for the meal.
- Turn unit off, empty the hopper and remove the hopper from the base.
- Check for food jamming in the throat of the base.
- Dislodge food jam.
- Re-assemble unit.
- Turn unit on and reset current time.
- If the “Low Battery” indicator light is lit:
- Turn unit off.
- Refer to "INSTALL BATTERIES" Section
- Turn the unit back on and set current time.
- If kibble is jamming check moisture content. This information is commonly called out near the ingredients section on pet foods. We recommend moisture content be below 12% to prevent kibble from sticking together.
NOTE: Meal programming remains and does not need to be
reprogrammed.
NOTE: Clock will be set after setting minutes and the unit is now in AUTOMATIC MODE. While setting current time, if the programming is not completed the Programmable Portion Right Food Dispenser waits until the current time is set and will not go into AUTOMATIC MODE.
ONE-YEAR WARRANTY
Warranted for one year from date of retail purchase against defects in material and workmanship. Solely for the benefit of the original consumer purchaser. (Retain your dated sales receipt as proof of purchase).
COVERED: Replacement of defective parts and labor, and product return to consumer.
NOT COVERED: Damages caused by abuse or failure to perform normal maintenance. Any other expense. This Warranty shall not apply to any defect, malfunction or failure to conform with the Warranty provisions if caused by damage (not resulting from defect or malfunction) due to unreasonable use by the Purchaser.
This includes CONSEQUENTIAL DAMAGES, INCIDENTAL DAMAGES OR INCIDENTAL EXPENSES, INCLUDING DAMAGE TO PROPERTY. SOME STATES DO NOT ALLOW THE EXCLUSION OR LIMITATION OF INCIDENTAL OR CONSEQUENTIAL DAMAGES, SO THE ABOVE LIMITATION MAY NOT APPLY TO YOU.
Pros & Cons
Pros
- Programmable meals and portion control
- Large capacity for less frequent refilling
- Durable and safe BPA-free plastic construction
- Anti-jam design for consistent food dispensing
- Low battery indicator
Cons
- Not suitable for wet or semi-moist food
- Higher price point compared to non-programmable dispensers
- May require frequent battery replacements
Customer Reviews of Petmate Food Dispenser
Customers rave about the Petmate Food Dispenser's convenience, customization options, and dependability. Many appreciate its ability to maintain a consistent feeding routine for their pets, especially when they are away from home. However, some users have reported issues with battery life and compatibility with certain dry food types.
Faqs
When it comes to food, what kinds of foods are compatible with the Petmate Programmable Food Dispenser?
I have a Petmate Programmable Food Dispenser; is it possible to change the size of the portions?
Which cleaning method should I use for the Petmate Programmable Food Dispenser?
In the event that the Petmate Programmable Food Dispenser is not delivering food, what steps should I take further?
How can I make adjustments to the feeding schedule that is set on the Petmate Programmable Food Dispenser?
What precautions should I take to guarantee that my Petmate Programmable Food Dispenser is safe to use?
In the event that the information stored on the Petmate Programmable Food Dispenser is reset, what should I do?
When using the Petmate Programmable Food Dispenser, how many meals can I programme it to deliver on a daily basis?
How should one proceed in the event that the Petmate Programmable Food Dispenser produces a sound?
When it comes to the Petmate Programmable Food Dispenser, is there a guarantee available?
Leave a Comment