Dji Drone Phantom 4 Pro Plus User Manual | Specs & Features
Content
DJI Drone Phantom 4 Pro Plus Introduction
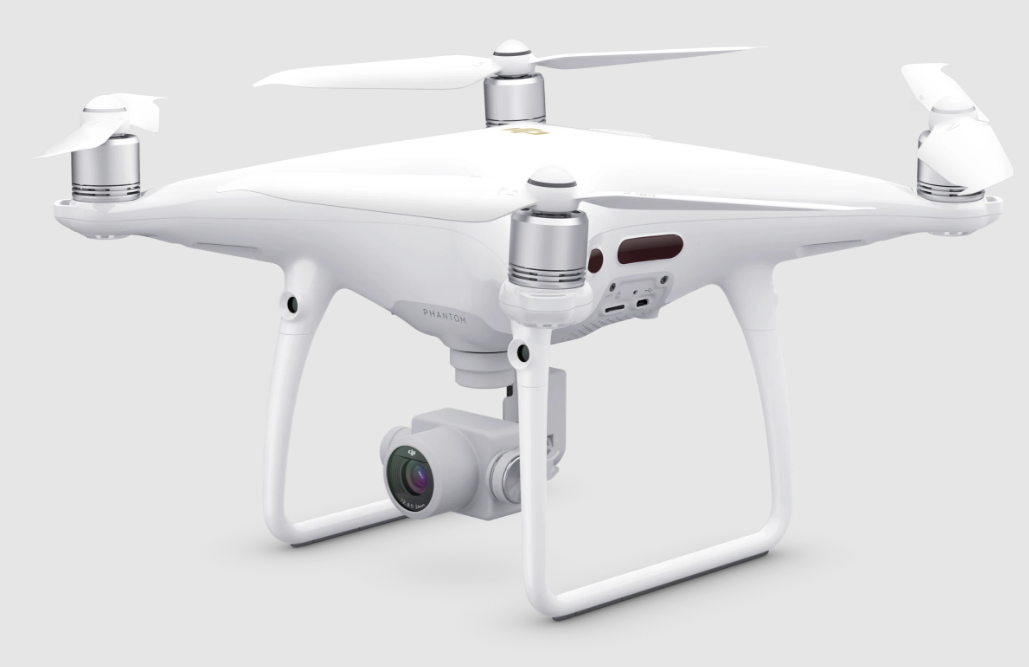
The DJI Phantom 4 Pro / Pro+ is an extremely smart flying camera with five-directions of obstacle sens-ing made up of vision and infrared sensors, making it able to intelligently avoid obstacles during flight. Its brand new camera offers unprecedentedly image quality for the Phantom, with greater clarity, lower noise, higher resolution photos and videos. Dual frequency support in the remote controller makes the HD video downlink more efficient and more stable.
The Phantom 4 Pro/Pro+ V2.0 also features a more efficient its propulsion system, as well as a 4dB (60%) operational noise reduction, as compared to the Phantom 4 Pro/Pro+. The illustrations in this user manual use Phantom 4 Pro / Pro+ as an example.
Priced at $1,356.91, the Phantom 4 Pro Plus combines cutting-edge technology with user-friendly
Aircraft Diagram
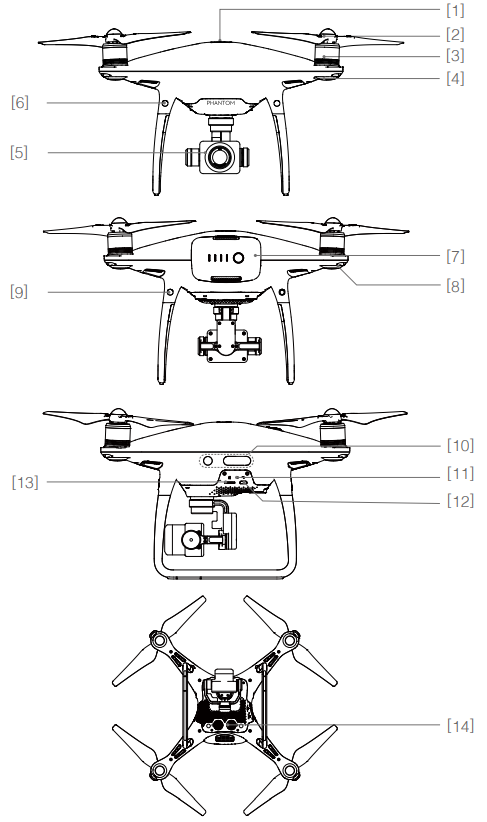
- GPS
- Propellers
- Motors
- Front LEDs
- Gimbal and Camera
- Forward Vision System
- Intelligent Flight Battery
- Aircraft Status Indicator
- Rear Vision System
- Infrared Sensing System
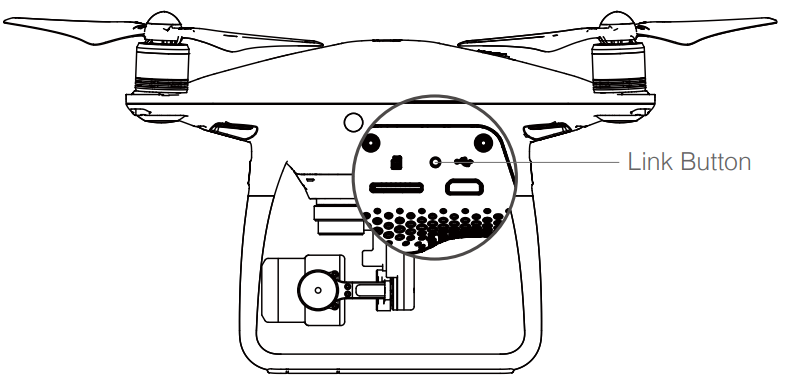
- Camera / Linking Status Indicator and Link Button
- Micro USB Port
- Camera Micro SD Card Slot
- Downward Vision System
Remote Controller Diagram
Phantom 4 Pro+ (Model: GL300E) / Phantom 4 Pro+ V2.0 (Model: GL300K)
- Antennas
Relays aircraft control and video signal. - Display Screen
Display device with Android system to run DJI GO 4 app. - Control Stick
Controls the orientation and movement of the aircraft. - Return Home (RTH) Button
Press and hold the button to initiate Return to Home (RTH). - Battery Level LEDs
Displays the battery level of the Remote Controller. - Status LED
Displays the Remote Controller's system status. - Power Button
Used to turn the Remote Controller on and off. - RTH LED
Circular LED around the RTH button displays RTH status. Speaker
Audio output.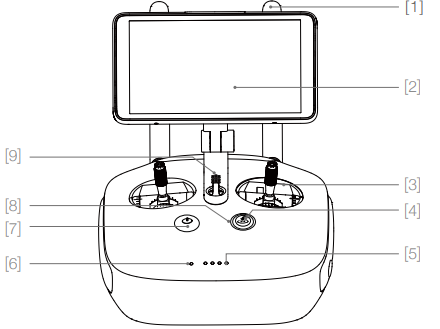
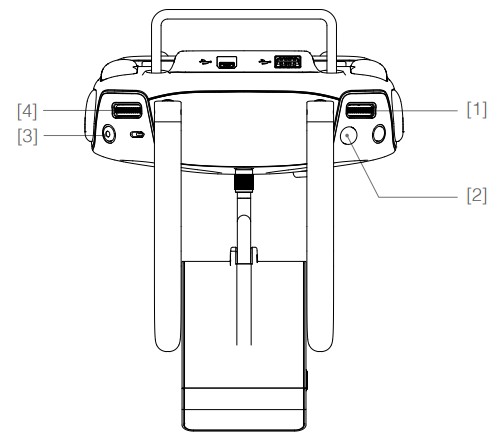
- Camera Settings Dial
Turn the dial to adjust camera settings. - Intelligent Flight Pause Button
Press once to allow the aircraft to exit from TapFly, ActiveTrack and other intelligent flight modes. - Shutter Button
Two-stage button, press to take a photo. - Sleep/Wake Button
Press to sleep/wake the screen, press and hold to restart. - Microphone
- Flight Mode Switch
Switch between P-mode, S-mode, and A- mode. - Video Recording Button
Press to start recording video. Press again to stop recording. - Gimbal Dial
Use this dial to control the tilt of the gimbal. - Micro USB Port
Upgrading the aircraft by connecting to the remote controller using the USB OTG cable. - Micro SD Card Slot
Provide extra storage space for the display device, maximum supporting 128 GB. - HDMI Port
Output HDMI video signal. USB Port
USB device support.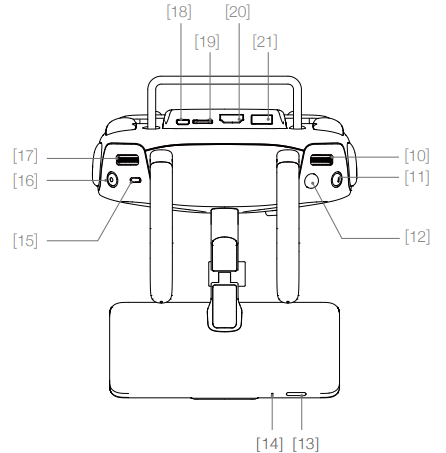
- C1 Button
Customizable through the DJI GO 4 app. - C2 Button
Customizable through the DJI GO 4 app. Power Port
Connect to the Charger to charge the battery of the Remote Controller.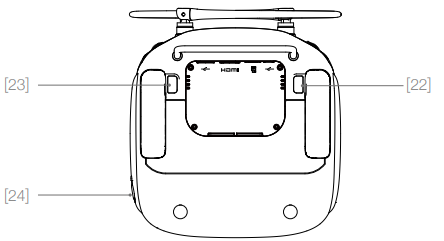
Phantom 4 Pro (Model: GL300F) / Phantom 4 Pro V2.0 (Model: GL300L)
- Antennas
Relays aircraft control and video signal. - Mobile Device Holder
Securely mounts your mobile device to the remote controller. - Control Stick
Controls the orientation and movement of the aircraft. - Return Home (RTH) Button
Press and hold the button to initiate Return to Home (RTH). - Battery Level LEDs
Displays the battery level of the remote controller. - Status LED
Displays the remote controller's system status. - Power Button
Used to turn the remote controller on and off. RTH LED
The circular LED around the RTH button displays RTH status.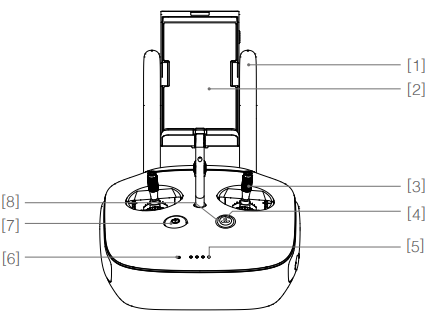
- Camera Settings Dial
Turn the dial to adjust camera settings. (Only functions when the remote controller is connected to a mobile device running the DJI GO 4 app.) - Intelligent Flight Pause Button
Press once to allow the aircraft to exit from TapFly, ActiveTrack and other intelligent flight modes. - Button
Two-stage button, press to take a photo. - Flight Mode Switch
Switch between P-mode, S-mode, and A-mode. - Video Recording Button
Press to start recording video. Press again to stop recording. - Gimbal Dial
Use this dial to control the tilt of the gimbal. - Micro USB Port
Reserved port. USB Port
Connection to mobile device for DJI GO 4 app.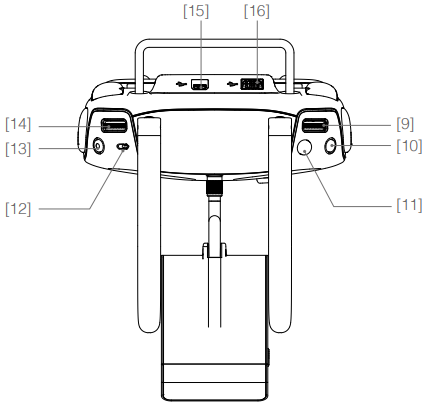
- C1 Button
Customizable through the DJI GO 4 app. - C2 Button
Customizable through the DJI GO 4 app. Power Port
Connect to the Charger to charge the battery of the remote controller.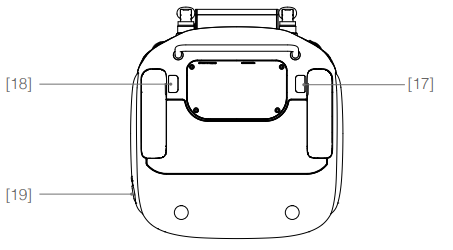
Description
The DJI Phantom 4 Pro Plus is engineered for precision and reliability. Its aerodynamic body and powerful motors ensure stable flight even in challenging conditions. The drone's camera is mounted on a 3-axis gimbal, providing smooth and stabilized footage. The advanced obstacle sensing system includes front, rear, and bottom sensors, allowing the drone to navigate complex environments safely. Additionally, the drone supports various intelligent flight modes that make capturing professional-grade footage easier than ever.
Remote Controller
Remote Controller Profile
The Phantom 4 Pro/Pro+ series remote controller is a multi-function wireless communication device that integrates a dual frequency video downlink system and the aircraft remote control system. The remote controller features a number of camera control functions, including photo/ video capture and gimbal control. The battery level is displayed via LED indicators on the front panel of the remote controller.
For a more stable and smooth video downlink, the Phantom 4 Pro/Pro+ remote controller uses Lightbridge technology. The Phantom 4 Pro/Pro+ remote controller uses the latest OcuSync technology, which also allows the Phantom 4 Pro+ V2.0 to connect with DJI Goggles series products wirelessly, offering a real-time aerial FPV experience. The Phantom 4 Pro+ series is equipped with a 5.5” screen to better adapt to outdoor shooting environments. It also has a built-in DJI GO 4 and various applications to support sharing your content anytime and anywhere.
Compliance Version: The remote controller is compliant with local compliance and regulations.
Operating Mode: Control can be set to Mode 1 or Mode 2, or to a custom mode.
- Mode 1: The right stick serves as the throttle.
- Mode 2: The left stick serves as the throttle.
Using the Remote Controller
Turning the Remote Controller On and Off
The Phantom 4 Pro / Pro+ remote controller is powered by a 2S rechargeable battery that has a capacity of 6000 mAh. The battery level is indicated via the Battery Level LEDs on the front panel. Follow the steps below to turn on your remote controller:
- When the remote controller is turned off, press the Power Button once. The Battery Level LEDs will display the current battery level.
- Press and hold the Power Button to turn on the remote controller.
- The remote controller will beep when it is turned on. The Status LED will rapidly blink green, indicating that the remote controller is linking to the aircraft. The Status LEDs will glow solid green when linking is complete.
- Repeat Step 2 to turn off the remote controller.

Charging the Remote Controller
Charge the remote controller using the included charger. Refer to the figure on next page below for more details.

Controlling the Camera
Shoot videos/photos, and adjust camera settings via the Shutter Button, Record Button, and Camera Set-tings Dial on the remote controller.
- Camera Settings Dial
Turn the dial to adjust camera settings such as ISO, shutter speed, and aperture without letting go of the remote controller. Press down on the dial to toggle between these settings. - Shutter Button
Press to take a photo. If burst mode is activated, multiple photos will be taken with a single press. - Video Recoding Button
Press once to start recording video, then press again to stop recording. - Gimbal Dial
Control the tilt of the gimbal.
Controlling the Aircraft
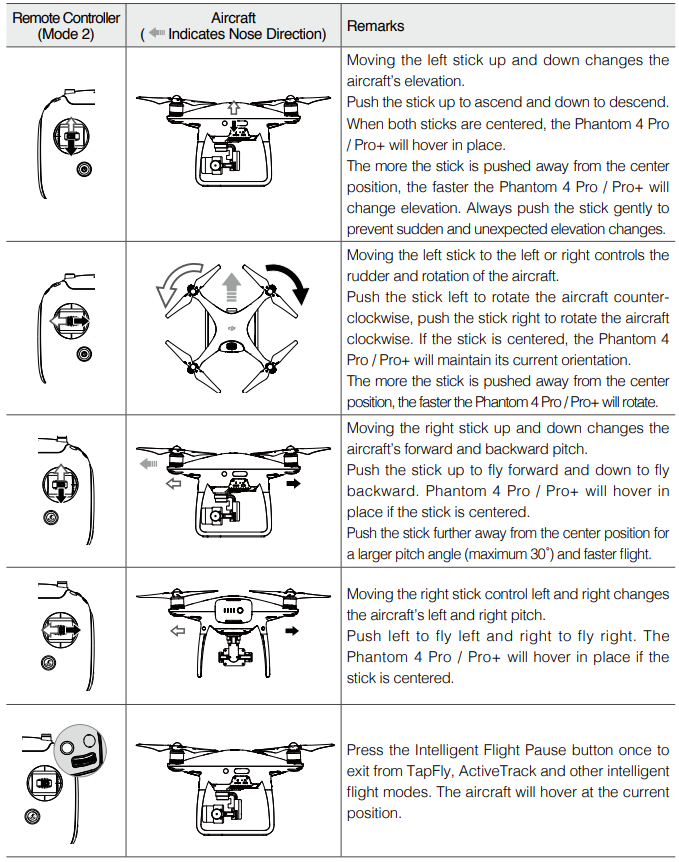
This section explains how to control the orientation of the aircraft through the remote controller. Control can be set to Mode 1 , Mode 2 or Mode 3, or to a custom mode.
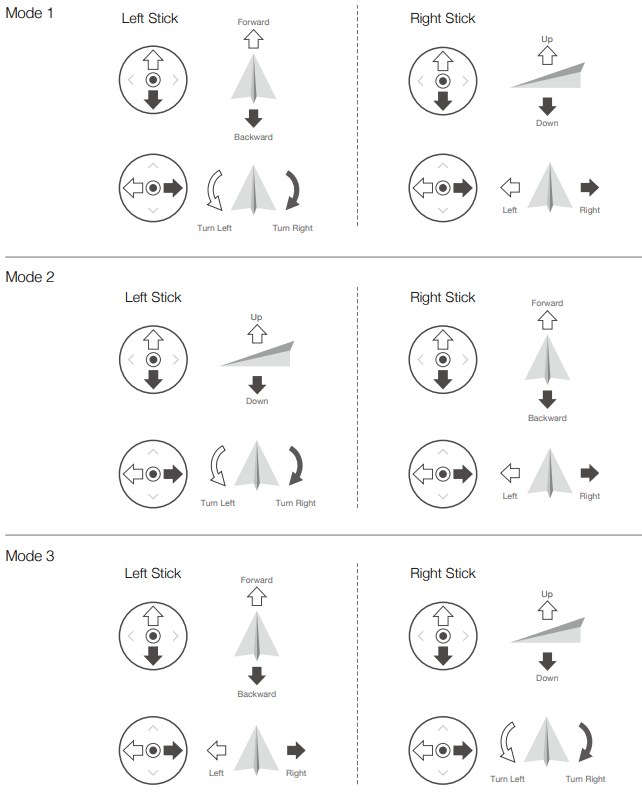
The Remote Control is set to Mode 2 by default.
NOTE: Stick Neutral/Mid-Point: Control sticks are in the center position. Moving the Control Stick: The control stick is pushed away from the center position.
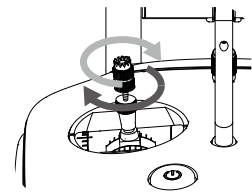
Adjusting Controller Sticks
Hold and twist the controller sticks clockwise or counter clockwise to adjust the length of the controller sticks. A proper length of controller sticks can improve the controlling accuracy.
Flight Mode Switch
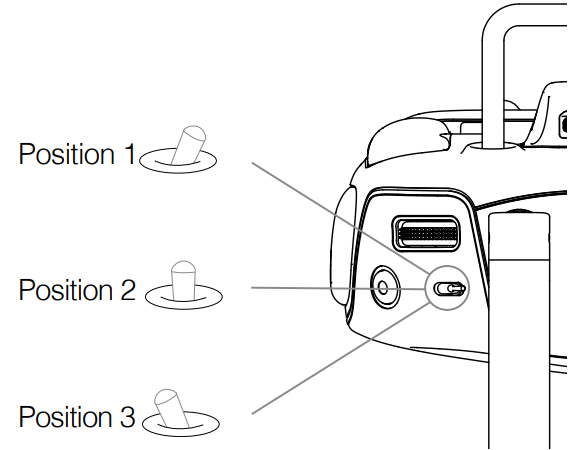
Toggle the switch to select the desired flight mode. Choose between; P-mode, S-mode and A- mode.
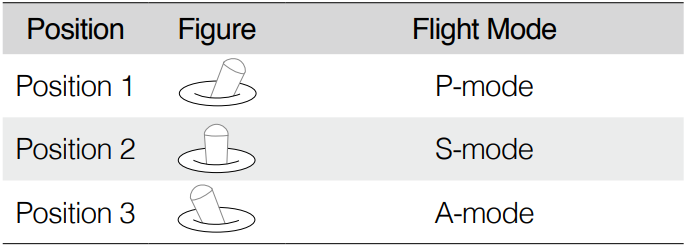
- P-mode (Positioning): P-mode works best when the GPS signal is strong. The aircraft utilizes GPS, stereo Vision System and Infrared Sensing System to stabilize, avoid obstacles or track moving subjects. Advanced features such as TapFly and ActiveTrack are enabled in this mode.
- S-mode (Sport): The handling gain values of the aircraft are adjusted to enhance aircraft maneuverability. The maximum flight speed of the aircraft is increased to 45mph (72kph). Note that Obstacle Sensing systems are disabled in this mode.
- A-mode (Attitude): When neither the GPS nor the Vision System is available, the aircraft will only use its barometer for positioning to control the altitude.
The Flight Mode is locked in P Mode by default, regardless of the switch position. To switch flight modes, go to Camera View in the DJI GO 4 app, tap,![]() and enable “Multiple Flight Modes”. After enabling multiple flight modes, toggle the switch to P and then to S to fly in Sport Mode.
and enable “Multiple Flight Modes”. After enabling multiple flight modes, toggle the switch to P and then to S to fly in Sport Mode.
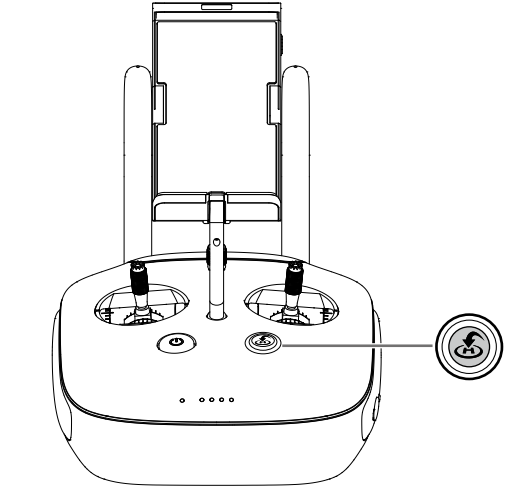
RTH Button
Press and hold the RTH button to start the Return-to-Home (RTH) procedure. The LED ring around the RTH Button will blink white to indicate that the aircraft is entering RTH mode. The aircraft will then return to the last recorded Home Point. Press this button again to cancel the RTH procedure and regain control of the aircraft.
Connecting Your Mobile Device
Tilt the mobile device holder to the desired position. Press the button on the side of the mobile device holder to release the clamp, and then place your mobile device into the cradle. Adjust the clamp down to secure the mobile device. To connect your mobile device to the remote controller using a USB cable, plug one end of the cable into your mobile device and the other end into the USB port on the back of the remote controller.
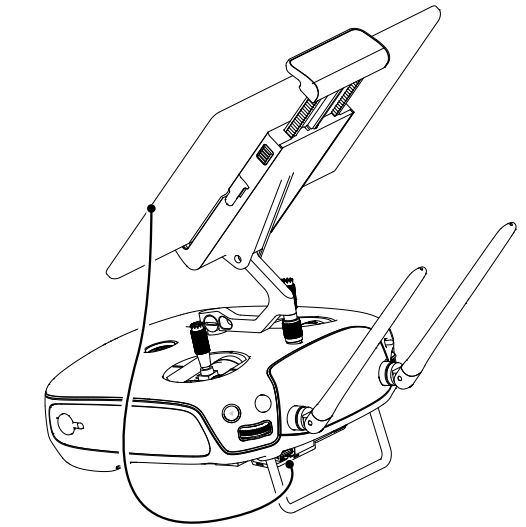
NOTE: The Remote Controller of the Phantom 4 Pro+ includes a display device optimized for the DJI GO 4 app. No other mobile devices are required.
Optimal Transmission Range
The transmission signal between the aircraft and the remote controller is most reliable within the area that depicted below:
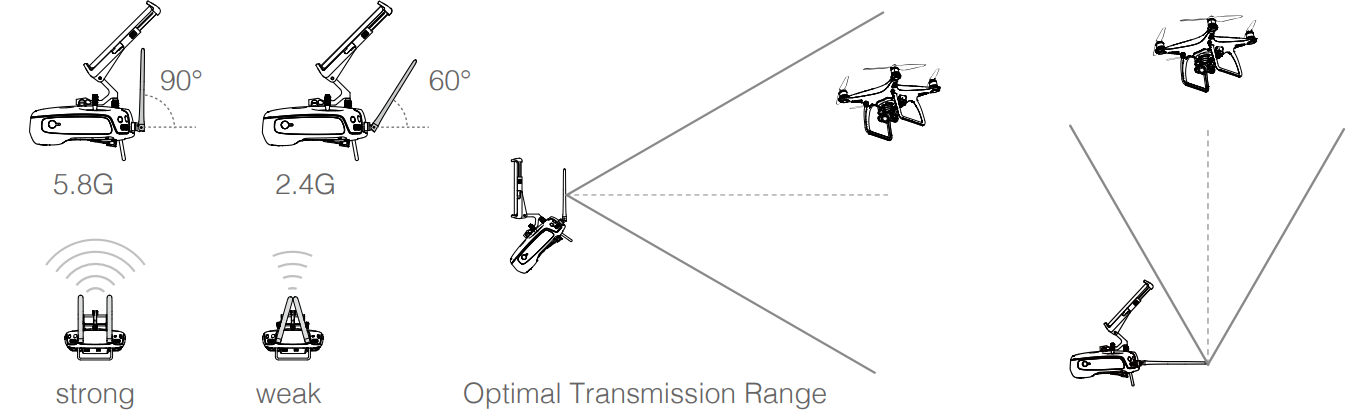
Ensure that the aircraft is flying within the optimal transmission zone. To achieve the best transmission performance, maintain the appropriate relationship between the operator and the aircraft.
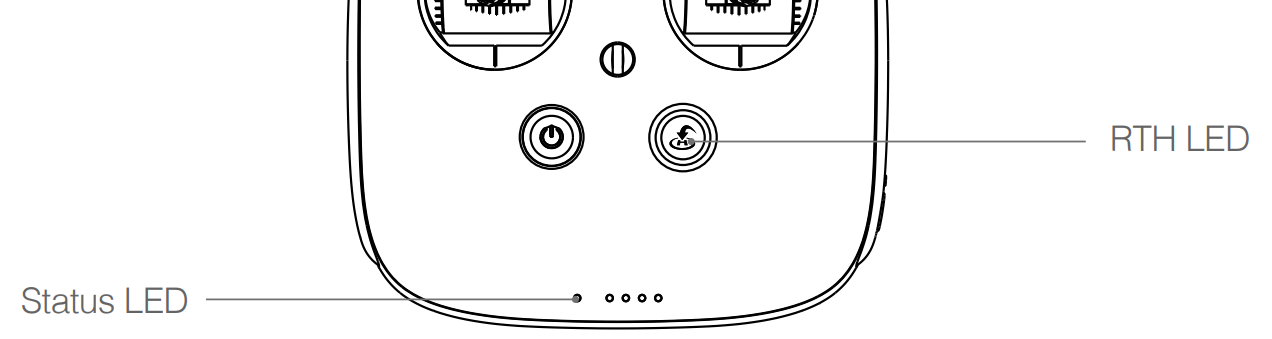
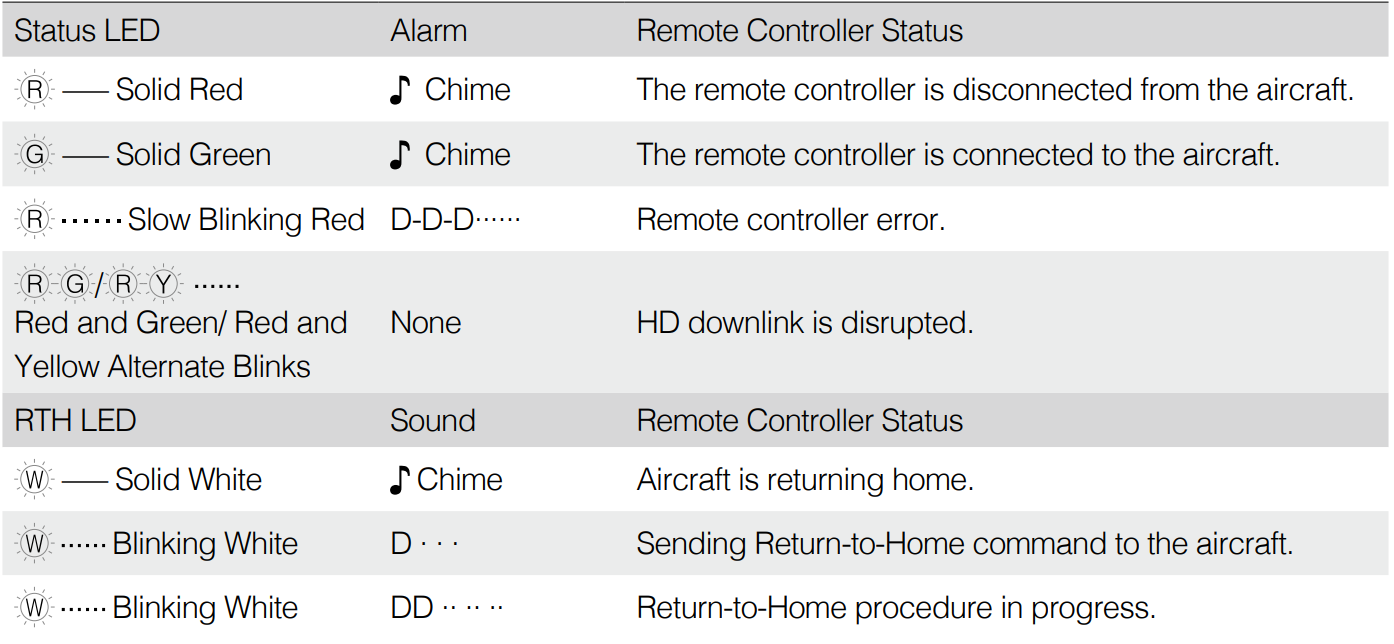
Remote Controller Status LED
The Status LED reflects the strength of the connection between the remote controller and the aircraft. The RTH LED indicates the Return-to-Home status of the aircraft. The table below contains more information about these indicators.
WARNING: The Remote Controller Status Indicator will blink red and sound an alert, when the battery level is critically low.
Linking the Remote Controller
The remote controller is linked to your aircraft before delivery. Linking is only required when using a new remote controller for the first time. Follow these steps to link a new remote controller:
- Turn on the remote controller and connect to the mobile device. Launch the DJI GO 4 app.
- Turn on the Intelligent Flight Battery.
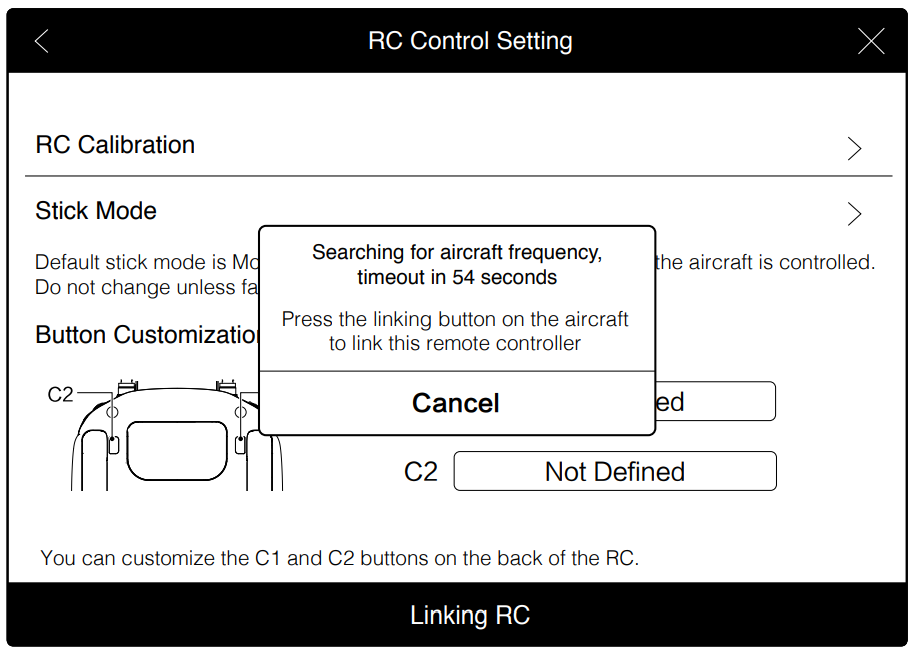
Select GO FLY and tap on
 and then tap “Linking RC” button as shown below.
The remote controller is ready to link. The Remote Controller Status Indicator blinks blue and a beep is emitted.
Locate the linking button on the side of the aircraft, as shown in the figure below. Press the link button to start linking. The Remote Controller Status Indicator LED will display a solid green once the remote controller is successfully linked to the aircraft.
WARNING: The remote controller will un-link itself from an aircraft if a new remote controller is linked to the same aircraft.
Specifications
Aircraft | |
Weight (Battery &Propellers Included) | Phantom 4 Pro/Pro+: 1388 g Phantom 4 Pro/Pro+ V2.0: 1375 g |
Diagonal Size (Excluding Propellers) | 350 mm |
Max AscentSpeed | Sport mode: 19.7ft/s(6 m/s); GPS mode:16.4ft/s(5 m/s) |
Max Descent Speed | Sport mode:13.1ft/s(4 m/s); GPS mode: 9.8ft/s (3 m/s) |
Max Speed | 45 mph (72 kph) (S-mode); 36mph(58 kph) (A-mode); 31 mph (50 kph) (P-mode) |
Max TiltAngle | 42° (Sportmode); 35° (Attitude mode); 25° (GPS mode) |
Max AngularSpeed | 250°/s (Sport mode); 150°/s (Attitude mode) |
Max Service Ceiling Above Sea Level | 19685 ft (6000 m) |
Max Wind SpeedResistance | 10 m/s |
Max FlightTime | Approx. 30 minutes |
Operating Temperature Range | 32° to 104° F (0° to 40° C) |
Satellite Positioning Systems | GPS/GLONASS |
Operating Frequecy | Phantom 4 Pro / Pro+: 2.400- 2.483 GHzand 5.725 - 5.850 GHz Phantom 4 Pro / Pro+ V2.0: 2.400 - 2.483 GHz and 5.725 - 5.850 GHz |
Transmitter Power (EIRP) | Phantom 4 Pro / Pro+: 2.4 GHz: ≤26 dBm (FCC); ≤20 dBm (CE); ≤20 dBm (SRRC) 5.8 GHz: ≤26dBm (FCC); ≤14dBm (CE); ≤26dBm (SRRC) Phantom 4 Pro / Pro+ V2.0: 2.4 GHz: ≤26 dBm (FCC); ≤20 dBm (CE); ≤20 dBm(SRRC) 5.8 GHz: ≤26 dBm (FCC); ≤14 dBm (CE); ≤26 dBm (SRRC) |
Hover Accuracy Range | Vertical: ±0.1m (With VisionPositioning); ±0.5 m (With GPS Positioning) Horizontal: ±0.3 m (With Vision Positioning); ±1.5 m (With GPS Positioning) |
Gimbal | |
Stabilization | 3-axis (pitch, roll,yaw) |
Controllable Range | Pitch: - 90° to + 30° |
Max Controllable AngularSpeed | Pitch: 90°/s |
Angular Vibration Range | ±0.02° |
Vision System | |
VelocityRange | ≤31 mph (50 kph) at 6.6 ft (2 m) above ground |
Altitude Range | 0 - 33 feet ( 0 - 10 m ) |
Operating Range | 0 - 33 feet ( 0 - 10 m ) |
Obstacle Sensory Range | 2 - 98 ft (0.7 - 30 m) |
FOV | Forward/Rear: 60° (horizontal), ±27°(vertical) Downward: 70° (front and rear), 50° (left and right) |
Measuring Frequency | Forward/Rear: 10 Hz Downward: 20 Hz |
Operating Environment | Surface with clear pattern and adequate lighting( lux > 15 ) |
Infrared Sensing System | |
Obstacle Sensory Range | 0.6 - 23 ft(0.2 - 7 m) |
FOV | 70°(Horizontal), ±10°(Vertical) |
Measuring Frequency | 10 Hz |
Operating Environment | Surface with diffusereflection material, and reflectivity > 8% (suchas wall, trees, humans, etc.) |
Camera | |
Sensor | 1’’ CMOS; Effective pixels: 20 M |
Lens | FOV (Field of View) 84°, 8.8 mm (35 mm format equivalent: 24 mm), f/2.8 - f/11, auto focus at 1 m - ∞ |
ISO Range | Video: 100 – 3200 (Auto); 100 - 6400 (Manual) Photo:100 - 3200 (Auto);100 - 12800(Manual) |
Mechanical Shutter | 8 - 1/2000 s |
ElectronicShutter | 8 - 1/8000s |
Image Size | 3:2 Aspect Ratio: 5472×3648 4:3 Aspect Ratio: 4864×3648 16:9 Aspect Ratio: 5472×3078 |
PIV Image Size | 4096×2160(4096×2160 24/25/30/48/50p) 3840×2160 (3840×2160 24/25/30/48/50/60p) 2720×1530 (2720×1530 24/25/30/48/50/60p) 1920×1080 (1920×1080 24/25/30/48/50/60/120p) 1280×720 (1280×720 24/25/30/48/50/60/120p) |
Still Photography Modes | Single shot Burst shooting: 3/5/7/10/14 frames Auto Exposure Bracketing (AEB): 3/5 Bracketed frames at 0.7EV Bias Interval: 2/3/5/7/10/15/20/30/60 s |
Video Recording Modes | H.265 C4K: 4096×2160 24/25/30p @100Mbps 4K: 3840×2160 24/25/30p @100Mbps 2.7K: 2720×1530 24/25/30p @65Mbps 2720×1530 48/50/60p @80Mbps FHD: 1920×1080 24/25/30p @50Mbps 1920×1080 48/50/60p @65Mbps 1920×1080 120p @100Mbps HD: 1280×720 24/25/30p @25Mbps 1280×720 48/50/60p @35Mbps 1280×720 120p @60Mbps H.264 C4K: 4096×2160 24/25/30/48/50/60p @100Mbps 4K: 3840×2160 24/25/30/48/50/60p @100Mbps 2.7K: 2720×1530 24/25/30p @80Mbps 2720×1530 48/50/60p @100Mbps FHD: 1920×1080 24/25/30p @60Mbps 1920×1080 48/50/60p @80Mbps 1920×1080 120p @100Mbps HD: 1280×720 24/25/30p @30Mbps 1280×720 48/50/60p @45Mbps 1280×720 120p @80Mbps |
Max. Bitrate Of Video | 100 Mbps |
SupportedFile Systems | FAT32 (≤ 32 GB); exFAT(> 32 GB) |
Photo | JPEG, DNG (RAW), JPEG+ DNG |
Video | MP4/MOV (AVC/H.264; HEVC/H.265) |
Supported SD Cards | Micro SD, Max Capacity: 128GB. Write speed ≥15MB/s, class 10 or UHS-1 rating required |
Operating Temperature Range | 32° to 104° F (0° to 40° C) |
Remote Controller | |
Operating Frequency | Phantom 4 Pro / Pro+: 2.400- 2.483 GHzand 5.725 - 5.825 GHz Phantom 4 Pro / Pro+ V2.0:2.400 - 2.483GHz and 5.725- 5.850 GHz |
Max Transmission Distance (Unobstructed, free of interference) | Phantom 4 Pro / Pro+: 2.4 GHz:4.3 mi (7 km, FCC);2.2 mi (3.5km, CE); 2.5mi (4 km, SRRC) 5.8 GHz: 4.3 mi (7 km, FCC);1.2 mi (2 km, CE); 3.1 mi (5 km,SRRC) Phantom 4 Pro / Pro+ V2.0: 2.4 GHz: 6.2 mi (10 km, FCC);3.7 mi (6 km, CE);3.7 mi (6 km, SRRC) 5.8 GHz: 6.2 mi (10 km, FCC);3.7 mi (6 km, CE);3.7 mi (6 km, SRRC) |
Operating Temperature | 32° to 104° F (0° to 40° C) |
Battery | 6000 mAh LiPo 2S |
Transmitter Power ( EIRP ) | Phantom 4 Pro/ Pro+: 2.4 GHz: ≤26 dBm (FCC); ≤17 dBm (CE); ≤20 dBm(SRRC) 5.8 GHz:≤28 dBm (FCC);≤14 dBm (CE);≤20 dBm (SRRC)Phantom 4 Pro / Pro+ V2.0: 2.4 GHz: ≤26 dBm (FCC); ≤20 dBm (CE); ≤20 dBm (SRRC) 5.8 GHz: ≤26 dBm (FCC); ≤14 dBm (CE); ≤20 dBm (SRRC) |
Operating Current/Voltage | 1.2 A @7.4 V |
Video Output Port | GL300E/GL300K: HDMI GL300F/GL300L: USB |
Mobile Device Holder | GL300E/GL300K: Built-in Display device (5.5 inch screen, 1920×1080, 1000 cd/m2, Android system, 4G RAM+16G ROM) GL300F/GL300L: Tablets andsmartphones |
Charger* | |
Voltage | 17.5 V |
Rated Power | 100 W |
Intelligent Flight Battery* (PH4-5870mAh-15.2V) | |
Capacity | 5870 mAh |
Voltage | 15.2 V |
Battery Type | LiPo 4S |
Energy | 89.2 Wh |
Net Weight | 468 g |
Charging Temperature Range | 41° to 104° F (5° to 40° C) |
Max. Charging Power | 100 W |
Features Highlights
Upgraded TapFly and ActiveTrack commands in the DJI GO 4 app, the Phantom 4 Pro / Pro+ flies anywhere visible on-screen with a tap and tracks moving subjects effortlessly.
Camera and Gimbal: The Phantom 4 Pro / Pro+, shoots at 4K at up to 60 frames per second and captures 20-megapixel photos that look crisper and cleaner than ever thanks to the new 1-inch CMOS sensor. Its mechanical shutter and auto focus create an even better aerial shooting experience.
- Flight Controller: The flight controller has been updated to provide a safer, more reliable flight experience. A new flight recorder stores critical data from each flight. A system of visual sensors enhances hovering precision when flying indoors or in environments where GPS is unavailable. Dual IMUs and compasses design provide redundancy.
- HD Video Downlink: The low-latency long-range HD video downlink is powered by an enhanced version of DJI LIGHTBRIDGETM for the Phantom 4 Pro/Pro+, and DJI’s latest long-range transmission technology OCUSYNCTM for the Phantom 4 Pro/Pro+ V2.0. Support of both 2.4 GHz and 5.8 GHz wireless bands ensures a more reliable and stable connection in environments with more interference.
- Remote Controller: The Phantom 4 Pro+ remote controller includes a 5.5-inch high luminance monitor with integrated DJI GO 4 for full control.
- Intelligent Flight Battery: The new 5870 mAh DJI Intelligent Flight Battery features upgraded battery cells and an advanced power management system to provide up to 30 minutes* of flight.
Installing the Aircraft
Preparing the Aircraft
Remove the gimbal clamp from the camera as shown below:
At sea level in calm environments when flying in ATTI mode, The flight time will vary due to different flight patterns, weather conditions and altitudes.
Attaching the Propellers
Mount the propellers with black propeller rings to the motors with black dots. Mount the propellers with sliver propeller rings to the motors without black dots. Press the propeller down onto the mounting plate and rotate in the lock direction until it is secured.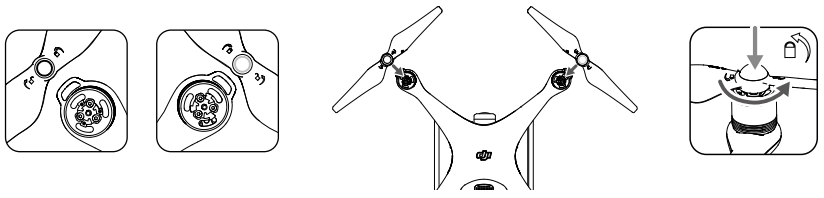
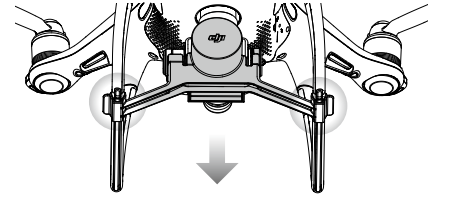
Battery Installation
Slide battery into the battery compartment according to the arrow’s direction as shown below.
WARNING: Make sure that you hear a click sound indicates the battery is firmly installed. Failure to do so may affect the flight safety of your aircraft.
Preparing the Remote Controller
Tilt the mobile device holder or the display device on the remote controller to the desired position, then adjust the antennas so they are facing outward.
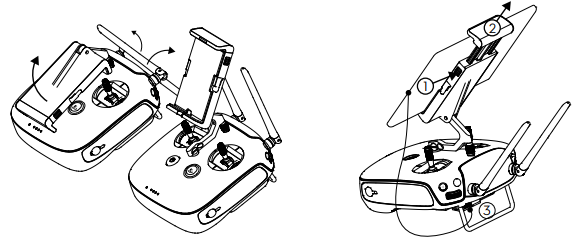
If using the Phantom 4 Pro, follow the steps below to secure tablet or mobile device to the mobile device holder.
- Press the button on the top right side of the mobile device holder to release the clamp, then adjust the clamp to fit the size of your mobile device.
- Secure your mobile device in the clamp by pressing down, and connect your mobile device to the remote controller using a USB cable.
- Plug one end of the cable into the mobile device, and the other end into the USB port on the back of the remote controller.
Setup Guide
To operate the DJI Phantom 4 Pro Plus, follow these steps:
- Assembly: Attach the propellers and ensure all connections are secure.
- Calibration: Calibrate the compass and IMU according to the DJI GO app instructions.
- Pairing: Pair the drone with the remote controller via the DJI GO app.
- Configuration: Configure settings such as mode selection (P, A, S), obstacle sensing, and intelligent flight modes through the app.
Updating the Firmware
Use the DJI GO 4 app or DJI Assistant 2 to update the firmware of the aircraft and remote controller.
Phantom 4 Pro/Pro+
Phantom 4 Pro/Pro+ does not support updating the aircraft and the remote controller simultaneously. Please follow the update process below.
Updating the Aircraft Firmware
Method 1: Using DJI GO 4
- Ensure both the aircraft and the remote controller are powered on and connected.
- For the Phantom 4 Pro, connect the Micro USB port of the aircraft to the mobile device with the USB OTG cable.
For Phantom 4 Pro+, connect the Micro USB port of the aircraft and the remote controller with the USB OTG cable. - Follow the on-screen instructions in DJI GO 4 to update. Ensure the internet is available during the update.
- Restart the aircraft after the firmware update is complete.
Method 2: Using a microSD Card (only for the GL300E remote controller)
- Visit the official DJI website and go to the Phantom 4 Pro/Pro+ page to download the latest firmware to a microSD card.
- Insert the microSD card into the microSD card slot of the remote controller.
- Power on the remote controller, enter System Settings > System Update, and click Local Update on the top-right corner. The latest firmware will show on the microSD card. Click Update to start updating.
Phantom 4 Pro/Pro+ V2.0
When the aircraft and the remote controller are connected, you can update both of them simultaneously through the following methods.
Method 1: Using DJI GO 4
Connect the remote controller and DJI GO 4, where you will be reminded if a new firmware update is available. To start updating, connect your mobile device to the internet and follow the on-screen instructions.
Method 2: Using DJI Assistant 2
When the aircraft and the remote controller are connected, you can update both of them simultaneously with DJI Assistant 2 (only for Phantom 4 Pro V2.0, where separate updating is also supported). Follow the instructions below to update the firmware through DJI Assistant 2:
- With the remote controller and the aircraft powered off, use a Micro USB cable to connect the remote controller to the computer through the USB port.
- Power on the remote controller and aircraft.
- Launch DJI Assistant 2 and log in with your DJI account.
- Select your product icon and click on “Firmware Update” on the left.
- Select the required firmware version.
- Wait for the firmware to be downloaded and the firmware update will start automatically.
- Restart the aircraft and the remote controller after the firmware update is complete.
Method 3: Using a microSD Card (only for the GL300K remote controller)
- Visit the official DJI website and go to the Phantom 4 Pro/Pro+ page to download the latest firmware to a microSD card.
- Insert the microSD card into the microSD card slot of the remote controller.
- Power on the remote controller, enter System Settings > System Update, and click Local Update on the top-right corner. The latest firmware will show on the microSD card. Click Update to start updating.
WARNING
- The firmware update will take around 15 minutes. It is normal that the gimbal will go limp, the aircraft status indicator blinks abnormally and the aircraft reboots. Wait patiently until the update is complete.
- Ensure the computer has access to the Internet.
- Ensure the battery level is adequate for the Intelligent Flight Battery and the remote controller.
- Do not disconnect the aircraft from the computer during firmware upgrade.
Intelligent Flight Mode
Intelligent Flight mode includes Course Lock, Home Lock, Point of Interest (POI), Follow Me and Waypoints features to assist users to capture professional shoots during the flight. Course Lock and Home Point lock ensure the lock of aircraft orientation, sparing the user to focus more on other operations. Point of Interest, Follow Me and Waypoints mode enable aircraft to fly automatically according to the pre-set flight maneuvers.
- Course Lock
Lock the current nose direction as the aircraft’s forward direction. The aircraft will move in the locked directions regardless of its orientation (yaw angle). - Home Lock
Pull the pitch stick backward to move the aircraft toward its recorded Home Point. - Point of Interest
The aircraft will orbit around the subject automatically to allow the operator to be more focus on framing their shoot on the subject in Point of Interest. - Follow Me
A virtual tether is created between the aircraft and the mobile device so that the aircraft can track your movement as you move. Note that Follow Me performance is subject to the GPS accuracy on the mobile device. - Waypoints
Record a flight path, then the aircraft will fly along the same path repeatedly while you control the camera and orientation. The flight path can be saved and re-apply in the future.
Troubleshooting
Common issues and solutions for the DJI Phantom 4 Pro Plus include:
- Connection Issues: Restart both the drone and controller, then re-pair them.
- Obstacle Sensing Malfunction: Clean the sensors and recalibrate them if necessary.
- Battery Drain: Ensure proper charging and storage of batteries.
- Warning Instructions: Always follow safety guidelines provided by DJI, such as maintaining a safe distance from obstacles and avoiding flying over populated areas.
DJI Phantom 4 Pro Plus Pros & Cons
Pros
- High-Quality Camera: Excellent image quality with 20-megapixel photos and 4K video at 60fps.
- Advanced Obstacle Sensing: Multiple sensors provide comprehensive safety features.
- Long Flight Time: Up to 30 minutes of flight time on a single charge.
- Intelligent Flight Modes: Various modes make capturing professional footage easier.
Cons
- High Cost: Priced around $1,700, making it an expensive option for hobbyists.
- Complexity: Requires some technical knowledge for optimal use.
- Size and Portability: The drone is relatively large and may require a dedicated case for transport.
Customer Reviews
Customers praise the DJI Phantom 4 Pro Plus for its exceptional image quality, robust build, and advanced flight features. However, some users have noted that the high price and complexity of the drone can be deterrents for those new to aerial photography. Common complaints include issues with connectivity and occasional software glitches.
Faqs
What is the maximum flight time of the DJI Phantom 4 Pro Plus?
What is the resolution of the camera on the DJI Phantom 4 Pro Plus?
Does the DJI Phantom 4 Pro Plus support intelligent flight modes?
How far can the DJI Phantom 4 Pro Plus fly?
Is the DJI Phantom 4 Pro Plus suitable for beginners?
What type of sensors does the DJI Phantom 4 Pro Plus use for obstacle sensing?
Can I use my smartphone with the DJI Phantom 4 Pro Plus?
How do I update the firmware of my DJI Phantom 4 Pro Plus?
What type of battery does the DJI Phantom 4 Pro Plus use?
Is there a built-in screen on the remote controller of the DJI Phantom 4 Pro Plus?
Leave a Comment