Makergear M2 Desktop Printer User Guide | Setup Instructions
Content
Introduction of Makergear M2 Desktop Printer
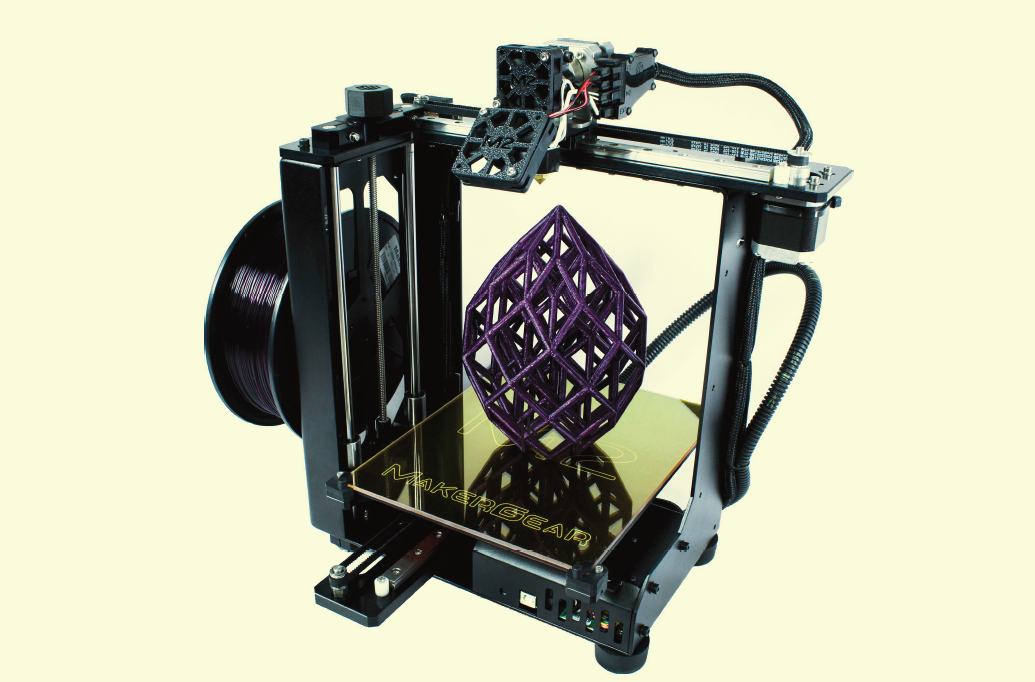
Professionals and enthusiasts alike will find the dependable, high-precision MakerGear M2 Desktop 3D Printer to be multifunctional. Built and tested in Beachwood, Ohio, USA, the M2 guarantees top-notional performance with characteristics such a strong metal frame, premium components, and user-friendly interface. Excellent print quality, durability, and user-friendly operation make the MakerGear M2 a unique choice in the 3D printing market ideal for manufacturing detailed prototypes, practical components, and creative projects.
To ensure both safety and high quality printing, carefully follow the Set Up instructions included in this booklet. This machine was assembled and tested at the MakerGear shop in Beachwood, Ohio, USA and was fully operational at the time that it was shipped, as demonstrated by the sample objects included with your M2—these were printed on your machine before shipping.
This booklet can also be found on the MakerGear website at www.makergear.com/pages/m2‐assembled, where you can also access more specific instructions and resources. For additional assistance, you can always visit our support page at www.makergear.com/pages/support.
Detailed Specifications
The Makergear M2 comes with the following key features:
- Build volume: 254 mm (X) x 204 mm (Y) x 195 mm (Z)
- Single extruder with a maximum temperature of 300°C
- Heated print bed with a maximum temperature of 110°C
- Layer resolution: 50 to 300 microns
- Compatible with various materials, including PLA, ABS, PETG, and TPU
- Filament diameter: 1.75 mm
- Connectivity: USB, SD card
- Open-source electronics and firmware
- Weight: 23 kg (50.7 lbs)
Important Safeguards
- To protect against electrical shock, do not put the machine body, cord or electrical plug in liquid. If your printer falls into liquid, do not touch it. Instead, unplug the unit, then remove it immediately. Do not reach into the liquid without unplugging the unit first.
- This machine should not be used by children unless supervised by an adult who understands the risks and precautions involved in using this machine. To avoid potential injuries, close supervision is necessary when unit is used by or near children.
- Unplug power cord from outlet when not in use. To unplug, grasp the plug and firmly pull it from electrical outlet. You should not ever pull the cord.
- Avoid any contact with moving parts.
- Keep hands/hair/clothing away from attachments of printer while the unit is operating to reduce risk of injury to persons, and/or damage to the unit.
- Do not operate your unit if: damaged cord/plug, malfunctioning, dropped or damaged in any way, or not operating properly.
What's Included
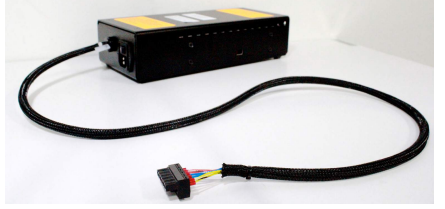
Power Supply—Please read instructions to ensure that your voltage is correctly set before powering on.
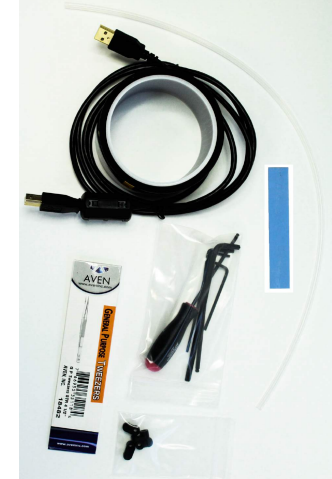
Tool kit, M3 driver, tweezers, filament guide tube, polyimide tape, USB cord, feeler gauge, and 4 extra bed hold‐down clips.
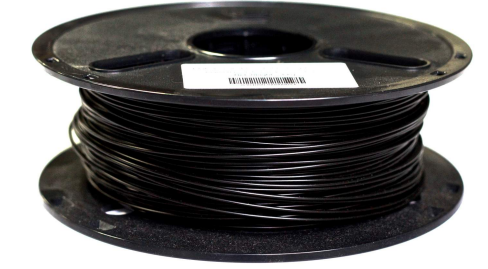
1 kg spool of 1.75 mm PLA (color may vary).
Spool holder with screws and sample objects, which were printed on your M2 using files on the included SD card.
Description
The Makergear M2 is a robust and versatile desktop 3D printer that prides itself on its high-quality components and sturdy build. Its heavy-duty aluminum frame, combined with precision linear guides, ensures consistent prints and minimizes vibrations. The M2's single extruder can reach high temperatures, enabling it to print with various materials, and its heated print bed supports a wide range of applications. With its user-friendly interface, open-source firmware, and compatibility with popular 3D printing software, the Makergear M2 is an excellent choice for those looking for a dependable desktop 3D printer.
M2 Features
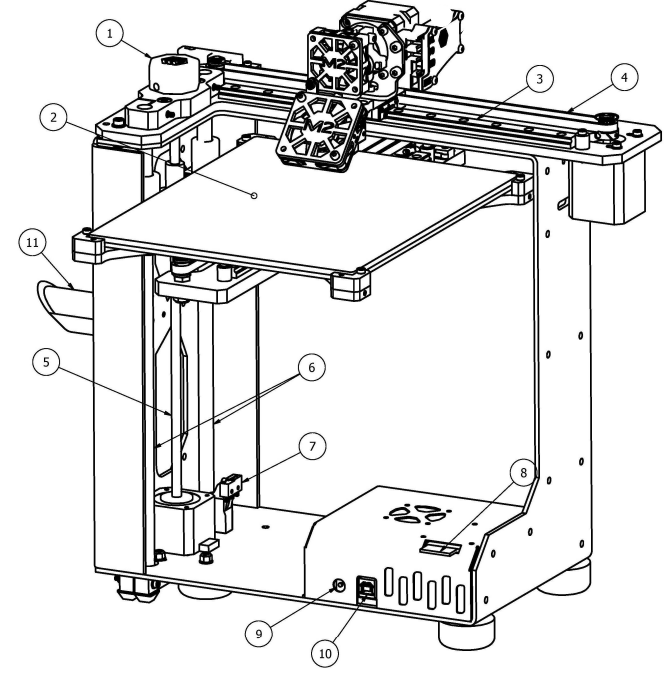
- Z‐Fine Adjust Knob: For last‐minute changes to the distance between your nozzle & bed.
- Heated Build Platform (HBP): Controls glass bed temperature.
- X‐Axis Rail: Guides your extruder during side‐to‐side movement.
- X‐Axis Belt: Keeps your extruder in‐sync with your X‐motor.
- Z‐Axis Leadscrew: Rotates to move bed up & down.
- 10mm Linear Rods: Guide your bed up & down.
- Z‐Axis Limit Switch: Sets "home" position for Z‐axis motion.
- SD Card Reader Slot: Retrieves stored command info.
- Manual Reset Button: Stops all current M2 operations.
- USB Port: Receives command info.
Spool Holder: Keeps your filament spool secure during printing.
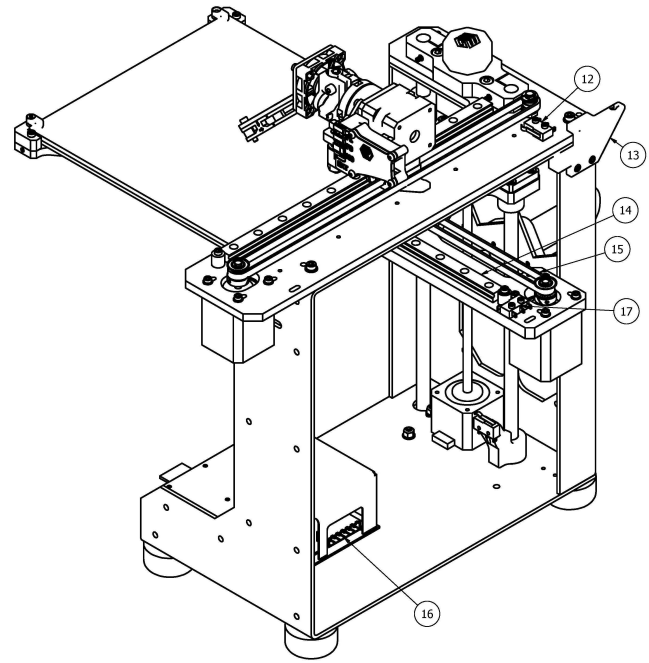
- X‐Axis Limit Switch: Sets "home" position for X‐axis motion.
- Filament Guide: Guides your filament from spool to guide tube.
- Y‐Axis Rail: Guides your bed during front‐to‐back movement.
- Y‐Axis Belt: Keeps your bed in‐sync with your Y‐motor.
- 6 Position Electronics Connector: Brings power to your M2.
Y‐Axis Limit Switch: Sets "home" position for Y‐axis motion.
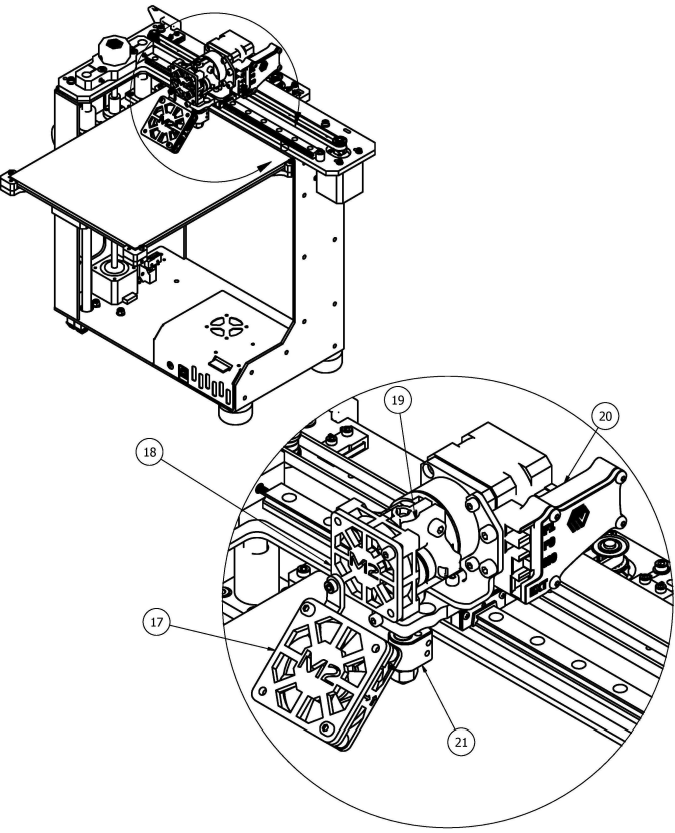
- 50 mm Fan: Helps solidify printed layers (as needed).
- 40 mm Fan: Cools your filament drive.
- Filament Drive: Pulls filament into your extruder.
- Extruder Wire Mount: Houses wiring for the extruder.
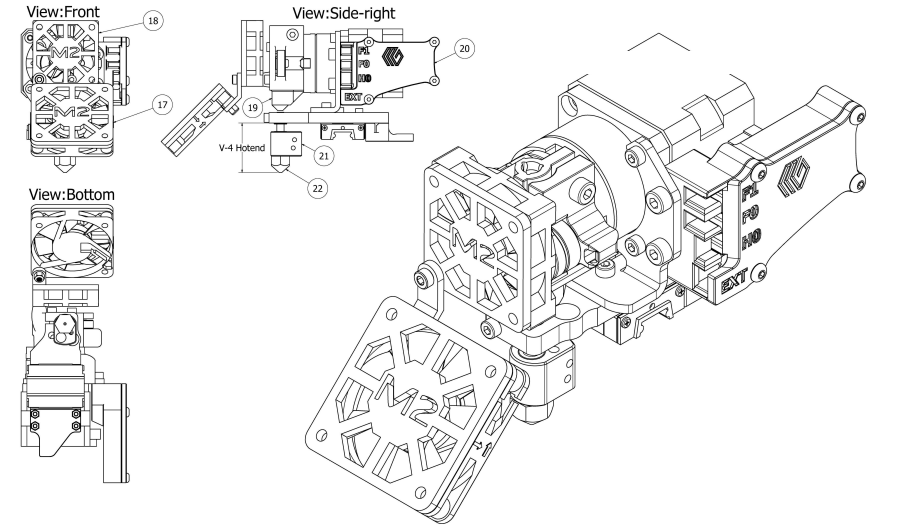
- V4 Hot End: Ensures precise extrusion.
V4 Nozzle: Provides consistent filament flow.
What's The Function?
Simple explanations of M2 Features
- Z‐Fine Adjust Knob: For last‐minute changes to the distance between your nozzle & bed.
- Heated Build Platform (HBP): Controls glass bed temperature.
- X‐Axis Rail: Guides your extruder during side‐to‐side movement.
- X‐Axis Belt: Keeps your extruder in‐sync with your X‐motor.
- Z‐Axis Leadscrew: Rotates to move bed up & down.
- 10 mm Linear Rods: Guide your bed up & down.
- Z‐Axis Limit Switch: Sets "home" position for Z‐axis motion.
- SD Card Reader Slot: Retrieves stored command info.
- Manual Reset Button: Stops all current M2 operations.
- USB Port: Receives command info.
- Spool Holder: Keeps your filament spool secure during printing.
- X‐Axis Limit Switch: Sets "home" position for X‐axis motion.
- Filament Guide: Guides your filament from spool to guide tube.
- Y‐Axis Rail: Guides your bed during front‐to‐back movement.
- Y‐Axis Belt: Keeps your bed in‐sync with your Y‐motor.
- 6 Position Electronics Connector: Brings power to your M2.
- Y‐Axis Limit Switch: Sets "home" position for Y‐axis motion.
- Extruder Wire Mount: Houses wiring for the extruder.
- 40 mm Fan: Cools your filament drive.
- 50 mm Fan: Helps solidify printed layers (as needed).
- Filament Drive: Pulls filament into your extruder.
Set-Up
- Do not update the firmware on your M2 unless you've made a hardware change that requires an update.
- Carefully remove the foam from the top of the printer and from inside the printer frame.
- Remove the HBP from its slot in the foam and place it on the 4 legged “Spider” inside the frame, with the glass facing up.
- Remove the printer from the bottom foam. Remove and read WARNING sheet from underneath your borosilicate glass bed by removing the binder clips. Then secure the bed to the HBP using the bed hold‐down clips on each corner of your bed.
- Do not remove the yellow polyimide tape from the glass.
- Unpack the power supply and set the Voltage Switch to the voltage supplied through your outlet. There are only two settings: 115 V (for 100 – 130 V) and 230 V (for 220 –240 V).
- To find the standard voltage level for your country, visit https://www.worldstandards.eu/electricity/plug‐voltage‐by‐country/
- Insert the 6 Position Power Supply Connector into the 6 Position Electronics Connector SECURELY IN PLACE in the electronics case—note that the power supply connector should run under all other wires.
- Next, plug the power supply into a wall outlet and flip the power supply switch to the on position.
- Install the Spool Holder with the four screws using the 3 mm allen key, ensuring that the longer side is facing upward.
- Place your PLA spool on the Spool Holder so that it unwinds upwards through the Filament Guide and feed it through. Cut the PLA so the tip is flat, then feed the filament into the filament guide tube and into the Filament Drive (if you have trouble feeding filament with a flat tip, then try cutting it at a 45 degree angle).
- Download the MakerGear Quick Start App via the link included in "QuickStart.pdf" on your SD card (or via https://www.MakerGear.com/pages/QuickStart‐App ).
Carefully follow the app's step‐by‐step instructions in order to create your first print:
- Connect: Install driver (Windows users only), connect to M2.
- Check Platform: Check starting height, check bed level, make adjustments using instructions provided by the app.
- Load Filament: Heat HBP & extruder, properly extrude filament.
- Print: Select "Bracelet.g" from your SD card, click "Print"
After printing "bracelet.g", you will be given three options:
- Click Retry if your first print was unsuccessful ‐ this will return you to the check platform section in order to identify and address any issues with your platform that may have caused print defects.
- Click Print Another File if your first print was successful and you want to experience more MakerGear Magic.
- Click Done to navigate to the "Advanced" tab, where you can find manual controls for your M2 as well as a real‐time display of the temperatures and coordinates of your extruder and HBP.
A Note About Nozzles
If you wish to remove or change your nozzle, you must first remove the entire hot end. Any attempts to unscrew the nozzle directly from your M2 will damage the hotend. Some of our users choose to print with a nozzle that is either larger or smaller than the .35 mm nozzle included on the M2 in order to accommodate specific printing needs. If you plan to print with different sized nozzles, we recommend keeping each nozzle installed in a separate hotend ‐ this allows you to switch between nozzles more easily.
Maintenance & Support
Weekly (every 50 hours)
- Ensure that your bed is at the correct height and properly leveled. To do so, open the MakerGear Quick Start application and follow the commands within the Set Up process in order to complete the following steps:
- Check Starting Height
- Check Bed Level
- Ensure that the print surface is free of defects (torn or bubbled tape) and dust/dirt/grease, and replace tape or clean surface with appropriate cleaner (alcohol/water at 50%/50% recommended).
Monthly (every 200‐250 hours)
- Ensure the machine is free of dust and filament debris, and clean if necessary. Focus areas include fans and fan guards, filament surface and filament drive, and the entire frame. Clean oil from the X and Y linear rails and apply a fresh coat to each. A dot of oil in each of the long grooves on the X and Y rails is sufficient. Once applied, move that axis through its full travel multiple times to spread the oil.
Shutdown & Storage
- If using your M2 regularly, then turn off the power supply and unplug both the power supply and USB cords when finished.
- If storing your M2 for a period of 1‐2 weeks, follow the instructions listed above AND store the filament spool in its original bag (fully sealed, with the desiccant packet inside).
- If storing your M2 for a period of 2 weeks or more, follow the instructions listed above THEN cover your entire machine in order to protect it from the buildup of dust and other airborne particles.
DO NOT unscrew your nozzle directly from your M2!
To change or remove its nozzle, you must first remove the entire hot end. Visit our website and YouTube channel for step-by-step instructions on how to remove the hot end and change its nozzle.
What does "M2 V4 Rev. E" mean?
| Machine Component | Replacement Part Name* | Additional Specifications |
|---|---|---|
| Bed Fan (Fan 0) | 50 mm fan, 24 V | 0.1 A |
| Extruder Fan (Fan 1) | 40 mm fan, 24 V | 0.1 A |
| Electronics Case Cooling Fan | 40 mm fan, 24 V | 0.1 A |
| Hot End | V4 Hot End, 0.35 mm | |
| Hot End—Nozzle | V4 Nozzle, Brass, 0.35 mm | |
| Hot End—Thermistor | Thermistor, Hot End | 300 °C thermistor |
| Hot End—Barrel | V4 Barrel | Stainless Steel |
| Hot End—Cartridge Heater | V4 Cartridge Heater | 24 V |
| Hot End—Heater Block | V4 Heater Block | 24 V |
| Filament Drive | V4 Filament Drive | rev 2 |
| Motor Mount | Metal with Printed Extruder Wire Mount | |
| HBP | HBP, 24 V | with flexible conduit |
| HBP-Thermistor | Thermistor, HBP, 31" | |
| Glass Build Surface | Glass with Polyimide Tape | 8" x 10" x 3.3 mm, borosilicate |
| Power Supply | Power Supply | 24 V, 450 W, metal case, rev 1 |
| Z Motor | Z Motor | HK Black, Fine Pitch Screw |
| Extruder Motor | Extruder Motor, Geared Stepper (5.2:1) | 42BYGH243-5 |
| Extruder Motor—Drive Gear | Extruder Motor Drive Gear | 24 Tooth Involute Spline |
| X/Y Motor | X or Y Motor | 42BYGH4803-C6 |
| Controller Board | RAMBo 1.3L | |
| Belt Set | Belt Set | 702 mm (Y) & 630 mm (X) |
| Filament Guide Tube | Filament Guide Tube | 2 mm ID |
| Carriage | X or Y Carriage | |
| Spider | Four Screw Leveling Spider | With Bed Holddown Clips |
| Z Axis Endstop | Bottom Z-Axis Endstop | |
| Firmware | M2E v100 (SnNRd) |
Troubleshooting
Here are some common issues and solutions for the Makergear M2:
- Issue: Poor print quality or adhesion
Solution: Level the print bed, adjust the Z-offset, or try printing with a different temperature. - Issue: Filament not feeding properly
Solution: Check for any clogs in the extruder, ensure the filament is not damaged, and adjust the idler tension if necessary. - Issue: Prints not sticking to the bed
Solution: Clean the print bed with rubbing alcohol, apply a glue stick or blue painter's tape, or increase the bed temperature.
Warranty
New M2s ordered from MakerGear or from an authorized MakerGear distributor have a Six‐Month Non‐Transferable Limited Warranty. MakerGear will replace defective parts on M2s that are under warranty. Replacement parts may be new or refurbished and include free shipping in the US only. Non‐US customers are responsible for the shipping costs for replacement parts.
Makergear M2 Desktop Printer Pros & Cons
Pros
- Sturdy aluminum frame
- Large build volume
- Heated print bed
- Compatible with various materials
- User-friendly interface
Cons
- Assembly required
- Price on the higher end
- Single extruder (dual extruder optional)
Faqs
With what materials can the Makergear M2 Desktop Printer?
What software can I use with the Makergear?
The MakerGear has what build volume?
Are the MakerGear M2 pre-assembled?
Which kind of program runs on the Makergear M2 Desktop Printer?
How does the MakerGear M2 connect to a computer?
What is the warranty on the Makergear M2 Desktop Printer?
Can novices use the MakerGear?
How often should I replace the nozzle on the Makergear?
What are the dimensions of the Makergear?
Leave a Comment