How to Recharge: Philips Norelco Bodygroom System BG2040 User Guide
Content
Introduction Of Philips Norelco Bodygroom System BG2040
The Philips Norelco Bodygroom System BG2040 is a versatile grooming tool designed for men who want a smooth and comfortable shave from head to toe. This all-in-one device features both a foil shaver and a trimmer, making it perfect for maintaining facial hair, chest hair, and everything in between. The estimated price of the Philips Norelco Bodygroom System BG2040 is around $50, making it an affordable option for those who want a high-quality grooming tool without breaking the bank.
Detailed Specifications
The Philips Norelco Bodygroom System BG2040 comes with several key features that make it a standout grooming tool, including:
- Dual-sided design with a foil shaver on one side and a trimmer on the other
- 3-hour runtime with a rechargeable battery
- Fully washable design for easy cleaning
- Five length settings for the trimmer, ranging from 1/8 inch to 1/2 inch
- Rounded blades to prevent skin irritation and cuts
Features

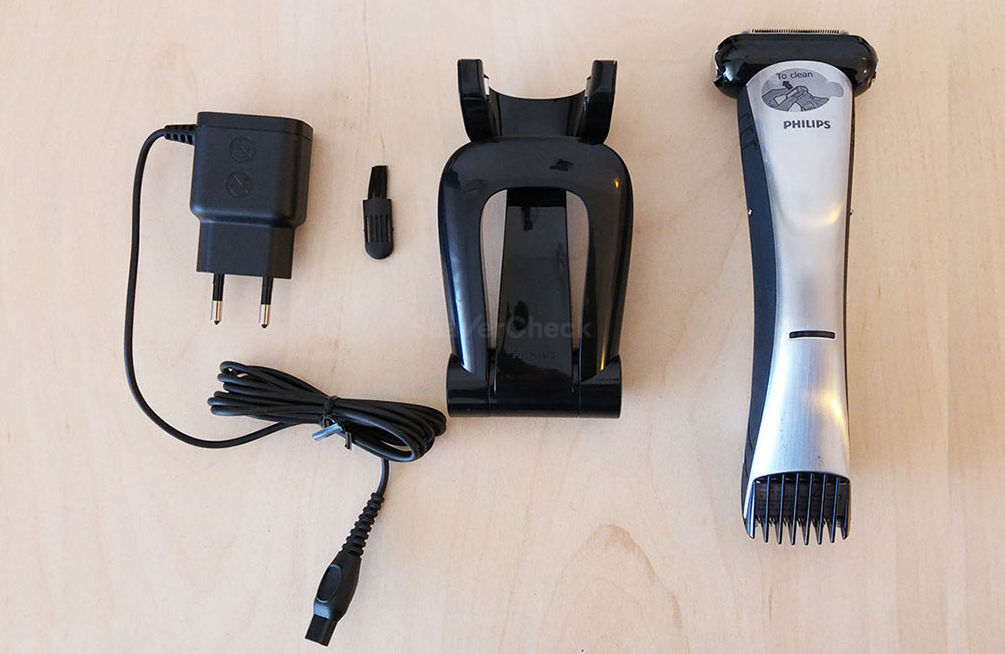
- Charging and Battery Low Indicator Light
- Shaving Unit
- Shaving Unit On/Off Button
- Trimming Unit On/Off Button
- Hair Length Selector
- Trimming Unit with Comb
- Charging Stand
- Socket for Small Plug
- Adaptor
- Small Plug
- Cleaning Brush Full 2-Year Warranty 45-Day Money-Back Guarantee
Description of Bodygroom System BG2040
The Philips Norelco Bodygroom System is a versatile grooming tool that is perfect for men who want to maintain their body hair. With its dual-sided design, you can use the foil shaver for a close, comfortable shave on your face and the trimmer for maintaining body hair. The device is lightweight and easy to handle, making it perfect for those hard-to-reach areas. Plus, with its rechargeable battery, you can take it with you on the go for touch-ups throughout the day.
Setup of Philips Norelco Bodygroom System
Setting up the Norelco Bodygroom System BG2040 is easy. First, make sure the device is fully charged. Then, select the length setting you want on the trimmer using the zoom wheel on the front of the device. Next, wet your skin and apply shaving gel or foam if desired. Finally, turn on the device and start grooming. When you're done, rinse the device under running water to clean it.
LED Charging Indicator
- The Charging Indicator Light on the Groomer will flash green to indicate Groomer is (re)charging.
- After approximately 1 hour the Charging Indicator Light lights up continuously to indicate the Groomer is fully charged.
- After Groomer is fully charged, the charging light goes out after 30 minutes to save energy.
Before First Use
- Charge the Groomer before you start using it (see 'Charging'). Make sure the Groomer is switched off before you start charging it.
- Before using, check foil, cutters and trimmers for wear or damage. If foil, cutters or trimmers show signs of wear or damage, do not use Groomer as injury may occur. Do not use Groomer until foil, cutters or trimmers have been replaced.
Charging
- Charging requires 1 hour.
- Use only the power cord and charging stand provided.
- Battery performance is best if you recharge only when the batteries are (almost) completely empty.
- Charging, recharging or storing at temperatures below 40°F/4,5°C or higher than 95°F/35°C adversely affects lifetime of batteries.
- The Groomer can only be charged in the charging stand.
- Be certain Groomer is OFF.
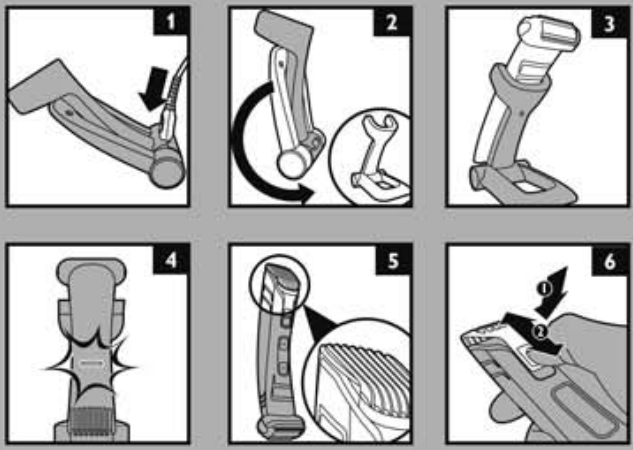
- Connect power cord to charging stand (Fig. 1 ).
NOTE: The small plug is easiest to insert when the charging stand is folded. - Unfold the charging stand (Fig. 2).
- Plug the adaptor into any 120V AC outlet. Use only the power cord provided. An adaptor plug may be necessary for power cord usage in some foreign countries. Use an attachment plug adaptor of the proper configuration for the power outlet.
- Put the Groomer in the charging stand with the shaving unit pointing upwards (Fig. 3). Make sure the charging contacts on each side of the Groomer fit into the charging stand correctly. When placed correctly, the charging light will flash green to indicate the Groomer is (re)charging (Fig. 4).
- Charging requires one hour. A fully charged Groomer has a cordless grooming time of up to 50 minutes.
- When the battery is fully charged, the charging light lights up green continuously.
NOTE: After Groomer is fully charged, the charging light will go off after 30 minutes. - Disconnect the power cord and unplug it from the electrical outlet.
Optimize The Working Life of The Battery
- After Groomer has been charged for the first time, do not recharge Groomer between grooming sessions. Continue using it until the battery is completely empty.
- Discharge the battery completely twice a year by letting the motor run until it stops.
- Do not keep plug permanently plugged in.
Recharging
- Recharging requires a full 1 hour.
- Recharge when the charging light lights up orange. This indicates there is approximately 10 minutes of operating time left.
- When Groomer is fully charged, disconnect the adaptor charging plug from outlet.
Trimming
- If you are trimming for the first time, be careful. Do not move the Groomer too fast. Make smooth and gentle movements.
- Practice trimming at the highest setting (5) first to prevent accidentally trimming hairs too short.
- Trimming is easier and more effective when skin and hair are dry.
- Hold the Groomer in the trimming position, with the trimming unit pointing upwards and the shaving unit pointing downwards (Fig. 5).
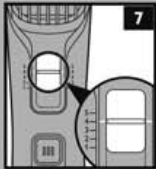
Press the Hair Length Selector (1) and slide it to the desired setting (2) (Fig. 6). The two lines next to the setting selector show which setting you have selected (Fig. 7).
Trimming Length SettingTable
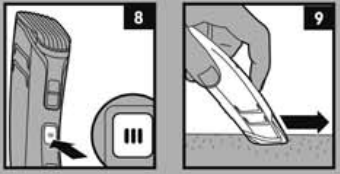
The trimming comb allows you to cut hair to 5 different lengths- Turn Groomer ON by pressing the trimming unit on/off button (Fig. 8).
Hold Groomer as shown and move against the direction of hair growth making sure the tips of the comb point in the same direction as you are moving the Groomer. Always make smooth and gentle movements and be sure the surface of the comb always stays in contact with your skin (Fig. 9).
NOTE: Since all hairs do not grow in the same direction, you may want to try different trimming positions (i.e. upwards, downwards, or across). Practice is best for optimum results.- Turn Groomer OFF by pressing the trimming unit on/off button.
Shaving
- Use this Groomer for its intended household use as described in this manual.
- Do not use this Groomer to shave or trim facial or scalp hair. The Groomer should only be used on skin below the neckline.
- When shaving sensitive areas for the first time, you may feel some discomfort, irritation or reddening of the skin. This is normal as your skin needs time to adjust to shaving.
- If your hair is longer than 13/32 in. / 10 mm, trim hair using a trimmer comb first for optimum shaving results.
- For dry use, be certain that your skin is clean and dry before using the Groomer.
- For wet use, you may prepare your skin with lathered soap or shaving foam before using the Groomer.
- Make sure the shaving foil is in complete contact with your skin for the closest shave and minimum foil wear.
- Pressing too hard may cause skin irritations.
- Practice is best for optimum results.
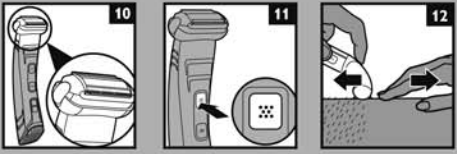
- Hold the Groomer in the shaving position,with the shaving unit pointing upwards and the trimming unit pointing downwards (Fig. 10).
- Turn Groomer ON by pressing the shaving unit on/off button (Fig. 11).
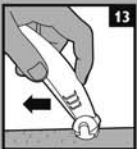
- Stretch your skin taut with your free hand and gently press Groomer to skin (Fig. 12) and move it slowly and smoothly against the direction of hair growth (Fig. 13). DO NOT press too hard. Too much pressure can distort the foil and cause skin irritation.
TIP: Stretching your skin can help prevent skin irritation. - Make sure the shaving head is always in full contact with your skin.
- Turn Groomer OFF by pressing the shaving unit on/off button (Fig. 11).
Cleaning
- The Groomer should be cleaned after each use.
- Always switch Groomer OFF and remove power cord from charging stand and outlet before cleaning.
- Do not use compressed air, abrasive cleaning agents, scourers or liquids such as alcohol or acetone to clean the appliance.
- Never clean, remove or replace shaving head assembly while motor is on.
- Do not apply pressure to shaving head. Do not touch foil with hard objects as this may dent or damage foil or cutters. If damage occurs, replace damaged parts.
- Do not use Groomer if foil, cutters or trimmers are damaged or broken as injury may occur.
- Only use the cleaning brush supplied. Any other brush may cause damage.
Cleaning the shaving unit
- Always switch Groomer OFF, remove the power cord from outlet and charging stand before cleaning.
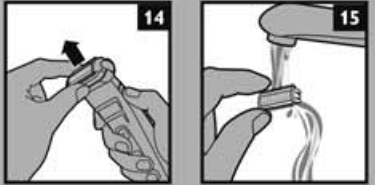
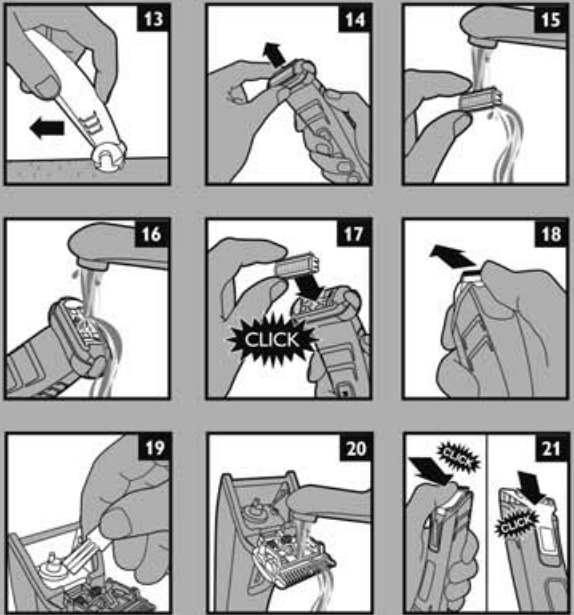
- Remove the shaving foil head by pulling it off the appliance (Fig. 14). Hold the shaving head by the plastic housing only.
Rinse the shaving unit under warm running tap water to rinse away debris (Fig. 15). Do not use the cleaning brush to clean the shaving unit as this may cause damage to the foil or cutters.
- Clean the hair chamber with the cleaning brush. You may also rinse the hair chamber under warm running tap water to remove any residual debris (Fig. 16).
- Do not use a towel or cloth to dry shaving foil or cutters as this may cause damage; allow to air dry thoroughly.
- Reattach the shaving head by snapping it back onto the Groomer (Fig. 17). You will hear a "click'.
- Rinse the Groomer body under running warn tap water: Wipe dry with a soft clean towel or cloth.
Cleaning the trimming unit
- Always switch Groomer OFF, remove the power cord from outlet and charging stand before cleaning.
- Remove the trimming comb by sliding it off the Groomer.
- Push the middle part of the trimming unit upwards with your thumb until it opens (Fig: 18).
- Remove hairs from the hair chamber with the supplied brush (Fig. 19). You may also rinse the hair chamber under warm running tap water to remove any residual debris.
- Rinse the trimming unit with warm runningtap water (Fig. 20).
- After cleaning, close the trimming unit and reattach the trimming comb (Fig. 21). You will hear a 'click'.
- Rinse the Groomer body under running warm tap water. Wipe dry with a soft clean towel or cloth.
Replacing the Shaving Foil Head
- If the shaving foil and cutters are worn or damaged, do not continue using the Groomer: Replace the shaving foil and cutters immediately.
- It is recommended that you replace your shaving foil and cutters once a year.
- Always switch Groomer OFF and remove Groomer from the charging stand before replacing shaving foil.
- Remove the shaving foil head by pulling it off the appliance (Fig. 14).
- Place the new shaving foil head on the Groomer by snapping it into place (Fig. 17). You will hear a "click".
After replacing the shaving foil head, check that the shaving head is firmly attached before using Groomer.
Warranty Of Philips Norelco Bodygroom System
Philips Electronics North America Corporation warrants each new Philips Norelco Product, Model BG2040 (except foil and cutters) against defects in materials or workmanship for a period of two years from the date of purchase, and agrees to repair or replace any defective product without charge.
IMPORTANT: This warranty does not cover damage resulting from accident, misuse or abuse, lack of reasonable care, the affixing of any attachment not provided with the product or loss of parts or subjecting the product to any but the specified voltage.
Pros & Cons of Philips BG2040
Pros
- Dual-sided design for versatile grooming
- Long battery life
- Fully washable design for easy cleaning
- Affordable price
Cons
- May not provide as close of a shave as a dedicated razor
- Some users may find the trimmer difficult to use for detailing facial hair
Customer Reviews of Philips Norelco Bodygroom System
Customers love the Norelco Bodygroom System for its versatile design and affordable price. Many users note that the device is easy to use and provides a comfortable shave. However, some users note that the trimmer may not be as effective for detailing facial hair as a dedicated trimmer. The most common complaint about the device is that the battery life may not be as long as advertised, but most users note that it still provides several grooming sessions before needing to be recharged.
Faqs
For the first time, how do I charge my Philips Norelco Bodygroom System BG2040?
Is it possible to use the BG2040 Philips Norelco Bodygroom System for both wet and dry shaving?
How should I proceed if my Philips Norelco Bodygroom System BG2040's blades start to dull?
How can I change the length of the trimming on my BG2040 Philips Norelco Bodygroom System?
Is sensitive skin suitable for the Philips Norelco Bodygroom System BG2040?
After using, how should my Philips Norelco Bodygroom System BG2040 be cleaned?
If my Philips Norelco Bodygroom System BG2040 won't turn on, what should I do?
Is it possible to shave my face using the Philips Norelco Bodygroom System BG2040?
How frequently does my Philips Norelco Bodygroom System BG2040's shaving head need to be changed?
What is covered by the Philips Norelco Bodygroom System BG2040 warranty, and how long is it valid for?
Leave a Comment