How to Recharge: Philips Sonicare AirFloss Pro User Manual
Content
Introduction
The Philips Sonicare AirFloss Pro is an innovative dental device designed to enhance oral hygiene for those who struggle with traditional flossing. Utilizing advanced microburst technology, it delivers quick bursts of air and liquid to effectively remove plaque and debris from between teeth, promoting healthier gums in just 60 seconds a day. This easy-to-use tool is clinically proven to be as effective as traditional flossing. The Philips Sonicare AirFloss Pro is priced at approximately $89.95.
Detailed Specifications
- Technology:** Uses a combination of air and water to remove plaque and debris
- Pressure Settings:** Multiple pressure settings to accommodate different comfort levels
- Nozzle Design:** Interchangeable nozzles for personalized use and hygiene
- Battery Life:** Up to 2 weeks on a single charge
- Dimensions:** Compact and ergonomic design for easy handling
- Color Options:** Available in various colors such as white, black, and pink
General description
(Fig. 1)
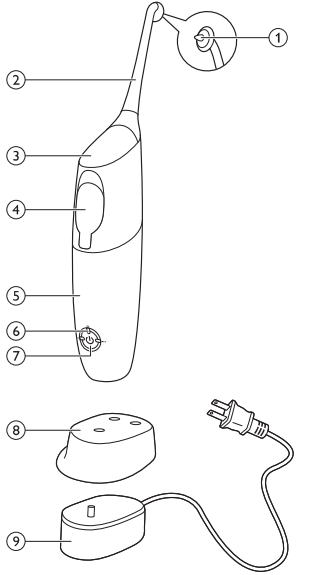
- Guidance tip
- AirFloss Pro nozzle
- Activation button
- Reservoir and reservoir cover
- Handle
- Charge & burst mode indicators
- Single burst: 1 LED
- Double burst: 2 LEDs
- Triple burst: 3 LEDs
- Power on/off button
- Removable nozzle holder (specific types only)
- Charger
Note: The contents of the box may vary based on the type purchased.
Philips Sonicare AirFloss Pro Charging
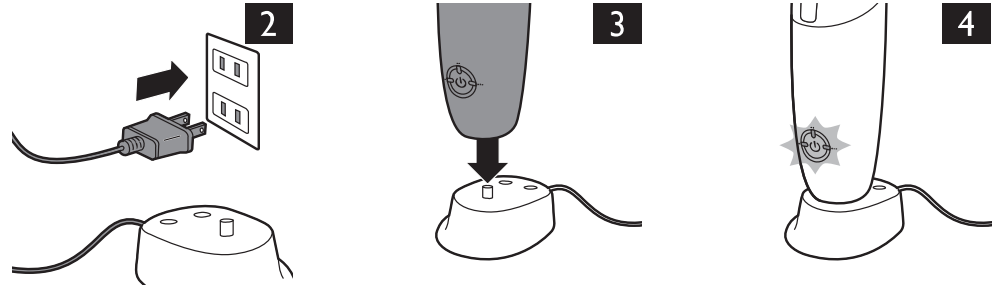
Charge the AirFloss Pro for 24 hours before first use.
- Put the plug of the charger in the wall socket (Fig. 2).
- Place the handle on the charger (Fig. 3).
- The charge indicators flash green to indicate that your AirFloss Pro is charging (Fig. 4).
Note: When it is fully charged, the AirFloss Pro has an operating time of up to 11 days when used in triple burst mode, and up to 33 days when used in single burst mode.
Note: When the charge indicators flash yellow, the battery is low and needs to be recharged (fewer than 3 uses left).
- The charge indicators flash green to indicate that your AirFloss Pro is charging (Fig. 4).
Preparing for use
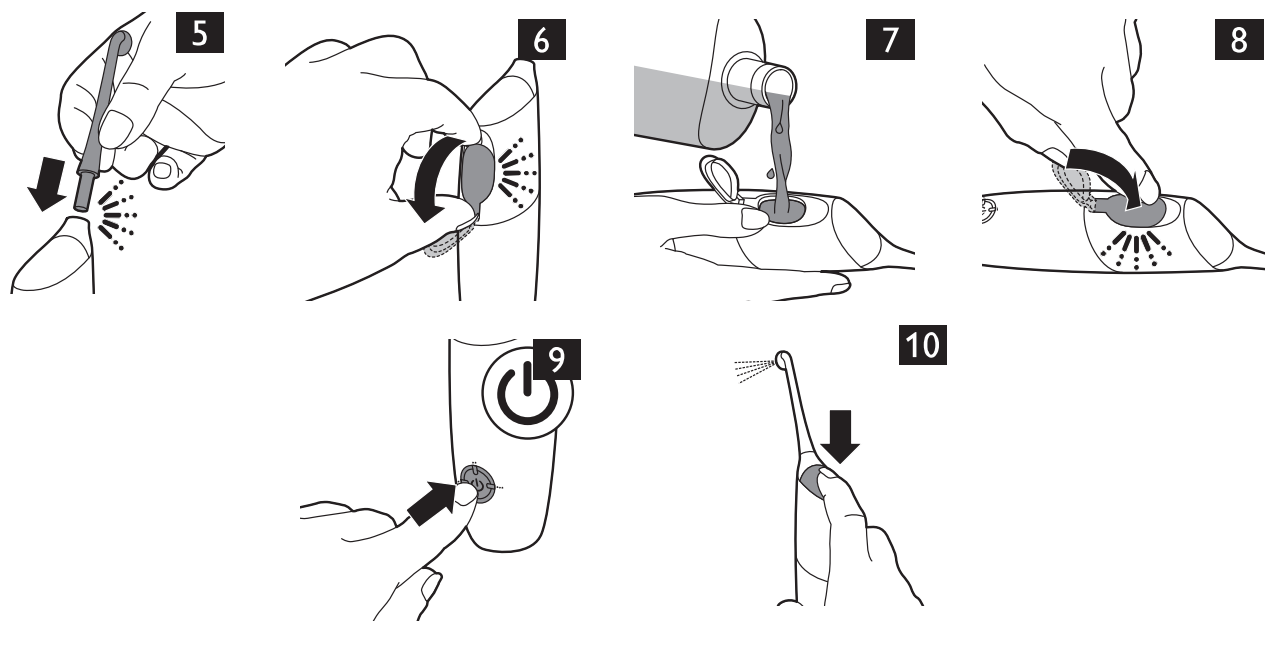
- Align the nozzle so the tip faces the front of the handle and press the nozzle down onto the handle ('click') (Fig. 5).
Note: Replace the nozzle every 6 months for optimal results. Also, replace the nozzle if it becomes loose or no longer 'clicks' onto the handle.
Note: The AirFloss Pro only supports AirFloss Pro nozzles. Do not attempt to use non-AirFloss Pro nozzles on the AirFloss Pro handle. - Open the cover of the reservoir ('click') (Fig. 6).
- Fill the reservoir with mouthwash or water (Fig. 7).
Tip: For the best result and a fresher experience, we advise you to use mouthwash with your AirFloss Pro.
Note: Do not use mouthwash that contains isopropyl myristate or high concentrations of essential oils, as it may damage the appliance. - Close the cover of the reservoir by pressing ('click') (Fig. 8).
- Press the power on/off button to switch on the appliance (Fig. 9). The LEDs light up.
- Press and hold the activation button until spray comes out of the tip of the nozzle (Fig. 10).
Description
The Philips Sonicare AirFloss Pro is a sleek and user-friendly device that simplifies the flossing process. It features a lightweight design with an ergonomic handle, making it comfortable to hold and maneuver. The device includes interchangeable nozzles, allowing multiple users to share the same unit while maintaining personal hygiene. The AirFloss Pro operates on a rechargeable battery, providing up to two weeks of use on a single charge.
Using the appliance
Make sure the AirFloss Pro is switched on. If it is off, press and release the power on/off button to switch on the appliance (Fig. 9). You can change the modes to have the desired number of bursts each time you press the activation button. For optimal results, use the triple burst mode (the default setting).
- To change modes, press the power on/off button to cycle through the modes until you reach your desired mode. The LEDs show the selected mode:
- Single burst: 1 LED (Fig. 11)
- Double burst: 2 LEDs (Fig. 12)
Triple burst: 3 LEDs (Fig. 13)
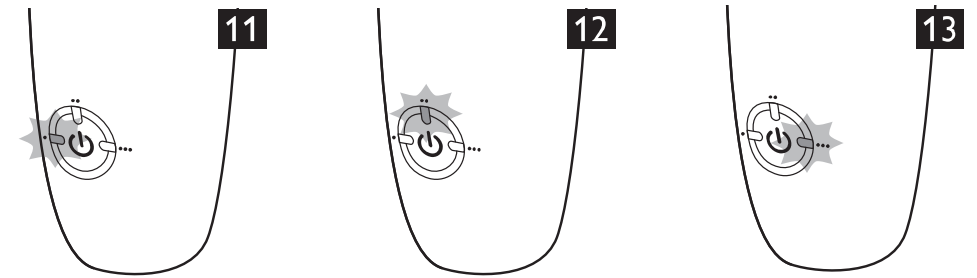
Note: The AirFloss Pro remembers the mode selected last and is ready for the next use. If your AirFloss Pro becomes fully drained of power, it goes back to the triple burst default mode once recharged.
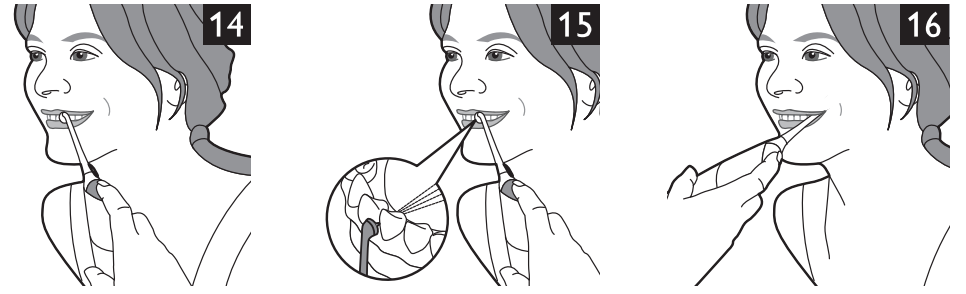
- Place the guidance tip between two teeth at your gum line. Slightly close your lips over the nozzle when it is in place to avoid splashing (Fig. 14).
- Press the activation button to deliver 1-3 bursts (depending on the selected mode) of air and micro-droplets of mouthwash or water between the teeth (Fig. 15).
- Slide the guidance tip along the gum line until you feel it settle between the next two teeth.
Continue this procedure for all spaces between your teeth, including behind your back teeth (Fig. 16).
Note: Refill the reservoir if needed.
Auto-burst function
Hold the activation button to deliver bursts continuously, approximately one burst every second.
- To switch off the AirFloss Pro, press and hold the power on/off button for one second.
Automatic shut-off function
The AirFloss Pro automatically switches off if it has not been used for one minute.
Setup Guide
- Assembly: Attach the nozzle to the main unit by aligning it with the air outlet and twisting it into place.
- Configuration: Fill the reservoir with water or mouthwash. You can also use the device with just air if preferred.
- Operation: Place the nozzle between your teeth, turn on the device, and adjust the pressure setting as needed.
- Pairing: No pairing required; it is a standalone device.
Cleaning
Do not clean the nozzle, handle, or charger in the dishwasher. Do not use cleaning agents to clean the appliance.
Handle and nozzle
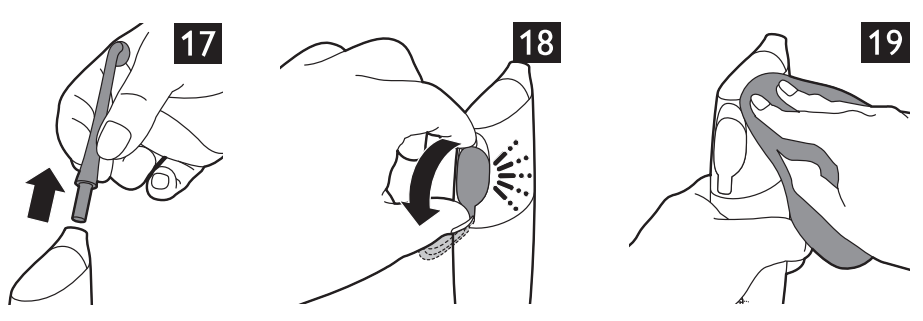
- Remove the nozzle from the handle. Rinse the nozzle after each use (Fig. 17).
- Open the reservoir and rinse it under the tap to eliminate residue (Fig. 18).
Tip: You can also use a cotton bud to wipe the reservoir.
Note: Do not immerse the handle in water. - Wipe the entire surface of the handle with a damp cloth (Fig. 19).
Charger
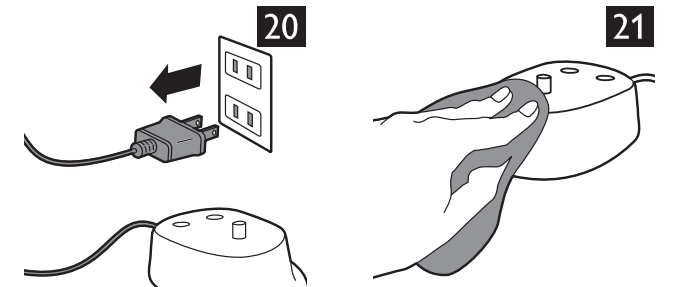
- Unplug the charger before you clean it (Fig. 20).
- Wipe the surface of the charger with a damp cloth (Fig. 21).
Storage
If you are not going to use the AirFloss Pro for an extended period of time, follow the steps below.
- Open the cover of the reservoir and empty it.
- Press the activation button until no more spray comes out of the nozzle.
- Unplug the charger (Fig. 20).
- Clean the AirFloss Pro nozzle, handle, and charger. See chapter 'Cleaning'.
- Store the AirFloss Pro in a cool, dry place away from direct sunlight.
Environment
- This symbol on a product means that the product is covered by European Directive 2012/19/EU (Fig. 22).
This symbol means that the product contains a built-in rechargeable battery covered by European Directive 2006/66/EC, which cannot be disposed of with normal household waste. Follow the instructions in the section 'Removing the rechargeable battery' to remove the battery (Fig. 23).
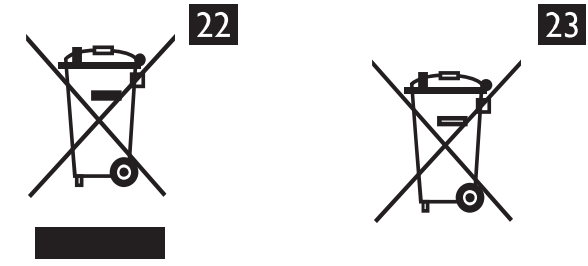
Inform yourself about the local separate collection system for electrical and electronic products and rechargeable batteries. Follow local rules and never dispose of the product and rechargeable batteries with normal household waste. Correct disposal of old products and rechargeable batteries helps prevent negative consequences for the environment and human health.
Removing the rechargeable battery
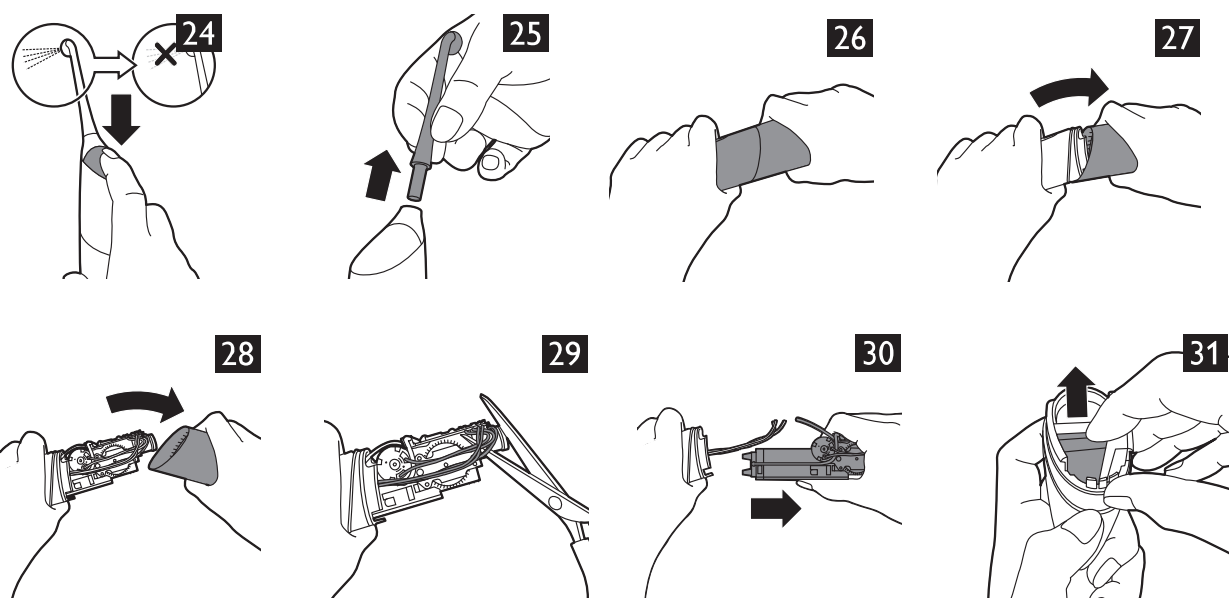
Please note that this process is not reversible.
- To deplete the battery, repeatedly press the activation button until the AirFloss no longer produces any bursts of air (Fig. 24).
- Remove the nozzle from the handle (Fig. 25).
- Firmly grab the handle with one hand at the top and one hand on the bottom (Fig. 26).
- Snap the handle into two parts (Fig. 27).
Note: This step requires a good amount of physical force. The top and bottom half of the handle should be separated once you snap the handle. - Remove the bottom half of the handle (Fig. 28).
- Cut all 6 wires on the internal component with scissors (Fig. 29).
- Completely pull apart the internal component from the top part of the handle (Fig. 30).
- The battery is located inside the top half of the handle. Remove the battery and dispose of it properly (not in household waste) (Fig. 31).
Important
Read this user manual carefully before you use the appliance and save it for future reference.
Danger
- Keep the charger away from water. Do not place or store it over or near water contained in a bathtub, washbasin, etc. Do not immerse the charger in water or any other liquid. After cleaning, make sure the charger is completely dry before you connect it to the mains.
Warning
- The mains cord cannot be replaced. If the mains cord is damaged, discard the charger. Always have the charger replaced with one of the original type in order to avoid a hazard.
- Use only charger type HX6100 provided with the AirFloss Pro to recharge the battery.
- If the appliance is damaged in any way (AirFloss Pro nozzle, handle and/or charger), stop using it.
- This appliance contains no serviceable parts. If the appliance is damaged, contact the Consumer Care Centre in your country (see chapter 'Guarantee and support').
- Do not use the charger outdoors or near heated surfaces.
- This appliance can be used by children aged from 8 years and above and by persons with reduced physical, sensory, or mental capabilities or lack of experience and knowledge if they have been given supervision or instruction concerning the use of the appliance in a safe way and if they understand the hazards involved. Cleaning and user maintenance shall not be made by children unless they are older than 8 and supervised. Keep the appliance and its cord out of reach of children aged less than 8 years.
- Children shall not play with the appliance.
Caution
- Consult your dentist before you use this appliance if you have had recent oral or gum surgery, suffer from an ongoing dental condition, had extensive dental work in the previous 2 months, or have suspected issues with your dental work (fillings, crowns, etc.). Consult your dentist if excessive bleeding occurs after using this appliance or if bleeding continues to occur after 1 week of use.
- If you have medical concerns, consult your doctor before you use this appliance.
- This Philips appliance complies with the safety standards for electromagnetic devices. If you have a pacemaker or other implanted device, contact your physician or the appliance manufacturer of the implanted appliance prior to use.
- Do not use attachments other than the ones recommended by the manufacturer.
- Do not exert excessive pressure on the guidance tip of the nozzle.
- To avoid physical injury, do not fill the reservoir with hot water. Do not put foreign objects in the reservoir.
- Only use the AirFloss Pro for its intended purpose as described in this user manual.
- To avoid physical injury, do not direct the spray under the tongue or into the ear, nose, eye, or other sensitive areas.
- Do not clean the AirFloss Pro nozzle, the handle, the charger, the water reservoir, and its cover in the dishwasher or a microwave.
- To avoid an ingestion hazard, do not put isopropyl alcohol or other cleaning fluids in the reservoir.
- The AirFloss Pro is a personal care appliance and is not intended for use on multiple patients in a dental practice or institution.
Electromagnetic fields (EMF)
This Philips appliance complies with all applicable standards and regulations regarding exposure to electromagnetic fields.
Philips Sonicare AirFloss Pro Troubleshooting
Common Problems and Solutions
- Nozzle Not Fitting Properly: Ensure the nozzle is aligned correctly and twisted into place securely.
- Low Pressure: Check the reservoir level and refill if necessary. Also, ensure the nozzle is not clogged.
- Device Not Turning On: Verify that the battery is fully charged or replace it if necessary.
Instructions and Warnings
- Always clean the device after use to prevent bacterial buildup.
- Do not share nozzles to maintain hygiene. - Use only water or mouthwash in the reservoir.
Guarantee and support
If you need information or support, please visit www.philips.com/support or read the separate worldwide guarantee leaflet.
Guarantee restrictions
The terms of the international guarantee do not cover the following:
- AirFloss Pro nozzle.
- Damage caused by misuse, abuse, neglect, alterations, or unauthorized repair.
- Normal wear and tear, including chips, scratches, abrasions, discoloration, or fading.
Pros & Cons
Pros
- Easy to Use: Simplifies the flossing process with minimal effort required.
- Effective: Removes plaque and debris efficiently.
- Multiple Pressure Settings: Adaptable to different comfort levels.
- Interchangeable Nozzles: Suitable for multiple users while maintaining hygiene.
- Long Battery Life: Up to two weeks on a single charge.
Cons
- Cost: More expensive than traditional flossing methods.
- Noise: Can be noisy during operation, although not excessively so.
- Limited Portability: Requires a charging base which may not be ideal for travel.
Customer Reviews
Customers generally praise the Philips Sonicare AirFloss Pro for its ease of use and effectiveness in removing plaque. Many appreciate the multiple pressure settings and the convenience of interchangeable nozzles. However, some users find it slightly more expensive than expected and note that it can be a bit bulky for travel.
Most Common Complaints
- Noise Level: Some users find it too loud during operation.
- Cost: Higher price point compared to traditional flossing tools.
Faqs
How does the Philips Sonicare AirFloss Pro work?
Is the Philips Sonicare AirFloss Pro easy to use?
How long does the battery last on a single charge?
Can I use the Philips Sonicare AirFloss Pro with just air?
How do I clean and maintain my Philips Sonicare AirFloss Pro?
Is the Philips Sonicare AirFloss Pro suitable for people with tight spaces between their teeth?
Can multiple people share the same Philips Sonicare AirFloss Pro unit?
What are some common issues with the Philips Sonicare AirFloss Pro and how do I troubleshoot them?
Is there any warranty or support provided by Philips for this product?
How does it compare to traditional flossing methods in terms of effectiveness?
Leave a Comment