Pioneer Air Conditioner PYR009AZFRVBKE Owners Manual
Content

Pioneer Air Conditioner PYR009AZFRVBKE Introduction
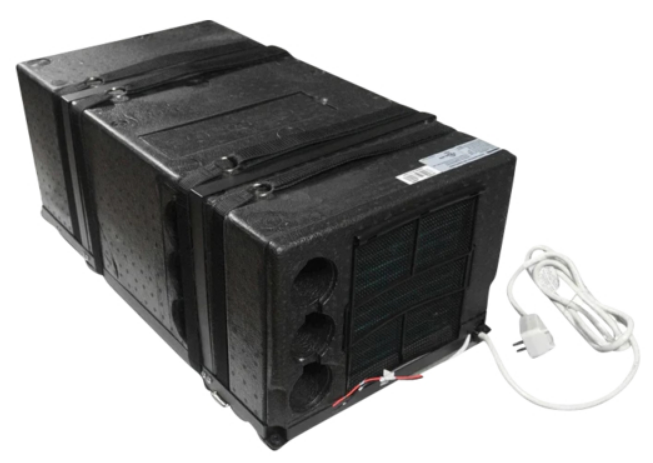
Compact and effective, the Pioneer Air Conditioner PYR009AZFRVBKE is a cooling machine that works well in tiny rooms to regulate temperature. This air conditioner combines great performance with energy efficiency and has a sleek, modern style. To improve comfort and air quality, it has features such a user-friendly remote control, adjustable cooling settings, and superior air filtration. The PYR009AZFRVBKE is perfect for use in homes or small offices as it provides dependable and steady cooling to maintain a comfortable atmosphere.
Technical Specifications
*All measurements in inches


| Description | Unit of Measurement | Model Number |
| PYR009AZFRVBKE | ||
| Refrigerant Type/Amount | See System Nameplate | |
| Cooling Capacity | BTU/hour | 9000 |
| Heating Capacity | BTU/hour | 9000 |
| Cooling Operational Consumption | Amps - Watts | 8.8 - 995 |
| Heating Operational Consumption | Amps - Watts | 7.2 - 810 |
| Breakaway Current | Amps | 20 (150ms) |
| Additional Heating Element | Watts | / |
| Electricity Supply | Volts - Hertz | 115 - 60 |
| Protection Class | IP | X5 |
| Maximum Treated Air Volume | CFM | 206 |
| Maximum Volume (Recommended with Insulated Walls) | 3 ft | 1060 |
| Weight | lbs | 61.29 |
| E.E.R. | - | 2.5 |
| C.O.P. | - | 2.6 |
| Ventilation | Speed No. | 3 |
| Operating Temperature | ˚F | 19.4 - 104 |
OPERATIONAL INSTRUCTIONS
Description and Illustration of the Machine
The purpose of this machine is to provide greater control of the air temperature within the vehicle that it is installed (such as motor homes, caravans, recreational vehicles, etc.). When the ambient outdoor temperature is hot and humid, it can supply the vehicle with cool and dehumidified air via the refrigeration cycle.
It can also run this process in reverse, to supply heated air into the vehicle, whether as a supplement, or replacement for the vehicle’s original heating system. In both instances, the setting of the desired air temperature is configurable by the user.
The system is composed of: (A) Compressor, (B) Condenser, (D) Evaporator, (F) 4-Way Valve, and Pressurized Refrigerant R410a.
Cooling Mode
Description of Operation: By changing the physical state from liquid to gas, the refrigerant heats or cools the components through which it passes. The air that is drawn into the system (the “return air”) by the fan blower (C) flows through the evaporator which has been made signficantly cold. The air then comes out cooled and removed from humidity (the “supply air”). This process repeated continuously over a long period of time leads to a reduction in the air temperature and humidity levels inside the vehicle. Heating Mode
Description of Operation: The method of heating is quite similar to that of cooling, however, the process occurs in reverse. The refrigeration cycle is reversed by the 4-way valve switching over (F). The internal coil becomes the condenser rather than the evaporator, thereby heating the air that passes through it. This process takes more standby time as the internal coil spends a few minutes heating up to begin working, in addition to periodic defrost cycles from the machine.

Best Practices for Optimal Performance
 For best results, the following tips are given in order to improve the output and efficiency of the machine:
 Increase the vehicle’s insulation amount by sealing off openings and covering glass surfaces with reflective or blackout curtains.
 - When running the machine, select the desired temperature and fan speed and ensure that the air vents are oriented in a suitable and proper direction.
- Avoid the frequent opening of doors and/or windows when not necessary.
- To prevent mechanical malfunctions and minimize the risk of personal injury, ensure that the following precautions are abided by:
 Avoid obstruction of the ventilated air inlet. Do not cover with a cloth, paper, etc.
 - Do not put hands or insert fingers into any of the machine’s openings.
- Do not spray water into or onto the surface of the machine.
- Keep flammable substances and objects 3 feet or more away from the machine.
- Clean the machine’s air filters periodically.
Description of the Controls
Selecting the Functional Mode: Press the MODE button to cycle between the available states on the machine. After two seconds have elapsed, the system will confirm the selection with an audible beep from the machine’s speaker. Always point the remote controller toward the wall pad when sending commands to ensure the best reception.
NOTE: When first switching on the system, the machine will stay in standby mode for a few minutes before the compressor begins operating.

X = Reserved/No Current Function
Automatic Mode Operation
In AUTO mode, the system manages the compressor, heat pump, and fan speeds entirely autonomously by comparing the set temperature with the current internal temperature as given in the following table:
| Internal Temperature | Operating Mode | SetPoint |
|---|---|---|
| T68°F | Heating, Ventilation | 68°F |
| 68°F < T < 77°F | Dehumidification, Ventilation | 72°F |
| T ≥ 77°F | Cooling | 77°F |
On the AUTO speed setting the ventilation, speed is set according to the difference in temperature between the setpoint and the current ambient temperature.
Automatic Mode Button Control:
 Press the On/Off button to switch the machine on or off
 Press the Change Mode button to select AUTO mode
 The temperature selection buttons are disabled in this mode
 Press the fan speed button to select low, medium, high, or automatic fan speed

- Set temperature is selected based on the conditions given in the setpoint table on this page.
- The selected configuration will be retained in the system’s memory when it is switched on again next.
Cooling Mode Operation
Cooling Mode Button Control: See page 3 for an explanation of Cooling Mode functionality.
- Press the On/Off button to switch the machine on or off
- Press the Change Mode button to select COOL mode
- Use the temperature selection buttons to select a set point between 64 and 86°F.
- Press the fan speed button to select low, medium, high, or automatic fan speed

The selected configuration will be retained in the system’s memory when it is switched on again next.
Dehudification Mode Operation
Dehumidification Mode Button Control: Dehumidification mode is a limited function that can help reduce the humidity/moisture of the room. However, this system is not intended for use as a dedicated dehumidifier and so this mode should not be left running for very long periods of time.
- Press the On/Off button to switch the machine on or off
- Press the Change Mode button to select DEHUDIFICATION mode
- Use the temperature selection buttons to select a set point between 64 and 86°F.
- Fan speed selection button is disabled in this mode.

The selected configuration will be retained in the system’s memory when it is switched on again next.
Ventilation Mode Operation
Ventilation Mode Button Control: Fan-only mode is used to set the system to use only air ventilation and no heating or cooling.
- Press the On/Off button to switch the machine on or off
- Press the Change Mode button to select VENTILATION mode
- Use the temperature selection buttons to select a set point between 64 and 86°F.
- Press the fan speed button to select low, medium, high, or automatic fan speed

The selected configuration will be retained in the system’s memory when it is switched on again next.
Heat Pump Mode
Heating Mode Button Control: See page 3 for an explanation of Heating Mode functionality.
- Press the On/Off button to switch the machine on or off
- Press the Change Mode button to select HEAT PUMP mode
- Use the temperature selection buttons to select a set point between 64 and 86°F
- Press the fan speed button to select low, medium, high, or automatic speed

The selected configuration will be retained in the system’s memory when it is switched on again next.
Night Mode Operation
Night Mode Button Control: Night mode is generally meant for periods of lower cooling requirements, such as during typical sleeping hours. This mode will result in decreased energy use, and can only be activated via remote control.
- Press the On/Off button to switch the machine on or off
- Press the Change Mode button to select the desired operation mode
 Press the night mode button to turn this feature on or off
- Use the temperature selection buttons to select a set point between 64 and 86°F
- The system automatically keeps the fan speed to low when using this mode

The selected configuration will be retained in the system’s memory when it is switched on again next.
Timer On and Timer Off Mode Operation
How to Configure the Timer Off Feature:
- Press the On/Off button to switch the machine on
- Press the Change Mode button to select the desired operation mode
- Use the temperature selection buttons to select a set point between 64 and 86°F.
- Press the fan speed button to select low, medium, high, or automatic fan speed
 Press the Timer Off button to set the time at which the system turns itself off
- Use the temperature selection buttons to modify the time value selection
- Press the Timer Off button to confirm the selections entered
- Pressing the Timer Off button once more will deactivate the feature
When the Timer Off button is first pressed, the symbol on the display will be flashing to signify the switch-off feature is being set. Pressing it once more will confirm the data entered, and the icon will remain solid to indicate that Timer Off is set. Pressing it a third time deactivates the Timer Off function.
How to Configure the Timer On Feature:
- The system must currently be off to configure the Timer On function
- Press the Timer On button to set the time at which the system will come on
- Use the temperature selection buttons to modify the time value selection
- Press the Timer On button once more to confirm, the selections entered
- Pressing the Timer On button for the third time will deactivate the feature

When the Timer Off button is first pressed, the symbol on the display will be flashing to signify the switch-off feature is being set. Pressing it once more will confirm the data entered, and the icon will remain solid to indicate that Timer Off is set. Pressing it a third time deactivates the Timer Off function.
The system starts in AUTO mode at the time of Timer On activation.
Handling the Remote Controller
Installing/Changing the Remote Controller Batteries:
- Remove the rear battery cover
- If there are already batteries installed, remove them and insert two fresh AAA size batteries, ensuring to pay attention to the direction of their polarities (+/-).
- Slide the rear battery cover of the remote back into place.
- Check that the remote works properly by pressing the ON button. If on pressing the ON button no icon appears on the display, re-install the batteries and confirm that they are new and have been placed in the correct orientation
The system is now ready to be controlled.

Description of the Wall Controller
Introduction to the Wall Controller Buttons

- Signal Receiver
Aim the remote at this location for best results. - ON/OFF Button
Use this button to switch the system On or Off. It will start using the memory of the previous settings. - MODE Button
Use this button to change the operating mode of the system. - FAN Button
Use this button to select the desired fan speed. - Up/Down Buttons
Use these two buttons to configure the desired temperature. - Functional LED Display
This will tell you the current setpoint temperature setting.
After 10 seconds have elapsed, this will begin showing the current room temperature. Once 1 minute has elapsed, the display will turn off.
Routine Maintenance
Periodic Cleaning Methods
- Using a soft and moist cloth, wipe down the surface area of the machine periodically in order to remove dust. Use clean water or a non-aggressive detergent if necessary. Do not use petrol or solvents to clean the machine.
- Repeat this process every season. Remove the air filters and wash gently by hand with a detergent solution, allowing it to dry before inserting back into place. Repeat this process every 30-45 days.
If an optional active carbon filter is installed, it is advised to replace them yearly.


Checking Best Practices
- Periodically inspect the system, particularly the points of drainage, as well as the air intake points.
- Ensure that the system is able to drain successfully. If there are any sort of clogs, clear the blockage before continuing to operate the system.
Confirm that there are no obstructions in the floor openings. For best performance, it is important that the condenser-side return air can enter and exit the system without any restrictions.

Getting Started
Installation should only be performed by those with sucient technical knowledge. In addition, the proper tools and equipment should be used for the installation process, to ensure the safety of themselves and those nearby.
Unpacking and Handling the System
Observe and follow any special instructions or warnings present on the outer packaging before attempting to handle the system.

Using equal force on both sides, lift the machine out of the box.

Lift the machine by using only the handles or the belts on the base.

When resting the system on a surface, assure to distribute the weight of the machine by supporting it on both sides equally.

Seek the help of an additional person to assist in transferring the system to the final place of installation, being sure to do so slowly and carefully.

Selecting the Location of Installation
- In order for the machine to properly provide uniform climate control in the vehicle, it should be installed as close to the center as possible, inside a housing/compartment.
- Position the machine so as to ensure ease of access and facilitation of both installation and disassembly.
- Place the template used for assembly within the compartment intended for installation and verify the available space for the needed openings in the Door.
- Avoid the frequent opening of doors and/or windows when not necessary.
- In order to minimize transmission of noise and/or vibration during operation, the machine must have a minimum clearance of 1 inch away from walls and Fittings on either side.
- The machine must be installed on the Door, and as horizontally level as possible.
- To allow for ease of Tlter replacement, keep a distance of 8 inches from the front of the machine and the interior wall of the compartment.

- If incorporating any external compartments (such as false bottoms), the air that is to be treated must be drawn in from the vehicle’s passenger compartment.
- Drawing in the air from outside can negatively impact the performance of the system significantly.
Preparation of Floor Openings and Unit Fastening
Clearances and Procedure for Securing the System
Installation of the machine involves creating openings in the oor. ese openings must not be covered or obstructed by parts of the chassis frame or similar fixtures. It is also important to block the openings from splashes coming from the wheels, using a splash guard or something similar if necessary. Take special care to ensure a gap of at least 1 inch is left between the machine and its adjacent walls. Use the provided kit to secure the machine to the interior.
Bottom View *All measurements in inches

- The machine must be installed completely level. ere is a maximum angle of 10° to prevent condensation leakage.
- Prior to cutting the holes, verify that there are no cables, gas pipes, or parts of the chassis frame or similar Extures underneath or hidden below.
Seal the machined surfaces of the floor openings with water-repellant solutions. The provided kit is used to secure the machine to the interior floor.

Securing the System to the Floor
The following pieces of hardware (included) will be used to fix the system to the floor:

There are three different methods of fixing the system to the floor using different combinations of the above hardware, depending on preference, explained later.
Preparing the Bottom Openings
(Top View): *All measurements in inches

KEEP AT LEAST 1 INCH BETWEEN THE UNIT AND THE SURROUNDING WALLS
- Use the included template as depicted above to mark the locations of the openings.
- Carefully cut out the openings at the bottom using a reciprocating saw or another cutting tool.
- Drill out the necessary 2”-1/4 diameter condensate drainage hole using a hole saw.
- Mark the locations of the fastening screws and the brackets using the above template after selecting the desired method of fixing the system to the floor.
(Optional) Creating a Side Cutout for Optimal Efficiency If possible, create an additional cutout on the side of the housing/compartment as depicted below, in order to increase the efficiency at which the system operates. This process is recommended but is not necessary/required.
Installation of the Side Cutout Opening
*All measurements in inches

Bottom Side/Corner of Housing Remove the side cover EPP cap, and prepare the air outlet by using adhesive foam to insulate around in preparation for sealing.

Cut out the side hole using the given measurements above at the proper location using a reciprocating saw or another cutter.

Fix the grille into place on the newly made side cutout.

The newly made cutout is ready for system installation.

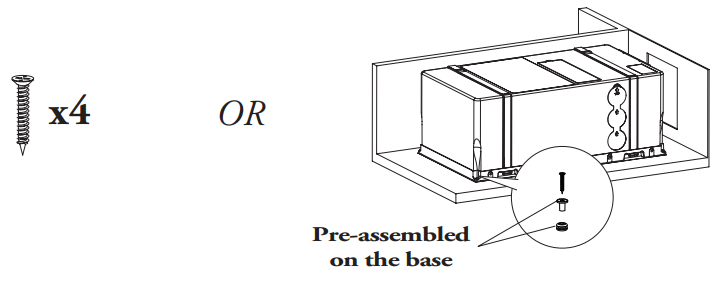
Fastening the System Into Place
Three Methods Are Available for Fastening:
- Use the given screws to fix the system directly onto the pre-assembled spacers on the base
- Use the given screws and brackets to fix the belts into place, which are used to strap the system
Use the given screws and washers to fix the belts into place, which are used to strap the system
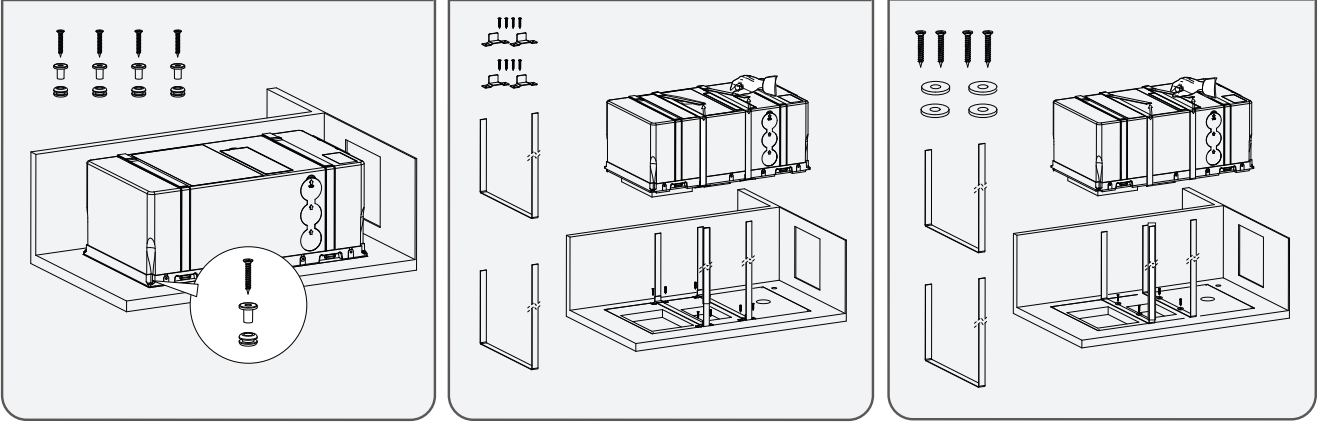
Select the method that works best for the installation and proceed.
Use the given screws to fix the system directly onto the pre-assembled spacers on the base.
Use the given screws and brackets to fix the belts into place, which are used to strap the system.
Use the given screws and washers to fix the belts into place, which are used to strap the system.

Placement of the Wall Thermostat
Locate the wall thermostat, handheld remote controller, batteries, thermostat support bracket, and extension cable. These items are typically found within the hidden compartment on top of the system itself during the first installation.

A 3/4” size hole must be drilled in order to pass the cables through. The wall thermostat cable will pass through this hole from behind. To locate where to make the hole, first nd the needed X value by placing the 3”-3/8 square wall thermostat against the wall. The length from the side edge of the thermostat to the side edge of the wall is X. e same applies to finding Y on the vertical axis. The center of the hole will be X+1”-3/4 inward from the side, and Y+1”-1/8 inward from the top.

Using two wood screws to fix the bracket of the thermostat to the wall, connect the extension cable to the wall thermostat and place the thermostat onto the support bracket.

Recirculation Air Compartment Opening
Final Cutout Opening for Recirculation Air:
Create an additional hole in the compartment where the system is installed, in order to permit recirculation of the internal air.

It would be best to locate the cutout near the front of the machine. If the opening cannot be made near the machine, ensure that the airflow is not obstructed by anything and create an air duct between the opening and the machine, if necessary.
The cutout should be roughly 50 in 2 in size, and the hole will be closed with a grille supplied.
Only allow this recirculation air to enter the compartment from within the passenger section. If the air entering this opening is from the outside, the performance of the machine would diminish.
Finally, install the condensation drain tubes provided with the system onto the bottom ports.
Air Ducting
Ductwork Best Practices:
Craft the ducting used to distribute the air using trade parts that are not included with this system supply.
It is advised to use a cardboard pipe for air conditioning, with an aluminum core and external PVC covering.
The nominal Inner Diameter should be sized up to 2”-3/8, and the Outer Diameter up to 2”-1/2.
The tapered hole on the air outlet allows the ventilation ducts to be joined by pressing them together.
Use either the outlet on the coil side of the side outlet (by removing the guard and closing the front holes) to connect the ducts.

For optimal efficiency, it is advised to:
- Route the air ducts as short and flat as possible.
- Do not exceed 16 ft in duct length.
- void laying the air ducts near any sources of heat.
Avoid condensation on the ducting by insulating the pipes with insulation material (sold separately).
Electrical Hookup

Connection and Powering Up of System:
Connect the receiver extension socket to the system, and power up the machine by inserting the included power plug into a 115V/60Hz outlet. A 12 VDC connection is also connected from the vehicle’s battery to supply power to the unit’s PCB.
Use the yellow wire next to the AC power cord to connect to the vehicle battery to facilitate power to the heat pump system’s command control module.
Before switching on, ensure that the electrical supply and the extension used are capable of withstanding the power input required by the system (see technical data and/or nameplate).
The installation process is now complete. For any troubleshooting steps, please see Page 22.
Simplified Wiring Diagram of PYR009AZFRVBKE
Electric Diagram

Special Supplemental Maintenance: For optimal efficiency, it is recommended to have your dealer/contractor perform designated cleaning prior to use, on the heat exchange coils and the condensation drain holes.
Setup Guide
To set up the Pioneer Air Conditioner PYR009AZFRVBKE, follow these steps:
- Place the unit in a suitable location, making sure there is enough space around it for proper airflow.
- Connect the unit to a power source and turn it on.
- Select the appropriate cooling mode and fan speed using the remote control or digital display.
- Set the temperature to your desired level.
- Use the 24-hour timer and programmable settings to schedule the unit as needed.
Safety Information
CAUTION - Read Before You Proceed
Read and Understand All Safety Precautions Prior to Installation
For safe operation, it is imperative that the following rules are obeyed:
- This appliance can only be used by children aged 8 years and above, or by persons with reduced physical, sensory, or mental capabilities, or persons with lack of experience and knowledge, if they have been given supervision or instructions concerning usage of the appliance in a safe way and understand the potential hazards involved.
- Children shall not play with this appliance. Proper cleaning and user maintenance shall not be done by children without supervision.
- If the supply cord is damaged, it must be replaced by the manufacturer, a certified service agent, or other qualified persons to avoid a hazard.
- The appliance shall have a full disconnect switch in the hardware configuration in accordance with the national electrical standards.
Electrical Danger

Failure to abide by the manufacturer's cautions can result in property damage, personal injury, and/or death.
WARNING: The Manufacturer Is Not Liable For the Following:
- Units that have sustained damage due to improper installation or have been connected with an incorrect voltage. Abide by the installation instructions fully and completely to prevent unexpected malfunctions.
- Products that have had extra Modi cations, where written consent was not provided by the manufacturer.
- Product usage in a way that is not the intended purpose as described in this operating instruction manual.
- Any sort of collateral damage to property or injury to nearby persons caused by failure of the product.
- Improperly grounded products. the product must be properly grounded at the time of installation, else electrical shock may occur.
- Incorrect configuration of drainage. Install drainage channels according to the instructions in this manual. Improper drainage may cause water damage to your vehicle and property.
![]() Note about Fluorinated Gasses and Operation of the System
Note about Fluorinated Gasses and Operation of the System
- This air-conditioning unit contains urinated gasses. For specific information on the type of gas and the amount, please refer to the relevant label on the unit itself.
- Installation, service, maintenance, and repair of this unit must be performed by a certified HVAC technician, or qualified personnel familiar with the risks of handling refrigerants and regulations of air conditioner systems.
- Product uninstallation and recycling must be performed by a certified HVAC technician.
- Do not use the system near combustible objects or ammable aids. Keep a distance of at least 2 feet from other nearby appliances. If a reoccurs, a proper extinguishing agent, rather than water, must be used.
- When the unit is being checked for leaks, proper logging and record-keeping of all checks by certified personnel are strongly recommended. Refrigerant must never be released into the air, a proper recovery device should be used.
- The system and/or its internal moving parts should not be touched, poked, or prodded during operation.
Scope and Purpose of this Manual
This manual has been specifically compiled by the manufacturer and is an essential component of the machine. The information contained within can guarantee proper usage of the machine if observed and followed carefully. Sections I and III are intended to provide helpful instructions and knowledge to the end-user. Section II is intended to instruct the installer, who should be a person that possesses expert knowledge and experience in this eld of work. Where applicable, some portions of text may be accompanied by certain symbols, that of which can be understood by referencing the below table:
 This symbol indicates a potential source of danger.
 - This symbol indicates useful information or a helpful tip.
 This symbol indicates information on being environmentally friendly. Model Number and Technical Details Identification
Interpreting the Rating Label

Troubleshooting
Troubleshooting and Diagnosis
| MALFUNCTION | POSSIBLE CAUSES |
| If the appliance is not cooling... | The current temperature is lower than 64°F |
| The setpoint temperature has been satisfied | |
| The external fan is defective | |
| The MODE button is not in the right position | |
| If the appliance is not heating... | The current temperature is higher than 86°F |
| The setpoint temperature has been satisfied | |
| Damaged/Stuck 4-Way Valve | |
| The MODE button is not in the right position | |
| The heat exchanger coils are dirty | |
| Damaged/Stuck 4-Way Valve | |
| The MODE button is not in the right position | |
| If the airflow is insufficient or no longer circulates inside the vehicle... | The heat exchanger coils are dirty |
| The internal/interior fan is malfunctioning | |
| The air filter is dirty/obstructed | |
| If there is water seeping into the vehicle... | The condensate drain hose is cracked, clogged, or is not secured onto the exhaust port |
| If the machine does not start... | Defective thermal protection |
| Damaged Compressor | |
| There is insufficient power going into the unit | |
| The voltage is too low (less than 100V) | |
| The electric condenser is damaged/malfunctioning | |
| If the machine stops working... | A defective thermistor or thermal protection |
| The heat exchanger coils are dirty | |
| The external fan is defective | |
| The voltage is too low (less than 100V) | |
| The electric condenser is damaged/malfunctioning |
Pros & Cons
Pros
- High-performance cooling capacity
- Energy-efficient with an EER rating of 11.2
- Customizable cooling with three fan speeds and three cooling modes
- Sleep mode and follow-me function for comfortable sleeping
- Remote control and digital display for easy operation
- 24-hour timer and programmable settings for convenience
- Washable filter and auto restart function for easy maintenance
Cons
- May be too loud for some users
- May not cool very large rooms effectively
Customer Reviews
Customers have praised the Pioneer Air Conditioner PYR009AZFRVBKE for its high-performance cooling and energy efficiency. They have also appreciated its customizable cooling options, sleep mode, and follow-me function. However, some users have complained about the unit's noise level, especially on the highest fan speed. Others have noted that the unit may not cool very large rooms effectively. Overall, the Pioneer Air Conditioner PYR009AZFRVBKE has received positive reviews for its features and performance.
Faqs
How big is the Pioneer air conditioner?
What is the Pioneer PYR009AZFRVBKE's cooling capacity?
Does the from Pioneer include a heating feature?
What is the Pioneer Air Conditioner energy efficiency rating?
Does the Pioneer require expert installation?
Does the unit have a programmable timer?
What is the Pioneer PYR009AZFRVBKE's noise level?
What is the recommended servicing frequency for the Pioneer?
Is it possible to combine the Pioneer PYR009AZFRVBKE with another heating system?
What is the Pioneer Air Conditioner PYR009AZFRVBKE's warranty?
Leave a Comment