Noco Multi-Bank Series Battery Jumper User Manual | Specs & features
Content
Introduction
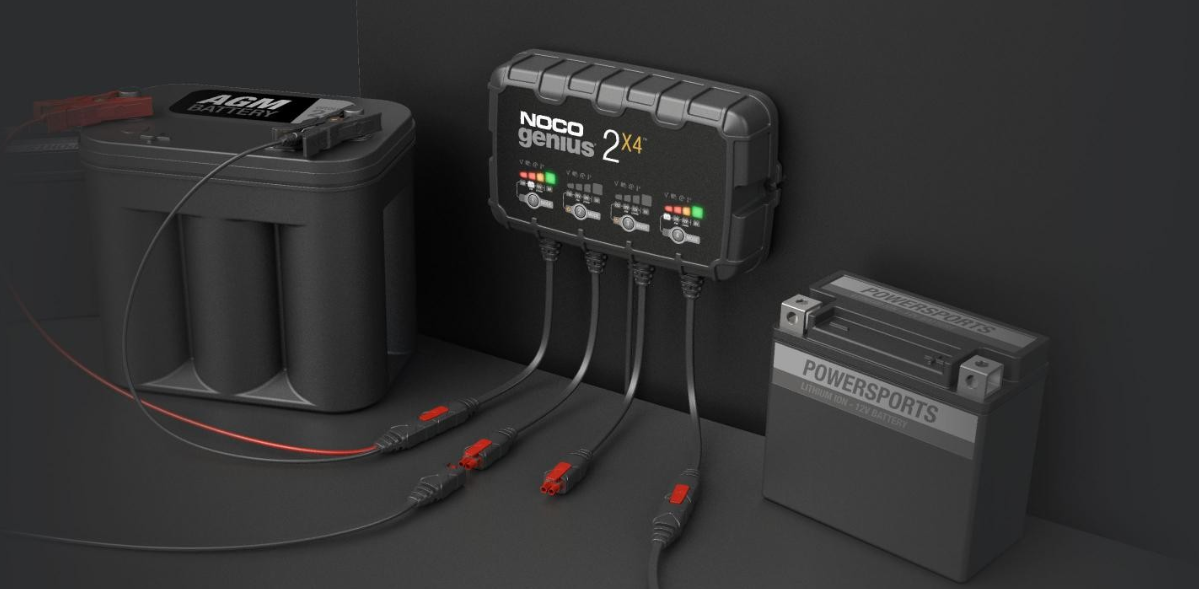
The noco Multi-Bank Series Battery Jumper is a versatile and powerful device designed to jump-start dead batteries in various vehicles, including cars, trucks, boats, and RVs. With a sleek and compact design, this jumper is easy to store and carry around. The estimated price of the noco Multi-Bank Series Battery Jumper is around $100 to $150, and it is now available in the market.
Technical Specifications
| Specification | GENIUS2X2 | GENIUS2X4 |
|---|---|---|
| Input Voltage AC | 100-240 VAC, 50-60Hz | 100-240 VAC, 50-60Hz |
| Working Voltage AC | 100-240 VAC, 50-60Hz | 100-240 VAC, 50-60Hz |
| Output Power | 30x2 W Max | 30x4 W Max |
| Charging Voltage | Various | Various |
| Charging Current | 2A (12V), 2A (6V) | 2A (12V), 2A (6V) |
| Low-Voltage Detection | 1V (12V), 1V (6V) | 1V (12V), 1V (6V) |
| Back Current Drain | <5mA | <5mA |
| Ambient Temperature | -20°C to +40°C | -20°C to +40°C |
| Type of Batteries | 6V & 12V | 6V & 12V |
| Battery Chemistries | Wet, Gel, MF, CA, EFB, AGM, Lithium | Wet, Gel, MF, CA, EFB, AGM, Lithium |
| Banks | 2 | 4 |
| Battery Capacity | Up to 40Ah, Maintains All Battery Sizes | Up to 40Ah, Maintains All Battery Sizes |
| Housing Protection | IP60 | IP60 |
| Cooling | Natural Convection | Natural Convection |
| Dimensions (L x W x H) | 4.4 x 5.1 x 1.9 Inches | 5.7 x 9.4 x 2.3 Inches |
| Weight | 1.1 Pounds | 3.9 Pounds |
How To Use
Charging Modes
The Genius Multi-Bank has six (6) modes: Standby, 12V, 12V AGM, 12V LITHIUM, 6V and Force. Some charge modes must be pressed and held for three (3) to five (5) seconds to enter the mode. These “Press and Hold” modes are advanced charging modes that require your full attention before selecting. It is important to understand the differences and purpose of each charge mode. Always check with battery manufacturer to confirm the right charge mode for your specific battery. Do not operate the charger until you confirm the appropriate charge mode for your battery. Below is a brief description:
| Mode | Explanation |
|---|---|
| Standby | In Standby mode, the charger is not charging or providing power to the battery. Energy Save is activated during this mode, drawing microscopic power from the electrical outlet. Canbus is enabled in Standby mode. When in Standby, the orange Standby LED will illuminate. |
| No Power | |
| 12V | For charging 12-volt Wet Cell, Gel Cell, Enhanced Flooded, Maintenance-Free and Calcium batteries. When selected, the 12V white LED will illuminate. 14.5V |
| 12V AGM | For charging 12-volt AGM batteries. When selected, the 12V AGM white LED will illuminate. 14.8V |
| 12V LITHIUM | For charging 12-volt lithium-ion batteries, including lithium iron phosphate. When selected, the 12V Lithium blue LED will illuminate. For use on batteries with Battery Management Systems (BMS) only. 14.6V |
| 6V Press & Hold (3 Seconds) | For charging 6-volt Wet Cell, Gel Cell, Enhanced Flooded, Maintenance-Free and Calcium batteries. When selected, the 6V white LED will illuminate. 7.25V |
| Force Mode Press & Hold (5 Seconds) | For charging batteries with a voltage above 1V. Press and Hold for five (5) seconds to enter Force Mode. The selected charge mode will then operate under Force Mode for five (5) minutes before returning to standard charging in the selected mode. 2A |
- Using 6V [Press & Hold for 3 seconds]
6V charge mode is designed for 6-volt lead-acid batteries only, like Wet Cell, Gel Cell, Enhanced Flooded, Maintenance-Free and Calcium batteries. Press and hold for three (3) seconds to enter 6V Charge Mode. Consult the battery manufacturer before using this mode. - Using 12V Lithium
12V Lithium charge mode is designed for 12-volt lithium-ion batteries only, including lithium iron phosphate.
CAUTION: USE THIS MODE WITH EXTREME CARE. THIS MODE SHOULD ONLY BE USED WITH 12-VOLT LITHIUM BATTERIES THAT HAVE A BUILT-IN BATTERY MANAGEMENT SYSTEM (BMS). LITHIUM-ION BATTERIES ARE MADE AND CONSTRUCTED IN DIFFERENT WAYS AND SOME MAY OR MAY NOT CONTAIN A BATTERY MANAGEMENT SYSTEM (BMS). CONSULT THE LITHIUM BATTERY MANUFACTURER BEFORE CHARGING AND ASK FOR RECOMMENDED CHARGING RATES AND VOLTAGES. SOME LITHIUM-ION BATTERIES MAY BE UNSTABLE AND UNSUITABLE FOR CHARGING.
Force Mode [Press & Hold for 5 seconds]
Force mode allow the charger to manually begin charging when the connected battery’s voltage is too low to be detected. If battery voltage is too low for the charger to detect, press and hold the mode button for 5 seconds to activate Force Mode, then select the appropriate mode. All available modes will flash. Once a charge mode is selected, the Charge Mode LED and Charge LED will alternate between each other, indicating Force Mode is active. After five (5) minutes the charger will return to the normal charge operation and low voltage detection will be reactivated.
CAUTION: USE THIS MODE WITH EXTREME CARE, FORCE MODE DISABLES SAFETY FEATURES AND LIVE POWER IS PRESENT AT THE CONNECTORS. ENSURE ALL CONNECTIONS ARE MADE PRIOR TO ENTERING FORCE MODE, AND DO NOT TOUCH CONNECTIONS TOGETHER. RISK OF SPARKS, FIRE, EXPLOSION, PROPERTY DAMAGE, INJURY, AND DEATH.
Connecting to the Battery
Do not connect the AC power plug until all other connections are made. Identify the correct polarity of the battery terminals on the battery. The positive battery terminal is typically marked by these letters or symbol (POS,P,+). The negative battery terminal is typically marked by these letters or symbol (NEG,N,-). Do not make any connections to the carburetor, fuel lines, or thin, sheet metal parts. The below instructions are for a negative ground system (most common). If your vehicle is a positive ground system (very uncommon), follow the below instructions in reverse order.
- Connect the positive (red) battery clamp or eyelet terminal connector to the positive (POS,P,+) battery terminal.
- Connect the negative (black) battery clamp or eyelet terminal connector to the negative (NEG,N,-) battery terminal or vehicle chassis.
- Connect the battery charger into a suitable electrical outlet. Do not face the battery when making this connection.
- When disconnecting the battery charger, disconnect in the reverse sequence, removing the negative first (or positive first for positive ground systems).
Begin Charging
- Verify the voltage and chemistry of the battery.
- Confirm that you have connected the battery clamps or eyelet terminal connectors properly and the AC power plug is plugged into an electrical outlet.
- [First time use] The charger will begin in Standby mode, indicated by an orange LED. In Standby, the charger is not providing any power.
- Press the mode button to toggle to the appropriate charge mode (press and hold for three seconds to enter an advanced charge mode) for the voltage and chemistry of your battery.
- The mode LED will illuminate the selected charge mode and the Charge LEDs will illuminate (depending on the health of the battery) indicating the charging process has started.
- The charger can now be left connected to the battery at all times to provide maintenance charging.
- Auto-Memory: The charger has built in auto-memory and will return to the last charge mode when connected. To change modes after the first use, press the mode button.
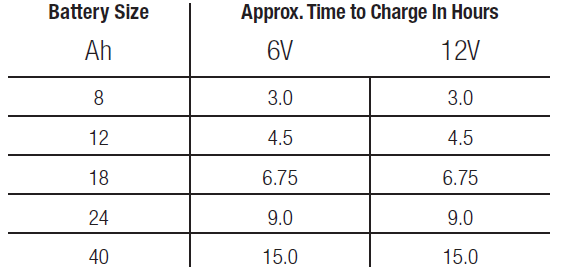
Charging Times
The estimated time to charge a battery is shown below. The size of the battery (Ah) and its depth of discharge (DOD) greatly affect its charging time. The charge time is based on an average depth of discharge to a fully charged battery and is for reference purposes only. Actual data may differ due to battery conditions. The time to charge a normally discharged battery is based on a 50% DOD. Temperature will also impact charging times. The Genius Multi-Bank features thermal compensation that automatically adjusts charging profiles to maximize charging performance.
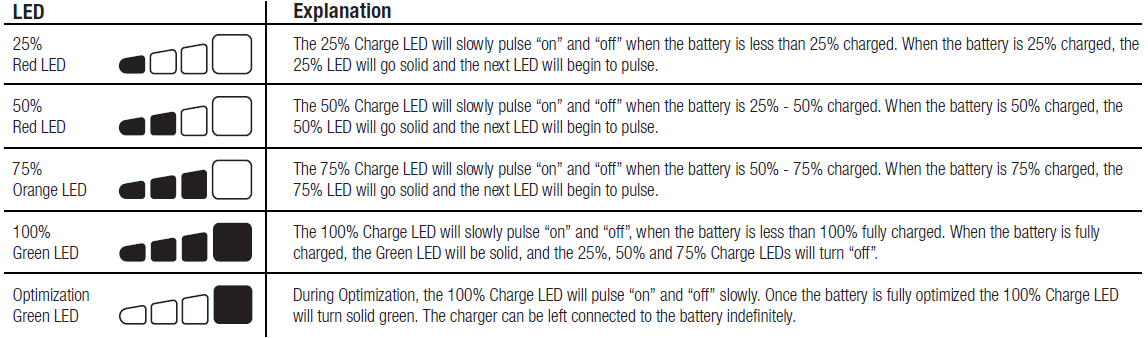
Understanding Charge LEDs
Understanding Error LEDs
Error Conditions will be indicated by the following LEDs.

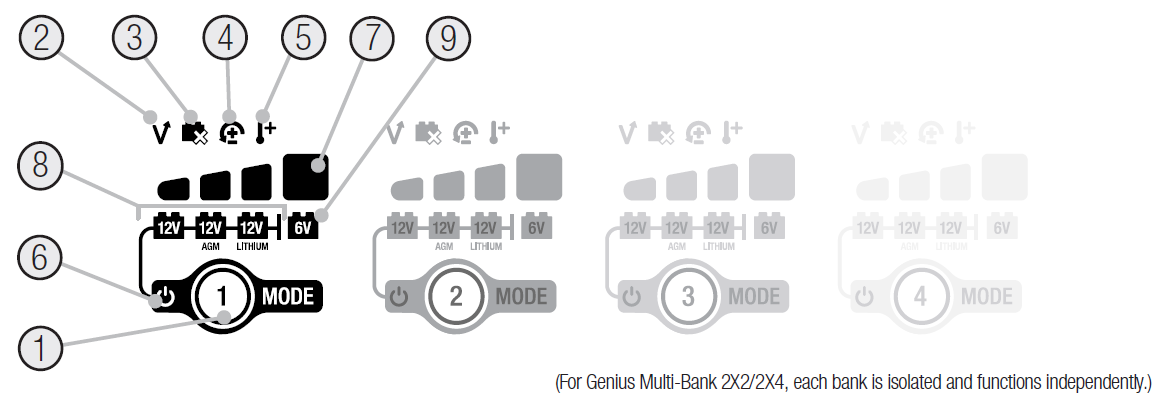
- Mode Button Push to cycle through charging Modes.
- Overvoltage Error LED Illuminates solid Red; Battery Voltage is above Protect voltage.
- Bad Battery Error LED Illuminates solid Red when connected battery will not hold a charge.
- Reverse Polarity Error LED Illuminates solid Red when reverse polarity is detected.
- Hot/Cold LED Illuminates solid Red when internal temperature is too high. Flashes Red (Along with 2. 3. 4. Error LEDs) when internal temperature is too low.
- Standby LED Illuminates when the charger is in Standby Mode, the charger is not charging or providing any power to the battery.
- Charge LED indicates the connected battery(s) state-of-charge.
- Mode LED Indicates the Charge Mode the charger is currently in. Push the MODE button to cycle through charge Modes.
- [Press and Hold] Mode LED Mode button must be pressed and held for 3 seconds to enter the mode.
Warranty
NOCO warrants that this product (the “Product”) will be free from defects in material and workmanship for a period of Three (3) years from the date of purchase (the “Warranty Period”). For defects reported during the Warranty Period, NOCO will, at its discretion, and subject to NOCO’s technical support analysis, either repair or replace defective products. Replacement parts and products will be new or serviceably used, comparable in function and performance to the original part and warranted for the remainder of the original Warranty Period.
Description
The noco Multi-Bank Series Battery Jumper is a must-have tool for any vehicle owner. Its compact and lightweight design makes it easy to store and carry around. The device has a user-friendly interface, with clear and easy-to-read indicators and buttons. The jumper cables are durable and have spark-proof technology, ensuring safe and efficient connections. The device also has a built-in safety feature that prevents reverse polarity, protecting both the device and the vehicle's battery. The 12-volt power bank and USB port are convenient for charging devices on the go, while the air compressor and LED flashlight are practical and useful in various situations.
Setup Guide
To use the noco Multi-Bank Series Battery Jumper, follow these steps: 1. Make sure the device is fully charged before use. 2. Connect the jumper cables to the device and the vehicle's battery, ensuring the clamps are securely attached to the battery terminals. 3. Turn on the device and wait for the ready indicator to appear. 4. Start the vehicle and let it run for a few minutes. 5. Disconnect the jumper cables in reverse order, starting with the negative clamp. 6. Use the device's other features, such as the air compressor and LED flashlight, as needed.
Troubleshooting
If the device is not working correctly, try these troubleshooting steps: 1. Make sure the device is fully charged. 2. Check the connections and ensure the clamps are securely attached to the battery terminals. 3. Make sure the device is turned on and the ready indicator is on. 4. Check for any error codes or messages on the device's display. 5. If the device is still not working, contact noco's customer support for further assistance.
Pros & Cons
Pros
- Versatile and powerful
- Compact and lightweight design
- User-friendly interface
- Built-in safety features
- Other useful features, such as air compressor and LED flashlight
Cons
- May be expensive for some users
- May not work with some vehicles' batteries
- May take some time to charge fully
Customer Reviews
Customers have praised the noco Multi-Bank Series Battery Jumper for its versatility and ease of use. Many have appreciated its compact and lightweight design, making it easy to store and carry around. Some have noted that the device may take some time to charge fully, but overall, they have been satisfied with its performance. The device's other features, such as the air compressor and LED flashlight, have also been well-received.
Most Common Complaints
Some customers have reported issues with the device not charging fully or not working with some vehicles' batteries. Others have noted that the device may not hold a charge for a long time. However, these complaints have been relatively rare, and most customers have been satisfied with the noco Multi-Bank Series Battery Jumper's performance.
Faqs
What is the noco Multi-Bank Series Battery Jumper's starting power?
Can the noco Multi-Bank Series Battery Jumper charge other devices?
How many light modes does the noco Multi-Bank Series Battery Jumper's LED flashlight have?
Does the noco Multi-Bank Series Battery Jumper have a built-in safety feature?
Can the noco Multi-Bank Series Battery Jumper inflate tires?
How long does it take to charge the noco Multi-Bank Series Battery Jumper fully?
What is the warranty period for the noco Multi-Bank Series Battery Jumper?
Can the noco Multi-Bank Series Battery Jumper be used with motorcycles' batteries?
How long can the noco Multi-Bank Series Battery Jumper hold a charge?
Can the noco Multi-Bank Series Battery Jumper jump-start diesel engines?
Leave a Comment