Yamaha MusicCast AV Receiver RX-V683 Instruction Manual
Content
Introduction
The Yamaha MusicCast AV Receiver RX-V683 is a versatile 7.2-channel unit designed to elevate your home theater experience. It supports advanced audio formats like Dolby Atmos and DTS:X, delivering powerful surround sound with 90 watts per channel at 8 ohms. The receiver features multiple connectivity options, including six HDMI inputs and built-in Wi-Fi, enabling seamless streaming from various services. Priced at approximately $400, it combines high-quality audio performance with user-friendly setup and operation.
Specifications
Input jacks
- Analog Audio
Audio x 5 (VIDEO AUX, AV 2, AUDIO 4-5, PHONO) - Digital Audio (Supported frequencies: 32 kHz to 96 kHz)
Optical x 2 (AUDIO 1-2)
Coaxial x 2 (AUDIO 3, AV 1) - Video
Composite x 1 (AV 2)
Component x 1 (AV 1) - HDMI Input
HDMI x 6 (HDMI 1-5, VIDEO AUX) - Other
USB x 1 (USB2.0)
NETWORK x 1 (100Base-TX/10Base-T)
Output jacks
- Analog Audio
- Speaker Out x 9 (7 ch) (FRONT L/R, CENTER, SURROUND L/R,
EXTRA SP 1 L/R*1, EXTRA SP 2 L/R*2)- Note: Assignment is possible
[F.PRESENCE, ZONE2] - Note: Assignment is possible
[SURROUND BACK, ZONE2, BI-AMP]
- Note: Assignment is possible
- Subwoofer Out x 2 (SUBWOOFER 1-2, mono)
- ZONE2 OUT x 1
- Headphone x 1
- Speaker Out x 9 (7 ch) (FRONT L/R, CENTER, SURROUND L/R,
- HDMI Output
HDMI OUT x 1
Other jacks
- YPAO MIC x 1
- REMOTE IN x 1
- REMOTE OUT x 1
- TRIGGER OUT x 1
HDMI
- 4K UltraHD Video (include 4K/60, 50Hz 10/12bit), 3D Video, ARC (Audio Return Channel), HDMI Control (CEC), Auto Lip Sync, Deep Color, “x.v.Color”, HD audio playback, Selectable HDMI input in HDMI standby mode, 21:9 Aspect Ratio, BT.2020 Colorimetry, HDR Compatible
- Video Format (Repeater Mode)
- VGA
- 480i/60 Hz
- 576i/50 Hz
- 480p/60 Hz
- 576p/50 Hz
- 720p/60 Hz, 50 Hz
- 1080i/60 Hz, 50 Hz
- 1080p/60 Hz, 50 Hz, 30 Hz, 25 Hz, 24 Hz
- 4K/60 Hz, 50Hz, 30 Hz, 25 Hz, 24 Hz
- Audio Format
- Dolby Atmos
- Dolby TrueHD
- Dolby Digital Plus
- Dolby Digital
- DTS:X
- DTS-HD Master Audio
- DTS-HD High Resolution Audio
- DTS Express
- DTS
- DSD 2.8MHz 2-ch to 6-ch
- PCM 2-ch to 8-ch (Max. 192 kHz/24-bit)
- Content Protection: HDCP compatible
(HDMI 1–3: HDCP 2.2 compatible) - Link Function: CEC supported
TUNER
- Analog Tuner
- [U.K. and Europe models]
FM/AM with Radio Data System x 1 (TUNER) - [Other models]
FM/AM x 1 (TUNER)
- [U.K. and Europe models]
USB
- Capable of Mass Storage Class USB Memory
- Current Supply Capacity: 1 A
Bluetooth
- Sink Function
Source Device to AVR (ex. Smartphone/Tablet) - Source Function
AVR to Sink Device (ex. Bluetooth Headphone) - Capable of Play/Stop Operation from Sink Device
- Bluetooth Version ...........................................................Ver. 2.1+EDR
- Supported Profile
- Sink Function..................................................................A2DP, AVRCP
- Source Function .............................................................A2DP, AVRCP
- Supported Codec
- Sink Function........................................................................ SBC, AAC
- Source Function ............................................................................SBC
- Wireless Output .......................................................Bluetooth Class 2
- Radio Frequency (Operational Frequency)....2402 MHz to 2480 MHz
- Maximum Output Power (E.I.R.P)...................... 3.91 dBm (2.46 mW)
- Maximum Communication Distance................................ 10 m (33 ft)
Network
- PC Client Function
- Compatible with DLNA ver. 1.5
- AirPlay supported
- Internet Radio
- Wi-Fi function
- Capable of WPS by PIN Method and Push-Button-Method
- Capable of sharing with iOS devices by wireless connection
- Capable of Direct Connection with Mobile Device
- Available Security Method: WEP, WPA2-PSK (AES), Mixed Mode
- Wireless LAN Standards: IEEE 802.11 b/g/n
- Radio Frequency (Operational Frequency): 2412 MHz to 2472 MHz
- Maximum Output Power (E.I.R.P): 17.42 dBm (55.2 mW)
Compatible Decoding Formats
- Decoding Format
- Dolby Atmos
- Dolby TrueHD, Dolby Digital Plus
- Dolby Digital
- DTS:X
- DTS-HD Master Audio, DTS-HD High Resolution Audio,
- DTS Express
- DTS 96/24, DTS-ES Matrix 6.1, DTS-ES Discrete 6.1
- DTS Digital Surround
- Post Decoding Format
- Dolby Surround
- DTS Neo:6 Music, DTS Neo:6 Cinema
Audio Section
- Rated Output Power (2-channel driven)
(20 Hz to 20 kHz, 0.06% THD, 8 Ω)
Front L/R .............................................................................90 W+90 W
(1 kHz, 0.9% THD, 8 Ω)
[U.S.A. and Canada models]
Front L/R .........................................................................105 W+105 W
Center..........................................................................................105 W
Surround L/R ..................................................................105 W+105 W
Surround Back L/R .........................................................105 W+105 W - Rated Output Power (1-channel driven)
(1 kHz, 0.9% THD, 8 Ω)
Front L/R ............................................................................... 125 W/ch
Center.................................................................................... 125 W/ch
Surround L/R ........................................................................ 125 W/ch
Surround Back L/R ............................................................... 125 W/ch
(1 kHz, 0.9% THD, 4 Ω)
Front L/R [U.K. and Europe models].................................... 150 W/ch - Maximum Effective Output Power (1 kHz, 10% THD, 6 Ω/8 Ω)
Front L/R............................................................................ 150 W/ch
Center ................................................................................ 150 W/ch
Surround L/R ..................................................................... 150 W/ch
Surround Back L/R ............................................................ 150 W/ch - Dynamic Power (IHF)
Front L/R (8/6/4/2 Ω) ........................................... 125/165/190/235 W - Damping Factor
Front L/R, 20 Hz to 20 kHz, 8 Ω........................................ 100 or more - Input Sensitivity / Input Impedance
PHONO (1 kHz, 100 W/8 Ω) ............................................3.5 mV/47 kΩ
AV 2 etc. (1 kHz, 100 W/8 Ω) .......................................... 200 mV/47 kΩ - Maximum Input Signal
PHONO (1 kHz, 0.1% THD) ........................................................60 mV
AV 2 etc. (1 kHz, 0.5% THD, Effect On)......................................... 2.3 V - Output Level / Output Impedance
SUBWOOFER ....................................................................... 1 V/1.2 kΩ
ZONE2 OUT ..................................................................470 mV/1.7 kΩ - Headphone Jack Rated Output / Impedance
AV 2 etc. (1 kHz, 50 mV, 8 Ω) .........................................100 mV/560 Ω - Frequency Response
AV 2 etc. to Front (10 Hz to 100 kHz) ..................................... +0/-3 dB - RIAA Equalization Deviation
PHONO ...................................................................................0±0.5 dB - Total Harmonic Distortion
PHONO to Speaker Out (FRONT)
(20 Hz to 20 kHz, 1 V)........................................................................................ 0.02% or less
AV 2 etc. to Front (Pure Direct)
(20 Hz to 20 kHz, 50 W, 8 Ω) ........................................... 0.06% or less - Signal to Noise Ratio (IHF-A Network)
PHONO (Input Shorted 35 mV, Speaker Out [FRONT]) .......................................................................................96 dB or more
AV 2 etc. (Pure Direct) (Input 1 kΩ Shorted, Speaker Out) .....................................................................................110 dB or more - Residual Noise (IHF-A Network)
Front L/R (Speaker Out)................................................ 150 μV or less - Channel Separation
PHONO (Input Shorted, 1 kHz/10 kHz) .............60 dB/55 dB or more
AV 2 etc. (Input 1 kΩ Shorted, 1 kHz/10 kHz) ............................................................................70 dB/50 dB or more - Volume Control
Main Zone............................. MUTE, -80 dB to +16.5 dB (0.5 dB Step)
Zone2.................................... MUTE, -80 dB to +10.0 dB (0.5 dB Step) - Tone Control Characteristics
Bass Boost/Cut .........................................±6 dB/0.5 dB Step at 50 Hz
Bass Turnover............................................................................350 Hz
Treble Boost/Cut ....................................±6 dB/0.5 dB Step at 20 kHz
Treble Turnover........................................................................3.5 kHz - Filter Characteristics
(fc=40/60/80/90/100/110/120/160/200 Hz)
H.P.F. (Front, Center, Surround, Surround Back) ..............12 dB/oct.
L.P.F. (Subwoofer)...............................................................24 dB/oct.
Video Section
- Video Signal Type...................................................NTSC/PAL/SECAM
- Video Signal Level
- Composite ........................................................................ 1 Vp-p/75 Ω Component
- Y ..................................................................................... 1 Vp-p/75 Ω
- Pb/Pr........................................................................... 0.7 Vp-p/75 Ω
- Video Maximum Input Level .................................... 1.5 Vp-p or more
FM Section
- Tuning Range
[U.S.A. and Canada models] ...........................87.5 MHz to 107.9 MHz
[Taiwan, Brazil, Asia and General models]...................................................87.5/87.50 MHz to 108.0/108.00 MHz
[U.K. and Europe models] ...........................87.50 MHz to 108.00 MHz
[Other models] ............................................87.50 MHz to 108.00 MHz - 50 dB Quiet Sensitivity (IHF, 1 kHz, 100% MOD.)
Mono .............................................................................3 μV (20.8 dBf) - Signal to Noise Ratio (IHF)
Mono ........................................................................................... 69 dB
Stereo.......................................................................................... 67 dB - Harmonic Distortion (IHF, 1 kHz)
Mono ............................................................................................ 0.5%
Stereo........................................................................................... 0.6% - Antenna Input.......................................................... 75 Ω unbalanced
AM section
- Tuning Range
[U.S.A. and Canada models] .............................. 530 kHz to 1710 kHz
[Taiwan, Brazil, Asia and General models] ............................................................ 530/531 kHz to 1710/1611 kHz
[U.K. and Europe models] .................................. 531 kHz to 1611 kHz
[Other models].................................................... 531 kHz to 1611 kHz
General
- Power Supply
[U.S.A. and Canada models] ...................................... AC 120 V, 60 Hz
[Brazil and General models] .................................................. AC 110 to 120/220 to 240 V, 50/60 Hz
[Korea model] ............................................................. AC 220 V, 60 Hz
[Australia model] ........................................................ AC 240 V, 50 Hz
[U.K. and Europe models] .......................................... AC 230 V, 50 Hz
[Asia model] ................................................AC 220 to 240 V, 50/60 Hz - Power Consumption
[U.S.A. and Canada models] ......................................................400 W
[Brazil, Asia and General models]................................................270 W
[Other models]............................................................................300 W - Standby Power Consumption
HDMI Control Off, Standby Through Off.....................................0.1 W
HDMI Control ON/Standby through AUTO HDMI no signal and no CEC for 8 hours................................................................0.4 W
HDMI Control On, Standby Through On (No Signals) ................1.1 W - Network Standby On
Wired.........................................................................................1.6 W
Wi-Fi ..........................................................................................1.6 W
Wireless Direct..........................................................................1.8 W
Bluetooth Standby On ................................................................1.6 W
HDMI Control On, Standby Through On (No Signals), Network Standby On (Wireless Direct) .......................................2.4 W - Maximum Power Consumption
[Taiwan, Brazil, Asia and General models]................................590 W - Dimensions (W x H x D)................................. 435 x 171 x 378 mm (17-1/8” x 6-3/4” x 14-7/8”)
- Including legs and protrusions
- Reference Dimensions (W x H x D) (with wireless antenna upright).................................435 x 234 x 378 mm (17-1/8” x 9-1/4” x 14-7/8”)
- Weight....................................................................... 10.0 kg (22.0 lbs)
The contents of this manual apply to the latest specifications as of the publishing date. To obtain the latest manual, access the Yamaha website then download the manual file.
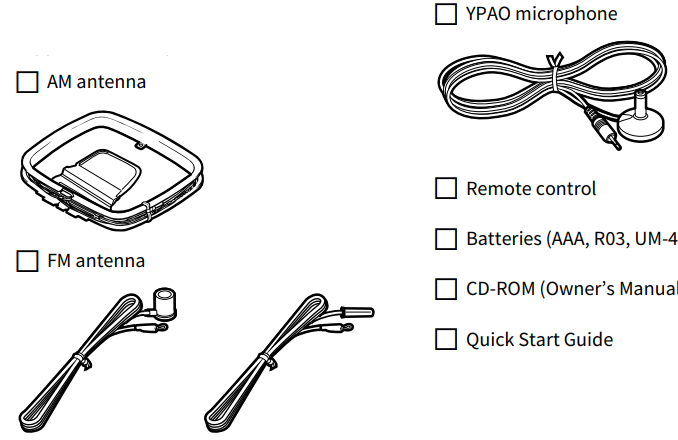
Accessories
Check that the following accessories are supplied with the product.
About this book
- In this manual, illustrations of English menu screens are used as examples.
- Some features are not available in certain regions.
- Due to product improvements, specifications and appearance are subject to change without notice.
- This manual explains operations using the supplied remote control.
- This manual describes all the “iPod touch”, “iPhone” and “iPad” as the “iPhone”. “iPhone” refers to “iPod touch”, “iPhone” and “iPad”, unless otherwise specified.
About remote control
This section explains how to use the supplied remote control.
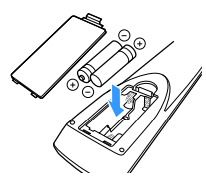
Batteries
Insert the batteries the right way round.
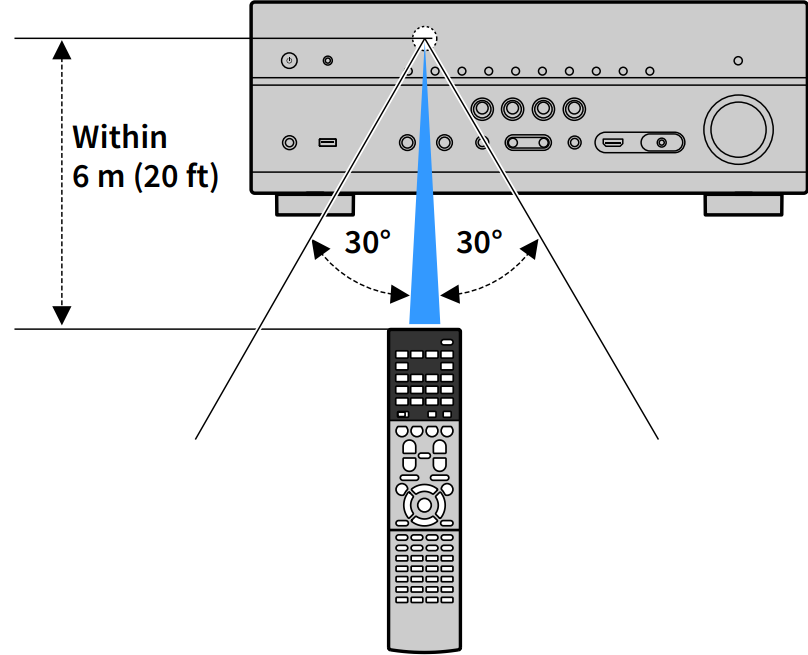
Operating range of the remote control
Point the remote control at the remote control sensor on the unit and remain within the operating range shown below.
FEATURES
What you can do with the unit
The unit is equipped with the various useful features.
- Connecting various devices
A number of HDMI jacks and various input/output jacks on the unit allow you to connect video devices (such as BD/DVD players), audio devices (such as CD players), game consoles, camcorders, and other devices. Playing back TV audio in surround sound with a single HDMI cable connection (Audio Return Channel: ARC)
When using an ARC-compatible TV, you only need one HDMI cable to enable video output to the TV, audio input from the TV, and the transmission of HDMI Control signals.
Various wireless connection methods
The unit supports the Wi-Fi feature that allows the unit to connect to your wireless router (access point) without a network cable connection. In addition, Wireless Direct enables connecting a mobile device to the unit directly without router.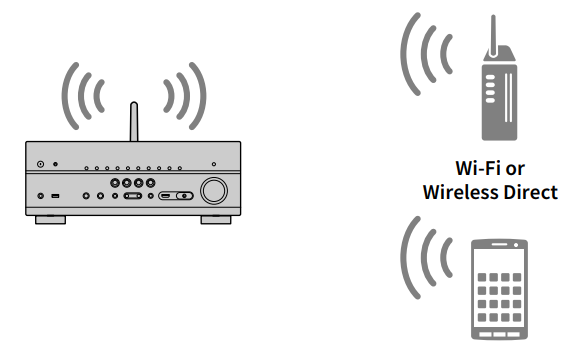
Creating 3-dimensional sound fields
Connecting presence speakers allows you to create a natural 3-dimensional sound field in your own room (CINEMA DSP 3D). Even when no presence speakers are connected, the Virtual Presence Speaker (VPS) function produces 3D surround sound. In addition, the unit creates a Virtual Surround Back Speaker (VSBS) using the surround speakers to add a sense of depth to the rear sound field even when no surround back speakers are connected.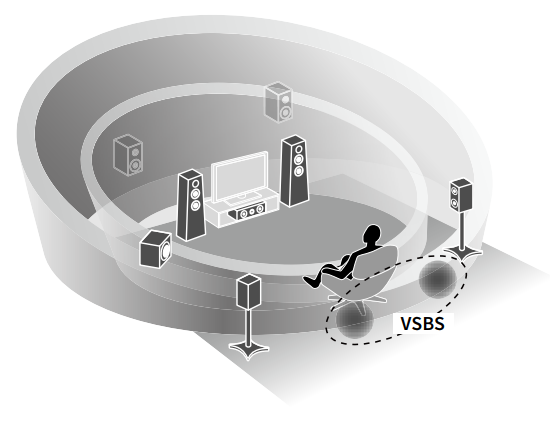
- Surround playback with 5 speakers placed in front
If you have surround speakers but there is no space to place them in the rear of your room, you can place them in the front and enjoy multichannel surround sound with the 5 speakers placed in the front (Virtual CINEMA FRONT). - Home Audio Network with MusicCast
The unit supports the MusicCast feature that allows you to link a MusicCast compatible device to another device in a different room and play them back simultaneously, or control all MusicCast compatible devices with the dedicated application “MusicCast CONTROLLER”. - Low power consumption
The ECO mode (power saving function) reduces the unit’s power consumption.
Part names and functions
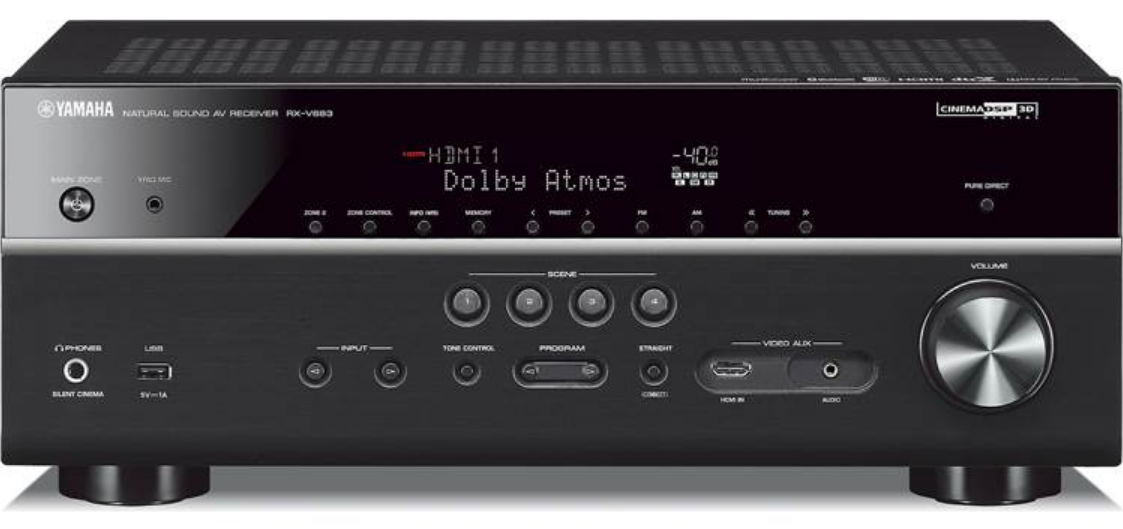
Front panel
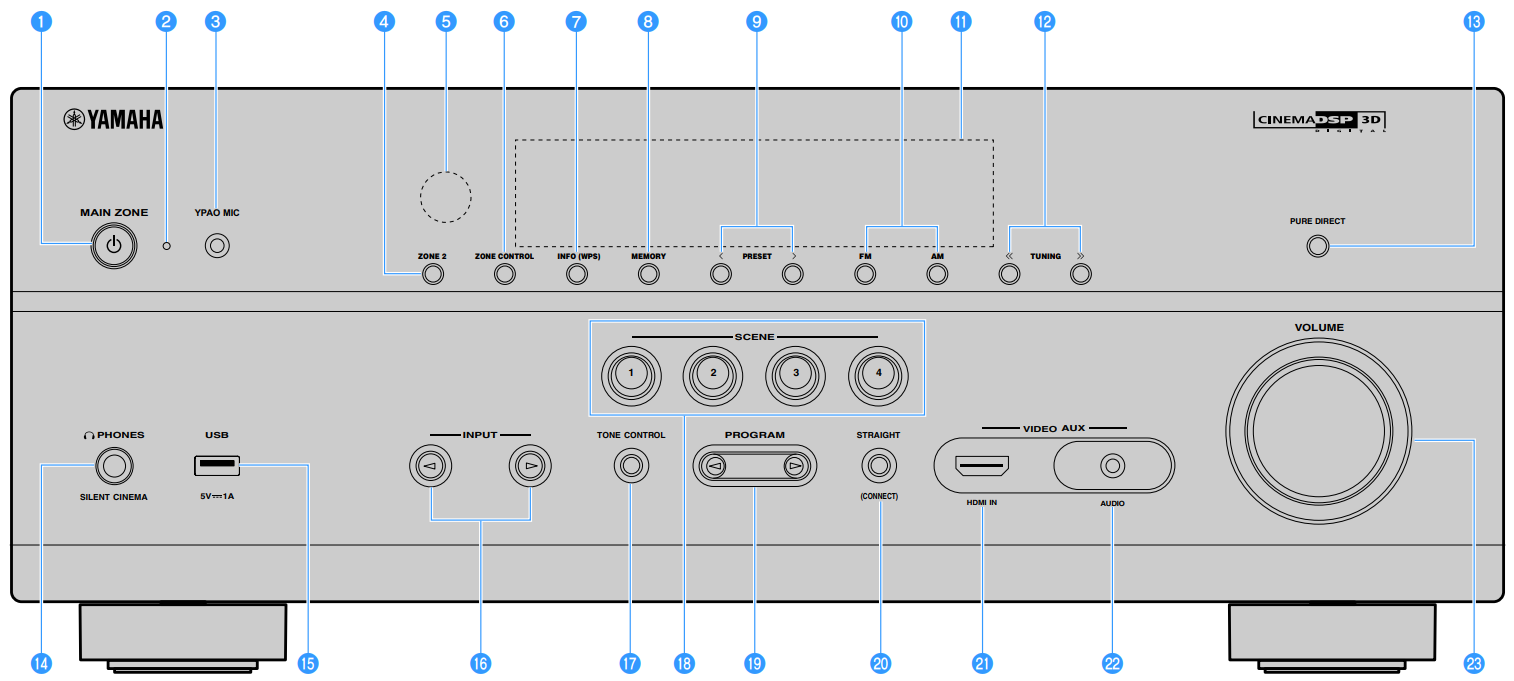
- MAIN ZONE z key
Turns on/off (standby) the unit. - Standby indicator
Lights up when the unit is in standby mode under any of the following conditions.- HDMI Control is enabled (p.113)
- Standby Through is enabled (p.114)
- Network Standby is enabled (p.115)
- YPAO MIC jack
For connecting the supplied YPAO microphone - ZONE 2 key
Enables/disables the audio output to Zone2 - Remote control sensor
Receives remote control signals - ZONE CONTROL key
Changes the zone (main zone or Zone2) that is controlled by the keys and knobs on the front panel - INFO (WPS) key
Selects the information displayed on the front display
Enters the wireless network connection setup (WPS push button configuration) by holding down for 3 seconds - MEMORY key
Registers FM/AM radio stations and USB, Bluetooth, and network content as presets. - PRESET keys
Select a preset FM/AM radio station - FM and AM keys
Switch between FM and AM - Front display
Displays information - TUNING keys
Select the radio frequency - PURE DIRECT key
Enables/disables Pure Direct - PHONES jack
For connecting headphones. - USB jack
For connecting a USB storage device - INPUT keys
Select an input source. - TONE CONTROL key
Adjusts the high-frequency range and low-frequency range of output sounds - SCENE keys
Select the assigned input source (included the selected radio station or content when it is assigned), sound program, and various settings with one touch. Also, turns on the unit when it is in standby mode - PROGRAM keys
Select a sound program or a surround decoder - STRAIGHT (CONNECT) key
Enables/disables the straight decode mode
Enters MusicCast CONTROLLER registration by holding down for 5 seconds - HDMI IN jack
For connecting to HDMI-compatible playback devices and inputting video/audio signals - AUDIO jack
Connect a portable audio player to the unit with a stereo mini-cable - VOLUME knob
Adjusts the volume.
Front display (indicators)
_yamaha_musiccast_av_receiver_rx-v683.png)
- ECO
Lights up when the unit is in the eco mode. - HDMI
Lights up when HDMI signals are being input or output.- OUT
Lights up when HDMI signals are being output.
- OUT
- LINK MASTER
Lights up when the unit is the master device of the MusicCast network. - Firmware update indicator
Lights up when a firmware update is available via the network. - Bluetooth indicator
Lights up when the unit is connecting to a Bluetooth device. - CINEMA DSP
Lights up when CINEMA DSP or CINEMA DSP 3D (p.58) is working. - SLEEP
Lights up when the sleep timer is on. - STEREO
Lights up when the unit is receiving a stereo FM radio signal.- TUNED
Lights up when the unit is receiving an FM/AM radio station signal.
- TUNED
- PARTY
Lights up when the unit is in the party mode. - ZONE2
Lights up when audio output to Zone2 is enabled. - kA-DRC
Lights up when Adaptive DRC is working. - Volume indicator
Indicates the current volume. - VIRTUAL
Lights up when the Virtual Presence Speaker (VPS) or Virtual Surround Back Speaker (VSBS), or the virtual surround processing is working. - Cursor indicators
Indicate the remote control cursor keys currently operational. - Information display
Displays the current status (such as input name and sound mode name). You can switch the information by pressing INFO. - Signal strength indicator
Indicates the strength of the wireless network signal. - ENHANCER
Lights up when Compressed Music Enhancer is working. - YPAO Volume
Lights up when YPAO Volume is enabled. - MUTE
Blinks when audio is temporarily muted. - Speaker indicators
Indicate speaker terminals from which signals are output.- L Front speaker (L)
- R Front speaker (R)
- C Center speaker
- SL Surround speaker (L)
- SR Surround speaker (R)
- SBL Surround back speaker (L)
- SBR Surround back speaker (R)
- SB Surround back speaker
- FPL Presence speaker (L)
- FPR Presence speaker (R)
- SW Subwoofer
Rear panel
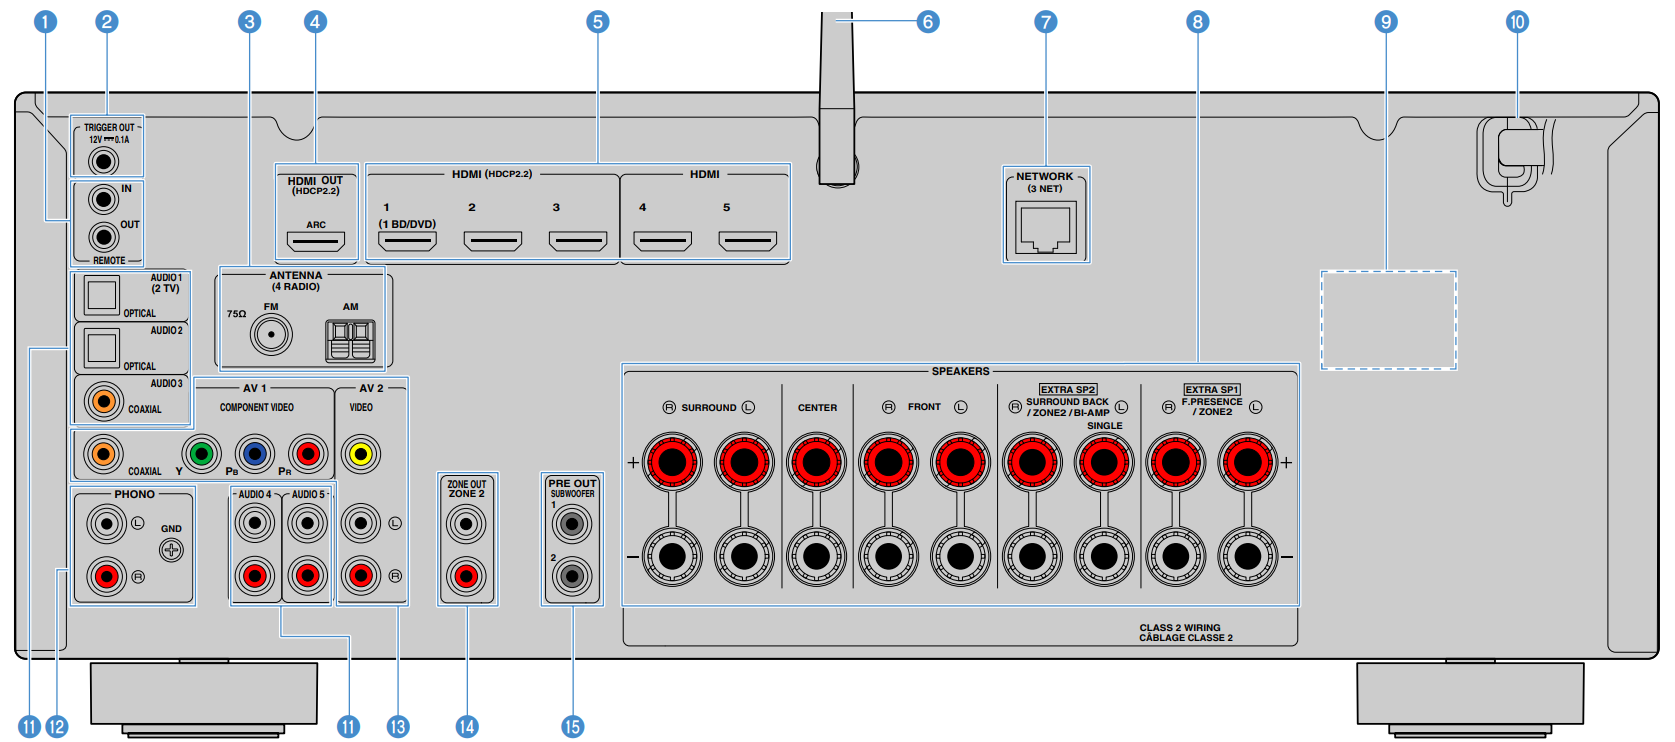
The area around the video/audio output jacks is marked in white on the actual product to prevent improper connections.
- REMOTE IN/OUT jacks
For connecting to an infrared signal receiver/emitter that allows you to operate the unit and other devices from another room. - TRIGGER OUT jack
For connecting to a device that supports the trigger function. - ANTENNA jacks
For connecting to FM and AM antennas. - HDMI OUT jack
For connecting to an HDMI-compatible TV and outputting video/audio signals. When using ARC, TV audio signal can also be input through the HDMI OUT jack. - HDMI 1-5 jacks
For connecting to HDMI-compatible playback devices and inputting video/audio signals. - Wireless antenna
For a wireless (Wi-Fi) connection to a network and a Bluetooth connection. - NETWORK jack
For connecting to a network with a network cable. - SPEAKERS terminals
For connecting to speakers. - VOLTAGE SELECTOR
(Taiwan, Brazil and General models only)
Selects the switch position according to your local voltage. - Power cable
For connecting to an AC wall outlet. - AUDIO 1-5 jacks
For connecting to audio playback devices and inputting audio signals (p.33). - PHONO jacks
For connecting to a turntable. - AV 1-2 jacks
For connecting to video/audio playback devices and inputting video/audio signals. - ZONE2 OUT jacks
For connecting to the external amplifier used in Zone2 and for outputting audio. - SUBWOOFER PRE OUT jacks
For connecting to a subwoofer with built-in amplifier.
Remote control
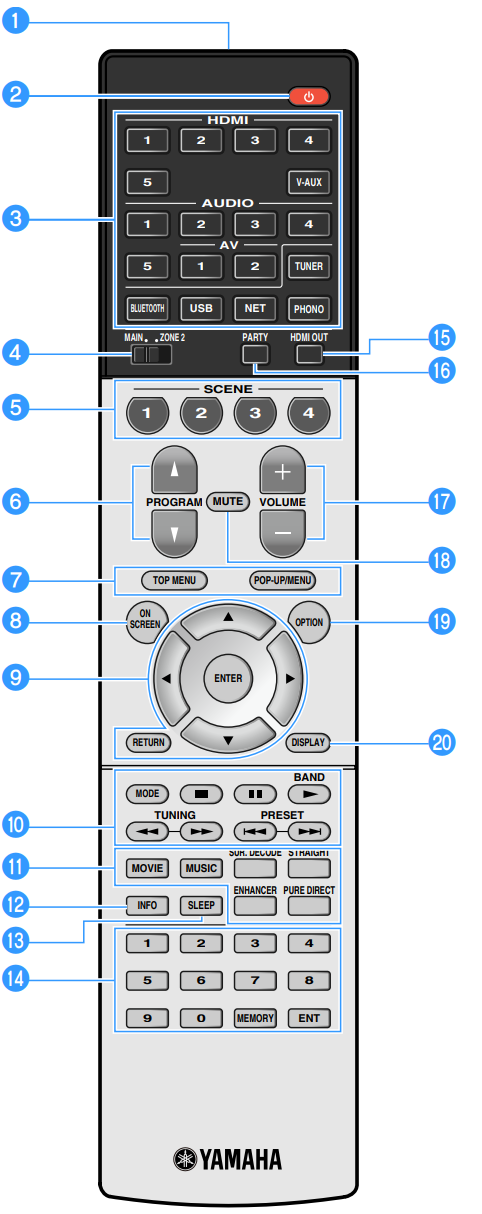
- Remote control signal transmitter
Transmits infrared signals.  (receiver power) key
Turns on/off (standby) the unit.- Input selection keys
Select an input source for playback.- HDMI 1-5: HDMI 1-5 jacks
- V-AUX: VIDEO AUX jack (on the front panel)
- AV 1-2: AV 1-2 jacks
- AUDIO 1-5: AUDIO 1-5 jacks
- TUNER: FM/AM radio
- BLUETOOTH: Bluetooth connection (the unit as a Bluetooth receiver)
- USB: USB jack (on the front panel)
- NET: NETWORK sources (press repeatedly to select a desired network source)
- PHONO: PHONO jacks
- MAIN/ZONE2 switch
Changes the zone (main zone or Zone2) that is controlled by the remote control. - SCENE keys
Select the assigned input source (included the selected radio station or content when it is assigned), sound program, and various settings with one touch. Also, turns on the unit when it is in standby mode. - PROGRAM keys
Select a sound program, a surround decoder, an input source, a network source, a preset radio station, a browse screen page, the volume of dialogue sounds or shuffle/repeat settings. - External device operation keys
Displays menus for the HDMI Control-compatible playback device. - ON SCREEN key
Displays the on-screen menu on the TV. - Menu operation keys
- Cursor keys: Select a menu or the parameter.
- ENTER: Confirms a selected item.
- RETURN: Returns to the previous screen.
- Radio keys
Operate the FM/AM radio when “TUNER” is selected as the input source.
BAND: Switches between FM and AM radio.
PRESET: Select a preset station.
TUNING: Select the radio frequency.
External device operation keys
Let you perform playback operations when “USB” or “NET” is selected as the input source, or control playback of the HDMI Control-compatible playback device. - Sound mode keys
Select a sound mode. - INFO key
Selects the information displayed on the front display. - SLEEP key
Pressing this key repeatedly will specify the time (120 min, 90 min, 60 min, 30 min, off), in which the unit switches to the standby mode. - Numeric keys
Let you enter numerical values, such as radio frequencies.- MEMORY key
Registers FM/AM radio stations and USB, Bluetooth, and network content as presets.
- MEMORY key
- HDMI OUT key
Enables/disables video/audio output from the HDMI OUT jack. - PARTY key
Turns on/off the party mode. - VOLUME keys
Adjust the volume. - MUTE key
Mutes the audio output. - OPTION key
Displays the option menu. - DISPLAY key
Displays status information on the TV.
Description
The RX-V683 is built with a robust design and features a sleek, modern aesthetic that fits well in any home theater setup. It includes seven HDMI inputs and two outputs, ensuring ample connectivity for all your devices. The receiver also supports various audio formats, including FLAC, WAV, and ALAC, making it a versatile choice for audiophiles.
The MusicCast app allows users to control the receiver and other MusicCast devices, stream music, and adjust settings from their smartphones or tablets. The YPAO system ensures optimal sound settings based on the room's acoustics, providing an enhanced listening experience.
Listening to Internet radio
You can listen to Internet radio stations from all over the world.

NOTE
- To use this function, the unit must be connected to the Internet. You can check whether the network parameters (such as the IP address) are properly assigned to the unit in “Network”in the “Information” menu.
- You may not be able to receive some Internet radio stations.
- The unit uses the airable.Radio service. airable is a service of Tune In GmbH.
- This service may be discontinued without notice.
- Folder names are different depending on the language.
Playback of Internet radio
- Press NET repeatedly to select “NET RADIO” as the input source.
The browse screen is displayed on the TV. Use the Cursor keys to select an item and press ENTER.
If an Internet radio station is selected, playback starts and the playback screen is displayed.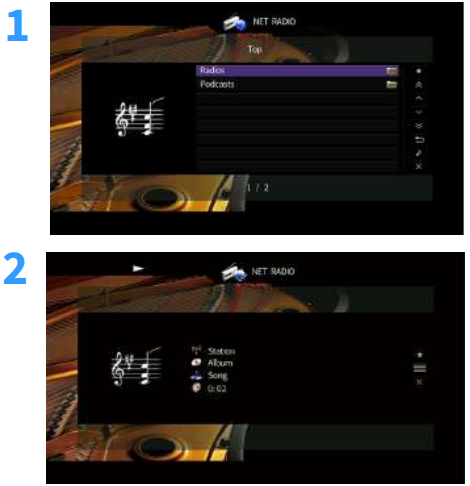
TIP
- To return to the previous screen, press RETURN.
- To return to the top screen during menu operations on the browse screen, hold down RETURN.
Browse screen
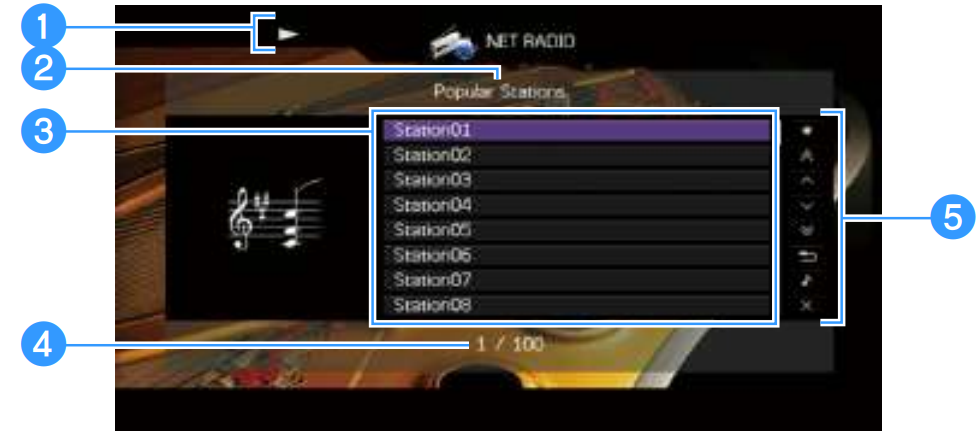
- Playback indicator
- List name
- Contents list
Displays the list of Internet radio content. Use the Cursor keys to select an item and press ENTER to confirm the selection. - Item number/total
- Operation menu
Press the Cursor key (▷) and then use the Cursor keys (△/▽) to select an item.
Press ENTER to confirm the selection.
| Menu Function | Description |
|---|---|
| Add to favorites | Adds/removes the station selected in the list to/from the “Favorites” folder (p.78). |
| 1 Page Up | Moves to the previous/next page of the list. |
| 1 Page Down | - |
| 10 Pages Up | Moves 10 pages forward/backward. |
| 10 Pages Down | - |
| Return | Returns to the higher-level list. |
| Now Playing | Moves to the playback screen. |
| Screen Off | Closes the screen display and shows the background. Press one of the Menu operation keys to redisplay it. |
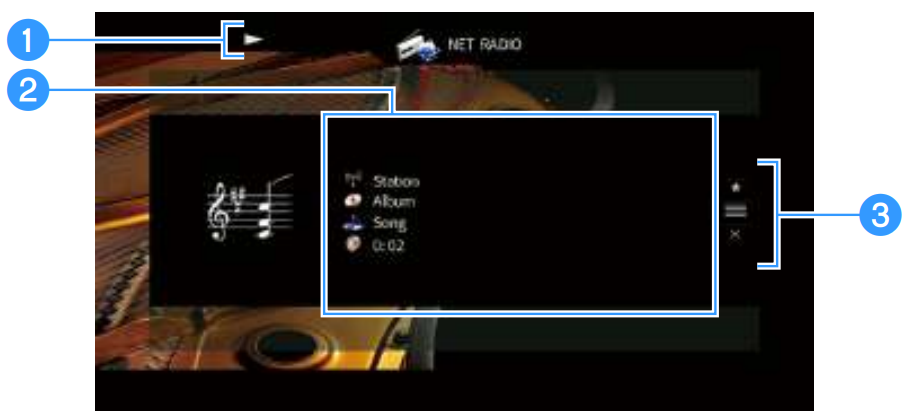
Playback screen
- Playback indicator
- Playback information
Displays the station name, album name, song title, and elapsed time.
Use the Cursor keys (△/▽) to select scrollable information. - Operation menu
Press the Cursor key (▷) and then use the Cursor keys (△/▽) to select an item.
Press ENTER to confirm the selection.
| Menu Function | Description |
|---|---|
| Add to favorites | Adds the current station to the “Favorites” folder (p.78). |
| Browse | Moves to the browse screen. |
| Screen Off | Closes the screen display and shows the background. Press one of the Menu operation keys to redisplay it. |
TIP
- You can use the External device operation key (▰) on the remote control to stop playback.
- Some information may not be available depending on the station.
Registering favorite Internet radio stations (Favorites)
By registering your favorite Internet radio stations to “Favorites”, you can quickly access to them from the “Favorites” folder in the browse screen.
TIP
You can also register up to 40 favorite USB, Bluetooth and network contents as shortcuts.
Registering the station on the browse/playback screen
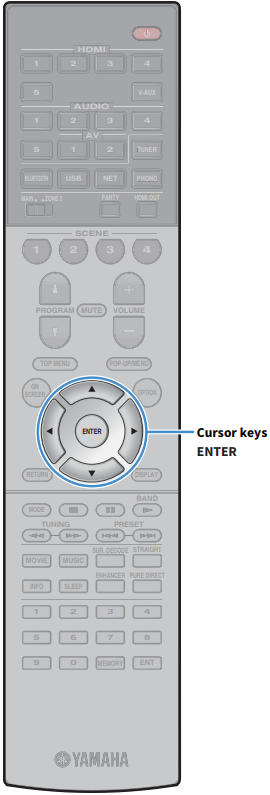
- Select the desired Internet radio station in the browse screen or start playback of it to display the playback screen.
- Press the Cursor key (▷) to select “Add to favorites” and press ENTER.
The selected station is added to the “Favorites” folder.
Radio stations registered to favorites are displayed with “★”.
Browse screen
TIP
To remove a station that is registered to favorites, select the station and then select “Remove from favorites”.
Setup Guide
To set up the Yamaha MusicCast AV Receiver RX-V683, follow these steps:
- Connect your TV, Blu-ray player, gaming console, and other devices to the HDMI inputs.
- Use the YPAO microphone to automatically calibrate the sound settings based on your room's acoustics.
- Download and install the MusicCast app on your smartphone or tablet to configure and control the receiver.
- Connect the receiver to your Wi-Fi network for wireless streaming and multi-room audio capabilities.
- Pair Bluetooth devices for wireless audio streaming.
RX-V683 Troubleshooting
First, check the following:
- The power cables of the unit, TV and playback devices (such as BD/DVD players) are connected to AC wall outlets securely.
- The unit, subwoofer, TV and playback devices (such as BD/DVD players) are turned on.
- The connectors of each cable are securely inserted in to jacks on each device.
Power, system and remote control
Problem | Cause | Remedy |
The power does not turnon. | The protection circuitry has been activated three times consecutively. When the unit is in this condition, the standby indicator on the unit blinks if you try to turn on the power. | As a safety precaution, capability to turn on the power is disabled. Contact your nearest Yamaha dealer or service center to request repair. |
The power does not turnoff. | The internal microcomputer has frozen, dueto an external electric shock (such as lightning or excessive static electricity) or to a drop in the power supply voltage. | Hold down MAIN ZONE z on the front panel for more than 10 seconds to initialize and reboot the unit. (If the problem persists, disconnect the power cable from the AC wall outlet and plug it again.) |
| The power turnsoff (standby mode)immediately. | The unit was turned on while a speaker cable was shorted. | Twist the bare wiresof each speaker cablefirmly and reconnect to the unitand speakers (p.22). |
The unit entersstandby mode automatically. | The sleeptimer worked. | Turn on the unit andstart playback again. |
The auto-standby function activated because the unit was not used for the specified time. | To disable the auto-standby function, set “Auto Power Standby” in the “Setup” menu to “Off”(p.122). | |
| The speakerimpedance setting is incorrect. | Set the speakerimpedance to matchyour speakers (p.126). | |
| The protection circuitry has been activated because of a short circuit. | Twist the bare wiresof each speaker cablefirmly and reconnect to the unitand speakers (p.22). | |
The unit is not reacting. | The internal microcomputer is frozen, due to an external electric shock (such as lightning or excessive staticelectricity) or to a dropin the power supply voltage. | Hold down MAIN ZONE z on the front panel for more than 10 seconds to initialize and reboot the unit. (If the problem persists, disconnect the power cable from the AC wall outlet and plug it again.) |
The unit cannot be controlled usingthe remote control. | The unitis out of theoperating range. | Use the remotecontrol within the operating range(p.5). |
| The batteries are weak. | Replace withnew batteries. | |
| The unit’s remote control sensor is exposed to direct sunlight or strong lighting. | Adjust the lighting angle,or reposition the unit. | |
The remotecontrol IDs of the unit and the remote controlare not identical. | Change the remotecontrol ID of the unitor the remotecontrol (p.126). |
Audio
Problem | Cause | Remedy |
No sound. | Another input sourceis selected. | Select an appropriate input source with the input selection keys. |
| Signals that the unit cannotreproduce are being input. | Some digital audio formats cannot be played back on the unit. To check the audio format of the input signal, use “Audio Signal” in the “Information” menu (p.124). | |
| The cable connecting the unit and playback device is defective. | If there is no problem with the connection, replace with another cable. | |
The volume cannotbe increased. | The maximum volumeis set. | Use “Max Volume” in the “Setup” menu to adjust the maximum volume (p.111). |
| A deviceconnected to theoutput jacks of theunit is not turnedon. | Turn on all devicesconnected to the output jacks of the unit. | |
No sound is coming froma specific speaker. | The playback source does not contain a signal for the channel. | To check it, use “Audio Signal”in the “Information” menu (p.124). |
The currently selected sound program/decoder does not use the speaker. | To check it, use “Test Tone” in the “Setup” menu (p.110). | |
| Audio output of the speaker is disabled. | Perform “Auto Setup” (p.40) or use “Configuration” in the “Setup” menu to change the speaker settings (p.107). | |
| The volume of thespeaker is set too low. | Perform “Auto Setup” (p.40) or use “Level” in the “Setup” menu to adjust the speaker volume (p.109). | |
| The speaker cable connecting the unit and the speakeris defective. | If there is no problem with the connection, replace with anotherspeaker cable. | |
| The speaker is malfunctioning. | To check it, replace with another speaker. If the problem persists, the unit may be malfunctioning. | |
No sound is coming from the subwoofer. | The playback source does not contain LFE or low-frequency signals. | To check if the subwoofer is working properly, use “Test Tone” in the “Setup” menu (p.110). |
| Subwooferoutput is disabled. | Perform “Auto Setup” (p.40) or set “Subwoofer” in the “Setup” menu to “Use”(p.108). | |
| The volume of the subwoofer is too low. | Adjust the volume on the subwoofer. | |
| The subwoofer has been turnedoff by its auto-standby function. | Disable the auto-standby functionof the subwoofer or adjust its sensitivity level. |
No sound from theplayback device (connected to the unit with HDMI). | The TV does not support HDCP (High-bandwidth Digital Content Protection). | Refer to theinstruction manuals for the TV and checkthe TV’s specifications. |
| The unit is setnot to output audio input through HDMI jacks from the SPEAKERS terminals. | In “Audio Output” in the “Setup” menu, set “Amp” to “On” (p.114). | |
| The numberof devices connected to the HDMIOUT jack exceeds the limit. | Disconnect some of the HDMI devices. | |
No sound from the playback device(when HDMI Control is used). | The TV is set to output audio from the TV speakers. | Change the audio output setting on your TV so that the playback device audio is output from the speakers connected to the unit. |
| TV audio is selected as the input source. | Select an appropriate input source with the input selection keys. | |
No sound from the TV (whenHDMI Control is used). | The TV is set to output audio from the TV speakers. | Change the audio output setting on your TV so that the TV audio is output from the speakers connected to the unit. |
A TV that does not supportARC is connected to the unit onlywith an HDMI cable. | Use a digitaloptical cable to make an audio connection (p.29). | |
(If theTV is connected to the unitwith an audio cable) The TV audio input settingdoes not matchthe actual connection. | Use “TV Audio Input”in the “Setup” menu to select the correct audio input jack (p.113). | |
(If you aretrying to use ARC) ARC is disabled on the unit or TV. | Set “ARC” in the “Setup” menu to “On” (p.114). Also, enable ARCon the TV. | |
Only the front speakers work on multichannel audio. | The playback deviceis set to output 2-channel audio (suchas PCM) only. | To check it, use “Audio Signal” in the “Information” menu (p.124). If necessary, change the digital audio output setting on the playback device. |
Noise/hum is heard. | The unit istoo close to another digital or radio frequency device. | Move the unitfurther away fromthe device. |
| The cable connecting the unit and playback device is defective. | If there is no problem with the connection, replace with another cable. | |
The sound is distorted. | The volume of the unit is too high. | Turn down thevolume. If “ECOMode” is setto “On”, set it to “Off” (p.122). |
| A device connected to the unit’soutput jacks is not turnedon. | Turn on all devices connected to the unit’s output jacks. |
Video
Problem | Cause | Remedy |
No video. | Another inputsource is selected on the unit. | Select an appropriate input source with the input selection keys. |
| Another input sourceis selected on the TV. | Switch the TV input to display the video from the unit. | |
| The video signaloutput from the unit is not supported by the TV. | Set “MON.CHK” in the “ADVANCED SETUP” menu to “YES”(p.127). | |
| The cable connecting the unit and TV (or playback device)is defective. | If thereis no problem with the connection, replace with another cable. | |
No video from theplayback device (connected to the unit with HDMI). |
The input video signal (resolution) is not supported by the unit. | To check the information about the current video signal (resolution), use “Video Signal” in the “Information” menu (p.124). For information about video signals supported by the unit, see “HDMI signal compatibility” (p.147). |
The TV does not support HDCP (High-bandwidth Digital Content Protection). | Refer to the instruction manuals for the TV andcheck the TV’s specifications. If you want to play back contents that require HDCP 2.2-compatible devices, both the TV and playback device must support HDCP 2.2. | |
The playback device that supports HDCP 2.2 is connected to other than the HDMI 1-3 jack. | To play back contents that require HDCP 2.2-compatible devices, connect the playback device to the HDMI 1-3 jack (p.30). | |
| The numberof devices connected to the HDMI OUTjack is overthe limit. | Disconnectsome of the HDMI devices. | |
| The menuof the unitis not displayed on the TV. | Another inputsource is selected on the TV. | Switch theTV input to display the video from the unit (HDMI OUT jack). |
FM/AM radio
Problem | Cause | Remedy |
FM radio reception is weak or noisy. | There is multi-path interference. | Adjust theFM antenna heightor orientation, or place it in a different location. |
Your area is too far from the FM station transmitter. | Set “FM Mode” in the “Option” menu to “Mono”to select monaural FM radio reception (p.93). | |
| Use an outdoor FM antenna. We recommend using a sensitive multi-element antenna. | ||
| AM radio reception is weak or noisy. | The noises may be caused by fluorescent lamps,motors, thermostats, or other electrical equipment. | It is difficult to completely eliminate noise. It may be reduced by using an outdoor AM antenna. |
Radio stations cannotbe selected automatically. |
Your area is too far from the FM station transmitter. | Select the stationmanually (p.63). |
| Use an outdoor antenna. We recommend usinga sensitive multi-element antenna. | ||
The AM radiosignal is weak. | Adjust the AM antennaorientation. | |
| Select the stationmanually (p.63). | ||
| Use an outdoor AM antenna. Connectit to the ANTENNA (AM)jack together withthe supplied AM antenna. | ||
| AM radio stations cannotbe registered aspresets. | Auto Preset has been used. | Auto Preset is for registering FM radio stations only. Register AM radio stations manually (p.64). |
Bluetooth
Problem | Cause | Remedy |
A Bluetooth connection cannot be established. | The Bluetooth function of the unit is disabled. | Enable the Bluetooth function (p.117). |
| Another Bluetooth device is already connected to the unit. | Terminatethe current Bluetooth connection and then establish a new connection (p.67). | |
| The unit and the Bluetooth device are too far apart. | Move the Bluetooth device closer to the unit. | |
| There is a device (such as microwave oven and wireless LAN) that outputs signals in the 2.4 GHz frequency band nearby. | Move the unitaway from thosedevices. | |
| The Bluetooth devicedoes not supportA2DP. | Use a Bluetooth device that supports A2DP. | |
| The connection information registered on the Bluetooth device is not working for some reason. | Delete the connection information on the Bluetooth device, and then establish a connection between the Bluetooth device and the unit again (p.67). | |
No sound is produced, or the soundis interrupted duringplayback. | The volumeof the Bluetooth deviceis set too low. | Turn up the volumeof the Bluetooth device. |
| The Bluetooth device is not set to send audio signalsto the unit. | Switch the audio output of the Bluetooth device to the unit. | |
| The Bluetooth connection has been terminated. | Establish a Bluetooth connection between the Bluetooth device and the unit again (p.67). | |
| The unitand the Bluetooth deviceare too far apart. | Move the Bluetooth device closer to the unit. | |
There is a device (such as microwave oven and wireless LAN) that outputs signals in the 2.4 GHz frequency band nearby. | Move the unitaway from thosedevices. |
USB and network
Problem | Cause | Remedy |
The unit does not detectthe USB device. | The USB device is not connected to the USB jacksecurely. | Turn off the unit, reconnect yourUSB device, and turn the unit on again. |
| The file system of the USB device is not FAT16or FAT32. | Use a USB device withFAT16 or FAT32format. | |
| Folders and filesin the USB device cannotbe viewed. | The data in the USB device is protected by the encryption. | Use a USB device withoutan encryption function. |
The network feature does not function. |
The network parameters (IP address) have not been obtained properly. | Enable the DHCP server function on your router and set “DHCP” in the “Setup” menu to “On” on the unit (p.115). If you want to configure the network parameters manually,check that you are using an IP address which is not used by other network devices in your network (p.115). |
The unit cannot connectto the Internet via a wireless router (access point). | The wireless router (access point) is turned off. | Turn on the wireless router. |
| The unitand the wireless router (access point)are too far apart. | Place the unit and the wireless router (access point) closer to each other. | |
| There is an obstacle between the unit and the wireless router (access point). | Move the unit andthe wireless router(access point) in a location where there areno obstacles between them. |
Wireless network is not found. | Microwave ovens or other wireless devices in your neighborhood might disturb the wireless communication. | Turn off thesedevices. |
| Access to the networkis restricted by the firewall settings of the wireless router (access point). | Check the firewall setting of the wireless router(access point). | |
The unit doesnot detect the PC. | The media sharingsetting is not correct. | Configure the sharing setting and select the unit as a device to which music contents are shared (p.72). |
| Some security software installed on your PC is blocking the access of the unit to your PC. | Check thesettings of security software installed on your PC. | |
| The unit and PC are not in the same network. | Check the network connections and your router settings, and then connect the unit and the PC to the same network. | |
| The MAC addressfilter is enabledon the unit. | In “MACAddress Filter” in the “Setup” menu, disable theMAC address filter or specify the MAC address of your PC to allow it to access to the unit (p.116). | |
The files in the PC cannot be viewed or played back. |
The files are not supported by the unit or the media server. | Use the file format supported by both the unit and the media server. For information about the file formats supported by the unit, see “Playing back music stored on media servers (PCs/NAS)” (p.72). |
The Internet radiocannot be played. | The selected Internet radio stationis currently not available. | There may be a network problem at the radio station, or the service may have been stopped. Try the station later or select another station. |
| The selected Internet radio station is currently broadcasting silence. | Some Internet radio stations broadcast silence at certain of times of the day. Try the station later or select another station. | |
Access to the network is restricted by the firewall settings of your network devices (such as the router). | Check the firewall settings of your network devices. The Internet radio can be played only when it passes through the port designated by each radio station. The port number varies depending on the radio station. | |
The iPhone does not recognize theunit when usingAirPlay. | The unit is connected to a multiple SSID router. | Access to the unit mightbe restricted by the network separation function on the router. Connect the iPhone to the SSID which can access the unit. |
The application for smartphone/tablet “AV CONTROLLER” does not detect the unit. | The unitand smartphone/tablet are not in the same network. | Check the network connections and your router settings, and then connect the unit and smartphone/tablet to the same network. |
| The MAC addressfilter is enabledon the unit. | In “MACAddress Filter” in the “Setup” menu, disable theMAC address filter or specify the MAC address of your smartphone/tablet to allow it to access to the unit (p.116). | |
Firmware update via the networkis failed. | It may not be possible depending on the condition of the network. | Update the firmware via the network again or use a USB memory device (p.128). |
Error indications on the front display
Message | Cause | Remedy |
| Access denied | Access to the PC is denied. | Configure the sharingsettings and selectthe unit as a deviceto which musiccontents are shared(p.72). |
Access error | The unit cannot accessthe USB device. | Turn off the unit and reconnect your USB device. If the problempersists, try anotherUSB device. |
There is a problem withthe signal path from thenetwork to the unit. | Make sure yourrouter and modemare turned on. | |
Check the connection between the unit and your router (or hub)(p.35). | ||
| Check SP Wires | The speakercables short circuit. | Twist the barewires of the cables firmly and connect to the unit and speakers properly. |
| Internal Error | An internal error has occurred. | Contact the nearest authorized Yamaha dealer or service center. |
| No content | There are no playable files in the selected folder. | Select a folderthat contains files supported by the unit. |
| No device | The unit cannot detectthe USB device. | Turn off the unit and reconnect your USB device. If the problempersists, try anotherUSB device. |
| Please wait | The unit is preparing for connecting to the network. | Wait until the message disappears. If the message stays more than 3 minutes, turn off the unit and turn it on again. |
| RemID Mismatch | The remotecontrol IDs of the unit and the remote controlare not identical. | Change the remotecontrol ID of the unit or theremote control (p.126). |
Unable to play |
The unit cannot play back the songs storedon the PC for some reason. | Check if the format of files you are trying to play is supported by the unit. For information about the formats supported by the unit, see “Playing back music stored on media servers (PCs/NAS)” (p.72). If the unit supports the file format, but still cannot play back any files, the network may be overloaded with heavy traffic. |
| USB Overloaded | An overcurrent is flowing through the USBdevice. | Turn off the unit and reconnect your USB device. If the problem persists, try another USB device. |
| Version error | Firmwareupdate is failed. | Update the firmware again. |
| Update failed. | Firmware update is failed. | Press STRAIGHT and select a firmware updating method,then press INFO to update the firmware again. |
Pros & Cons
Pros
- Excellent sound quality with support for Dolby Atmos and DTS:X
- Robust connectivity options including HDMI 2.1 and built-in Wi-Fi
- Seamless integration with other MusicCast devices for multi-room audio
- Easy setup and calibration using YPAO
- Support for 4K Ultra HD and HDR formats
Cons
- Pricier than some other mid-range AV receivers on the market
- No Dolby Vision passthrough in earlier firmware versions (requires update)
- Slightly complex menu system for beginners
Customer Reviews
Customers praise the RX-V683 for its exceptional sound quality, especially in Dolby Atmos and DTS:X configurations. The ease of use with the MusicCast app and the robust connectivity options are also highly appreciated. However, some users have reported issues with the initial setup process and the need for firmware updates to enable full functionality.
Common Complaints
- Some users find the menu system complex and time-consuming to navigate.
- Occasional connectivity issues with Bluetooth devices.
- The need for periodic firmware updates can be inconvenient.
Faqs
What is the power output of the Yamaha MusicCast AV Receiver RX-V683?
Does the RX-V683 support 4K Ultra HD?
How do I set up the YPAO on the RX-V683?
Can I use voice control with the RX-V683?
How many HDMI inputs does the RX-V683 have?
Is the RX-V683 compatible with MusicCast multi-room audio?
What audio formats does the RX-V683 support?
How do I update the firmware of the RX-V683?
Does the RX-V683 have built-in Bluetooth?
What is eARC and does the RX-V683 support it?
Leave a Comment
