Toshiba Canvio Basics Hard Drive User Manual | Installation
Content
Introduction of Toshiba Canvio Basics Hard Drive
Thank you for choosing our TOSHIBA Canvio Basics Hard Drive.
Please read this User’s Manual carefully, as it contains all relevant information for installation, usage and maintenance of the drive, as well as security and safety advice.
Detailed Specifications
The Toshiba Canvio Basics Hard Drive is a portable external hard drive that offers reliable storage for your files and media. It has a capacity of up to 4TB and uses a USB 3.0 interface for fast data transfer speeds. The hard drive has a sleek and compact design, making it easy to take with you on the go. It also features plug-and-play functionality, so you can start using it right away without the need for any additional software or drivers. The hard drive is compatible with both Windows and Mac operating systems.
Toshiba Canvio Basics Hard Drive: Description
The Toshiba Canvio Basics Hard Drive is a reliable and affordable storage solution for your files and media. With a capacity of up to 4TB, you'll have plenty of space to store all of your important documents, photos, and videos. The hard drive features a USB 3.0 interface, which allows for fast data transfer speeds, so you can quickly and easily move files to and from the drive. The hard drive has a sleek and compact design, making it easy to take with you on the go. It also features plug-and-play functionality, so you can start using it right away without the need for any additional software or drivers. The hard drive is compatible with both Windows and Mac operating systems.
Check the Components
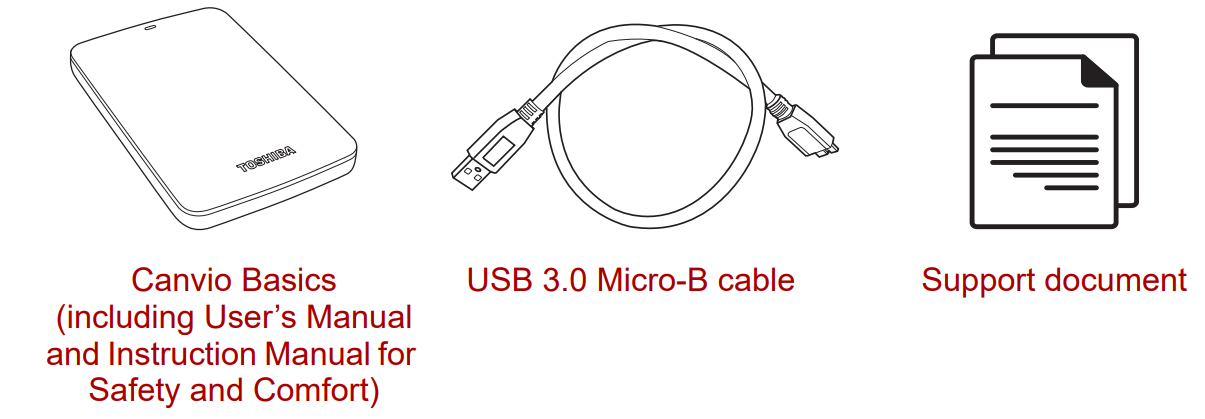
Please refer to the “Instruction Manual for Safety and Comfort” that is preloaded on this external hard drive.
System Requirements
- Formatted NTFS for Windows 10, Windows 8.1, Windows 7
- Requires reformatting for macOS v10.14 / v10.13 / v10.12 / OS X v10.11 / v10.10
- One free port of USB 3.0 or USB 2.0
NOTE:USB 3.0 is backward compatible with USB 2.0.
Installing the drive
Some information about bus-powered operation and the supplied USB cable
- Your drive is bus-powered. Therefore, there is no need to connect an external power supply as all needed current will be supplied by the connected USB port(s).
- Passive USB hubs or USB connectors like keyboards, mice or similar products cannot be used or connected to the drive.
- Make sure that the connectors will be inserted correctly.
- Never use pressure for connecting the cables. Check the polarity before connecting!
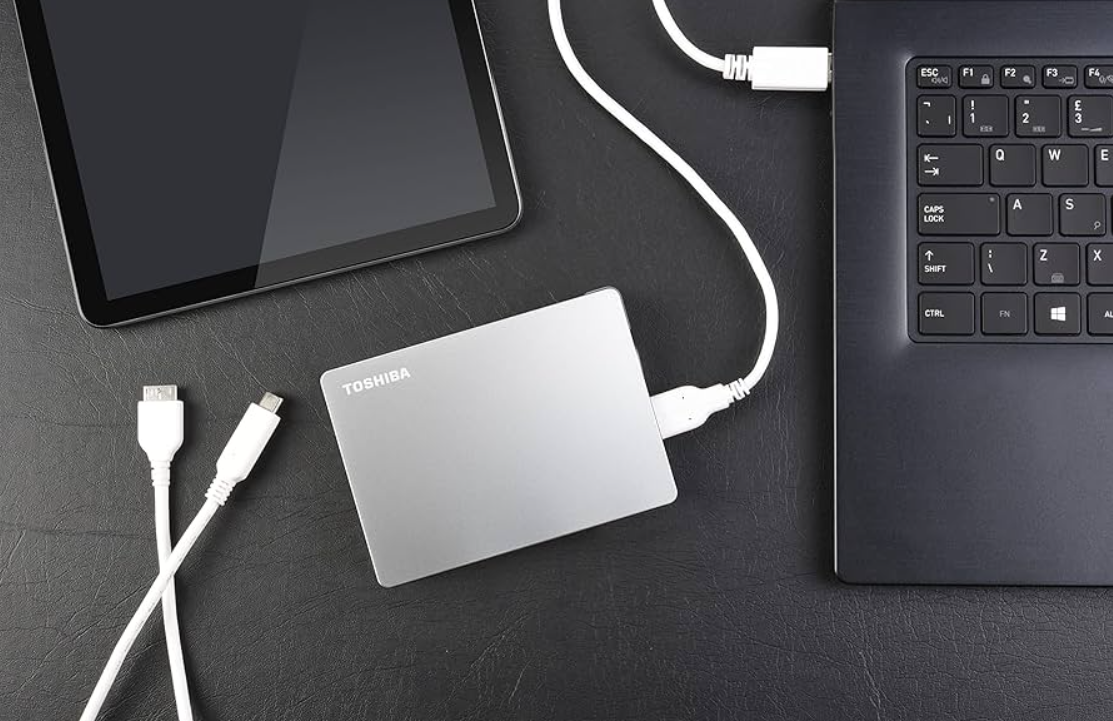
Connecting the drive to your computer
- USB 3.0 Micro-B connector
- Power/Data indicator light
- USB 3.0 Standard-A connector
- USB 3.0 host backward compatible to USB 2.0
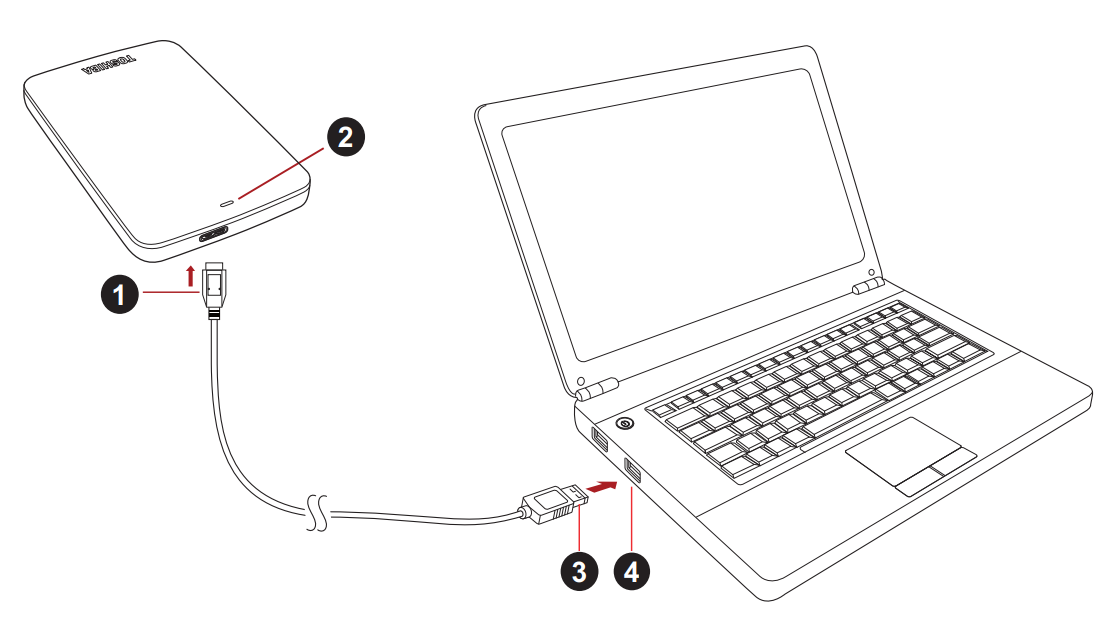
With your computer powered on and fully booted up, plug the USB 3.0 Standard-A connector into a USB port of your host system, or an active USB HUB.
NOTE:You may need USB 3.0 Express Card Host Controller for your computer if the computer doesn’t have USB 3.0 port. You also can connect the device to USB 2.0 port of your computer, However the transfer rate will be downgraded to that of USB 2.0.
- Now, plug the USB 3.0 micro-B connector into the corresponding port of the drive itself.
< Windows PC >
Immediately,- the Power/Data indicator light will illuminate
- the drive will power up
- the drive should mount and a new drive icon should appear in “My Computer”
< Mac >
Immediately, - the Power/Data indicator light will illuminate
- the drive will power up and is ready to use
Dismount and disconnect the drive
It is strongly recommended not to unplug the drive by just unplugging the cable connection as it may be that data is written to the drive at that time.
Such data will be lost and the drive may be damaged physically!Please follow the steps below for a safe dismount of the drive.
< Windows PC >
- Click the “Hardware and Eject Media – icon”
A pop-up message box will appear listing the external devices connected to your computer. - Select the TOSHIBA drive to eject.
After a few seconds, you will get the notification that it is now safe to remove the device. - Click “OK” and you can unplug the drive now.
< Mac >
Ctrl-click on the hard disk icon and choose “Eject”. OR Drag the hard disk icon to the trashcan.
You can unplug the drive now.
Cleaning the drive case / enclosure
Before cleaning the drive, make sure that it’s physically disconnected from the computer. We suggest to use standard products for cleaning it and to make sure that possible remaining liquid on the surface will be wiped off.
Further Advise
For any further action of normal operation such as renaming the drive, backup data, or file management, we suggest to read your operation system user’s manual.
Also for maintenance tasks such as defragmenting and optimisation we suggest to refer to the operating system user’s manual.
We also strongly suggest having anti-virus software installed to protect your data against intended damage caused by virus or trojan programs.
Troubleshooting
My computer does not recognize the disk drive at all.
- Make sure all of your connections are secure.
- If your drive is connected via a USB hub, make sure that it has its own power supply.
- If using an add-on card, make sure it is working properly and update the software/firmware.
Is it dangerous if the drive feels warm whilst in operation?
A: This is normal, and therefore not dangerous.
The drive gives me a “Device cannot start.”
A: Two possible reasons. It is either a power problem and you should check the connections, or the drive has a malfunction and requires service.
I cannot see my drive in “My Computer”, but it does appear in the Device Manager.
A: Follow these instructions
- Right-click “My Computer”.
- Select “Manage” in the pop-up menu.
- Select “Disk Management”. You should see a list of available storage devices.
- Check whether your drive is listed.
- Right-click the right hand box and select “Delete Partition” in the pop-up menu.
- Right-click the box and select “Create New Partition” in the pop-up menu.
- Then select “Primary Partition” in the partition wizard window. Click next.
- A drive letter will be displayed, which you can change. Click next.
- Confirm to format the drive.
NOTE:When you format the drive all the data on your drive will be deleted.
As I try to format the drive, I receive the message “Could not complete format”.
A: This can be caused by formatting the drive with FAT file system. Try “NTFS” file system. This should solve the problem.
Pros & Cons of Toshiba Canvio Basics Hard Drive
Pros:
- Large storage capacity of up to 4TB
- Fast data transfer speeds with USB 3.0 interface
- Sleek and compact design
- Plug-and-play functionality
- Compatible with both Windows and Mac operating systems
Cons:
- No built-in encryption or security features
- No included software for automatic backups
- No shock or water resistance
- No LED indicator for power or data transfer
Customer Reviews about Toshiba Canvio Basics Hard Drive
Customers generally have positive things to say about the Toshiba Canvio Basics Hard Drive. They appreciate its large storage capacity, fast data transfer speeds, and plug-and-play functionality. Some customers have noted that the hard drive can get a bit warm during extended use, but this does not seem to affect performance. The most common complaints are about the lack of built-in encryption or security features and the lack of included software for automatic backups.
Faqs
Is it possible to transfer an operating system from one machine to another using Toshiba Canvio Basics Hard Drive?
What interface does the Toshiba Canvio Basics Hard Drive use?
What is the Toshiba Canvio Basics's data transfer speed?
Is there a shockproof Toshiba Canvio Basics Hard Drive?
How can I use Toshiba Canvio Basics Hard Drive to create a file backup?
Why is a fan not required for theToshiba Canvio Basics Hard Drive?
How do I format the Toshiba Canvio Basics Hard Drive for use with a Mac?
How do I transfer files to and from the Toshiba Canvio Basics Hard Drive?
Can I use the Toshiba Canvio Basics Hard Drive with a Linux operating system?
What is the Toshiba Canvio Basics Hard Drive's warranty?
Leave a Comment