How to Use: Polaroid Spectra Camera 1200si User Manual
Content
Introduction
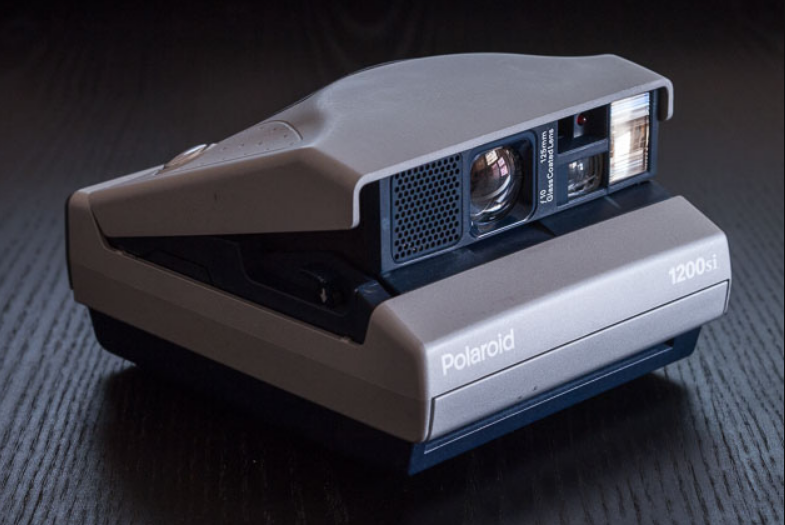
The Polaroid Spectra Camera 1200si is a classic instant camera that brings nostalgia and creativity to photography enthusiasts. Designed for the Image/Spectra film format, this camera features a 125mm lens with an f/10 maximum aperture and an advanced autofocus system for sharp images. Priced at $249.00, the 1200si offers various settings, including a built-in flash and exposure controls, allowing users to capture stunning photos with ease. Its compact design and user-friendly interface make it perfect for both casual snapshots and artistic projects.
Specifications
Spectra boasts several key features that make it a standout in the world of instant photography:
- Uses Polaroid Spectra film, which produces 3.5 x 2.9 inch photographs.
- Multiple exposure modes including single shot, continuous shooting, and self-timer.
- Built-in flash with adjustable intensity.
- Automatic focus with close-up lens for macro shots.
- Battery-powered operation using 6 AA batteries.
- Ergonomic design with comfortable grip and intuitive controls.
Front View
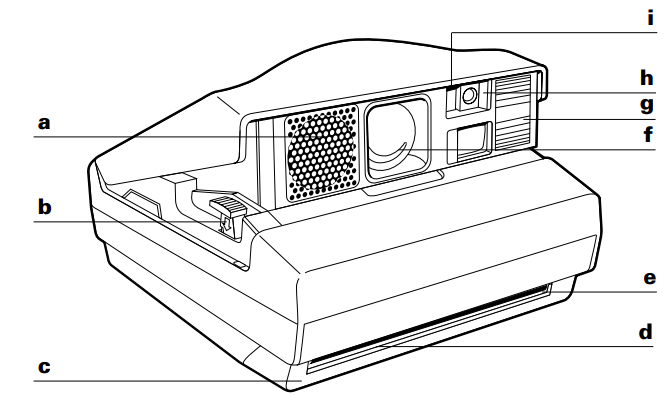
- Sonar range finder
- Film door release
- Film door
- Film exit
- Film shade
- Quintic, three-element, 125mm lens g Programmed flash
- Photocell
- Self-timer indicator (1200si)
Polaroid Spectra Camera 1200si Rear View
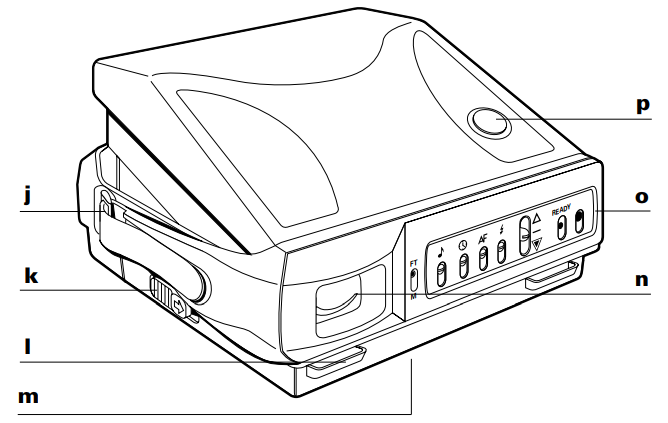
- Hand strap
- Release latch (open/close camera)
- Neck strap connector
- Tripod socket
- Viewfinder
- System control panel (1200si shown)
- Two-stage shutter button
Control Panel
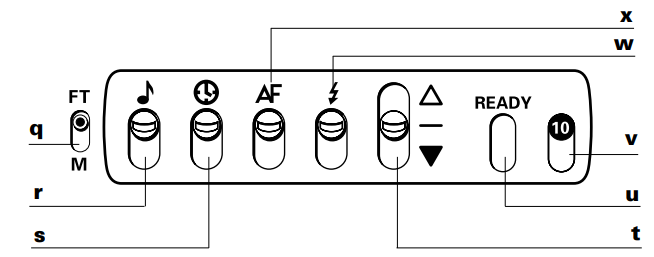
- Feet or meters selector (1200si)
- Audio signal switch (1200si)
- Self-timer switch (1200si)
- Exposure control (1200si/1200i)
- Recharge indicator (1200si/1200i)
- Picture counter (1200si/1200i)
- Programmed flash override (1200si)
- Sonar autofocus override (1200si)
Description
Polaroid Camera features a streamlined and robust design, rendering it both practical and visually appealing. The camera possesses a durable plastic chassis with an ergonomic grip, guaranteeing a secure fit in the hand during prolonged usage. The user interface is user-friendly, with clear labeling and accessible buttons that provide smooth navigation of the many functionalities.
The camera's capacity to generate high-quality, full-color images is one of its most enticing features. Each photograph is processed immediately, enabling users to witness their creations emerge before them. The use of a close-up lens and adjustable flash enhances adaptability, allowing users to record a diverse array of scenes with accuracy.
Opening and Closing the Camera
To open, slide release latch (a) in direction of arrow. Camera opens automatically.
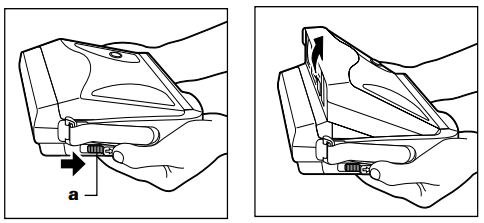
WARNING: DO NOT force cover open as it will damage camera.

To close, slide release latch (a) in direction of arrow. Hold camera as shown. Close lid and let go of release latch.
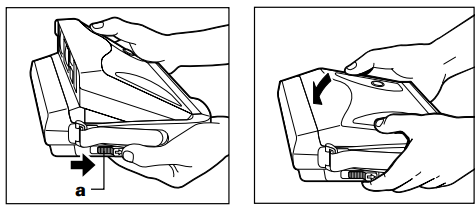
WARNING: DO NOT force cover closed as it will damage camera.

Loading and Unloading the Film
Note: Use only Polaroid film. Before use, check expiration date.
This camera uses 1200 film with 12 frames per pack, or Spectra or Image 990 film with 10 frames per pack.
12- frame film:
- Blank = no film pack inserted
- S = start, numbers count up
- E = empty, 12 frames taken
10-frame film:
- Blank = no film pack inserted
- S = start, numbers count up
- 10 (orange) = empty, 10 frames taken
- 11, E (orange) = empty, camera cycled beyond last (10th) frame
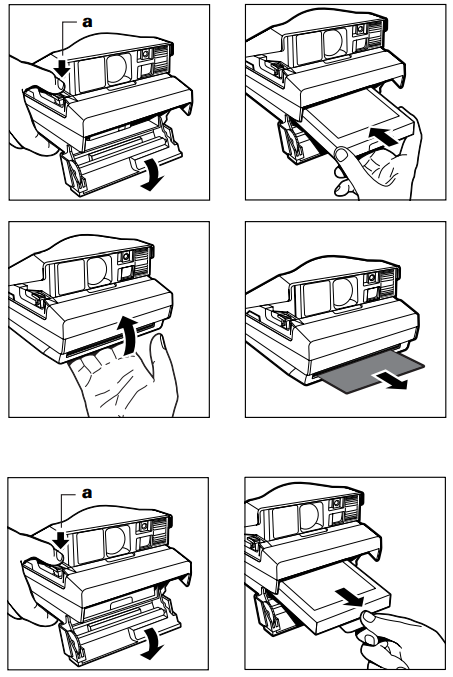
- To load the film, press film door release (a) to open.
- Hold film by edges. Insert film pack as shown. Push film pack in until a "click" is heard.
- Close film door. Film cover ejects automatically.
- To unload film, press film door release (a) to open. Pull tab to remove empty film pack.
Taking Pictures with the 1200si
- For horizontal photos, hold camera as shown in a.
- For vertical photos, hold camera as shown in b.
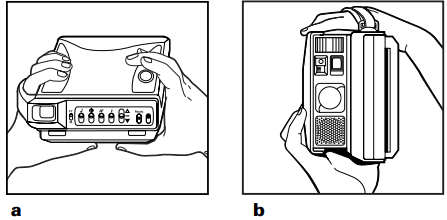
- Frame your subject in viewfinder.
- Press shutter button halfway. The distance to your subject (in meters or feet) and a symbol are displayed. A green symbol indicates that it is okay to take photo.
Press shutter button all the way. The photo is automatically ejected.

Note: If flash or focus is not correct, camera beeps and/or a flashing yellow caution symbol appears. Adjust the camera or reposition your subject as described in the next section.
If the flash or focus is not correct. . .
When the caution symbol and the following error indicators appear:
- Your subject is too close. The number “0.1” is displayed. Release shutter button and stand at least 0.6 m (2 ft.) from subject.
- Your subject is beyond flash range. A number from 4.8 to 6.2 is displayed. Release shutter button and position your subject within the 0.6 m to 4.6 m (2-15 ft.) flash range.
- Your subject is within range, but the flash is off. A number from 4.8 to 6.2 is displayed. Slide the flash switch up to turn flash on.
Note: Distance readings do not appear when subject is beyond 6.2 m (20 ft).

Other Features
Exposure Control
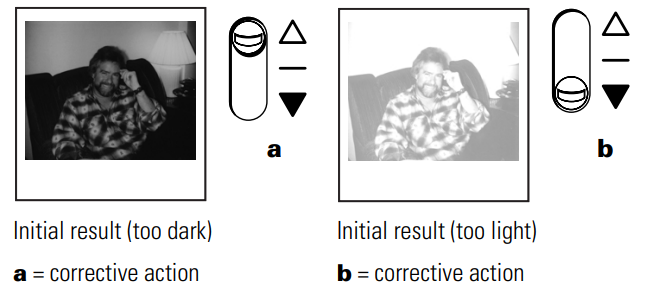
Use this feature to retake photo that was too light or too dark. To lighten dark photo, slide exposure control up (a). To darken light photo, slide exposure control down (b). Retake photo.
Using Self-timer
- Place camera on tripod or other secure surface and set up photo.
- Press shutter button halfway and release button. Slide self-timer switch down.
- You have 12 seconds before self-timer activates shutter release.
Camera beeps and red light flashes for 10 seconds, then beeps steadily and red light shines continuously for an addi-tional two seconds before taking photo.

- Slide self-timer up. Photo ejects automatically.
Note: To avoid double exposure, do not close camera before
Taking Photos Through Glass
Use these features
- To override autofocus and autoflash slide their controls down to OFF position.
Always return controls to normal position after using.

Setup Guide
To utilize the Polaroid Spectra, adhere to the following procedures:
- Insert six AA batteries into the battery compartment situated at the base of the camera.
- Insert the Polaroid Spectra film pack into the camera, ensuring it locks into position firmly.
- Modify the focus settings according to the distance of your subject via the focus slider.
- Select your preferred exposure mode (single shot, continuous shooting, or self-timer) using the mode selection.
- Position and compose your photograph using the viewfinder, then depress the shutter button to capture an image.
The camera will expel the film, which will develop after a few minutes, unveiling your snapshot.
Camera Maintenance
- Do not touch lens. Clean camera lens with soft, lint-free cloth.
If spots or banding appears on photos, camera may have dirty developer rollers.

- To clean developer rollers, dampen clean cloth with tap water.
Open film door and thoroughly clean rollers. If film is in camera, clean rollers in dimly lit area.

Developing Photos

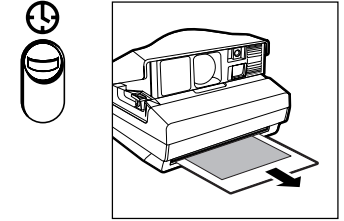
Do not shake. Do not bend. If temperature is below 55° F (13° C) place developing photo in warm location, such as your pocket.
Troubleshooting
Guide to better pictures
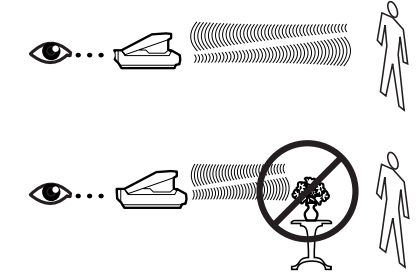
Be sure soundwaves have clear path to your subject.
If an object in foreground prevents soundwaves from reach-ing your subject, lens focuses on foreground object. Subject will be out of focus.
Blurry Picture
| Cause | Solution |
|---|---|
When subject is not centered in the picture, the sound waves pass by the subject and measure the distance to the background. This causes the subject to be unclear because the lens focuses on the background.  | Center the subject in the picture. Or, if you want to keep your subject off-center, frame your subject in the middle of the viewfinder. Press and hold the shutter button halfway to lock in the correct lens setting. Then reframe your subject off center and press the shutter button all the way. |
Object in foreground prevented sound waves from measuring correctly. Lens focuses on object, causing unclear and possibly dark subject.  | The sound waves travel to the central part of the scene. Be sure there are no objects in front of your subject. |
Background was too far from subject. Subject may have been beyond flash range.  | Place subject near a background and keep the exposure control in the normal position. Stay within flash range of 0.6 m to 4.6 m (2 to 15 ft), and keep the exposure control in the normal position. |
| Issue | Cause | Solution |
|---|---|---|
Repeated spots or bar pattern  | Developer rollers inside the film door need to be cleaned. | Open film door in indirect light (do not remove film). While turning rollers, clean them with a lint-free cloth dampened with water. |
Damaged picture  | Picture was shaken back and forth or bent shortly after it was ejected from the camera. | During first 60 seconds of development, handle print gently; hold it only by its wide white border, and do not wave or bend it. |
| Picture was left in the exit slot, and camera was set down on a table or other surface. | Remove print from exit slot as soon as it ejects. | |
Subject too dark  | Camera’s photocell measured the bright window light, causing the subject to be too dark. | Reposition subject away from the bright background. |
 | When a bright source of light (lamplight, candlelight, etc.) is in the central part of the scene and in front of the subject, the camera’s photocell will measure the bright light, causing the subject to be too dark. | Move the source of light to one side of your subject so it is not in the central part of the scene. |
| Picture too blue or too red/yellow | Picture taken at temperatures below 55°F (13°C) can have a blue tint. | In cold weather, keep camera and film as warm as possible. Immediately place developing picture in a warm pocket for at least a minute, being careful not to bend it. |
| Pictures taken at temperatures above 95°F (35°C) can have a red or yellow tint. | Avoid storing camera and film in hot places, such as glove or luggage compartments of a car, or near a heat source, such as a radiator. |
Pros & Cons
Pros
- Premium, full-color instant pictures.
- Various exposure modes for adaptable photography.
- Integrated flash with variable intensity.
- Automatic focus with macro lens functionality.
- Ergonomic design for enhanced comfort throughout use.
Cons
- Comparatively costly in relation to other instant cameras available in the market.
- Reliance on certain Polaroid Spectra film, which may be difficult to locate in certain regions.
- The battery life may be diminished with heavy use.
- No digital preview or chance to delete errors.
Customer Reviews
Customers commend 1200si for its capacity to generate exquisite instant photographs. Numerous individuals like the user-friendliness and the diverse functionalities that facilitate creative autonomy. Nonetheless, several users observe that locating suitable film might be difficult and that the camera's battery longevity is insufficient for their preferences.
A prevalent grievance is the expense of replacing film packs, which may accumulate over time. Notwithstanding these small concerns, the camera continues to be a preferred choice among instant photography aficionados.
Warranty
Three-year limited warranty
Three-year limited warranty except in U. S., Latin America and Canada, where one-year limited warranty applies
Faqs
What type of film does the Polaroid Spectra Camera 1200si use?
How do I load the film into the Polaroid Spectra Camera 1200si?
Can I use other types of Polaroid film with the 1200si?
Why are my photos coming out blurry?
How long does it take for the photos to develop?
Can I use the Polaroid Spectra Camera 1200si indoors?
How many batteries does the Polaroid Spectra Camera 1200si require?
Is the Polaroid Spectra Camera 1200si compatible with newer Polaroid films?
How do I adjust the focus on the Polaroid Spectra Camera 1200si?
What should I do if my flash is not working?
Leave a Comment
