Powerbass AutoSound Speaker System OE-6C Guide | Specs & Features
Content
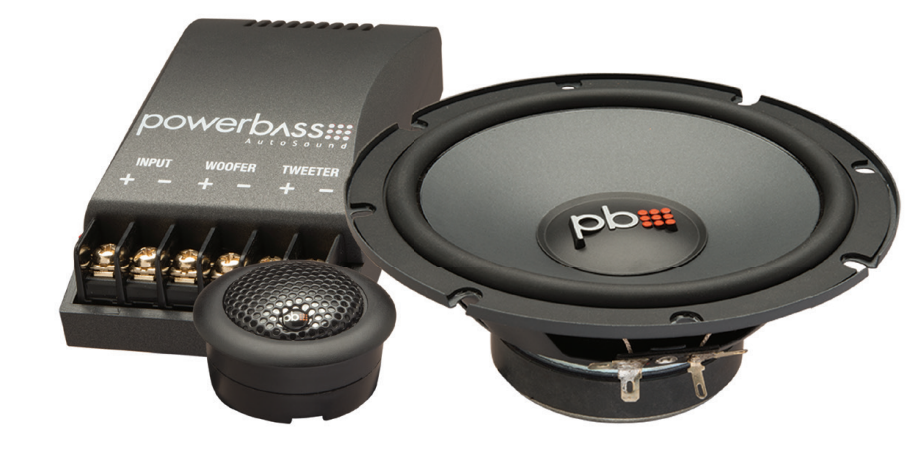
Powerbass Autosound Speaker System OE-6C Guide
The Powerbass Autosound Speaker System OE-6C is a high-quality audio solution designed for car enthusiasts who want to upgrade their vehicle's audio system. These speakers are perfect for replacing factory-installed speakers, delivering clear and powerful sound. The estimated price for the Powerbass Autosound Speaker System OE-6C is around $100 to $150 per pair, making it an affordable option for many car owners. The product is currently available in the market.
POWERBASS AUTOSOUND OE COMPONENT FEATURES
- Advanced Injection Molded Cone: An injection molded PP cone with carbon fiber was developed for better bass performance while minimizing distortion. This ultra lightweight cone is resistant to elements of the environment while giving the listener impeccable listening experience over the factory speakers.
- Non-resonant Basket Treatment: Each steel speaker basket has been treated with a proprietary resonant damping material making the speaker platform acoustically “dead.”
- High Damping Butyl Rubber Surround: Butyl rubber was chosen to ensure linear travel throughout the entire frequency range resulting in more bass output and higher efficiency while reducing distortion.
- Aluminum Hard Dome Tweeter: Ferrofluid enhanced aluminum dome tweeters deliver sharp clarity and crisp treble reproduction.
- High Power 2-ohm Voice Coil: These highly efficient 2-ohm coils were designed for greater efficiency and are compatible with most premium factory sound systems to make your vehicle sound better than ever.
- Deluxe Computer Optimized Crossover Network: The asymmetrical crossovers included were designed using a sophisticated computer program known as LEAP and provide a smooth, flat frequency transition between the midrange and tweeter. Each 12db 2-way crossover features high quality air and iron core inductors plus parallel stacked high stability metal film capacitors to insure audiophile sound separation.
- Tweeter Mounting Kit: Flush, surface and angle-mounting cups allows multiple mounting options for custom tailored high frequency dispersion.
- Additional Features: Acoustically transparent speaker grills, professional mounting hardware and splice-in speaker wiring harnesses add further value to your speaker investment.
SPECIFICATIONS FOR POWERBASS OE COMPONENTS
(Due to Constant Improvements, Specifications and Parameters are subject to change without notice.)
Model | Size | Nominal Impedance | Frequency Response | Sensitivity1W/1M | Magnet Size | Mounting Depth | Power RMS/ Peak |
OE-6C | 6.5” | 2-ohm | 58Hz-21kHz | 90dB | 8.6oz. | 2.13” (54mm) | 75W/150W |
Before beginning your installation, thoroughly read this guide and keep it as a reference. It will give you tips on proper placement, wiring, and installation as well as how to obtain the best sound from the PowerBass speakers you have selected.
OE-SERIES COMPONENT ALUMINUM TWEETER SPECIFICATIONS
DOME SIZE | MOUNTING(DIAMETER) | NOMINALIMPEDANCE | FREQUENCYRESPONE | SENSITIVITY(1M / 1M) | MOUNTING(DEPTH) | POWER(RMS/PEAK) |
1.0” | 1 7/8” | 3W | 3K-21Khz | 91 dB | 7/8” | 45/90 |
INSTALLATION EXPERIENCE
Installation of PowerBass Autosound Speakers requires experience with a variety of mechanical and elec-trical procedures. This manual only provides general installation and operation instructions. If you have any reservations about your installation skills or lack of the proper tools, please contact your local PowerBass Autosound dealer for assistance.
TIPS TO GET THE MOST OUT OF YOUR POWERBASS SYSTEM
Your PowerBass Autosound speakers have been meticulous engineered and designed to handle high power musical reproduction. Despite their rugged construction, it is possible to damage your speaker if they are improperly used. In general, you will hear distortion as a so-called warning before any damage occurs. If you hear distortion in your system, immediately reduce the musical level to the point where the sound retains its clarity.
- Be sure you supply the speakers with enough unclipped amplifier power to drive them properly. (More damage can be done to a speaker by under-powering and clipping your amplifier than any other way!)
- To avoid any possible sound cancellation from the front of the speaker to that of the rear of the speak-er, cut a panel of Masonite or MDF to firmly mount the speaker if the vehicle’s original cutout is too big.
- When connecting speaker wires from the amplifier or head unit to that of the speaker itself, pay attention to the polarity of the connection. This will insure optimum sound reproduction and performance.
- Do not mount any speakers or external crossovers where they will get wet.
PREPARING FOR INSTALLATION
NOTE: The tools listed below may be required for proper installation.
- An electric drill with drill bits
- Phillips-head and standard screwdrivers
- Wire strippers
- Crimping tool and needle-nose pliers
- Hole saw
INSTALLATION PRECAUTIONS
NOTE: Proceed only if you are a qualified installer otherwise; let your dealer do it.
- Always wear protective eyewear when using tools.
- Turn off all stereo and other electrical devices before you begin.
- Disconnect the (-) negative lead from your vehicle’s battery.
- Keep the speakers in the package until final installation.
- Check to see if there is enough clearance behind the mounting surface before installing the speakers.
- When running speaker wires through sheet metal, be sure to use grommets to properly insulate the wires from metal edges.
- Since these speakers utilize a unique low profile tweeter housing that has minimal tweeter protrusion, original factory mounting cutouts can still be used with the factory grills in many cases.
- These PowerBass Autosound speakers can be used above or below the mounting hole. Typically, your vehicle factory’s speaker cutouts will accommodate these new speakers without any modifications. When the speaker has been correctly installed, there should be no air leaks between the front and back of the speaker.
- For door installations, check the clearance of the windows throughout the entire range of the window’s travel.
- Mount your speakers securely! If the speaker has four or more mounting holes, it is best to use all of them.
- Check the available mounting depth before installing the speaker. Use care when removing factory grills, door panels and factory speakers.
COMPONENT SYSTEM INSTALLATION
Component Midrange
The proper installation procedure for mounting these high performance mid-range speakers is to secure the speaker to the vehicle’s speaker mounting hole. Once the speaker is in place, determine if the sup-plied grill needs to be installed. If so, place the grill in place over the speaker and screw the speaker into the mounting hole.
Component Tweeter
These high quality tweeters come complete with several mounting housings for installation versatility. Once you have chosen the housing that is to be used, gently press the tweeter into the proper mounting cup. Experiment with the tweeter positioned in several locations to determine the best imaging result before cutting out any panel. Typically tweeters should be mounted on axis and as close to ear level as possible. If the tweeter has to be removed from the mounting cup, insert a small screwdriver in the back of the tweeter and carefully push the tweeter from the mounting cup.
INSTALLATION PROCEDURES
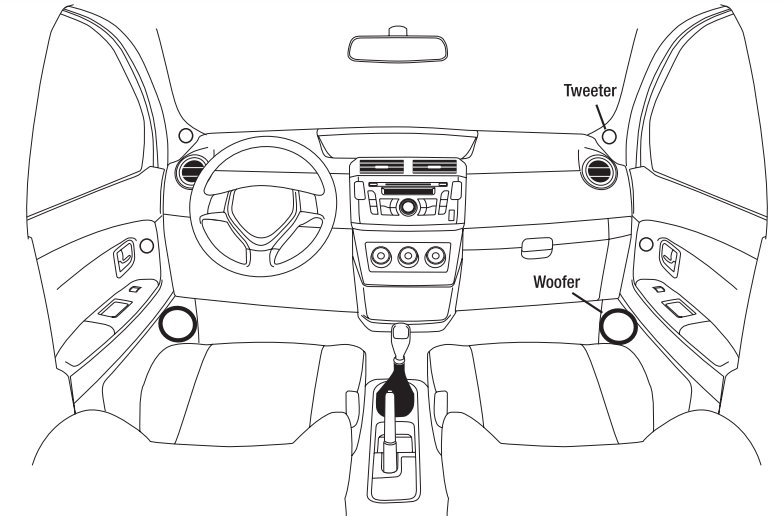
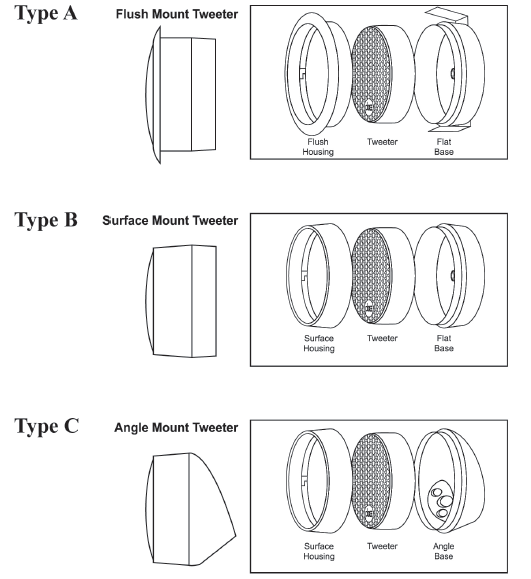
By mounting the tweeter separately from the woofer (or mid-range driver) the installer can choose the best location for sound quality and imaging. Three mounting types are possible allowing more versatility for the tweeter location. These are flush mount, surface mount, and angle mount.
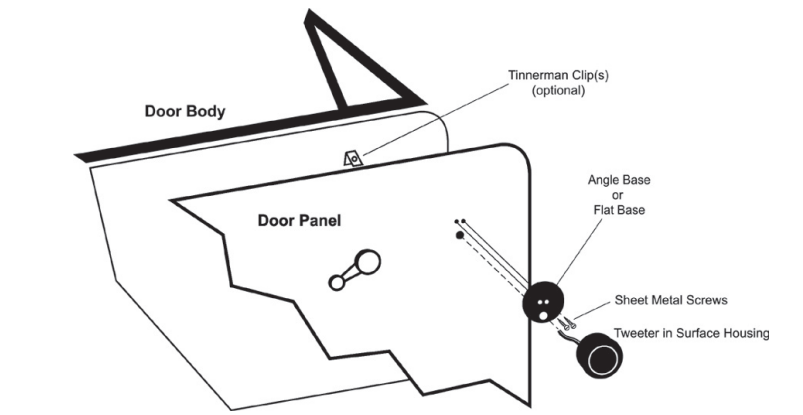
Flush Mounting (Type A)
The best location for the tweeter is usually high up on the door and as far forward as possible without interference from the dashboard. If the desired location is flat and space behind the door panel allows the use of the flush mount housing, follow the drawing as shown below:
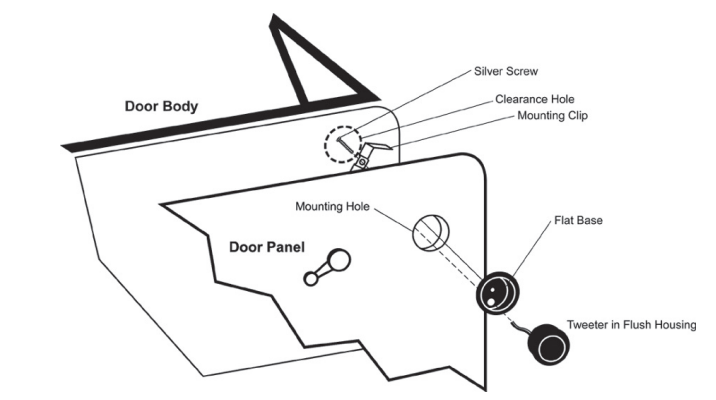
After checking for clearance, cut the mounting hole in the door panel (see Tweeter Specifications for hole size). Mount the Flat Base from the outside with the mounting clip on the inside of the door panel. Secure the mounting clip to the Flat Base with the long silver screw provided.
Surface/Angle Mounting (Type B and C)
If mounting the tweeter on the surface works out best, refer to the following drawing to see how to best mount the tweeter. Black sheet metal screws have been provided to attach the surface base to the door panel.
AUTOSOUND COMPONENT TWEETERS
These high quality tweeters come complete with several mounting housings for installation versatility. Typically tweeters should be mounted on axis and as close to ear level as possible. After you have chosen the housing to be used, gently press the tweeter in the proper mounting base. Once the tweeter base is mounted, push and “twist” the housing until it locks to the base. Below are exploded views showing the possible types of tweeter mounting.
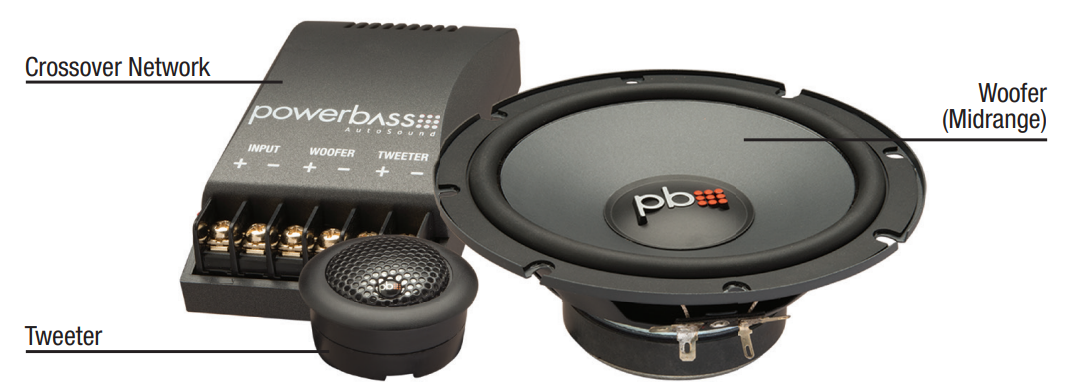
CROSSOVER NETWORK INSTALLATION AND WIRING
Your PowerBass Autosound Component system contains two separate 2-way crossover networks. When choosing a location to mount the crossovers, keep in mind they contain electronic parts which can be damaged by moisture and dirt.
Correct wiring of the crossover is critical to avoid damage to the speakers and ensure true high fidelity sound. Pay close attention to the markings on the crossover to be certain the correct speakers are in the correct outlets as follows:
- Connect the amplifier or head unit output to the crossover’s INPUT terminals.
- Connect the terminals labeled WOOFER to the component midrange speaker.
- Connect the terminals labeled TWEETER to the component tweeter set.
CAUTION: Care must be taken when adjusting the screws on the input terminals that fasten the speaker wires to the crossover network. Make sure each connection is secure without over tightening. Use of power tools to tighten these screws is not recommended as they can strip the screws and permanently damage the input terminals.
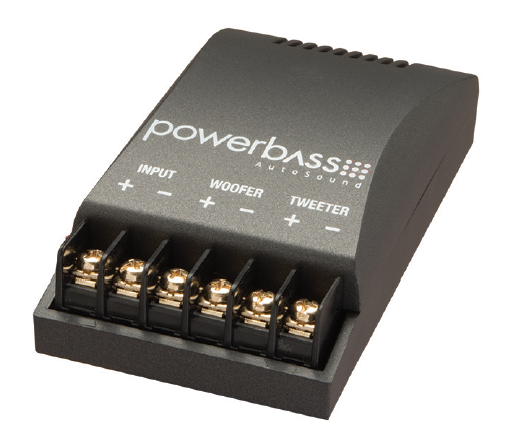
NOTE: BE SURE TO OBSERVE PROPER POLARITY WHEN CONNECTING SPEAKER WIRES TO THE CROSSOVER NETWORK TERMINALS.
This manual is the exclusive property of PowerBass USA, Inc. Any reproduction of this manual, or use other than its intentions is strictly prohibited without the express consent of PowerBass USA, Inc. Copyright 2020 PowerBass USA, Inc.
LIMITED WARRANTY POLICY
PowerBass USA, Inc. offers limited warranty on PowerBass products under normal use on the following terms: PowerBass Autosound Speakers are to be free of defects in material and workmanship for a period of one (1) year. This warranty applies only to PowerBass products sold to consumers by Authorized PowerBass Dealers in the United States of America. Products purchased by consumers from a PowerBass dealer in another country are covered only by that coun-try’s Distributor and not by PowerBass USA. This warranty covers only the original purchaser of PowerBass product. In order to receive service, the purchaser must provide PowerBass with the receipt stating the consumer name, dealer, product and date of purchase.
Description
The Powerbass Autosound Speaker System OE-6C features a 6.5-inch woofer and a 0.5-inch tweeter, providing a frequency response of 50 Hz to 20 kHz. The speakers have a sensitivity of 90 dB and a power handling capacity of up to 60 watts RMS. The speakers come with a grille and mounting hardware, making it easy to install. The product is designed to fit in most standard speaker locations in cars.
Troubleshooting
If you encounter any issues with the Powerbass Autosound Speaker System OE-6C, here are some common problems and solutions:
- No Sound: Ensure that the speakers are properly connected to the audio source and that the audio source is turned on.
- Distorted Sound: Check if the speakers are overpowered or if the volume is too high. Reduce the volume or lower the power to the speakers.
- Rattling Noise: Make sure that the speakers are securely mounted and that there is no contact between the speakers and any other objects.
Pros & Cons
Pros
- High-quality sound
- Easy to install
- Affordable price
- Durable construction
Cons
- May not fit in some cars
- No built-in crossover
Customer Reviews
Customers who have purchased the Powerbass Autosound Speaker System OE-6C have praised its sound quality and ease of installation. However, some customers have reported issues with the speakers not fitting in their cars. The most common complaint is the lack of a built-in crossover.
Faqs
What is the frequency response of the Powerbass Autosound Speaker System OE-6C?
What is the sensitivity of the Powerbass Autosound Speaker System OE-6C?
What is the power handling capacity of the Powerbass Autosound Speaker System OE-6C?
What is included in the box with the Powerbass Autosound Speaker System OE-6C?
Can the Powerbass Autosound Speaker System OE-6C be used in motorcycles?
Do the Powerbass Autosound Speaker System OE-6C have a built-in crossover?
What is the warranty period for the Powerbass Autosound Speaker System OE-6C?
Can the Powerbass Autosound Speaker System OE-6C be used with aftermarket amplifiers?
How do I install the Powerbass Autosound Speaker System OE-6C?
What is the price of the Powerbass Autosound Speaker System OE-6C?
Leave a Comment