Powerbass MC-200 Digital Media Center | TFT Display Key Operations
Content

Powerbass MC-200 Digital Media Center: The Ultimate Entertainment Hub
Introduction
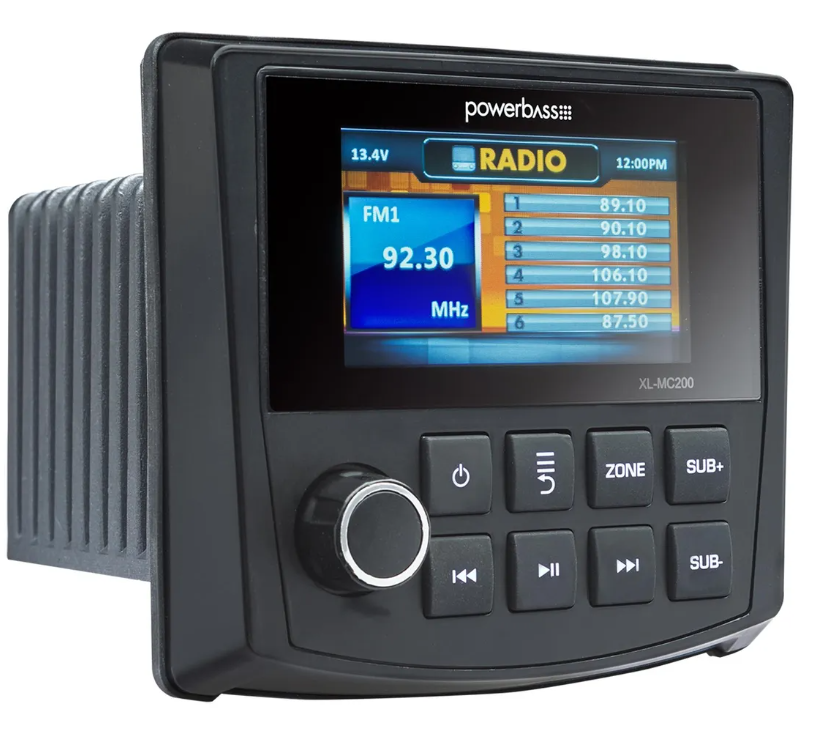
Experience unparalleled entertainment with the Powerbass Digital Media Center, designed to provide you with an immersive audio and video experience. This versatile device offers a wide range of features, making it an ideal choice for music and movie enthusiasts. With an estimated price range of $200 to $250 and a launch date set for early Q2 2023, the Powerbass MC-200 Digital Media Center is poised to revolutionize your home entertainment setup. Congratulations on your purchase of PowerBass Xtreme Marine Media Center. You now own a product of uncompromising design and engineering from a factory that truly believes in the relentless pursuit of perfection. Incorporating the highest quality parts and state-of-the-art materials. At PowerBass USA, Inc. we are confident you will have many years of outstanding enjoyment from this great investment. For maximum performance, we recommend that you have your new Powerbass MC-200 Digital Media Center product installed by an Authorized PowerBass Xtreme Dealer.
Warning
Continuous exposure to sound pressure levels in excess of 100 dB can cause permanent hearing loss. PowerBass Speakers are capable of producing sound pressure levels well over 170 dB. Please observe all local sound ordinances while listening to your PowerBass system. PowerBass USA, Inc. accepts no liability for hearing loss, bodily injury, or property damage due to the result of use or misuse of this product.
Detailed Description
The Powerbass Digital Media Center is a feature-rich entertainment device that supports multiple audio and video formats. Its sleek design and user-friendly interface make it easy to navigate and control. Key features include a high-resolution 7-inch touchscreen display, built-in Wi-Fi and Bluetooth connectivity, and a powerful amplifier that delivers crisp and clear audio. The device also comes with a variety of input options, such as USB, SD card, and AUX, allowing you to connect various devices and enjoy your favorite content.
SPECIFICATIONS of Powerbass MC-200 Digital Media Center
- Power Supply Requirements: DC 12 Volts, Negative Ground DC 10.5-17.9 Volts, Negative Ground Chassis Dimensions: 94mm(W) x 84mm(D) x 70mm(H) / 3.7” x 3.3” x 2.72”
- Mounting Depth (including harness brace): 105mm / 4.13”
- Maximum Output Power: 4 x 50 W @ 2 Ohms
- Fuse Rating: 15A
- Pre-output Voltage/Load: 2.5Vrms/10k ohm load
- Subwoofer Preamp out: 1 Pair RCA OUT 3 ZONE Preout: 3 Pair RCA OUT (Zone1, Zone2, Zone3)
- Frequency Response: 20Hz-20KHz
- TFT display: 3 inch 960x240 pixel
RADIO FM
- Frequency Range (EUROPE AREA): 87.5-108 MHz (Step 50 KHz) Frequency Range (USA AREA): 87.5-107.9 MHz (Step 200 KHz) Preset memory stations: 18
RADIO AM/WB
- Frequency Range (EUROPE AREA): 522-1620 KHz (Step 9 KHz) Frequency Range (USA AREA): 530-1710 KHz (Step 10 KHz)
- Preset memory stations: 12
WB RADIO
- Frequency Range: 162.400-162.550 MHz (Step 25 KHz)
- Preset memory stations: 7
USB INTERFACE
- USB Compatibility: USB 2.0
- Support format: MP3/WMA
- USB Charging : 2A
- iPhone Control : Direct USB (Only supports lightning interface devices)
BLUETOOTH
- Music Streaming: A2DP
- Bluetooth VERSION: 5.0
KEY OPERATIONS
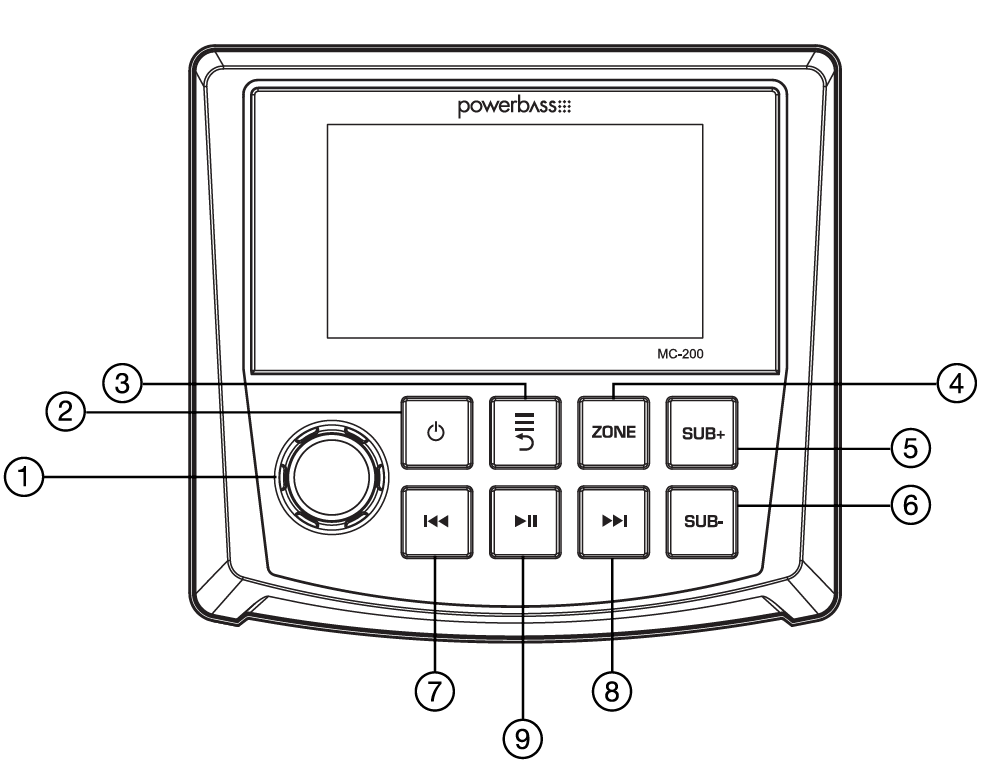
- ROTARY ENCODER Knob
- POWER/MENU Button
- MODES/SETTINGS Button
- ZONE Button
- SUB VOL+ Button
- SUB VOL- Button
- SEEK / TRACK DOWN Button
- SEEK / TRACK UP Button
- PLAY/PAUSE Button
| BUTTON KEY | RADIO Press | RADIO Hold | USB Press | USB Hold | BLUETOOTH Press | BLUETOOTH Hold | AUX IN Press | AUX IN Hold |
|---|---|---|---|---|---|---|---|---|
| (1) Knob [ROTATE] | Volume +/- / Menu Navigation | Volume +/- / Menu Navigation | Volume +/- / Menu Navigation | Volume +/- / Menu Navigation | Volume +/- / Menu Navigation | Volume +/- / Menu Navigation | Volume +/- / Menu Navigation | Volume +/- / Menu Navigation |
| (1) Knob [PUSH] | ENTER/BAND FM1,2,3, AM1,2 WB | Preset 1-5 | ENTER | - | ENTER | - | ENTER | - |
| (2) Power/ Menu | MAIN MENU POWER ON | POWER OFF | MAIN MENU POWER ON | POWER OFF | MAIN MENU POWER ON | POWER OFF | MAIN MENU POWER ON | POWER OFF |
| (3) Modes/ Settings | FM/AM SETTINGS Previous Page | GENERAL SETTINGS Previous Page | USB SETTINGS Previous Page | GENERAL SETTINGS Previous Page | BLUETOOTH SETTINGS Previous Page | GENERAL SETTINGS Previous Page | GENERAL SETTINGS Previous Page | GENERAL SETTINGS Previous Page |
| (4) Zone | 3 ZONE Volume | Backlight High/Low | 3 ZONE Volume | Backlight High/Low | 3 ZONE Volume | Backlight High/Low | 3 ZONE Volume | Backlight High/Low |
| (5) Sub Vol + | Subwoofer Vol + | Subwoofer Continuous Vol + | Subwoofer Vol + | Subwoofer Continuous Vol + | Subwoofer Vol + | Subwoofer Continuous Vol + | Subwoofer Vol + | Subwoofer Continuous Vol + |
| (6) Sub Vol - | Subwoofer Vol - | Subwoofer Continuous Vol - | Subwoofer Vol - | Subwoofer Continuous Vol - | Subwoofer Vol - | Subwoofer Continuous Vol - | Subwoofer Vol - | Subwoofer Continuous Vol - |
| (7) Track/Seek Down | Seek Down | Manual Tune Down | Previous Song | Fast Rewind | Previous Song | Fast Rewind | Previous Song | Fast Rewind |
| (8) Track/Seek Up | Seek Up | Manual Tune Up | Next Song | Fast Forward | Next Song | Fast Forward | Next Song | Fast Forward |
| (9) Play/Pause | Mute | - | Play/Pause | Play/Pause | Play/Pause | - | Mute | - |
GENERAL SETTINGS
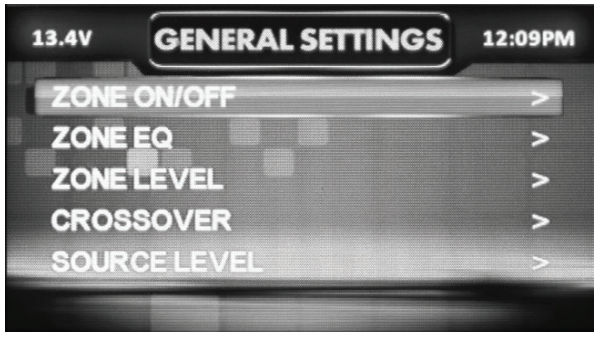
To access the Powerbass MC-200 Digital Media Center general settings, hold the MENU button until all options appear. Rotate the knob to scroll through the list of settings, press the knob to select the setting you wish to change. (Zone-ON/OFF>Zone-EQ>Zone-Level>Crossover> Source-Level>Subwoofer>Loudness>Balance>Backlight>LED-Color>Internal-Amplifier> Clock-Mode>Clock-Adjust>Factory-Reset>Version)
- ZONE ON/OFF
Press the knob to select the ZONE1/ZONE2/ZONE3 on/off options. Rotate the knob to select each ZONE. Press the knob to turn on/off. - ZONE EQ
Press the knob to select the ZONE EQ settings, Rotate the knob to select ZONE1 EQ> ZONE2 EQ > ZONE3 EQ, Use the rotary to scroll through the EQ settings. (CUSTOM > CLASSIC > JAZZ > ROCK > POP > FLAT) When setting up the CUSTOM EQ, press the knob to select the frequency. Once active, rotate the knob to adjust the frequency settings. Press the knob again to access the next frequency. Repeat until all EQ settings are complete. Press the MENU button to exit and go back up one level. - ZONE LEVEL
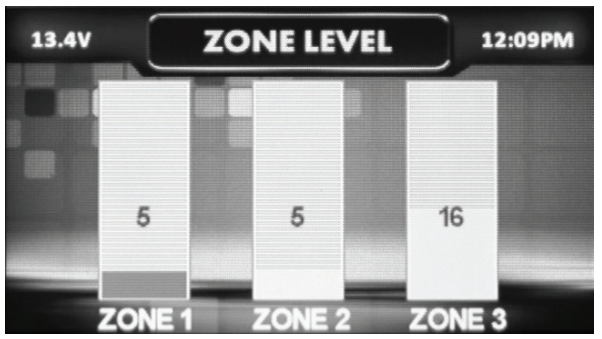
- Press the knob to select the ZONE LEVEL settings.
- Press the knob to select zone volume. (ZONE1 > ZONE2 > ZONE3 > ALL) When setting up the ZONE volume, press the knob to highlight the ZONE to adjust, rotate the knob to adjust the ZONE level settings. press the MENU button to exit and go back up one level.
- CROSSOVER
Press the knob to select crossover settings, Rotate the knob to select the crossover zone options (ZONE1 HPF> ZONE2 HPF> ZONE3 HPF>SUB LPF), Press the knob to adjust the frequency of the crossover HPF- (OFF>80Hz>100Hz>120Hz), LPF- (60Hz>80Hz>100Hz), press MENU to exit and go back up one level. - SOURCE LEVEL
To adjust the source level, scroll through the inputs (RADIO>BT>AUX>USB) to the source you want to adjust, press the knob to access the level settings. Rotate the knob to set the level (-3dB>-2dB>- 1dB>0dB>+1dB>+2dB>+3dB). - SUBWOOFER
Press the knob to access the SUBWOOFER setting. Rotate the knob to select on/off. - LOUDNESS
Press the knob to access the LOUDNESS setting. Rotate the knob to select on/off. - BALANCE
Press the knob to access the BALANCE adjustment settings. Rotate the knob button to set the left-to-right balance. - BACKLIGHT
Press the knob to access the two brightness settings. Rotate the knob to select HIGH or LOW. - LED COLOR
Press the knob to select the LED COLOR settings. Rotate the knob to scroll through the LED colors. (RED>GREEN - INTERNAL AMPLIFIER
Press the knob to select the INTERNAL AMPLIFIER option. Rotate the knob to select (ON>OFF). When not using the MC-200’s INTERNAL AMPLIFIER, select to OFF. If you are powering your speakers directly from the MC-200, select the INTERNAL AMPLIFIER to ON. - CLOCK MODE
Press the knob to select 12H or 24H CLOCK MODE. Rotate the knob to select 12-hour or 24-hour clock display mode. - CLOCK ADJUST
Press the knob to go into the CLOCK ADJUST settings. Rotate the knob to set the time. - FACTORY RESET
Press the knob to reset. Rotate the knob to select YES/NO. Selecting YES will reset your unit back to factory default settings. - VERSION
Press the knob to select VERSION to display the current firmware version of the MC-200.
BASIC OPERATION
- TURNING THE UNIT ON / OFF
Press the POWER button to turn the unit ON, hold the POWER button to turn the unit OFF. - ADJUSTING THE VOLUME
Rotate the knob left or right to desired volume level (0-40). The current volume level will be displayed during adjustment. - ADJUSTING THE SUBWOOFER OUTPUT
Press the SUB+ or SUB- buttons to adjust the subwoofer output level (0-20). - ADJUSTING THE SCREEN BRIGHTNESS
Hold the ZONE button to adjust the brightness level. - SELECTING A SOURCE
Press the POWER button to show the different source options (RADIO > BT > AUX > USB > CAMERA). Rotate the knob to scroll through sources. Press the knob to select a source to play music or media. - VOLTAGE MONITOR
In all modes, the screen will display the vehicle voltage in the top left corner. - CAMERA
The MC-200 has a reverse camera video input with reverse camera trigger. Use the CAMERA source or trigger the reverse wire to view. - ZONE LEVEL
- Press the ZONE button to access the ZONE LEVEL settings. Press the knob to select a zone. (ZONE1 > ZONE2 > ZONE3 > ALL)
- When setting up the ZONE volume, press the knob to highlight the ZONE to adjust, rotate the knob to adjust the ZONE level settings. press the MENU button to exit.
AUX OPERATION
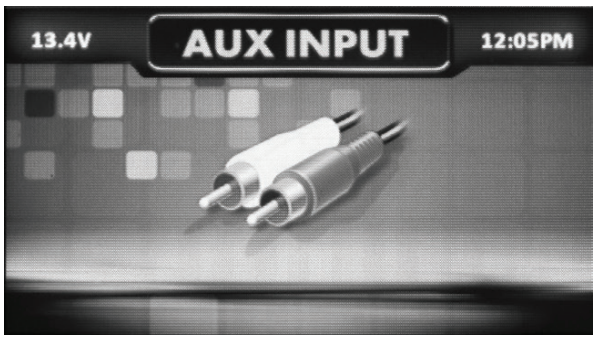
After your device is plugged into the Powerbass MC-200 Digital Media Center. Select the AUX source and use your plugged-in device to control TRACK UP/DOWN, PLAY/PAUSE, and TRACK FFWD/REV.
RADIO OPERATION (FM/AM/WB)
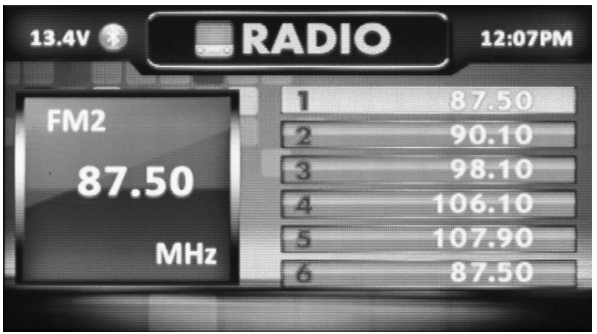
- BAND SELECTION
Press the knob to select your band of choice in the following sequence: FM1 > FM2 > FM3 > AM1 > AM2 > WB - FM SETTINGS
To access the FM SETTINGS, press the MENU when using the FM radio. This will give you access to the settings specific to the FM radio (PRESETS>SAVE PRESETS>RADIO REGION>LOCAL>FM BAND>AUTO STORE>STEREO). - PRESETS
Press the knob to access the PRESETS list. Using this feature allows you to see all PRESETS saved to the MC-200. - SAVE PRESETS
Press the knob to select the SAVE PRESETS option. You will need to be set to both the station and PRESET group you want to save first (FM1>FM2>FM3). Using this feature allows you to save stations to the MC-200. Once selected, rotate the knob to select the PRESET number (1-6) you want the station saved to. - RADIO REGION
To adjust, press the knob to select REGION , then rotate to select the TUNER REGION of your preference. (EUROPE > USA ) - LOCAL
Press the knob to select the LOCAL option. Once selected, rotate the knob to select ON or OFF. The local option tunes to nearby radio stations with sufficiently strong signals for good reception. In areas where reception is poor, switching to distance tuning enables the unit to tune in to more distant stations. Distance tuning is the default. - FM BAND
Press the knob to access the FM PRESET options (FM1>FM2>FM3). Using this feature allows you to have separate tuner preset groups to choose from. Rotate the knob to scroll through the TUNER groups and press the knob to select the group. - AUTO STORE
Press the knob to access the AUTO STORE function. You will need to be within the PRESET group you want to adjust first (FM1>FM2>FM3). This feature automatically stores presets on the MC200. It will stop when presets 1-6 are set. Select the next PRESET group and repeat to fill next set, and finally to scan the preset memorized station, each preset scan for 5 seconds. - STEREO
Press the knob to access the STEREO options. Once selected, rotate the knob to select ON or OFF. Select ON
(stereo reception mode) or OFF (mono reception). - BAND SELECTION
Press the knob to select your band of choice in the following sequence:
FM1 > FM2 > FM3 > AM1 > AM2 > WB - AM SETTINGS
To access the AM SETTINGS, press the MENU when using the AM radio. This will give you access to the settings specific to the AM radio (PRESETS>SAVE PRESETS>RADIO REGION>AM BAND>AUTO STORE). - PRESETS
Press the knob to access the PRESETS list. Using this feature allows you to see all PRESETS saved to the MC-200. - SAVE PRESETS
Press the knob to select the SAVE PRESETS option. You will need to set both the station and PRESET group you want to save first (AM1>AM2). Using this feature allows you to save stations to the unit. Once selected, rotate the knob to select the PRESET number (1-6) you want the station saved to. - AM BAND
Press the knob to access the AM PRESET options (AM1> AM2 ). Using this feature allows you to have separate tuner preset groups to choose from. Use the rotary encoder button to scroll through the TUNER groups and short press to select the group. - AUTO STORE
Press the knob to select the AUTO STORE function. You will need to be within the PRESET group you want to adjust first (AM1>AM2). This feature automatically stores presets on the unit. It will stop when presets 1-6 are set. Select the next PRESET group and repeat to fill next set, and finally to scan the preset memorized station, each preset scan for 5 seconds. - WB BAND
Press the FWD and REV buttons to select the PRESET number (1-7) for weather updates.
USB (iPhone) OPERATION
.png)
- After your device is connected to the MC-200, you can control playback from your device directly from the MC-200. To do so select the USB source option on the MC-200.
- To play or pause a song, press the PLAY/PAUSE button.
- To skip a track forward, press >> button. To skip a track backward, press the << button.
- Hold << and >> button to activate a track fast backward or forward playing. With each pressing, the playback speed will increase like follow: Normal - x2 - x4 - x8 - x20
- During fast playback, press the Play/Pause button to resume normal speed. When fast backward/forward playback reaches the previous or next track, the unit will resume normal payback.
- To access the USB (iPhone) settings, press the MENU button for the list of settings (BROWSER>REPEAT>SHUFFLE). Rotate the knob to make your selection.
USB SETTINGS of Powerbass MC-200 Digital Media Center
- USB Play Mode
Press the knob to access the BROWSER options, when you return to the current folder file list, rotate the knob to scroll through the file list. Press the MENU button to exit and go back up one level. - iPhone mode
Press the knob to access the BROWSER options (PLAYLISTS> ARTISTS> ALBUMS> GENRES> SONGS> COMPOSERS> AUDIOBOOKS> PODCASTS). Using this feature allows you to search for tracks or songs by different types of categories. - REPEAT
Press the knob to access the REPEAT feature options (OFF > ONE >DIR> ALL). - SHUFFLE
Press the knob to access the SHUFFLE feature option ( OFF > ON). This feature allows you to set your preference on shuffling tracks or songs.
BLUETOOTH OPERATION
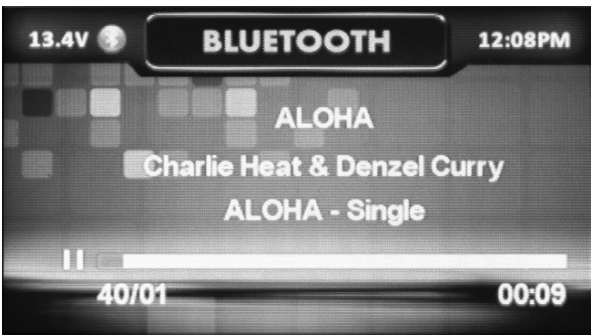
BLUETOOTH SETTINGS
- Pairing Mode
When using BLUETOOTH for the first time, you will need to pair your device first. Once connected, the BT icon will turn on. Go into your devices Bluethooth settings and search for a new device. Select Powerbass MC-200 Digital Media Center and device pairing is finished. - Music Playback
- To play or pause a song, press the PLAY/PAUSE button.
- To skip a track forward, press >> button. To skip a track backward, press << button
- BT Settings
To access Bluetooth settings, press the MENU button for the list of settings (BT PAIRED LIST>CONNECT LAST DEVICE). Rotate the knob to select the option to change. - BT Paired List
Press the knob to access the BT PAIRED LIST options, you can view a list of paired device names. Rotate the knob to select device name, and press the knob to select, connect, or delete a device. - Connect Last Device
When Bluetooth is not connected to the device, the Connect Last Device menu displays, the last connected device. Rotate the knob to select the device to reconnect or to disconnect the device.
INSTALLATION
NOTES: Before installation, disconnect the battery negative (-) terminal to prevent damage to the unit, fire and/or possible injury.
Before beginning any installation of Powerbass MC-200 Digital Media Center, follow these simple rules
- Be sure to carefully read and understand the instructions before attempting to install the unit.
- For safety, disconnect the negative lead from the battery prior to beginning the installation.
- For easier assembly, we suggest you run all wires prior to mounting your unit in place.
- Route all of the RCA cables close together and away from any high current wires.
- Use high-quality connectors for a reliable installation and to minimize signal or power loss.
- Think before you drill! Be careful not to cut or drill into gas tanks, fuel lines, brake or hydraulic lines, vacuum lines or electrical wiring when working on any vehicle.
- Never run wires underneath the vehicle. Running the wires inside the vehicle provides the best protection.
- Avoid running wires over or through sharp edges. Use rubber or plastic grommets to protect any wires routed through metal, especially the firewall.
- ALWAYS protect the battery and electrical system from damage with proper fusing. Install the appropriate fuse holder.
- When grounding to the chassis of the vehicle, scrape all paint from the metal to ensure a good, clean ground connection. Grounding connections should be as short as possible and always be connected to metal that is welded to the main body or chassis of the vehicle. Seatbelt bolts should never be used for connecting to ground.
MOUNTING
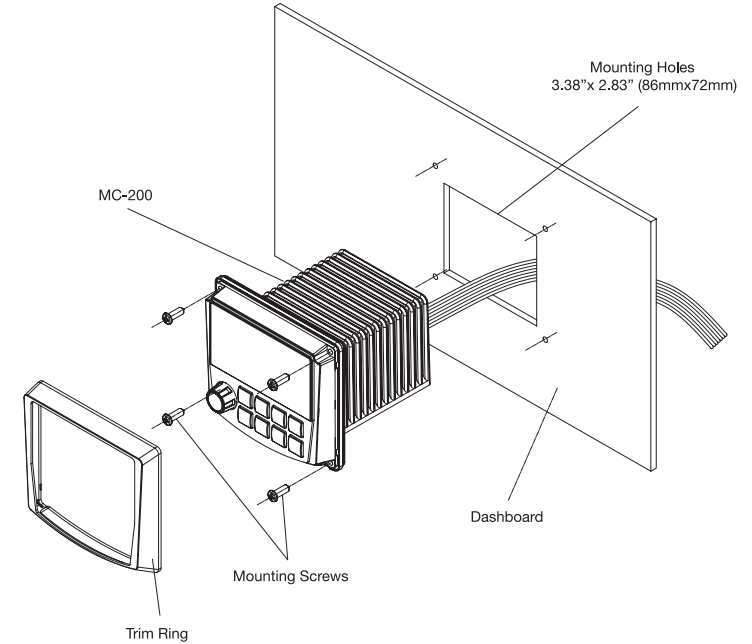
INSTALLATION
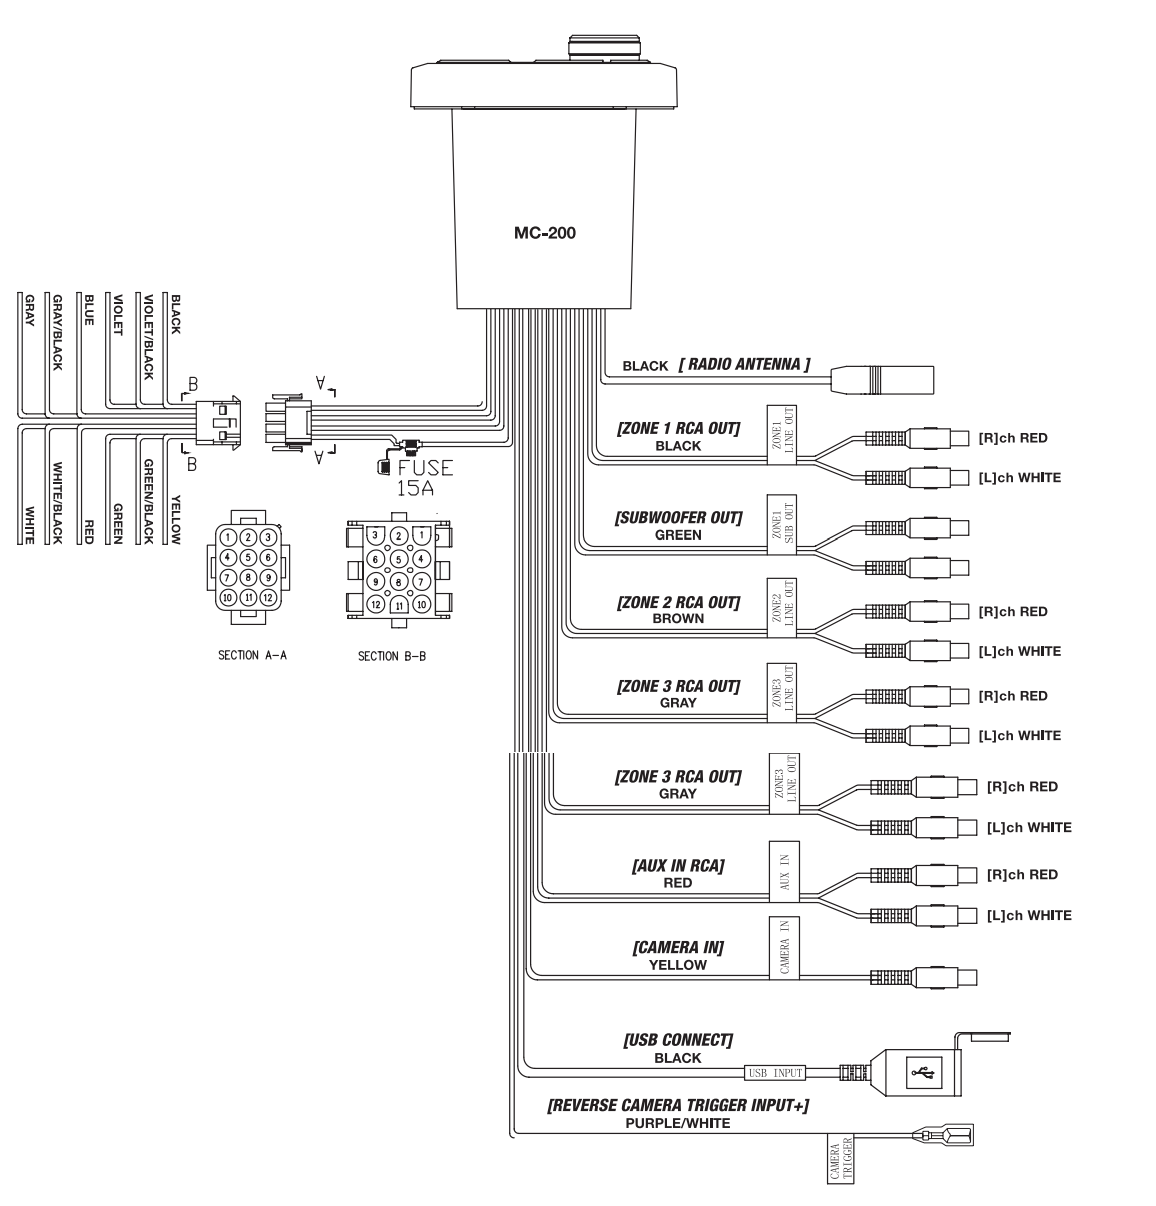
| PIN No. | Wire Color | Wire Spec | Description |
|---|---|---|---|
| 1 | Green | 20# AWG | ZONE2 LEFT SPEAKER (+) |
| 2 | Green/Black | 20# AWG | ZONE2 LEFT SPEAKER (-) |
| 3 | Yellow | 16# AWG UL | BATTERY (+12V) |
| 4 | White | 20# AWG | ZONE1 LEFT SPEAKER (+) |
| 5 | White/Black | 20# AWG | ZONE1 LEFT SPEAKER (-) |
| 6 | Red | 20# AWG | ACC (+12V) |
| 7 | Gray | 20# AWG | ZONE1 RIGHT SPEAKER (+) |
| 8 | Gray/Black | 20# AWG | ZONE1 RIGHT SPEAKER (-) |
| 9 | Blue | 20# AWG | POWER AMP REMOTE ON |
| 10 | Violet | 20# AWG | ZONE2 RIGHT SPEAKER (+) |
| 11 | Violet/Black | 20# AWG | ZONE2 RIGHT SPEAKER (-) |
| 12 | Black | 16# AWG UL | GROUND |
TROUBLESHOOTING
Before going through the checklist, check the wiring connection. If any of the problems persist after checklist has been made, consult your nearest service dealer.
| Symptom | Cause | Solution |
|---|---|---|
| No power | The ignition switch is not on. | Switch the ignition key to “ACC”. |
| The fuse blown. | Replace the fuse. | |
| No sound | Volume is in minimum. | Adjust volume to a desired level. |
| Wiring is not properly connected. | Check wiring connection. | |
| Bluetooth audio is cutting in and out | Device is out of Bluetooth range. | Ensure the music device is located near the MC200 to prevent interruptions to audio playback. |
| USB device is not recognized | The USB device is damaged. | Disconnect USB device and reconnect. If the device is still not recognized, try replacing with a different USB device |
| Connectors are loose | Check connections | |
| No sound heard with the display “No File” shown | No MP3/WMA files are stored on the USB device | Files must be stored properly on the USB device. |
| The radio does not work. The radio station automatic selection does not work | The antenna cable is not connected. | Insert the antenna cable firmly. |
| The signals are too weak. | Select a station manually. |
This manual is the exclusive property of PowerBass USA, Inc. Any reproduction of this manual, or use other than its intentions is strictly prohibited without the express consent of PowerBass USA, Inc. Copyright 2020 PowerBass USA, Inc.
POWERBASS ELECTRONICS WARRANTY POLICY
PowerBass USA, Inc. offers limited warranty on PowerBass products under normal use on the following terms
- PowerBass Xtreme Electronics are to be free of defects in material and workmanship for a period of one (1) year.
- This warranty applies only to PowerBass products sold to consumers by Authorized PowerBass Dealers in the United States of America. Products purchased by consumers from a PowerBass dealer in another country are covered only by that country’s Distributor and not by PowerBass USA.
- This warranty covers only the original purchaser of PowerBass product. In order to receive service, the purchaser must provide PowerBass with the receipt stating the consumer name, dealer, product and date of purchase.
- Products found to be defective during the warranty period will be repaired or replaced (with a product deemed to be equivalent) at PowerBass’s discretion and will not be liable for incidental or consequential damages. PowerBass will not warranty this product under the following situations
- Amplifiers received with apparent rust or corrosion
- Any evidence of liquid damage or exposure to excessive heat
- Attempted repairs or alterations of any nature
Customer Reviews and Common Complaints
Customers have praised the Powerbass Digital Media Center for its impressive sound quality, versatile features, and stylish design. However, some users have reported issues with the device's Wi-Fi connectivity and the user manual's clarity. Common complaints include difficulty setting up the device and occasional software glitches.
Faqs
What audio and video formats does the powerbass MC-200 Digital Media Center support?
Can I connect the Powerbass MC-200 to my smartphone?
Is it possible for the MC-200 Digital Media Center to pair Bluetooth with my smartphone?
Is it possible to change the Powerbass MC-200's sound settings?
Can I control the MC-200 Digital Media Centerusing a remote control?
How do I update the MC-200 Digital Media Centers software?
What should I do if I experience connectivity issues with the MC-200 Digital Media Center Wi-Fi?
Can I mount the MC-200 Digital Media Centeron a wall?
How do I reset the MC-200 Digital Media Centerto its factory settings?
What is the warranty period for the MC-200 Digital Media Center?
Leave a Comment
