Prepac 5-Drawer Chest DC-3345 User Guide | Instructions
Content
Introduction
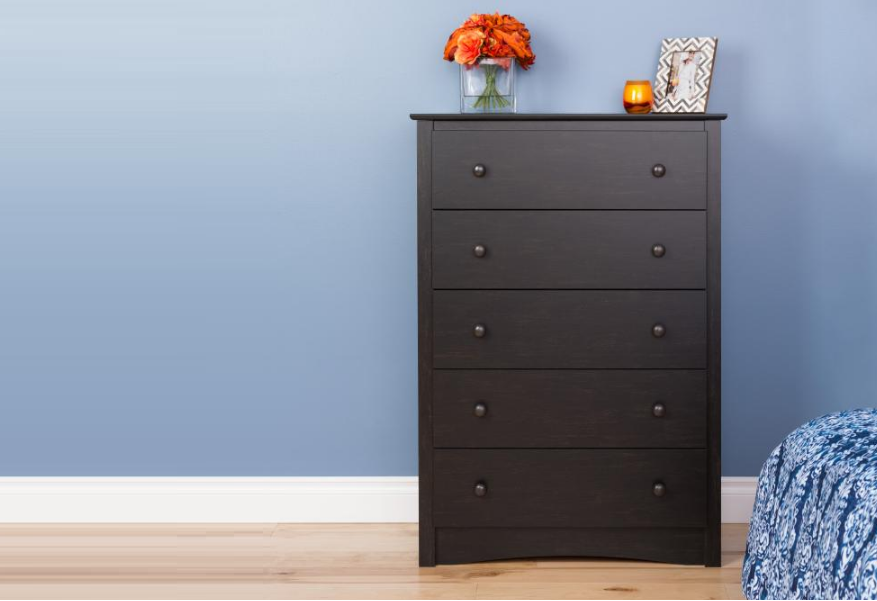
The Prepac 5-Drawer Chest DC-3345 is a stylish and functional storage solution designed to enhance any bedroom or living space. Crafted from durable, non-toxic laminated composite woods, this chest features five spacious drawers that glide smoothly for easy access to clothing and accessories. Its sleek design, complete with bronzed knobs, adds an elegant touch to your decor. Priced at approximately $300, it combines practicality with aesthetic appeal, making it a valuable addition to your home.
Specifications
The Prepac 5-Drawer Chest DC-3345 comes with several key features that make it a standout in its category:
- Material: Engineered wood
- Number of Drawers: 5
- Drawer Mechanism: Soft-close, smooth-gliding metal runners
- Dimensions: 66" H x 30" W x 18" D
- Finish: Available in various finishes such as Espresso, White, and more
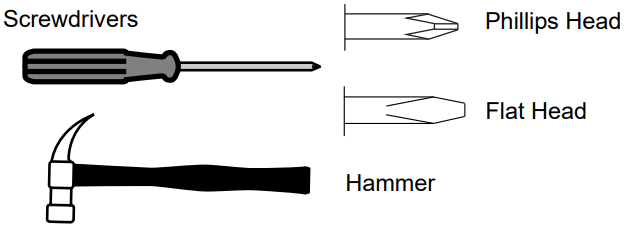
Required Tools
Optional Tools
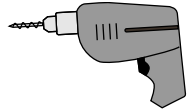
Using a power screwdriver will speed up assembly.
Caution
- Do not over-tighten any screws.
- The last few turns of each screw should be done very slowly or by hand.
Hardware Identification
Cabinet Hardware
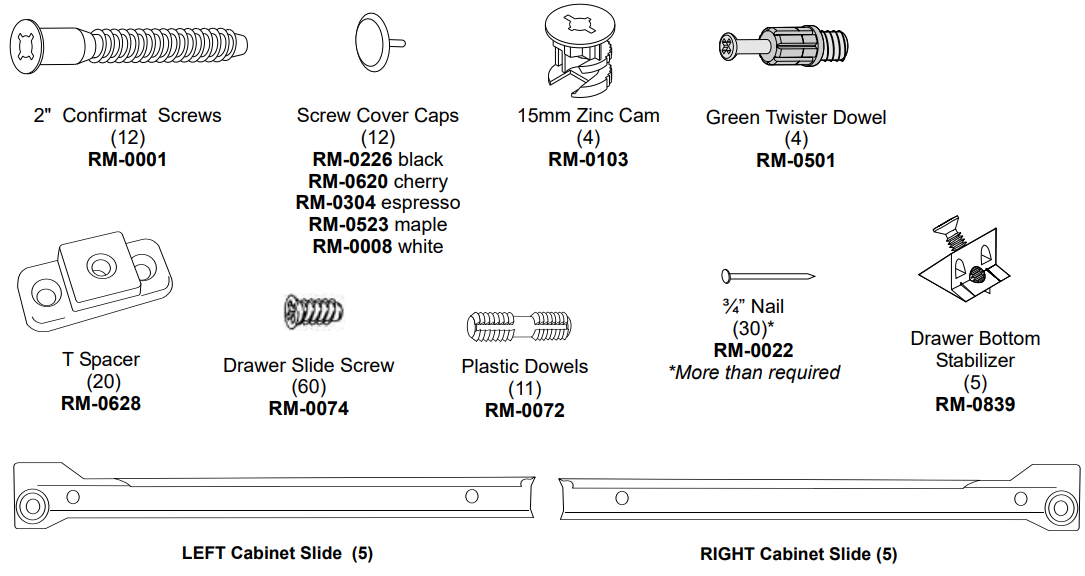
Drawer Hardware
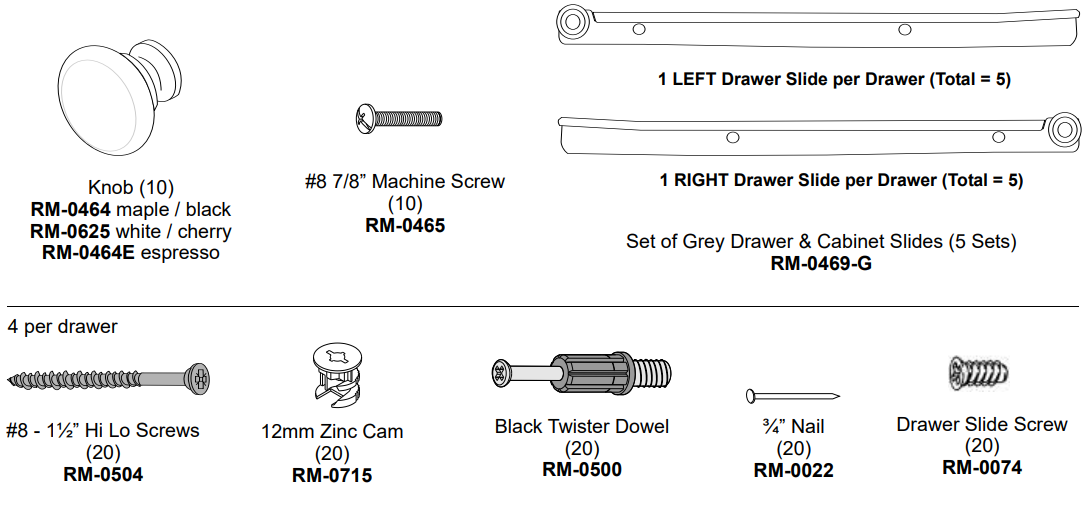
Cable Tie Hardware Package

Description
The Prepac 5-Drawer Chest DC-3345 is designed to blend seamlessly into any home decor while providing substantial storage. Each drawer is spacious enough to hold a variety of items, from clothing to linens. The chest's compact width makes it suitable for use in smaller rooms or against walls where space is limited. The engineered wood construction ensures durability and stability, making this piece a long-term investment for your home.
Cabinet Parts
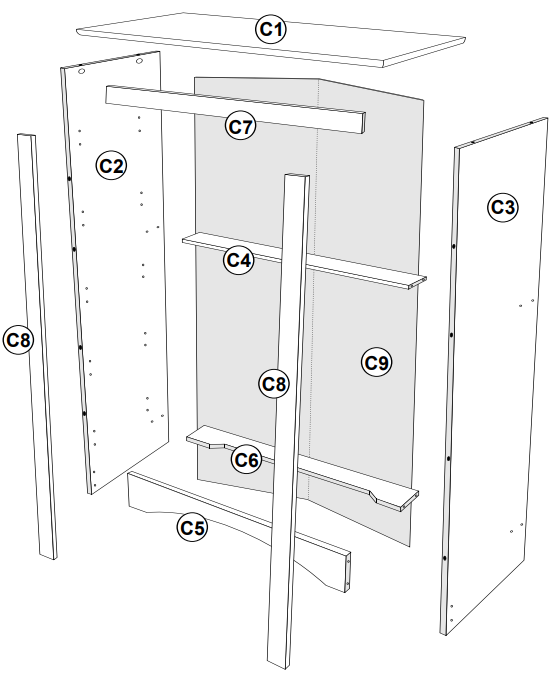
- C1
Profiled Top (1)- TP-0412 black
- TP-0492 cherry
- TP-4630 espresso
- TP-0472 maple
- TP-0402 white
- C2
Left Side (1)- SL-0412 black
- SL-0492 cherry
- SL-4611 espresso
- SL-0472 maple
- SL-0402 white
- C3
Right Side (1)- SR-0412 black
- SR-0492 cherry
- SR-4611 espresso
- SR-0472 maple
- SR-0402 white
- C4
Plain Stabilizer (1)- ST-4112 black
- ST-4912 cherry
- ST-4631 espresso
- ST-4712 maple
- ST-4012 white
- C5
Decorative Stabilizer A (1)- KR-0412 black
- KR-0492 cherry
- KR-0462 espresso
- KR-0472 maple
- KR-0402 white
- C6
Decorative Stabilizer B (1)- ST-4111 black
- ST-4911 cherry
- ST-4630 espresso
- ST- 4711 maple
- ST-4011 white
- C7
1¾” Top Molding (1)- TR-4112 black
- TR-4912 cherry
- TR-4612 espresso
- TR-4712 maple
- TR-4012 white
- C8
1¾” Side Molding (2)- TR-0414 black
- TR-0494 cherry
- TR-0464 espresso
- TR-0474 maple
- TR-0404 white
- C9
Foldable- Backer (1)
- BB-0106
Assembly Instructions
- STEP 1 Estimated Time: 15 - 25 minutes
- 1a: Attach T-spacers to left and right cabinet sides using drawer slide screws
1b: Then, attach metal cabinet slides to T-spacers using drawer slide screws
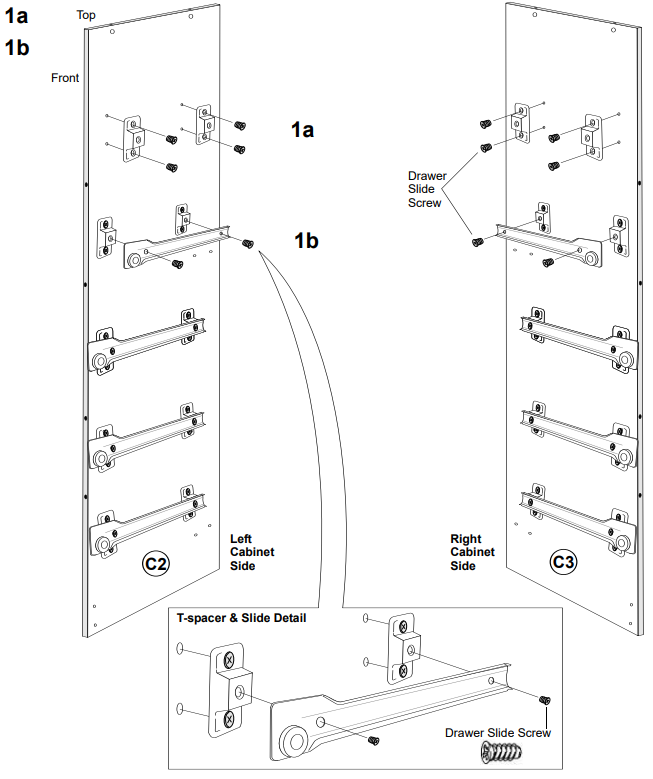
STEP 2 Estimated Time: 1 minute
Insert cams into holes on the top of each side.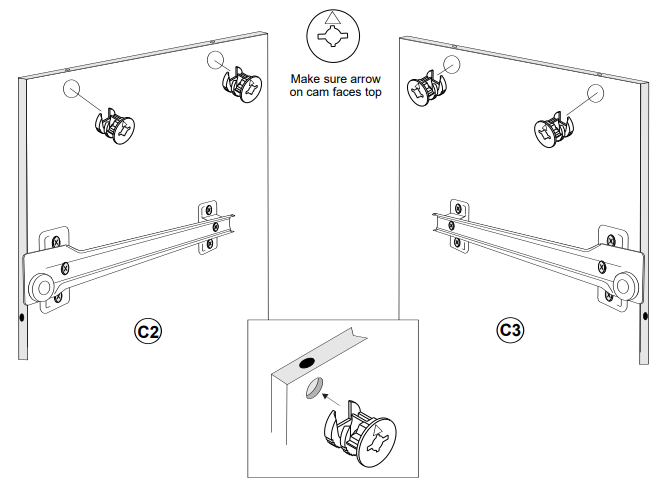
STEP 3 Estimated Time: 2 minutes
Screw green twister dowels into the underside of the top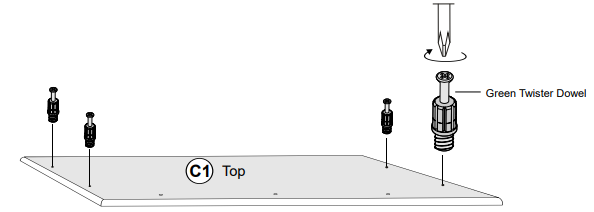
STEP 4 Estimated Time: 10 minutes
Attach all 3 stabilizers to left and right sides using Confirmat screws. Insert screw cover caps to finish.
Decorative stabilizers C5 & C6 are interchangeable. Please choose the style that you prefer and attach it to the front.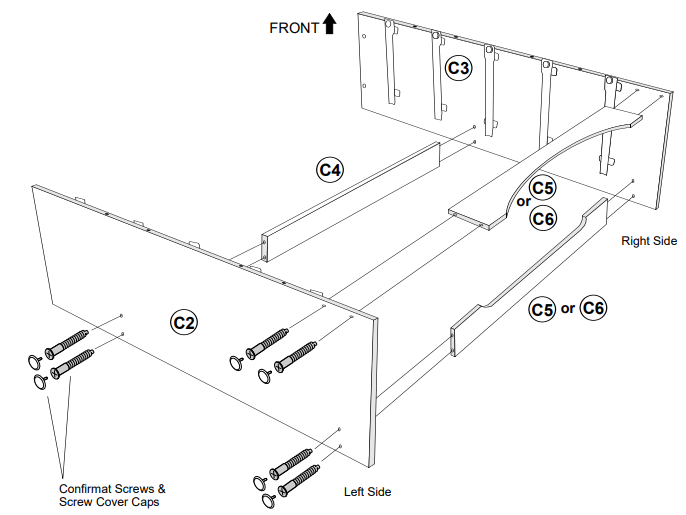
STEP 5 Estimated Time: 2 minutes
Attach top to sides and lock cams using a flat head screwdriver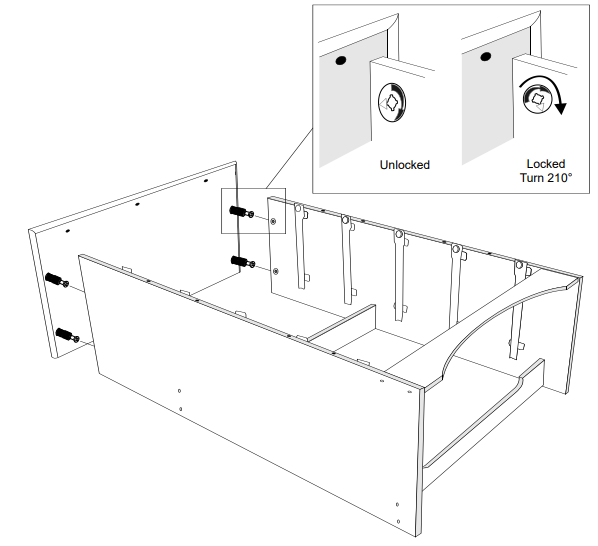
STEP 6 Estimated Time: 3 minutes
Hammer plastic dowels halfway into side and top moldings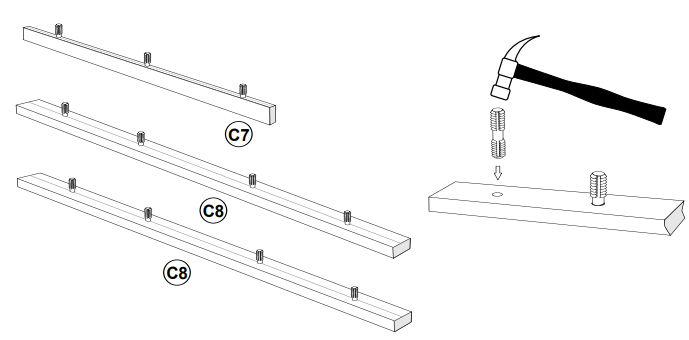
STEP 7 Estimated Time: 3 minutes
Attach top & side moldings.
Using your hands, apply even pressure to moldings and press firmly
Do not use a hammer
It may damage the molding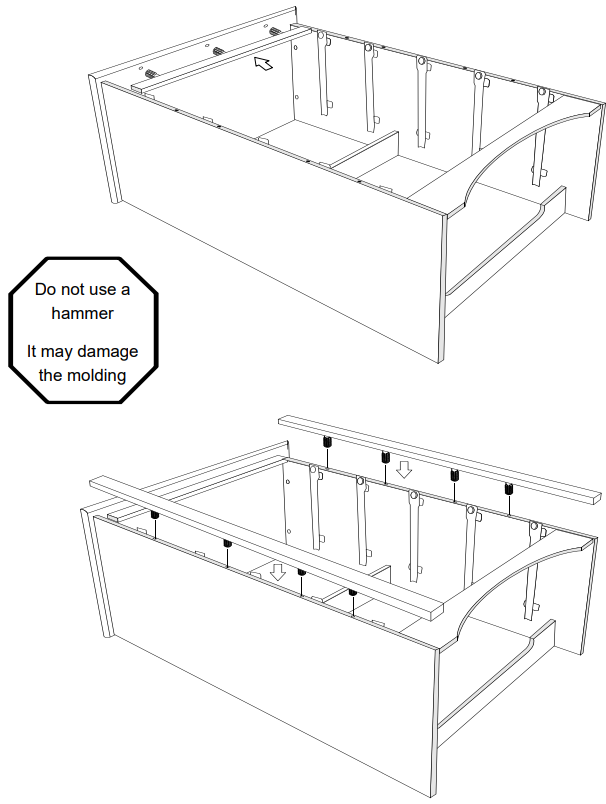
STEP 8 Estimated Time: 4 minutes
Carefully turn the chest over and attach backer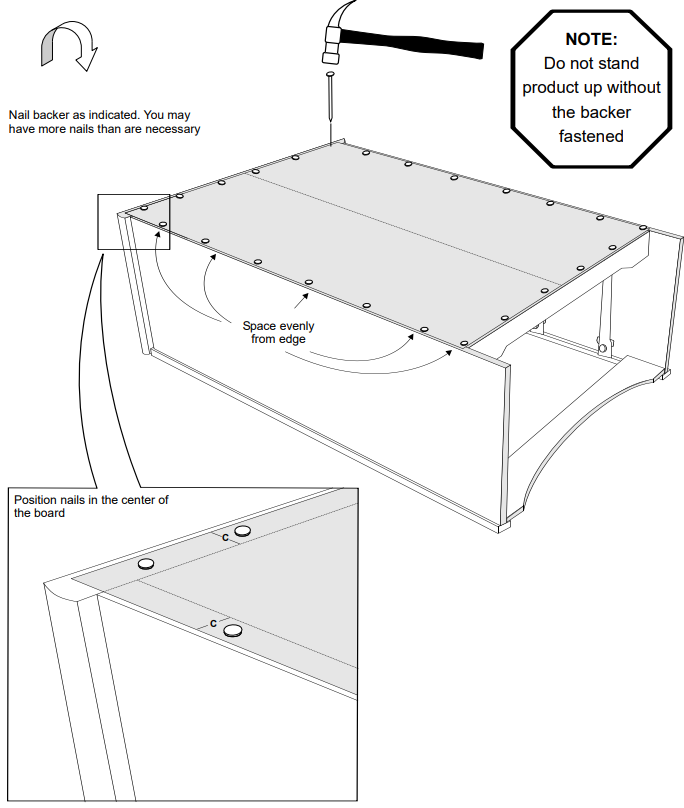
Drawer Parts Identification
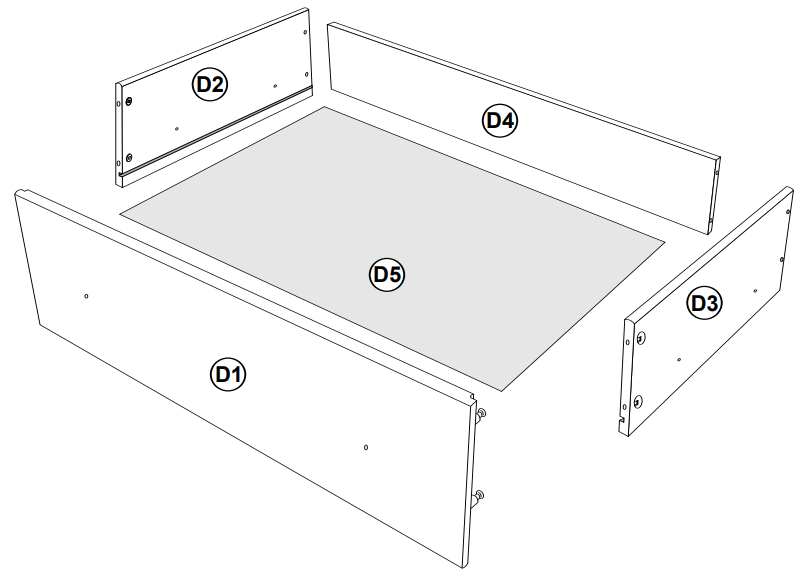
- D1
- Drawer Front (5)
- DF-10014-B black
- DF-10017-C cherry
- DF-10014-E espresso
- DF-10014-M maple
- DF-10017-W white
- D2
Left Drawer Side (5)- DS-0412W-L
- D3
Right Drawer Side (5)- DS-0412W-R
- D4
Drawer Back (5)- DK-0415W
- D5
Drawer Bottom (5)- DB-0415 unfinished
Continue…
- STEP 9 Estimated Time: 5 minutes PER DRAWER
9a Insert cams into drawer sides
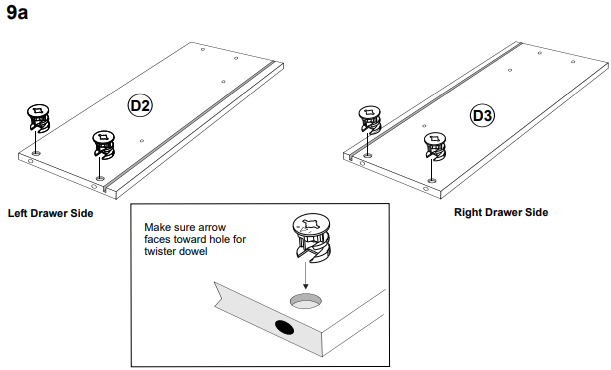
- 9b Screw black twister dowels into drawer fronts
9c ” Hi Lo screws
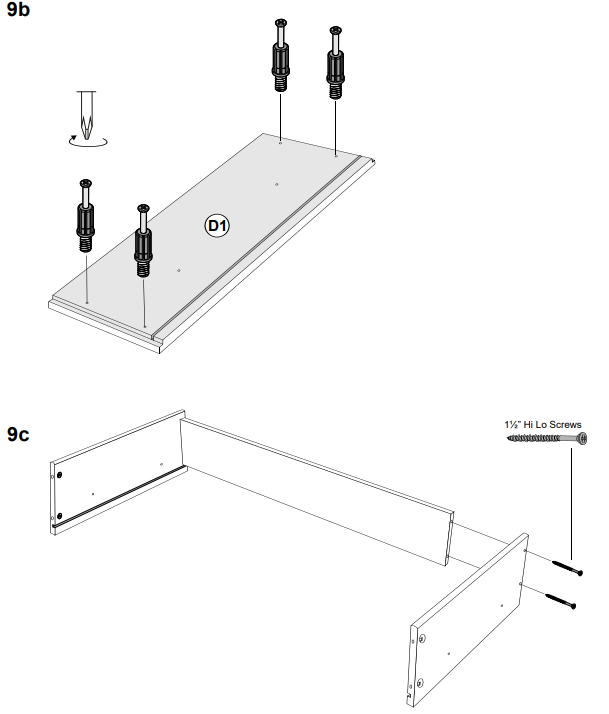
- 9d Attach drawer front and tighten cams using a flat head screwdriver
9e Turn drawer upside down and slide drawer bottom into grooves
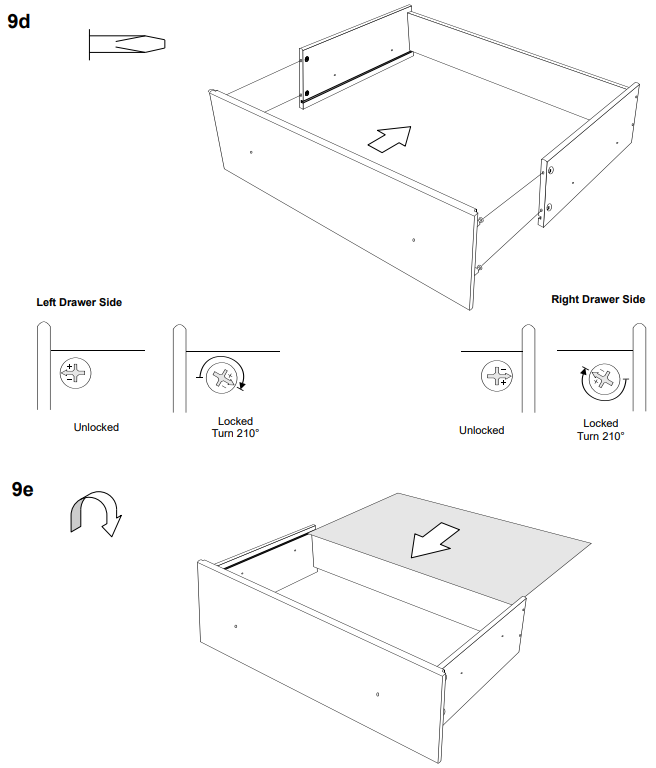
- 9f Secure the drawer bottom to the drawer back with nails
9g Insert the Drawer Bottom Stabilizer
Position the Stabilizer in the center of the drawer and insert it into the groove on the drawer front. This is the same groove that you inserted the drawer bottom into. Then, tighten screw until it is flush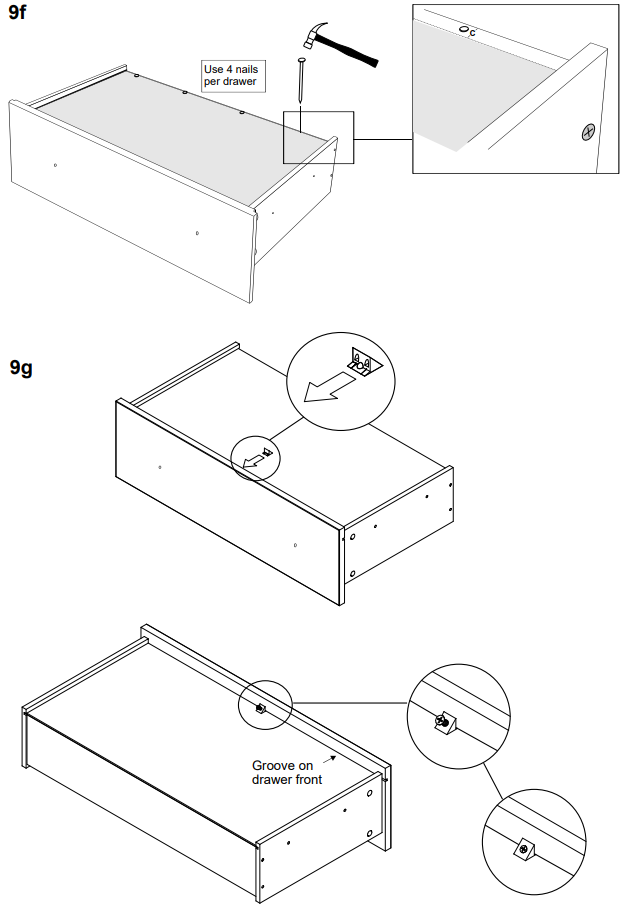
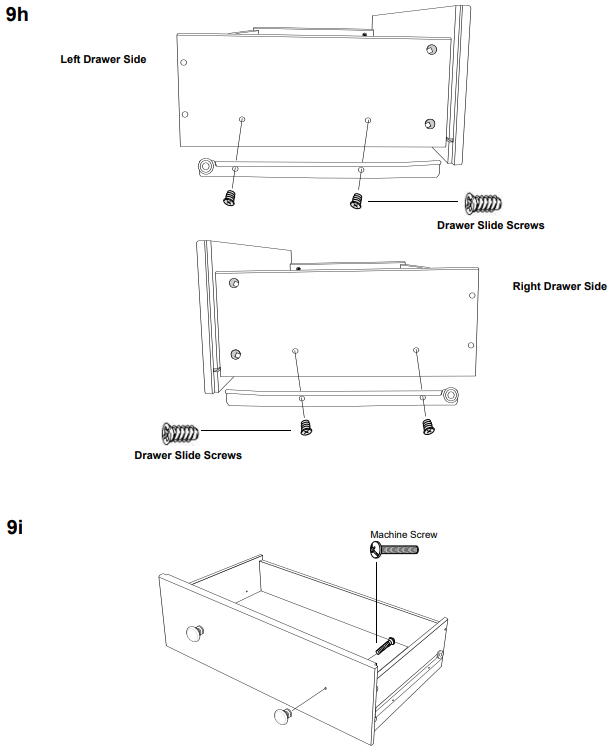
- 9h Attach drawer slides to left and right drawer sides using drawer slide screws
9i Attach knobs with machine screws
STEP 10 Estimated Time: 2 minutes
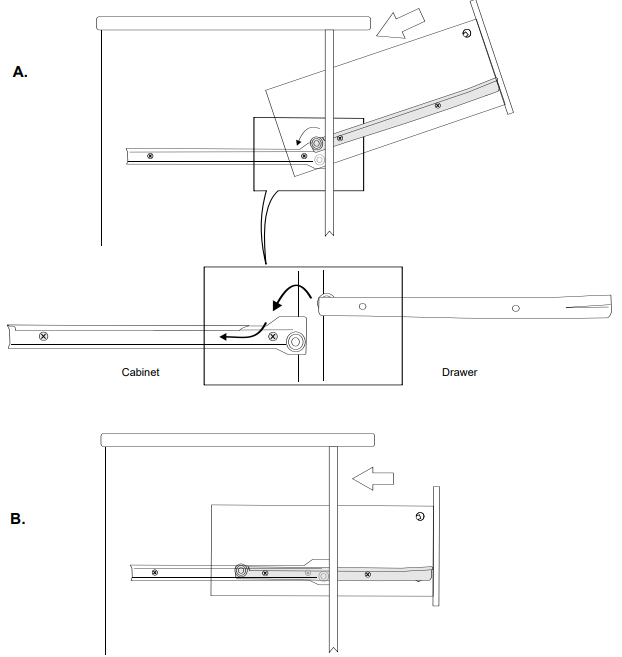
Note: When drawers are installed correctly, you will not be able to remove them without first lifting up the drawer front.
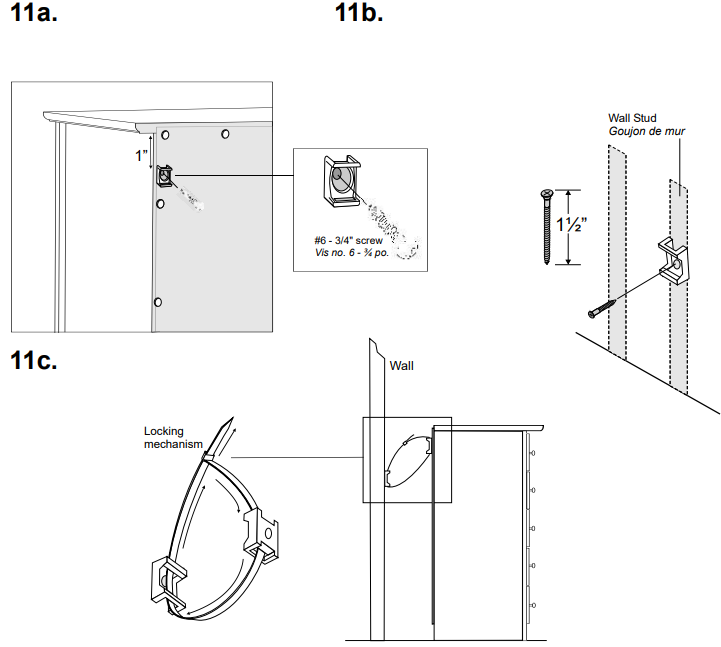
- STEP 11 Attaching and Using the Cable Tie
We strongly recommend using a cable tie on all furniture, especially if small children have access- 11a. With the #6-3/4” screw, attach one of the mounting bases to one of the sides 1 inch from the top.
- 11b. Attach the 2nd mounting base to the wall 2” lower than the one on the cabinet
Important: Find a wall stud and attach the mounting base with a 1½” screw (not included). If you cannot locate a stud, use an approved wall mounting system 11c. Feed the cable tie through each the locking mechanism to tighten.
Setup Guide
To assemble the Prepac 5-Drawer Chest DC-3345, follow these steps:
- Unpacking: Carefully unpack all components and hardware from the box.
- Base Assembly: Assemble the base frame using the provided screws and instructions.
- Drawer Construction: Construct each drawer by attaching the sides, back, and bottom panels together.
- Mounting Drawers: Install the drawers into the chest frame using the soft-close drawer glides.
- Final Touches: Attach any finishing components such as handles or knobs.
Troubleshooting
Common issues and solutions for the Prepac 5-Drawer Chest DC-3345 include:
- Stuck Drawers: Check if the drawers are properly aligned with the glides; adjust if necessary.
- Misaligned Drawers: Ensure all screws are tightened securely; reassemble if needed.
- Scratches or Damages: Handle with care during assembly; use felt pads on floors to prevent scratching.
Always refer to the user manual for specific troubleshooting instructions and follow safety guidelines during assembly.
Prepac 5-Drawer Chest DC-3345 Pros & Cons
Pros:
- Affordable: Priced competitively compared to similar products on the market.
- Spacious Storage: Five large drawers offer ample storage space.
- Sturdy Construction: Made from durable engineered wood.
- Easy Assembly: Clear instructions and straightforward assembly process.
Cons:
- Limited Design Options: Fewer color and style options compared to other brands.
- No Built-in Shelves: Only drawer storage available.
- Weight Capacity Limitations: Drawers have specified weight limits; overloading can cause damage.
Customer Reviews
Customers have generally been satisfied with the Prepac 5-Drawer Chest DC-3345, praising its ease of assembly and spacious drawers. However, some have noted that the quality of the finish could be improved and that there are limited design options available.
Common complaints include issues with drawer alignment during assembly and concerns about the weight capacity of each drawer.
Faqs
To what extent is the Prepac 5-Drawer Chest DC-3345 difficult to assemble?
Which tools are required to put the Prepac 5-Drawer Chest together?
Does the package come with assembly instructions for the Chest?
If any parts of the Prepac 5-Drawer Chest are missing, what should I do?
How can I adjust the Prepac that is wobbling?
What steps should I take during assembly if I come across misaligned holes?
Is it possible to watch how to assemble the Prepac 5-Drawer online?
How can I avoid getting scratches on the Prepac 5-Drawer Chest when assembling it?
After assembly, what should I do if the Prepac feels unstable?
Leave a Comment
