Pulsar Products Fuel Inverter Generator PGDA70BiSCO User Guide
Content
Introduction
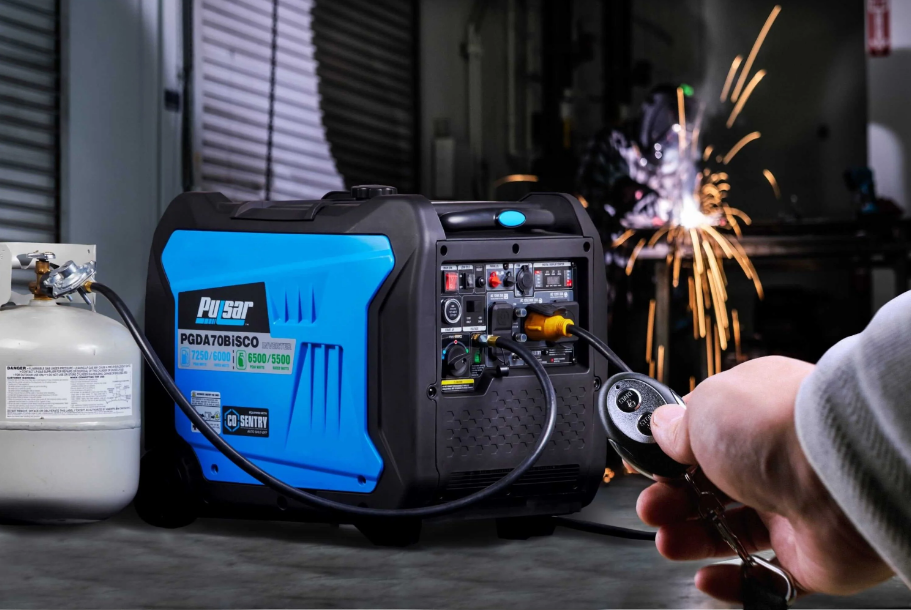
The Pulsar Products Fuel Inverter Generator PGDA70BiSCO is a versatile and powerful dual-fuel generator designed to meet various energy needs, whether for home backup or outdoor activities. With a peak wattage of 7,250 watts and a running wattage of 6,000 watts when using gasoline, it also operates efficiently on propane, providing flexibility in fuel choice. Its quiet operation at just 62 dBA ensures minimal disturbance, while the remote start feature adds convenience. Priced at $1,345.99, this generator is an excellent investment for reliable power on the go.
Components
Before operating your generator, you must read and understand the manual and familiarize yourself with the safe operation practices.

Control Panel

Specifications
ENGINE | ||
Engine Type | Single Cylinder, FourStroke, Air Cooled, Overhead Valve, Gasoline Engine | |
Cylinder Borex Stroke(mm) | 80x62 | |
Displacement | 312cc | |
Compression Ratio | 8.5:1 | |
Gas Distribution Mode | OHV | |
Cooling Mode | Forced Cold Air | |
Output Power (kW/r/min) | 7.0/3600 | |
Starting Mode | Electric and Manual Recoil | |
Gasoline Tank Capacity | 3.5 gallons | |
Fuel | Unleaded Gasoline or LPG (Propane) | |
Engine Oil Capacity(L) | 0.8 (27 fl oz) | |
Engine Oil Type | SAE 10w30,API index ‘SJ’or better | |
Lubrication System | Splash Lubrication | |
GENERATOR | Noise dB @7m | 62 |
Rated Power(kW) | 6.0 | |
Max Power (kW) | 7.25 | |
Rated Voltage (V) | 230/120/240V | |
Rated Frequency (Hz) | 50/60 | |
Power Factor | 1.0 | |
Number of Phases | Single Phase | |
DC Output | 12V/8.3A | |
CONFIGURE | Generator Type | Permanent Magnet |
Voltage Regulation | Controller Regulation | |
Frequency regulation | Controller Regulation | |
Dimensions(mm) | 24”x19”x22” | |
Net Weight | 52kg (114.5 lbs.) | |
Description
The Pulsar PGDA70BiSCO is engineered with a focus on reliability and efficiency. Its inverter technology ensures a clean sine wave output, making it safe for use with electronic devices such as laptops, smartphones, and medical equipment. The generator features an automatic idle control which helps in reducing fuel consumption and noise when the load is low. The compact design and durable construction make it easy to transport and maintain.
The control panel is user-friendly, with clear labels and easy access to all outlets and controls. The generator also includes safety features like overheat protection, low oil shutdown, and GFCI protection to ensure safe operation.
Pulsar Products Fuel Inverter Generator PGDA70BiSCO Preparation
Preparation
Your generator requires some assembly. This unit ships from our factory without oil; it must be properly filled with oil before operation.
Unpacking
- Set the shipping carton on a solid, flat surface.
- Remove everything from the carton except the generator.
- Using the carrying handles of the unit, carefully remove the generator from the box (two people lifting is recommended).
Add Engine Oil
CAUTION: DO NOT attempt to crank or start the engine before it has been properly filled with the recommended type and amount of oil. Damage to the generator because of failing to follow these instructions will void your warranty.
NOTICE: Failure to follow the instruction may result in the damage to your generator and other property.
If running the generator in extreme temperatures, refer to the following chart for recommended oil type.

- Place the generator on a solid, flat, level surface.
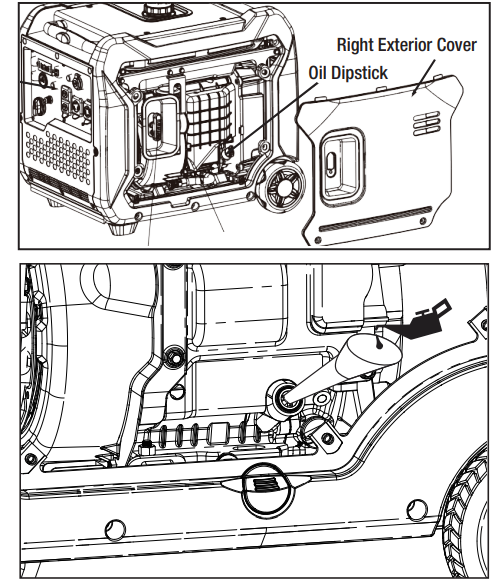
- On the right side of the generator, loosen the screws and remove the maintenance cover.
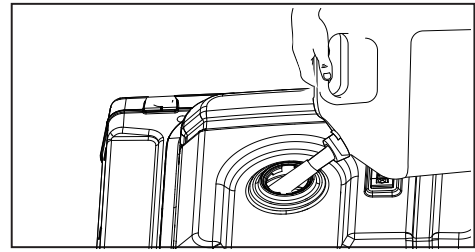
- Remove oil fill cap/dipstick to add oil.
Using a funnel, as needed, add the appropriate type of oil until the oil level is at the proper level. SAE 10w-30 oil is recommended for general use. DO NOT OVERFILL. Replace oil fill cap/dipstick and secure maintenance cover.
Check engine oil level daily and add as needed.
NOTICE
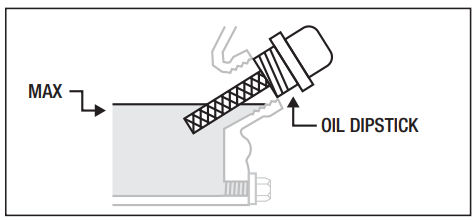
Once the oil has been added, a visual check should show oil about 1-2 threads from running out of the fill hole. When using the dipstick to check the oil level, DO NOT screw in the dipstick while checking.
NOTICE
Check oil level often during the break-in period. Refer to the Maintenance section for recommended service intervals.
CAUTION
This engine is equipped with a low oil shut-off and will stop when the oil level in the crankcase falls below a critical level.
NOTICE
The first 5 hours of run time are the break-in period for the unit. During the break-in period stay at or below 50% of the running watt rating and vary the load occasionally to allow stator windings to heat and cool. Adjusting the load will also cause engine speed to vary slightly and help seat piston rings. After the 5-hour break-in period, change the oil.
NOTICE
Synthetic oil may be used after the 5-hour initial break-in period. Using synthetic oil does not increase the recommended oil change interval. Full synthetic 5W-30 oil will aid in starting in cold ambient < 41° F (5° C) temperatures.
Add Gasoline
WARNING
TO PREVENT SERIOUS INJURY FROM FIRE:
Fill the gasoline tank in a well-ventilated area away from ignition sources. If the engine is hot from use, shut the engine off and wait for it to cool before adding gasoline. Do not smoke.
- Make sure the generator is on a solid, flat, level surface.
- Unscrew the fuel cap and set it aside.
- Slowly add gasoline to the fuel tank. Be careful not to overfill. The fuel gauge on the top of the fuel tank indicates how much gasoline is in the generator fuel tank.
Replace the fuel cap and wipe up any spilled gasoline with a dry cloth then remove the cloth from the area.
DANGER: Do not overfill the gasoline the tank. Overfilling can result in a fire, explosion,or death.
WARNING
Gasoline can expand. Do not fill the gasoline tank to the top. Leave a minimum of 1.5 inches open space. Gasoline fumes are highly flammable. Do not fill the tank near an open flame. Always check for gasoline spills.
- To ensure that the generator runs smoothly use only FRESH, UNLEADED GASOLINE WITH AN OCTANE RATING OF 87 OR HIGHER.
- Never use an oil/gasoline mixture. Never use old gasoline.
- Avoid getting dirt or water in the gasoline tank.
- Gasoline can age in the tank and make it hard to start up the generator in the future.
- Never store generator for extended periods of time with gasoline in the tank.
Connecting an LPG Tank
- Propane tanks that use liquid withdrawal system can not be used on these models.
- Confirm that the re-qualification date on the tank has not expired.
- DO NOT use included LPG hose for any other appliances.
NOTICE
- All new propane tanks must be purged of air and moisture prior to filling. Used propane tanks that have not been plugged or kept closed must also be purged. The purging process should be done by a propane tank supplier (propane tanks from an exchange supplier should have been purged and filled properly).
- ALWAYS position the propane tank so the connection between the valve and the gas inlet will not cause sharp bends or kinks in the hose.
WARNING
Explosion hazard. DO NOT start generator if you smell propane. ALWAYS fully close the propane tank valve and disconnect the LPG hose from the generator when not in use.
- Turn the generator OFF and place on a flat surface in a well ventilated area.
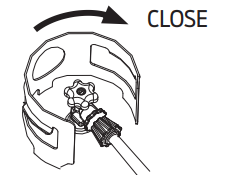
Verify that the propane tank valve is in the fully closed position.
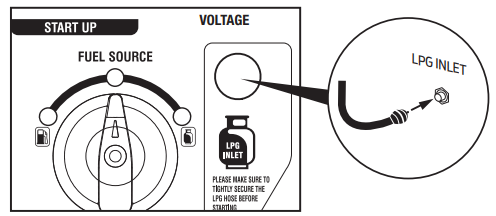
- Remove the cover on the generator propane inlet.
Use your fingers to hand tighten the LPG hose (included) to the propane inlet on the generator.
IMPORTANT: DO NOT use thread seal tape or any other type of sealant to seal the LPG hose connection.
- Tighten the LPG hose connector with an adjustable wrench until it is snug. DO NOT overtighten.
- Remove the safety plug or cap from the propane tank valve and attach the other end of the hose to the LPG connector on the tank. Hand-tighten.
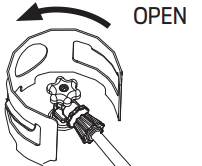
Turn the propane tank valve to the fully open position. Check all connections for leaks by wetting the fittings with a solution of soap and water. Bubbles which appear or bubbles which grow indicate that a leak exists. If a leak exists at a fitting, turn the propane tank valve to the fully closed position and tighten the fitting. Open the propane tank valve and recheck the fitting with the soap and water solution. If the leak continues or if the leak is not at a fitting then DO NOT use the generator and contact an authorized Pulsar service center.
Connecting The Battery
- On the left side of the generator, loosen the screws and remove the cover.
Confirm that the rubber battery strap is firmly securing the battery in place. If loose, pull on the strap and hook it onto the mounting base.
Note: If the strap is loose behind the battery, remove the battery, reconnect the strap, replace the battery, then thread the strap under the battery quick-connect cables.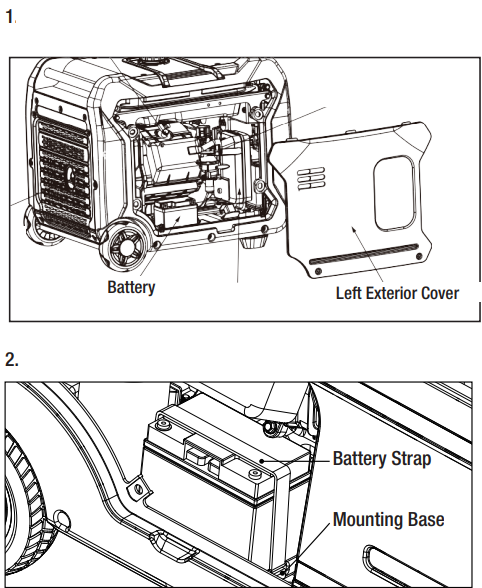
A quick-connect battery plug is pre-installed on the battery. Remove the cable tie securing the plugs, align colors, then push firmly to connect them.
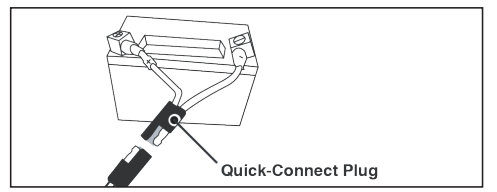
- Align the tabs on the bottom of the battery access cover with the generator case then push to reinstall the cover.
Note: The generator is equipped with a battery charging feature. Once the engine is running, a small current will slowly recharge the battery.
Grounding The Generator
Attach grounding wire (if required by code)
- Ground the generator by tightening the grounding nut against a grounding wire.
- Connect the other end to a copper or brass grounding rod that’s driven into the earth.
A generally acceptable grounding wire is a No. 12 AWG (American Wire Gauge) stranded copper wire.
Grounding codes can vary by location. Please contact a local electrician to check the grounding regulations for your area.
WARNING
Failure to properly ground the generator can result in electrocution.
Operation
Generator Location
WARNING
- NEVER operate the generator inside any building, garage, basement, crawlspace, shed, or enclosure, including the generator compartment of a recreational vehicle.
- NEVER operate or start the generator in the back of an SUV, camper, trailer, truck bed (regular sides, flat or other configuration), under staircases, stairwells, next to walls or buildings, or in any other location that will not allow for adequate cooling of the generator or for the proper exit of the exhaust flow.
- DO NOT operate or store the generator in wet weather conditions such as rain or snow. Using a generator in wet conditions could result in serious injury or death due to electrocution.
- Generators must have a minimum of 5 feet (1.5 m) of clearance from all combustible material.
- Generators must also have a minimum of 3 feet (91.4 cm) of airflow clearance on all sides to allow for adequate cooling, maintenance, and service.
- Always place the generator in a well-ventilated area. NEVER place the generator near air intake vents or where exhaust fumes could be drawn into occupied or confined spaces.
- Always carefully consider wind and air currents when positioning the generator.
- Always allow generators to properly cool before transport or for storage purposes.
- Failure to follow proper safety precautions may result in personal injury, damage to the generator, and void the manufacturer's warranty.
WARNING
During operation, the muffler and exhaust fumes will become hot. If there is inadequate cooling space or if the generator is blocked or enclosed, temperatures can rise quickly and may lead to a fire.
Starting The Generator
- Make sure the generator is on a solid, flat, level surface.
- Disconnect all electrical loads from the generator. Never start or stop the generator with electrical devices plugged in or turned on.
Turn the fuel switch to the desired fuel source. When the Switch is in the Gasoline position, the generator is ready to start with Gasoline. When the Switch is in the LPG position, the generator is ready to start with propane.
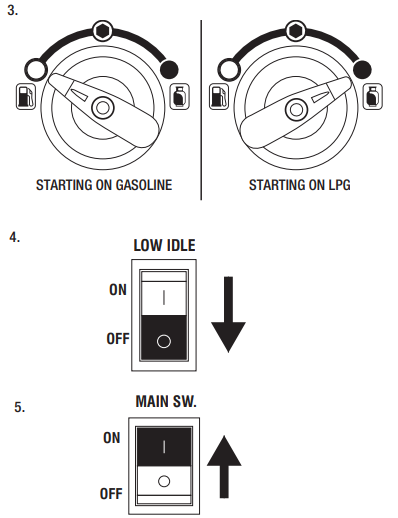
- Switch OFF Low Idle
The low idle switch is located next to the push start button on the panel. Flip the switch down to disable low idle when starting the generator.
LOW IDLE - Turn the Main Switch ON
Press the main switch up to the start position to start the generator. - Choose the starting method
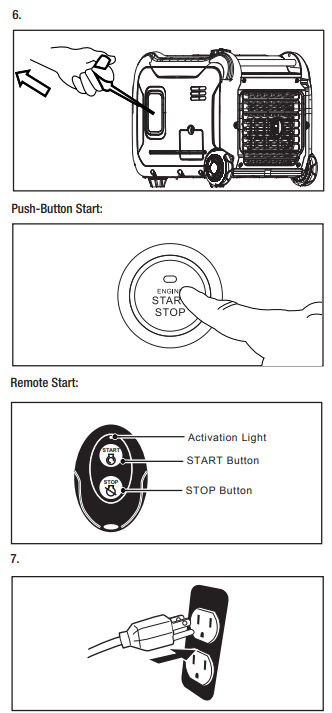
Recoil Start: Firmly grasp and pull the recoil handle slowly until you feel resistance, let it retract then pull swiftly.
Push-Button Start: Press the start button down for 1-3 seconds, then release, to start the generator.
Remote Start: Push and hold the ON button on the remote start key fob for one second. Plug-in devices
DANGER
Fire and explosion hazard. Always turn the propane tank valve to the fully closed position if not running the generator on propane.
WARNING
When using the generator with propane, make sure there is no possible ignition source close to the generator.
Gasoline To LPG
IMPORTANT: Load capacity is reduced when running on LPG. Make sure the generator can supply enough (running) and surge (starting) watts for the items you are powering before switching to LPG.
- Turn the LPG tank valve to the fully open position.
- Turn the fuel selector switch to propane operation.
LPG To Gasoline
- Turn the fuel selector switch to gasoline operation.
- Turn the LPG tank valve to the fully closed position.
NOTE: When switching to LPG operation the engine may run rough for a few seconds while it purges gasoline from the carburetor.
If the engine stops when switching fuel sources, disconnect all loads then restart the unit on the fuel source of choice.
Parallel Operation
The parallel connection ports allow you to connect two generators to increase the total available electrical power. Follow the instructions included with your parallel connection kit for proper installation and operation.
Overload Indicator
Note: The OVERLOAD light may turn on for a few seconds as a large device starts. This is normal for loads approaching the capacity of this generator.
- The total combined load through the outlets on the generator must not exceed the running power of the unit.
- If the OVERLOAD light turns on and the generator stops producing power, it has been overloaded.
- Turn off and disconnect all electrical devices and stop the engine. Compare device requirements to generator rating and reduce the total wattage of connected devices if necessary. Move anything that may be limiting generator ventilation away.
- Check if any circuit breakers have tripped and make sure that ALL circuit breakers are reset before starting the generator again.
- Restart the engine and reconnect devices while being careful to not overload the generator.
Low Oil Indicator
- If the engine oil level is too low, the LOW OIL light turns on and the engine will automatically shut off.
- The engine cannot be restarted until the proper amount of oil has been added. Add the appropriate type of oil until the oil level is at the proper level. SAE 10w-30 oil is recommended for general use.
NOTICE
Do not run the engine with too little oil. Engine will shut off if engine oil level is too low.
Low Idle Switch
- Turn the low idle Switch ON to limit noise and fuel consumption for lighter generator loads.
- Switch low idle OFF to operate engine at full speed when:
- Starting the generator
- A heavy load is applied
Voltage Selector
The Voltage Selector allows more current to be available at 120V outlets if 240V output is not required:
- Place switch at 120V only - only 120V outlets can be used.
- Place switch at 120/240V: Both 120V and 240V outlets can be used.
NOTE: Do not change the switch while under load. For parallel function, switch position must be at 120/240V.
Stop The Engine
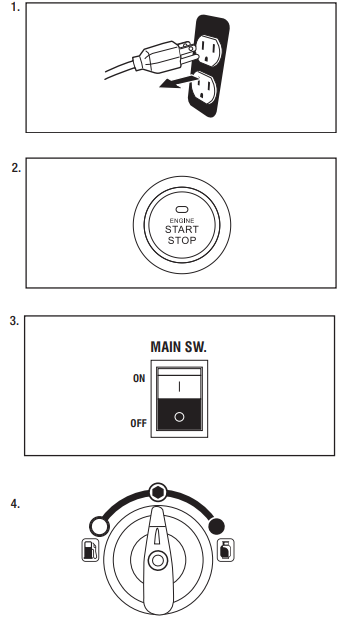
- Turn off and unplug all connected electrical loads. Never start or stop the generator with electrical devices plugged in or turned on.
- Push and hold the ON/OFF button for one second or push STOP on the remote start key fob for one second.
- Turn the main switch down to the off position.
Turn the fuel selector knob to the off position.
Generator Capacity
NOTICE
Do not overload the generator's capacity. Exceeding your generator's wattage capacity can damage the generator and/or electrical devices connected to it.
Make sure the generator can supply enough continuous (running) and surge (starting) watts for the items you will power at the same time.
The total power requirements (Volts x Amps=Watts) of all appliances connected must be considered. Appliance and power tool manufacturers usually list rating information near the model or serial number. To determine power requirements:
- Select the items you will power at the same time.
- Total the continuous (running) watts of these items. This is the amount of power the generator must produce to keep the items running. See the wattage reference chart on the next page.
- Estimate how many surge (starting) watts you will need. Surge wattage is the short burst of power needed to start electric motor-driven tools or appliances such as a circular saw or refrigerator. Not all motors start at the same time, total surge watts can be estimated by adding only the item(s) with the highest additional surge watts to the total rated watts from step 2.
Example:
Watts* | Watts* | |
RV Air Conditioner (13,000 BTU) | 1100 | 1800 |
TV (Flat Screen) | 150 | 150 |
RV Refrigerator | 180 | 600 |
Radio | 50 | 50 |
Light (75 Watts) | 75 | 75 |
Coffee Maker | 600 | 600 |
2155 Total Running Watts* | 3275 Highest Starting |
*Wattages listed are approximate. Verify actual wattage.
Setup Guide
To set up the Pulsar PGDA70BiSCO,
- Start by reading the user manual carefully.
- Ensure the generator is placed on a level surface away from flammable materials.
- Fill the fuel tank with the recommended type of gasoline and check the oil level.
- Connect any necessary accessories such as the battery for electric start if available.
- Plug in your appliances to the appropriate outlets and turn on the generator.
- Let it run for a few minutes before connecting your load to allow the engine to warm up.
Maintenance
WARNING
- ACCIDENTAL STARTING: Turn the fuel selector to the “OFF” position, wait for the engine to cool, and disconnect the spark plug cable before performing any inspection, maintenance, or cleaning procedures.
- EQUIPMENT FAILURE: Do not use damaged equipment. If abnormal noise, vibration, or excess smoking occurs, have the problem corrected before further use.
Many maintenance procedures, including any not detailed in this manual, will need to be performed by a qualified technician for safety. If you have any doubts about your ability to safely service the equipment or engine, have a qualified technician service the equipment instead.
Power
Cleaning, Maintenance, and Lubrication Schedule
Note: This maintenance schedule is intended solely as a general guide. If performance decreases or if equipment operates unusually, check systems immediately. The maintenance needs of each piece of equipment will differ depending on factors such as duty cycle, temperature, air quality, fuel quality, and other factors.
Note: The following procedures are in addition to the regular checks and maintenance explained as part of the regular operation of the engine and equipment.
Procedure | Before EachUse | Monthly or every 8 hr. of use | Every 3 mo. or 50 hr. of use | Every 6 mo. or 100 hr. of use | Yearly or every 300 hr. of use | Every 2 Years |
|
| |||||
Change engine oil |
| |||||
Clean/replace air cleaner |
| |||||
|
| |||||
|
| |||||
Replace fuel line if necessary |
|
Checking and Filling Fuel
WARNING
TO PREVENT SERIOUS INJURY FROM FIRE:
Fill the fuel tank in a well-ventilated area away from ignition sources. If the engine is hot from use, shut the engine off and wait for it to cool before adding fuel. Do not smoke.
- Clean the Fuel Cap and the area around it.
Unscrew and remove the Fuel Cap.
- Remove the strainer and remove any dirt and debris. Then replace the strainer.
Note: Do not use gasoline containing more than 10% ethanol (E10). Do not use E85 ethanol. Add a fuel stabilizer to the gasoline or the Warranty is VOID.
Note: Do not use gasoline that has been stored in a metal fuel container or a dirty fuel container. It can cause particles to enter the carburetor, affecting engine performance and/or causing damage. - If needed, fill the Fuel Tank to about 1 inch under the fill neck with 87 octane unleaded gasoline that has been treated with a fuel stabilizer additive. Follow fuel stabilizer manufacturer's recommendations for use.
- Replace the Fuel Cap.
- Wipe up any spilled fuel and allow excess to evaporate before starting the engine. To prevent FIRE, do not start the engine while the smell of fuel hangs in the air.
Engine Oil Change
CAUTION
Oil is very hot during operation and can cause burns. Wait for the engine to cool before changing the oil.
- Make sure the engine is stopped and is level.
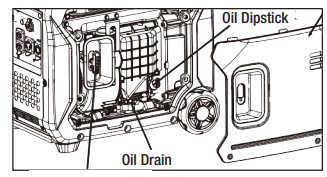
- On the right side of the generator, loosen the screws and remove the Oil Fill Access Door.
- Place an oil drain pan under the generator and center under the Oil Drain Hose opening. Remove the Oil Drain Cap, tilt the generator slightly to facilitate drainage, and wait for the oil to drain completely. Recycle used oil.
- Clean the top of the Oil Fill Cap/Dipstick and the area around it. Remove the Cap/Dipstick, turning it counterclockwise.
- Remove the upper Rubber Seal from just below the Oil Drain Plug.
- Use a wrench (sold separately) to remove the Oil Drain Plug and allow the oil to drain completely.
- Replace the Oil Drain Cap. Put the Oil Drain Hose back into the generator.
- Add the appropriate type of oil until the oil level is at the proper level. SAE 10w-30 oil is recommended for general use.
Note: Make sure the generator is level when adding oil to prevent overfilling which could cause engine damage. - Check the oil level. The oil level should be just below the edge of the hole as shown.
- Tighten the Oil Fill Cap / Dipstick and replace the Oil Fill Access Door.
NOTICE
Do not attempt to run the engine with too little oil. The engine will not start with low or no engine oil.
Air Filter Element Maintenance
- Loosen screws and remove the Air Filter Access Panel on the left side of the generator.
- Unsnap the Air Filter Cover Clip and remove Air Filter Cover. See the figure below.
Remove Air Filter.
Spark Arrestor Maintenance
WARNING
TO PREVENT SERIOUS INJURY AND FIRE: Operate only with proper spark arrestor installed
WARNING
The operation of this equipment may create sparks that can start fires around dry vegetation. A spark arrestor may be required. The operator should contact local fire agencies for laws or regulations relating to fire prevention requirements.
- Allow the generator to cool completely.
- Remove the Screws from the back of the generator.
- Remove the Tail Pipe and Spark Arrestor.
- Clean the Spark Arrestor using a wire brush (sold separately). Replace the arrestor if damaged.
WARNING
TO PREVENT SERIOUS INJURY FROM ACCIDENTAL BRUSH FIRE, secure Spark Arrestor back in place immediately after cleaning and before further operation.
Spark Plug Maintenance
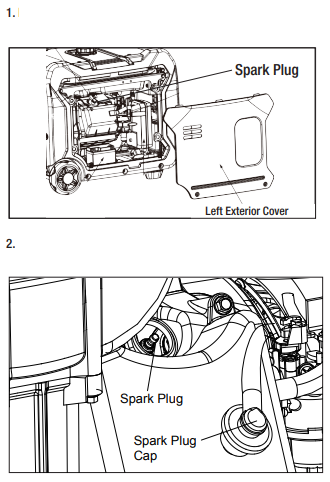
- Loosen two screws and remove the Access Panel on the left of the generator.
- Disconnect Spark Plug Cap from the end of plug. Clean out debris from around Spark Plug.
Using the Spark Plug Wrench, remove the Spark Plug.

- Inspect the Spark Plug: If the electrode is oily, clean it using a clean, dry rag. If the electrode has deposits on it, clean it with a brass wire brush. If the white insulator is cracked or chipped, replace the spark plug.
NOTICE:Use only BPR6ES (NGK) type spark plug or equivalent. Using an incorrect spark plug may damage the engine. - When installing a new spark plug, adjust the plug's gap to the specification on the Specifications Chart. Do not pry against the center electrode, the spark plug can be damaged.
- Apply anti-seize material to Spark Plug threads. Install the new spark plug or the cleaned spark plug into the engine.
Finger-tighten until the gasket contacts the cylinder head, then tighten about 3/4 turn more.
NOTICE: Tighten the Spark Plug properly. If loose, the Spark Plug will cause the engine to overheat. If overtightened, the threads in the engine block will get damaged. - Apply dielectric spark plug boot protector (not included) to the end of the spark plug and reattach the boot securely.
- Replace Spark Plug Access Cover and Access Panel.
Storage
When the equipment is to remain idle for longer than 20 days, prepare the engine for storage as follows:
- CLEANING:
Wait for the engine to cool, then clean the engine with a dry cloth.
NOTICE: Do not clean using water. The water will gradually enter the engine and cause damage. - FUEL:
Gasoline Treatment/Draining the Fuel Tank
To protect the fuel tank during storage, fill the tank with fresh gasoline that has been treated with a fuel stabilizer additive. Follow fuel stabilizer manufacturer's recommendations for use.
WARNING: Fill tank in a well-ventilated area away from ignition sources. If the engine is hot from use, shut the engine off and wait for it to cool before adding fuel. Do not smoke.
Draining the Carburetor
After closing the Fuel Valve, place an appropriate container under the Carburetor and carefully remove the Drain Bolt from the bottom of the Carburetor Bowl, allowing the fuel to drain completely. Replace the Drain Bolt after draining.
Aged gasoline that has not been treated with stabilizer ahead of time must be safely drained and disposed of, never run old gasoline through the engine.
WARNING
To prevent serious injury and fire, close the Fuel Valve before draining the Carburetor. - LUBRICATION:
- Change engine oil.
- Clean out the area around the spark plug. Remove the spark plug and pour one tablespoon of engine oil into the cylinder through the spark plug hole.
- Replace spark plug, but leave spark plug cap disconnected.
- Pull Starter Handle to distribute oil in the cylinder. Stop after one or two revolutions when you feel the piston start the compression stroke (when you start to feel resistance).
- STORAGE AREA:
Cover and store in a dry, level, well-ventilated area out of reach of children. The storage area should also be away from ignition sources, such as water heaters, clothes dryers, and furnaces.
NOTICE: During extended storage periods the engine must be started every 3 months and allowed to run for 15-20 minutes. - AFTER STORAGE:
Untreated gasoline will deteriorate quickly. Drain the fuel tank and change to fresh fuel if untreated gasoline has been sitting for a month, if treated gasoline has been stored beyond the fuel stabilizer's recommended time, or if the engine does not start.
Troubleshooting about Pulsar Products Fuel Inverter Generator PGDA70BiSCO
Problem | Possible Causes | Probable Solutions |
THE ENGINE WILL NOT START | FUEL RELATED:
| FUEL RELATED:
unleaded gasoline and open fuel valve. Do not usegasoline with morethan 10% ethanol (E15,E20,E85, etc.).
87+ octane stabilizer-treated unleaded gasoline only. Do not use gasoline with more than 10%ethanol (E15, E20,E85, etc.).
to a safe, outdoor location and contact a certified Pulsar Service Center before using the generator again
|
IGNITION (SPARK) RELATED:
| IGNITION(SPARK)RELATED:
repair ignition system. |
THE ENGINE WILL NOT START | COMPRESSION RELATED:
Problem after long storageperiods.
(Hissing noise will occur when trying to start.)
misadjusted or stuck. | COMPRESSION RELATED:
If that does not work, replace the spark plug. If the problem persists, may have a head gasket problem, see#3.
|
ENGINE OIL RELATED:
|
ENGINE OIL RELATED:
| |
SPARK ARRESTOR RELATED: 1. Spark Arrestor clogged with soot. | SPARK ARRESTOR RELATED: 1. Cleanand replace SparkArrestor. | |
ENGINE MISFIRES |
|
|
ENGINE STOPS SUDDENLY |
1.Low oil shutdown. |
1. Fill engine oil to the proper level. Check engine oilbefore EVERY use. |
ENGINE STOPS SUDDENLY |
|
|
ENGINE STOPS WHEN UNDER HEAVY LOAD |
|
|
ENGINE KNOCKS |
|
|
ENGINE BACKFIRES |
|
|
THE ATTACHED DEVICE DOESN'T HAVE POWER |
|
then plug it back in againand turn it on.
|
Follow all safety precautions whenever diagnosing or servicing the generator or engine.
Pros & Cons
Pros:
- High peak power capacity for heavy-duty applications.
- Quiet operation with a noise level of 60 dB.
- High fuel efficiency with up to 8 hours of runtime.
- Inverter technology for clean energy output.
- Compact and lightweight design for easy transport.
- User-friendly control panel with multiple outlets.
Cons:
- Higher cost compared to traditional generators.
- Requires regular maintenance to ensure longevity.
- Not as heavy-duty as some larger generators on the market.
- Some users may find it slightly heavier than expected despite its compact size.
Customer Reviews
Customers have generally praised the Pulsar PGDA70BiSCO for its reliability and performance. Many appreciate its quiet operation and high fuel efficiency, making it ideal for camping trips and home backup use. Some users have noted that while it is more expensive than some other options, its quality and features justify the cost. However, a few users have reported issues with the electric start system and recommend ensuring proper maintenance to avoid these problems.
Common Complaints
Sometimes, users have reported issues with starting the generator after extended periods of inactivity. This can often be resolved by ensuring proper storage and maintenance as outlined in the user manual. Another common complaint is regarding customer service support, where some users have found it challenging to get assistance with technical issues.
Faqs
What is the peak power capacity of the Pulsar PGDA70BiSCO?
How long does the fuel last on a full tank?
Is this generator suitable for sensitive electronics?
What safety features does the Fuel Inverter Generator ?
Can I use this generator for parallel operation?
How do I maintain the generator to ensure longevity?
Is there an electric start option available?
What is the noise level of this generator?
Can I use this Pulsar Products Fuel Inverter Generator PGDA70BiSCO in high-altitude areas?
What kind of warranty does Pulsar offer for this product?
Leave a Comment
