Pyle SereneLife Digital Treadmill SLFTRD18 User Guide
Content
Introduction
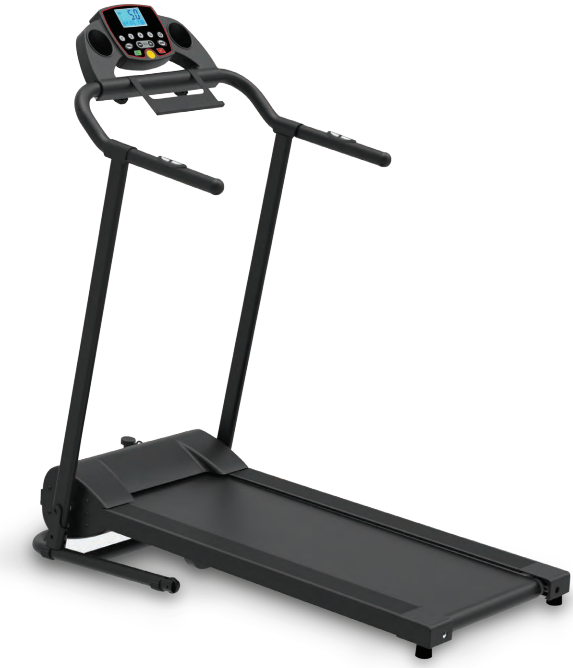
The Pyle SereneLife Digital Treadmill SLFTRD18 is a versatile and compact exercise machine designed for home fitness enthusiasts. Launched in 2019, this treadmill is manufactured by Pyle, a brand known for its quality fitness equipment. Priced at approximately $299, the SLFTRD18 features an adjustable speed range of 0.6 to 6.0 MPH, Bluetooth connectivity, and an LCD display that tracks workout metrics, making it ideal for walking, jogging, and running in the comfort of your home.
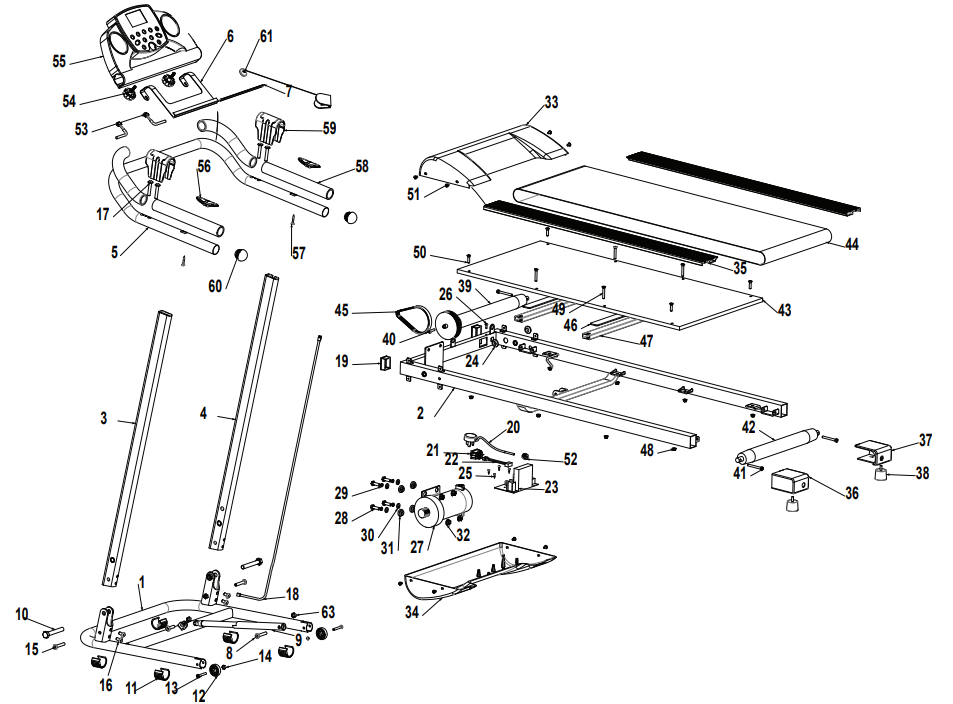
PARTS LIST
Part No. | Description | Qty | Part No. | Description | Qty |
1 | Base Frame | 1 | 32 | Flange Nut M8 | 4 |
2 | Main Frame | 1 | 33 | Upper Motor Cover | 1 |
3 | Left Stand Tube | 1 | 34 | Lower Motor Cover | 1 |
4 | Right Stand Tube | 1 | 35 | Side Rail | 2 |
5 | Handlebar Tube | 1 | 36 | Left Rear Cover | 1 |
6 | Tablet Holder | 1 | 37 | Right Rear Cover | 1 |
7 | EVAProtection | 1 | 38 | Foot Pad | 2 |
8 | HexScrew M8X35 | 2 | 39 | Front Roller | 1 |
9 | GasSpring | 1 | 40 | Cross Screw M6X20 | 1 |
10 | HexScrew M12X70 | 2 | 41 | Hex Socket Screws | 3 |
11 | Foot Pad | 5 | 42 | Back Roller | 1 |
12 | Transportation Wheel | 2 | 43 | Running Board | 1 |
13 | Head Hex SocketScrews | 2 | 44 | Running Belt | 1 |
14 | Locknut M6 | 2 | 45 | Driving Belt | 1 |
15 | Hex Screw M8X50 | 2 | 46 | Reinforced Tube | 2 |
16 | HexScrew M8X15 | 4 | 47 | Reinforced Pad | 2 |
17 | Head Hex SocketScrews | 4 | 48 | Frange Nut M6 | 8 |
18 | Main Control Cable | 1 | 49 | Cross Screw M6X40 | 4 |
19 | EndCap 30X40 | 2 | 50 | Cross Screw M6X25 | 4 |
20 | Power Cord | 1 | 51 | Cross Screw M5X10 | 8 |
21 | Power Swtch | 1 | 52 | Power Cord Grommet | 1 |
22 | Wire for Power Switch | 1 | 53 | Pulse Senor Wire | 2 |
23 | Electric controller | 1 | 54 | Console Knob | 2 |
24 | Wire Grommet | 2 | 55 | Console | 1 |
25 | Head Self-drilling Screw | 4 | 56 | Pulse Senor | 2 |
26 | Head Cross Screws | 1 | 57 | Self-drilling Screw 4X30 | 2 |
27 | Motor | 1 | 58 | Handlebar Foam Grip | 1 |
28 | HexScrewM8X25 | 4 | 59 | Handlebar Cover | 2 |
29 | Spring Washer M8 | 4 | 60 | Tube Cap for Handlebar | 2 |
30 | Washer M8 | 4 | 61 | Safety Key | 1 |
31 | Foot Pad For Motor | 4 | 62 | Spring Washer | 2 |
63 | Locknut | 2 |
EXPLODED VIEW
Pyle SereneLife Digital Treadmill SLFTRD18 TOOL KIT

COMPATIBLE FITNESS APPLICATIONS
Android: Download your favorite application from the Google PlayStore.

iPad/iPhone: Download your favorite application from the AppStore. Check if your mobile device confirms the requirements for the application. The requirements of each application are shown in the Google PlayStore or AppStore.
How to use:
Turn on the Bluetooth function of your mobile device. Open the application on your device. Click on in the main menu on the button "Indoor" to search for available devices.

Choose the shown device from the list to pair it.
Once the device is paired you can start using the application in different categories:
- Quick Run
- Map Mode
- Target Mode
Please understand that we are not able to offer you a complete operation guide of the application inside this manual, as the app will be updated from time to time.
This process can make changes to the operation or the design of the application. Please refer to the instructions inside the specific app download store or contact us.
Track Base Smart Digital Treadmill with Downloadable App
- Smart Digital Treadmill Design
- Get Connected with the ‘iFitShow’ App
- Pairs to Your Device via Bluetooth Connectivity
- Running & Training Data Statistics Readout
- Built-in Hand Grip Sensors for Pulse Monitoring
- Digital LCD Display Screen with Touch Button Controls
- Displays Run Time, Distance, Speed, Calories Burned, Heart Rate
- Adjustable Speed Settings
- Selectable Preset Training Modes
- Simple Electric Motorized Plug-in Design
- Convenient Folding Style for Easy Setup & Storage
- Used for Walking, Jogging, Running Exercise Training
- Perfect for Weight Loss, Cardiovascular Fitness, Endurance & Stamina Building
- Integrated Safety Key, Emergency Power Off
- Removable Book / Tablet Device Holder
The ‘iFitshow’ App:
- Train Smarter and Connect via Your Favorite Device
- Works with Smartphones, Tablets, Laptops, etc.
- Free to Download via Your Smartphone
- Multifunctional Sports App
- Connect to the Treadmill via Bluetooth
- App Provides Access to Exercise Activities
- Linked to ‘HealthKit’ to Record and Collect Activity Data
- Easily Share Health and Fitness Data via Social Media
- Available for iOS and Android
Bluetooth Connectivity:
- Hassle-Free Pairing, No Password Required
- Compatible with All of Today’s Latest Bluetooth Devices
- (Smartphones, Tablets, Laptops, Computers, etc.)
- Bluetooth Version: 4.0 BLE
Technical Specs:
- Motorized Treadmill Motor Power: 1.0HP
- Running Belt / Running Surface Size (L x w): 39.3’’ x 13.4’’ -inches
- Motor Power: 1.0 HP
- Adjustable Speed: 0.6 – 6.0 mph
- Maximum Weight Support: Up to 265 lbs.
- *Some Assembly Required
- Power Supply: 100-120V
- Total Folded Dimensions (L x W x H): 49.6’’ x 24.0’’ x51.2’’ -inches
- Total Open Dimensions (L x W x H): 27.5’’ x 24.0’’ x 51.2’’ -inches
- Sold as: Unit
Description
The Pyle SereneLife Digital Treadmill SLFTRD18 boasts a sturdy steel frame that ensures stability and durability during your workouts. The treadmill's spacious running surface of 49.2" x 15.7" provides ample room for comfortable walking, jogging, or running. The backlit LCD display is user-friendly, showing vital statistics such as speed, distance, calories burned, and heart rate.
The treadmill is equipped with 12 preset workout programs, allowing you to vary your routine and challenge yourself differently each day. Additionally, the adjustable incline feature lets you simulate uphill walking or running, further enhancing the effectiveness of your workout.
ASSEMBLY INSTRUCTIONS
5 easy steps to assemble your treadmill then you're ready to workout.
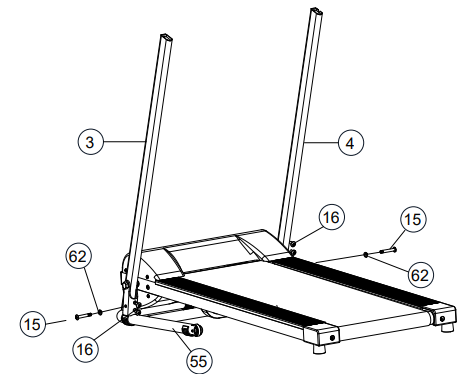
- Step 1
- Place the treadmill in the upright position on a level flat surface.
Lift the Left Stand Tube (3) and Right Stand taube (4) up, insert the Hex Screw M8X50 (15) and Hex Screw M8X15 (16) into the holes on the Base Frame (1), tighten them by Allen Key.
- Step 2
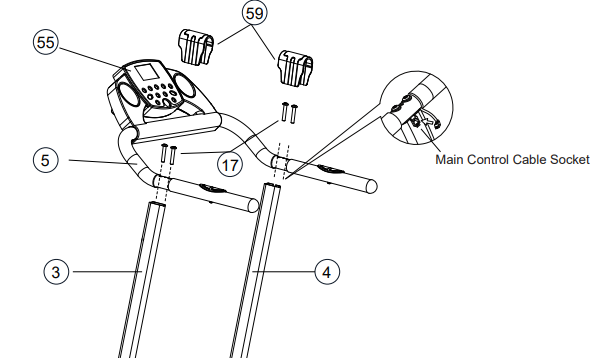
- Remove the four Head Hex Socket Screws (17) in the end of the Left Stand Tube (3) and Right StandTube (4).
- Attach the Handlebar (5) onto both ends of the Stand Tube (3 and 4), tighten the screws with the Allen Key provided.
- Connect the wire that comes from the Computer Console (55) to the Main Control Cable Socket from the right handlebar support of the Right Stand Tube (4).
Install both Handlebar Covers (59) onto the Handlebar (5).
- Step 3
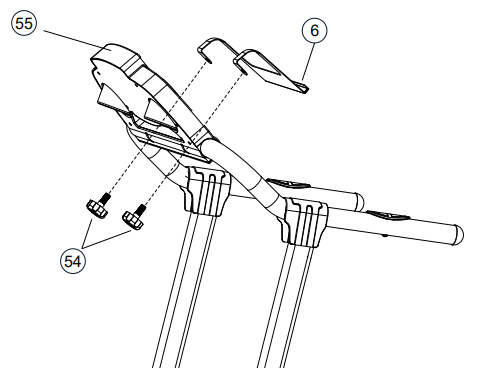
- Turn the Computer Console (55) up or down to align the computer knob hole, and then place the Tablet Holder (6) onto the Computer Console (55) to align the hole.
Lock the Computer Console (55) in place by tightening the Computer Knob (54).
FOLDING INSTRUCTIONS
TO FOLD
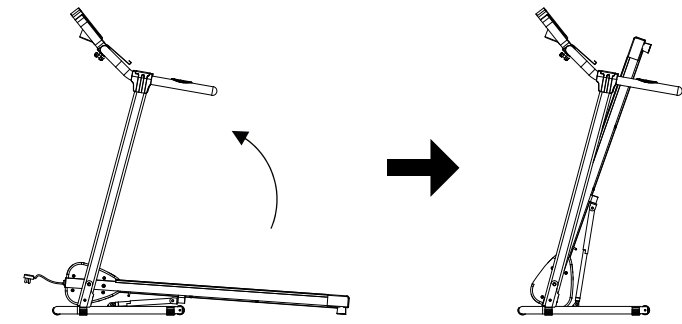
Firmly grasp the rear end of the main frame with both hands. Carefully lift the end of the main frame up into the upright position until the Foot Lock Latch engages and securely locks the main frame into position. Make sure the main frame is securely latched before moving the treadmill. Store the treadmill in a clean and dry environment away from children.
TO UNFOLD
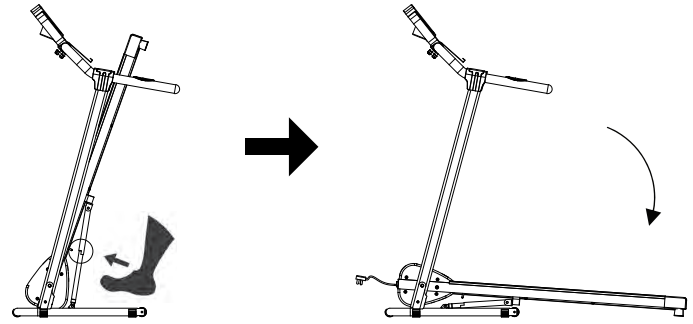
To set down the treadmill, firmly grasp the back end of the treadmill with both hands. Gently kick on the Foot Lock Latch with your foot until the lock latch disengages. Carefully lower the main frame to the ground.
OPERATING THE COMPUTER
Flip the Master Power Switch that is located at the front of the treadmill to the ON position.
Before beginning a workout session ensure that the Safety Tether Key is properly placed onto the Computer Console and the Safety Clip is securely attached to an article of your clothing.
NOTE: Always stand on the side rails when you start the treadmill, never start the treadmill while you are standing on the running belt.
QUICK START Pyle SereneLife Digital Treadmill SLFTRD18
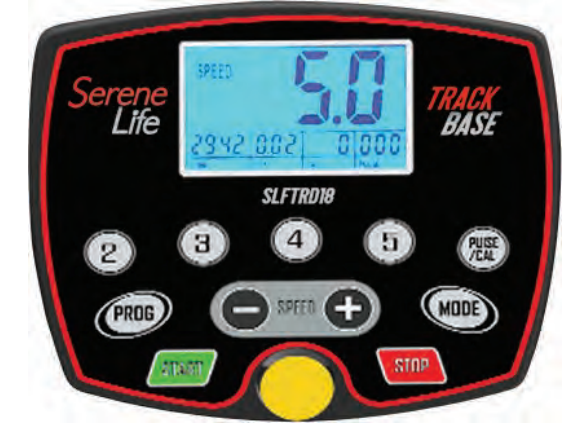
- Press the START button on the computer to start exercise, the LCD window will countdown 3 seconds with the LCD showing "3-2-1" before the running belt starts moving. The running belt starts moving with an initial speed of 0.6 MPH.
- Always allow the treadmill to reach a speed of 0.6 MPH before stepping on to the running belt. You may press the SPEED or SPEED button on the computer console or handlebar to increase or decrease the running speed during exercise. The split window of SPEED will display your current running speed.
- The speed range is from a minimum 0.6 MPH to the maximum 6 MPH. You may also press one of the INSTANT SPEED buttons (2 / 3 / 4 / 5 ) on the computer console and the split window of SPEED will display the speed that you have pressed and the running speed will change to 2 MPH, 3 MPH, 4 MPH, or 5 MPH respectively.
- The split window of TIME will display your elapsed workout time in minutes and seconds. The split window of DIST. (DISTANCE) will display the accumulative distance travelled during workout. The split window of CAL. (CALORIES) will display the total accumulated calories burned during workout.
- The split window of PULSE will display your current heart rate in beats per minute (BPM).
- To activate, grip the hand pulse sensors on both handlebars during exercise and the pulse will display after 4-5 seconds. For a more accurate reading, grip pulse sensors with both hands. During training, you may press the STOP button on the computer console to stop the treadmill running at any time, or pull out the safety tether key to stop the treadmill running.
FUNCTION BUTTONS
- START:
Press the START button to start training on different training mode. - STOP:
Press the STOP button to stop training on different training mode. - PROG (PROGRAM):
Press the PROG button to select the pre-set training program (P01-P12) mode before training. - MODE:
Press the MODE button to select different functions (time or distance) for setting exercise goals in manual program mode before training.  (SPEED UP):
Press the button to make upward adjustments for pre-setting target training time or distance in manual program mode before training. Press the
  button to make upward adjustments for pre-setting target training time in pre-set training program (P01-P12) mode before training. Makes speed adjustments during all training periods on different training modes. The speed range is from 0.6 MPH to 6.0 MPH.
 (SPEED DOWN):
Press the button to make backward adjustments for pre-setting target training time or distance in manual program mode before training. Press the
  button to make backward adjustments for pre-setting target training time in pre-set training program (P01-P12) mode before training. Makes speed adjustments during all training periods on different training modes. The speed range is from 0.6 MPH to 6.0 MPH.
- INSTANT SPEED (2 / 3 / 4 / 5 ):
Used to reach desired speed more quickly. - PULSE/cal:
During exercise mode, press the PULSE/cal button to switch display the pulse and calories values on the split window of PULSE/CAL..
DISPLAY FUNCTIONS
- TIME: Displays your elapsed workout time in minutes and seconds. Press the START button on the computer to begin exercising, the LCD window will countdown 3 seconds with the LCD showing "3-2-1" before the running belt starts moving. The running belt starts moving with an initial speed of 0.6 MPH. You may press the
 button on the computer console or handlebar to increase or decrease the running speed during exercise. Time starts counting up from 0:00 to 99:00 per 1 second increment.
 - SPEED: Displays the current speed from the minimum 0.6 MPH to the maximum 6.0 MPH. You may increase or decrease the speed by pressing the
 button on the computer console or handlebar.
 - DIST. (DISTANCE): Displays the accumulative distance travelled during workout. Press the START button on the computer to begin exercising, the LCD window will countdown 3 seconds with the LCD showing "3-2-1" before the running belt starts moving. The running belt starts moving with an initial speed of 0.6 MPH. You may press the
 button on the computer console or handlebar to increase or decrease the running speed during exercise. Distance starts counting up.
 - PULSE: Displays your current heart rate in beats per minute (BPM). To activate, grip the hand pulse sensors during exercise and the pulse will display after 2-5 seconds. For a more accurate reading, grip pulse sensors with both hands.
- CAL. (CALORIES): Displays the total calories burned during your workout. Press the START button on the computer to begin exercising, the LCD window will countdown 3 seconds with the LCD showing "3-2-1" before the running belt starts moving. The running belt starts moving with an initial speed of 0.6 MPH. You may press the
 button on the computer console or handlebar to increase or decrease the running speed during exercise. Calorie starts counting up. (This data is a rough guide for comparison of different exercise sessions and should not be used in medical treatment).
TRAINING IN MANUAL PROGRAM MODE:
- You may pre-set target TIME or DISTANCE in STOP mode before training. Only one of the functions can be pre-set. To set TIME press the MODE button on the computer console until you see the split window of TIME begin blinking. Press the
 button on the computer console or handlebar to change the setting.
 - Each increment is 1 minute. The pre-set target time range is from 5:00 to 99:00 minutes. Once you pre-set target time, press the START button on the computer to begin exercising. The running belt starts moving with an initial speed of 0.6 MPH.
- You may press the
 button on the computer console or handlebar to increase or decrease the running speed during exercise. Time starts counting down from pre-set target time to 0:00 per 1 second backward. When the pre-set target time counts down to 0:00, the computer will beep to alert you and the treadmill will stop automatically.
 - To set DISTANCE press the MODE button on the computer console until you see the split window of DISTANCE begin blinking. Press the
 button on the computer console to change the setting. The pre-set target distance range is from 0.50 to 65.00 miles, the default dist ance is 1 mile.
 - Once you pre-set target distance, press the START button on the computer to begin exercising. The running belt starts moving with an initial speed of 0.6 MPH. You may press the
 button on the computer console or handlebar to increase or decrease the running speed during exercise.
 - Distance starts counting down from pre-set target distance to 0.00. When the pre-set target distance counts down to 0.00, the computer will beep to alert you and the treadmill will stop automatically.
TRAINING IN PRE-SET PROGRAM MODE (P01-P12):
- The computer offers 12 pre-set programs (P01-P12). You may select one of the pre-set training programs in STOP mode before training. Press the PROG (PROGRAM) button on the computer console to select one of the training programs.
- The split window of TIME begin blinking. You may press the
 button on the computer console or handlebar to change the setting. Each increment is 1 minute.
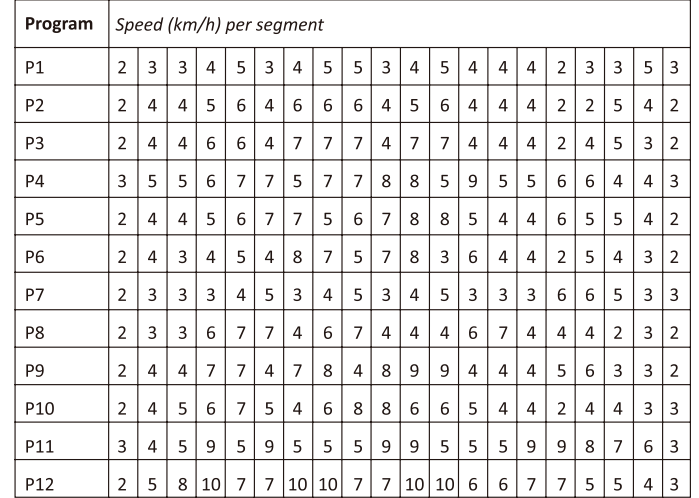
 - The pre-set target time range is from 5:00 to 99:00 minutes. Once you pre-set target time, press the START button on the computer to begin exercising. The running speed will change automatically during the workout (as shown below). The program is split evenly into 20 intervals. You may press the
 button on the computer console or handlebar to increase or decrease the running speed during exercise.
 - When the pre-set training program time count down to 0:00, the computer will beep to alert you and the treadmill will stop automatically.
Setup Guide
To operate the Pyle SereneLife Digital Treadmill SLFTRD18,
- Start by carefully unpacking and assembling the unit according to the provided instructions.
- Ensure all parts are securely fastened and the treadmill is placed on a level surface.
- Plug in the power cord and turn on the treadmill.
- Use the control panel to select your desired program or manually adjust the speed and incline.
- For Bluetooth connectivity, pair your device with the treadmill using the Bluetooth settings menu on your device.
- Before your first use, make sure to read through the user manual to understand all safety precautions and operational guidelines.
CARE & MAINTENANCE
WARNING: To prevent electrical shock, please turn off and unplug the treadmill before cleaning or performing routine maintenance.
WARNING: Always check the wear and tear components like spring knob and running belt to prevent injury.
CLEANING
After each exercise, ensure that the unit is wiped down and any sweat is removed from the unit.
The treadmill can be cleaned with a soft cloth and mild detergent. Do not use abrasives or solvents. Be careful not to get excessive moisture on the display panel as this might damage the unit and create an electrical hazard. Please keep the treadmill, especially the computer console, out of direct sunlight to prevent damage to the screen.
STORAGE
Store the treadmill in a clean and dry indoor environment. Never leave or use the unit outdoors. Ensure the master power switch is off and the power cord is un-plugged from wall outlet.
IMPORTANT: Read all instructions carefully before using this product. Retain this owner’s manual for future reference. The specifications of this product may vary from this
photo and are subject to change without prior notice.
IMPORTANT SAFETY INSTRUCTIONS
Basic precautions, including the following important safety instructions should always be followed when using this treadmill. Read all instructions before using this treadmill.
DANGER: To reduce the risk of electric shock, always unplug the treadmill from the electrical outlet immediately after using and before cleaning, assembling, or servicing the treadmill.
Failure to follow these instructions may lead to personal injury and cause damage to the treadmill.
WARNING: To reduce the risk of burns, fire, electric shock or injury to any persons, please read the following:
- Never leave the treadmill unattended while plugged in. Disconnect by turning off the master power switch and unplugging from wall outlet when not in use and before putting on or taking off parts.
- Use this appliance only for its intended use as described in this manual. Do not use attachments not recommended by the manufacturer.
- Never operate this treadmill if it has a damaged cord or plug, or if it is not working properly. If it has been dropped or damaged, or been exposed to water, return the appliance to a service center for examination and repair.
- Do not attempt any maintenance or adjustments other than those described in this manual. Should any problems arise, discontinue use and consult an Authorised Service Representative.
- Never operate the appliance with the air openings blocked. Keep the air openings free of lint, hair, and other obstructions.
- Do not use the treadmill outdoors.
- Do not pull the treadmill by its power cord or use the cord as a handle.
- Keep children and pets away from the equipment while in use.
- Elderly or disabled users should only use this treadmill in the presence of an adult who can provide assistance if required.
- Do not operate where aerosol (spray) products are being used or where oxygen is being administered.
- Keep dry - do not operate in a wet or moist condition.
- The motor cover can become hot while the treadmill is in use. Do not place the treadmill on a blanket or other flammable surface as this can create a fire hazard.
- Keep electrical cord away from heated surfaces.
- Keep the treadmill on a solid, level surface with a minimum safety area clearance of two meters around the treadmill. Be sure the area around the treadmill remains clear of any obstructions during use.
- This treadmill is for domestic household use only.
- Only one person should use the treadmill at a time.
- Wear comfortable and suitable clothing when using the treadmill. Do not use the treadmill barefoot or in socks. Always wear appropriate, enclosed athletic footwear.
- Never wear loose or baggy clothing as it can become caught on the treadmill and create an entrapment hazard.
- Always hold on to the handrails while using the treadmill.
- Always make sure the spring knob and round knob are in place when folding and moving the treadmill.
- Do not leave children who are under 12 years-old unsupervised near or on the treadmill.
- To disconnect, turn all controls to the off position, then remove plug from the wall outlet.
- This appliance is not intended for use by persons (including children) with reduced physical, sensory or mental capabilities, or lack of experience and knowledge, unless they have been given supervision or instruction concerning use of the appliance by a person responsible for their safety.
- Children should not be allowed to play on or near the treadmill at any time.
- CAUTION - RISK OF INJURY TO PERSONS - To avoid injury, use extreme caution when stepping onto or off of a moving treadmill belt. Carefully read this instruction manual before use.
- Maximum Weight Capacity is 120 kgs.
- Pull out the Safety Tether Key for emergency stop.
- This unit must be plugged into a nominal 110 volt 60 Hz outlet which has been grounded.
- Keep hands clear of all moving parts. Never place hands or feet under the treadmill while in use.
- Do not use the treadmill on a carpet that is greater than 1.3 cm in height.
- Before using the treadmill, check that the belt is aligned and centered on the running deck and all visible fasteners on the treadmill are sufficiently tightened and secure.
- Children shall not play with the appliance.
- Cleaning and user maintenance shall not be made by children without supervision.
- If the supply cord is damaged, it must be replaced by the manufacturer, its service agent or similarly qualified persons persons in order to avoid a hazard.
- Never operate this treadmill if it is in the folded position.
- Allow the running belt to fully stop and unplug the power cord from the wall outlet before folding up the treadmill.
- Always face towards the computer console and do not run backwards on the running belt.
WARNING: Before beginning any exercise program consult your physician. This is especially important for people who are over 35 years old or who have pre-existing health problems. Read all instructions before using any fitness equipment. Do not operate this exercise equipment without properly fitted guards, as the moving parts can present a risk of serious injury if exposed.
CAUTION: Read all instructions carefully before operating this product. Retain this Owner’s Manual for future reference.
TROUBLESHOOTING GUIDE
Problem | Potential Causes | Corrections |
Treadmill will not start. |
|
|
Belt slips. | Belt not tight enough. | Adjust belt tension. |
Belt hesitates when stepped on. |
|
|
Belt is not centred. | Running belt tensionnot even across the rear roller. | Center the belt. |
LUBRICATION
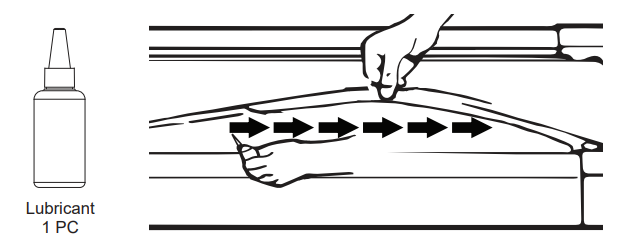
Lubricating under the running belt will ensure superior performance and extend its life expectancy. After the first 25 hours of use (or 2-3 months) apply some lubricant, and repeat for every following 50 hours of use (or 5-8 months).
How to check running belt for proper lubrication
Lift one side of the running belt and feel the top surface of the running deck. If the surface is slick to the touch, then no further lubrication is required. If the surface is dry to the touch, apply some lubricant.
How to apply lubricant
Lift one side of running belt. Pour some lubricant under the centre of the running belt on the top surface of the running deck. Run on the treadmill at a slow speed for 3 to 5 minutes to evenly distribute lubricant.
NOTE: DO NOT over lubricate running deck. Any excess lubricant that comes out should be wiped off.
EMERGENCY STOP
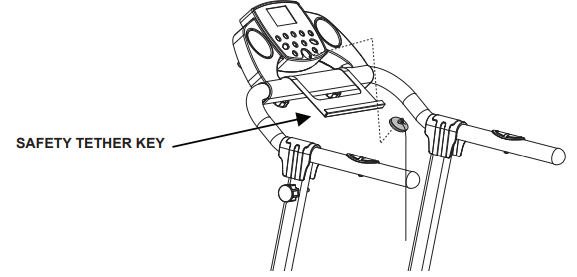
Before beginning a workout session ensure that the Safety Tether Key is properly placed onto the Computer Console and the Safety Clip is securely attached to an article of your clothing.
If you fall the clip will pull out the SAFETY TETHER KEY from the Computer Console and the running belt will stop immediately for emergency stop, helping to prevent injury.
Replaced the Safety Tether Key onto the Computer Console. Press the START button to begin exercise again.
BELT ADJUSTMENT
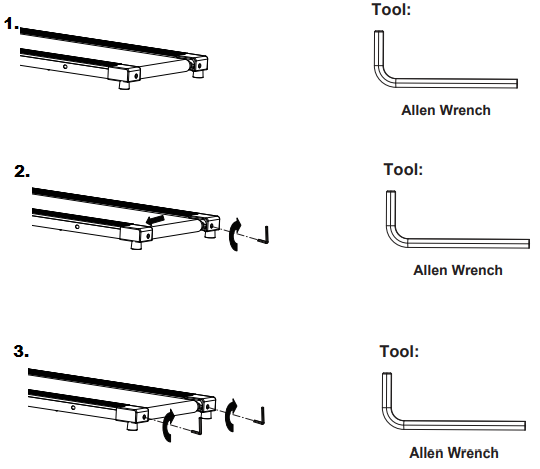
The running belt is pre-adjusted to the running deck at the factory, but after prolonged use it can stretch and require readjustment. To adjust the belt, turn on the main power switch of the treadmill and let the belt run at a speed of 8-10 KPH. Use the Allen Wrench provided to turn the rear roller adjustment bolts in order to centre the belt.
- If the running belt is shifting to the left, turn the left adjustment bolt 1/4 turn clockwise, and the running belt should start to correct itself.
- If the running belt is shifting to the right, then turn the right adjustment bolt 1/4 turn clockwise, and the belt should start to correct itself. Keep turning the adjustment bolts until the running belt is properly centered.
If the running belt is slipping during use, turn off and unplug the treadmill. Using the Allen Wrench provid-ed, turn both left and right rear roller adjustment bolts 1/4 turn clockwise, then turn the main power switch back on and run the treadmill at a speed of 8-10 KPH. Run on to the running belt to determine if the belt is still slipping. Repeat this procedure until the belt no longer slips.
Pros & Cons
Pros
- Compact and foldable design for easy storage
- Powerful 2.25 HP motor for smooth operation
- 12 preset programs for varied workouts
- Bluetooth connectivity for streaming music and tracking workouts
- Affordable price compared to other high-end treadmills
Cons
- Limited incline range compared to some other models
- No cooling fan or additional comfort features
- Assembly can be time-consuming and requires some technical skill
Customer Reviews
Customers have generally praised the Pyle SereneLife Digital Treadmill SLFTRD18 for its durability, ease of use, and value for money. Many users appreciate the space-saving design and the variety of preset programs. However, some users have noted that assembly can be challenging and that customer support could be improved.
Common Complaints
- Some users have reported difficulties in assembling the treadmill.
- A few customers have mentioned issues with customer support response times.
Faqs
What is the maximum weight capacity of the Pyle?
How many preset workout programs does this treadmill offer?
Does this treadmill have Bluetooth connectivity?
What are the dimensions of the running surface on this treadmill?
How do I assemble the SereneLife SLFTRD18?
What is the speed range of this treadmill?
Does this treadmill come with heart rate monitoring features?
Is there an incline feature on this treadmill?
Leave a Comment
