Rally 8-in-1 Jumpstarter Hand Generator 7471 User Guide
Content

Introduction of Rally 8-in-1 Jumpstarter Hand Generator 7471
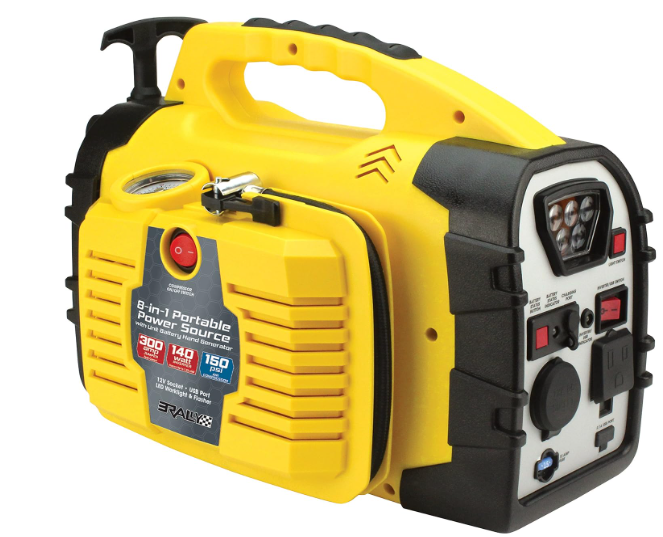
The Rally 8-in-1 Jumpstarter Hand Generator 7471 is a versatile and powerful tool that combines eight different functions in one compact device. Ideal for both professional and personal use, this jumpstarter is designed to provide reliable power in any situation. With an estimated price of $129.99 and a launch date set for May 1st, 2023, this product is perfect for those who need a dependable and portable power source.
SPECIFICATIONS
- Built-in battery: 8-amp hour (Ah) sealed, lead-acid, maintenance-free, spill-proof, rechargeable
- DC socket: 12 Volt DC (15 Amp replaceable blade fuse)
- USB port: 5 Volt DC / 2.1A
- LED light: 12 Volt DC / 330 mA
- Power inverter: 140 Watt
- Air compressor: 150 PSI
- Circuit breaker: Internal, Auto-reset (after 60 seconds)
- Net weight: 10.6 lbs.
- Unit dimensions: 9.14 in. (h) x 6.97 in. (w) x 12.2 in. (d)
- Storage temperature: (-4ºF - 140ºF) (-20ºC - 60ºC). Store in a cool, dry, well-ventilated area with overhead cover.
- Operation temperature: (32ºF - 104ºF) (0ºC - 40ºC). Operate in a dry, well-ventilated area and place device on a leveled surface.
FEATURES
- BOOSTER CABLES POWER SWITCH: Heavy-duty rotary switch turns power off to booster cables when not in use. Power can be turned on by turning the rotary switch in the clockwise direction.
- POWER STATUS & CHARGE INDICATOR:
- Red LED = Battery charging
- Amber LED = Battery charged at mid-level
- Green LED = Battery is fully charged
- HAND GENERATOR: Manually charges device battery in remote areas.
- HAND GENERATOR CHARGE INDICATOR: LED indicator illuminates when battery is being charged (blinking).
- CONVENIENT CHARGE CORDS: 120 Volt AC charger for in-home use & 12 Volt DC charger for on-the-road use.
- 12 VOLT DC POWER OUTLET WITH OVERLOAD PROTECTION: Provides power to most 12 Volt DC accessories equipped with a 12 Volt DC accessory plug. Device circuit is protected with an auto-reset overload circuit breaker and a replaceable 15A fuse on the front panel.
- HEAVY-DUTY BOOSTER CLAMPS: 200 AMP rated color-coded battery clamps.
- PROFESSIONAL QUALITY CABLES: Color-coded cables with extra-thick, oil-resistant, external-cable insulation sheathing.
- BOOSTER CLAMPS STORAGE HOLDERS: Prevents accidental sparking when cables are not in use.
- REVERSE BATTERY POLARITY DETECTION CIRCUITRY: Circuitry automatically activates if accidental reverse polarity clamp connection occurs. Red LED illuminates accompanied by a high pitch alarm.
- BUILT-IN POWERFUL 150 PSI COMPRESSOR:
- Compressor power switch.
- Accurate air-pressure dial gauge with large and easy to read pressure increments in (PSI) and units.
- Heavy-duty, high-pressure inflator rubber air-hose with a universal air valve stem quick-connector nozzle.
- Nozzle adaptors for inflatables.
- STANDARD 5 VOLT USB PORT: Switch-activated standard USB port for personal devices.
- 140 WATT POWER INVERTER: Switch-activated power inverter provides portable power to 120 Volt AC devices.
- LED LIGHT: Provides long-lasting portable lighting with emergency flasher function.
Rally 8-in-1 Jumpstarter Hand Generator 7471 Description
The Rally 7471 is a hand-crank powered device that provides a variety of functions, including a jumpstarter, flashlight, radio, and USB charging port. The device features a high-quality 12V battery, a bright LED flashlight, and an AM/FM radio with NOAA weather alerts. Additionally, the jumpstarter is capable of delivering 400 peak amps, making it suitable for jumpstarting most cars, trucks, and SUVs. The device is also compact and lightweight, making it easy to store and transport.
JUMP STARTER OPERATION
WARNING: Do not use with dry-cell batteries. These batteries may burst and may cause injury to persons or damage personal property.
WARNING: Never charge or jump-start a vehicle with a frozen battery.
CAUTION: This device contains a sealed, non-spillable lead-acid battery and must be disposed of properly. Contact your local government recycling authority for proper disposal.
CAUTION: Place device on a flat and stable surface near the vehicle battery that is clear of any moving parts. Do not smoke, use matches, lighters or open flame while attempting to jump-start (battery boost) a vehicle. Do not touch battery clamps together to prevent short circuit or arching.
NOTE: Some late model vehicles have on-board computers that might be damaged if jump-started. Always read the vehicle owner’s manual before attempting to jump-start (battery boost) the vehicle to determine if external-starting assistance is acceptable.
- Use this device with 12 Volt lead-acid batteries only. Do not connect to 6 Volt or 24 Volt DC batteries.
- Use only the provided cables and clamps. Do not use additional attachments other than those recommended or provided by the manufacturer. Unauthorized parts may damage the device.
- Do not exceed manufacturer’s recommended specifications.
- Keep battery terminals clean. Be careful to keep corrosion from coming in contact with eyes.
Before Connecting to Battery
- Turn off the vehicle ignition and all accessories.
- Set the emergency brake and put the vehicle with automatic transmission in the park position.
- Ensure that the device booster switch is in the Off position.
- Access the device booster clamps by squeezing the clamp handles. Pull the clamps outward and remove clamps from their storage holders.
- Determine the polarity of the vehicle battery terminals. The positive (POS, P, +) battery terminal usually is larger in diameter than the negative (NEG, N, -) terminal
- Follow instructions for negative grounded system or positive grounded system as indicated in Steps 2 and 3.
Negative Ground System Connection ( – )
- Negative battery terminal is grounded to chassis. Most vehicles use this system. (If you are unsure you should refer to the vehicle owner’s manual).
- Securely connect the positive (+) red clamp to the positive (POS, P, +) terminal of the vehicle battery or the remote positive (+) terminal if equipped.
- Securely connect the negative (-) black clamp to the vehicle chassis, engine block or a non-moving grounded metal part of the vehicle as far away from the battery as possible. Do not clamp directly to carburetor, fuel lines, or non-grounded sheet-metal body parts.
- Device green LED is On/Lit (proper battery polarity connection.)
NOTE: If red LED is On/Lit and alarm sounds, stop! Carefully disconnect the device booster clamps. Reconnect the device booster clamps to the proper battery polarity (red booster clamp to the positive terminal of the battery and the black booster clamp to vehicle ground.)
Positive Ground System Connection ( + )
- Positive battery terminal is grounded to chassis or any other metallic part of the vehicle. (If you are unsure you should refer to the vehicle owner’s manual).
- Securely connect the negative (-) black clamp to the negative (NEG, N, -) ungrounded terminal of the vehicle battery.
- Securely connect the positive (+) red clamp to the vehicle chassis, engine block or a non-moving grounded metal part of the vehicle as far away from the battery as possible. Do not clamp directly to carburetor, fuel lines, or sheet-metal body parts.
- Device green LED is On/Lit (proper battery polarity connection.)
NOTE: If red LED is On/Lit and alarm sounds, stop! Carefully disconnect the device booster clamps. Reconnect the device booster clamps to the proper battery polarity (black booster clamp to the negative terminal of the battery and the red booster clamp to vehicle ground).
Jump Starting Battery
- Turn device booster switch clockwise to turn On power to the booster clamps (located above positive (+) red clamp).
- Allow 2 or 3 minutes charging time. It is recommended to have a second person to assist holding the device unit securely in place during the next steps.
- Turn the ignition key and attempt to start the vehicle.
NOTE: If the vehicle does not start after 4 to 5 seconds of engine cranking, stop and wait 3 to 4 minutes, then try again. Repeat several times until the vehicle starts. - If the vehicle starts, turn the device booster switch counter clockwise to the Off position.
- Disconnect clamps in reverse sequence to connecting procedure above as far away from the vehicle battery as practical: For negative grounded system first disconnect negative (-) black clamp then positive (+) red clamp. For positive grounded system first disconnect positive (+) red clamp then negative (-) black clamp.
- Replace the clamps to their storage holders.
NOTE: Excessive engine cranking can damage vehicle starter motor. If the engine turns, but fails to start after several attempts, other technical problem(s) might be involved. Discontinue cranking until the other problem is determined and corrected.
LED LIGHT & EMERGENCY FLASHER OPERATION
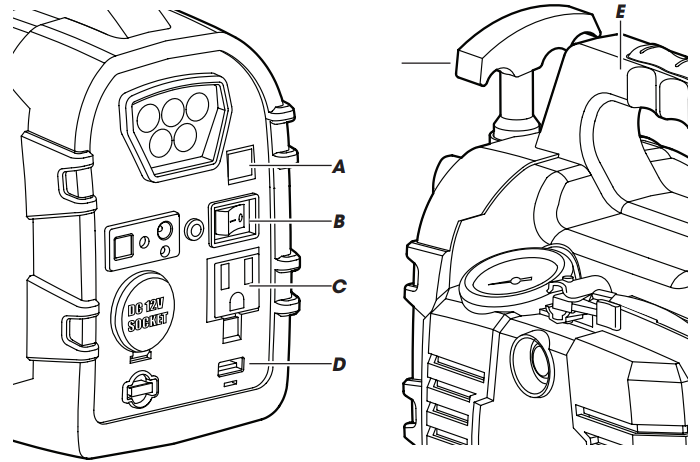
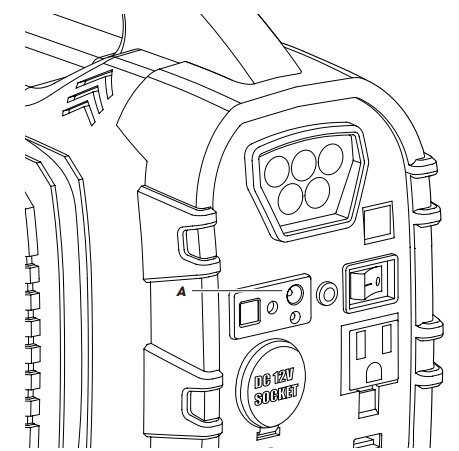
- To power On the LED light, press the push-button switch (A) once and release.
- To power Off, press the push-button switch once more and release.
- To power On the emergency flasher, press the push-button switch (A) once and release.
- To power Off, press the push-button switch once more and release.
NOTE: LED light or emergency flasher functions operate in sequence to each other. The mode will depend on the prior (last) operating function selected. User may have to cycle between modes in order to achieve the proper lighting function.
POWER INVERTER OPERATION
- Prior to operating, make sure the 120 Volt AC accessory switch and the inverter power switch (B) are in the Off [ ] position.
- Connect the 120 Volt AC accessory to the inverter receptacle (C).
- Press the inverter power switch to the On [ – ] position. LED green indicated normal operation. LED red indicates inverter malfunction (over temperature, overload, over voltage & low voltage).
- Power On and operate the 120 Volt AC device
- To power Off, first power Off the 120 Volt AC device then press the inverter power switch to the Off [ ] position.
CAUTION: Only operate the 120 Volt AC device and inverter in a clear dry area.
CAUTION: Provided with integral protection against overloads. Do not expose to rain. To prevent fire, do not cover or obstruct ventilation openings. Do not mount in zero-clearance compartment. Overheating may result. Neutral floating. The output of this device is not sinusoidal. It has a total harmonic distortion of 31 percent and maximum single harmonic of 35 percent. This unit employs components that tend to produce arcs or sparks – to prevent fire or explosion, do not install in compartments containing batteries or flammable materials. For continued protection against risk of fire, or electric shock, replace only with same type and rating of fuse.
USB OPERATION
- Prior to connecting any USB accessory to the USB port of this device, make sure the accessory is Off [ ].
- Using the interface cable included with the USB accessory to be powered or charged, connect the accessory to the USB port (D) on the device.
- Press the USB port power switch (B) to the On [ – ] position. (The device with built-in battery will start charging automatically).
- Turn On the accessory and use as normal.
UNIT BATTERY HAND GENERATOR OPERATION
- Make sure device switches are in the Off position.
- Place the unit in a dry, open, flat area with overhead cover.
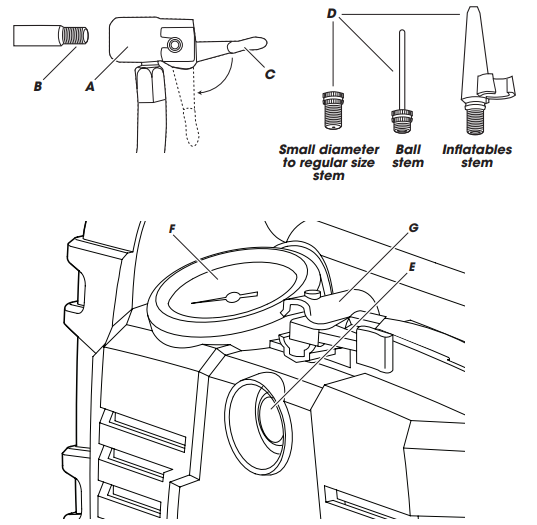
- Using either hand, securely grasp the device carrying handle (E). With the free hand, securely grasp the hand generator pull-handle (F).
- To generate unit battery crank charging, firmly pull-up on the hand generator pull-handle while holding down the device. Allow the hand generator pull-handle cord to retract back into the device housing, thereby completing one (1) generator crank cycle.
- Continue hand generator cranking cycles for a minimum period of 3 minutes. Hand generator charge LED indicator will be flashing during operation.
- The device internal battery will achieve a charging level adequate enough for one (1) vehicle battery boost charge.
NOTE: Do not exceed the hand generator pull-handle maximum cord length of 30 inches.
NOTE: The device unit battery charge level will vary pending the device battery status at time of crank charge. User may have to continue unit hand generator crank cycles until the device unit battery reaches the charge level adequate for jump starting (battery boosting) a vehicle.
COMPRESSOR OPERATION
WARNING: Bursting hazard! Do not overinflate any inflatable article. Do not exceed the manufacturer’s recommended inflation pressure. Most tires are properly inflated between 24-35 PSI. Some truck & bicycle tires require 40 PSI or more.
WARNING: Do not operate the air compressor around flammable materials or in an area where flammable fumes are present. Each operation shall be within 4 to 10 minutes. Allow the compressor to cool down between each continuous operation.
To inflate plastic inflatables (Balls, air mattresses, rubber rafts, etc.)
- Remove the valve cap from the inflatable valve stem.
- Connect the compressor air-hose nozzle (A) onto or into the inflatable valve stem (B) and turn the locking thumb-lever (C) to the down position. Connect the appropriate valve stem adapter (D) onto the air-hose nozzle (if needed).
- Ensure that the air-hose nozzle and the valve stem adapter (if used) are properly seated onto/into the inflatable valve stem.
- Insert the air-hose nozzle with the valve stem adapter (if needed) into or onto the inflatable air valve stem as far as practical.
- Press the compressor power switch (E) to the On [ I ] position.
- Monitor the pressure on the compressor air-pressure gauge (F). When the desired pressure is reached, press the compressor power switch to the Off [ O ] position.
- Unlock the air-hose nozzle thumb-lever to the up position.
- Recap the inflatable air valve stem.
- Stow the air-hose back into the device storage compartment (G).
To inflate tires
- Remove the valve cap from the tire air valve stem.
- Ensure that the air-hose nozzle locking thumb-lever is in the up position. If necessary, use the valve stem adaptor.
- Insert the compressor air-hose nozzle (A) onto the tire air valve stem (B), make sure that the nozzle is pushed onto the tire stem as far as possible and is seated properly. Press down the locking-thumb lever (C) to engage as shown in the illustration.
- Press the compressor power switch (E) to the On [ I ] position.
- In the event that the tire is completely flat, raise the vehicle using a recommended rated jack and jack stands before inflating the tire.
- Monitor pressure on the compressor air-pressure gauge (F). It is recommended to use a separate air gauge to check the actual tire inflation pressure.
- Press the compressor power switch Off [ O ] when the desired tire air pressure is reached.
- Disconnect the air-hose nozzle from the tire valve stem by lifting the locking thumb-lever to the Up position. (Also, remove any air-hose nozzle adapter, if any).
- Recap the tire air valve stem.
Stow the air-hose back into the device storage compartment (G).
RECHARGING OPERATION
WARNING: Do not charge the device on a boat, boat ramp or docks since the electrical cords and outlets used for charging could cause severe electrical shock if they get wet.
CAUTION: Make sure that any electrical outlet, located in a potentially wet or moist area, and is to be used to charge the device, is protected by a Ground Fault Interrupt switch.
CAUTION: Do not overcharge this unit. Overcharging may result in damage to the unit.
CAUTION: Do not recharge device near flammable materials or any location which accumulate flammable fumes. Do not smoke, use matches, lighters or open flame near the device when/during recharging. Recharge the device in a clear, unobstructed open area.
NOTE: This device may arrive partially charged from the manufacturer. It is recommended to fully charge the device immediately after purchase and before using for the first time.
NOTE: Ensure both booster clamps (positive & negative) are placed in their storage holders when not in use and during the portable power source recharging.
NOTE: Do not recharge device battery with damaged chargers, replace them immediately. Use only the provided chargers and cables. Unauthorized parts may damage the device.
- When using the 120 Volt AC or 12 Volt DC charger, pull on the plug and never pull on the cord when disconnecting.
- For proper and safe operation of this device, do not place anything into the 12 Volt DC power socket except the plug of the 12 Volt DC accessory to be used.
- Do not place anything into the device’s charging port except the provided plug from the charger unit.
- It is recommended that the device is in an upright position while charging. It is important to know that the 120 Volt AC power unit (charger) is intended to be correctly oriented in a vertical or floor mount position during connection to a 120 Volt AC receptacle.
- Fully recharge the device when the Red LED is illuminating.
- Ensure that the device power switches are in the Off ( ) positions.
- The charging LED indicator will be illuminated while charging. When charging the red LED will change color to amber (mid-level charge) and finally to green (fully charged). This light will not go out until the charging plug is removed.
- Do not charge device for more than 48 hours continuously
- Allow one (1) hour cool-down period before recharging.
CHARGING WITH 120 VOLT AC CHARGER
- Insert the 120 Volt AC charger plug into the device charging port (A).
- Insert the 120 Volt AC charger transformer plug into a 120 Volt AC receptacle.
- Fully charge the unit according to the following:
Initial & first time charge: 24 hours continuously.
Recharge or between each use: 15 hours continuously. - When charging is complete unplug the 120 Volt AC charger transformer plug first and then the 120 Volt AC charger plug from the charging port on the device.
RECHARGING WITH 12 VOLT DC CHARGER
- Insert the 12 Volt DC charger plug into the device charging port (A).
- Insert the 12 Volt DC charger accessory plug into the vehicle cigarette lighter or 12 Volt DC accessory socket.
- Fully charge the unit for 8 hours continuously, while vehicle engine is running.
When charging is complete unplug the 12 Volt DC charger accessory plug first and then the 12 Volt DC charger plug from the charging port on the device.
Setup Guide
To operate the Rally 8-in-1 Jumpstarter Hand Generator 7471, follow these steps:
- Charge the device fully before first use.
- To jumpstart a vehicle, attach the clamps to the vehicle's battery, making sure to connect the red clamp to the positive terminal and the black clamp to the negative terminal.
- Turn on the jumpstarter and wait for the green light to indicate that the vehicle's battery is ready to start.
- Start the vehicle and remove the clamps.
- To use the flashlight or radio, simply press the corresponding button and adjust the settings as needed.
MAINTENANCE & STORAGE
- This unit should be stored in a dry, open, flat area with an overhead cover. Store at room temperature.
- The device switches must be in the Off positions. Ensure that the booster clamps are secured to their storage holders.
- If not used for prolonged time, recharge every 2 months in the winter and monthly in summer.
12 VOLT DC ACCESSORIES POWERED BY PORTABLE POWER SOURCE
| Accessory | Wattage Consumption | Estimated Continuous Operation at Full Battery Charge |
|---|---|---|
| Utility Lights | 2 watt | 48 hours |
| Cellular Phones | 4 watt | 24 hours |
| Radios | 9 watt | 10 hours & 42 min. |
| Fans | 15-25 watt | 6.4 hours-3.8 hours |
| Spot Light | 55 watt | 1 hour & 42 min. |
| Car Vacuums | 84 watt | 1 hour & 6 min. |
| Air Compressor | 90 watt | 1 hour & 3 min. |
| Flood Lights | 100 watt | 57 min. |
GENERAL, WORK AREA & PERSONAL SAFETY
WARNING: Do not operate or place this device near flammable materials or any location, which accumulates flammable fumes.
WARNING: Working around lead-acid batteries may be dangerous. Lead-acid batteries generate explosive gases during normal charging and jump-starting operations.
WARNING: All lead-acid batteries (car, truck, and boat) produce hydrogen gas, which may violently explode in the presence of fire or sparks. Do not smoke, use matches, lighters, or open flame near batteries.
WARNING: Avoid dropping metal tools onto the vehicle battery. It might spark or short-circuit the battery or other electrical part that may cause short circuits or explosion.
WARNING: If contact with battery acid occurs, rinse immediately and thoroughly with water, then wash with soap and water. Get immediate medical attention if redness, irritation, or pain is present. For eye contact, flush eyes for at least 15 minutes and get immediate medical attention.
WARNING: Stay clear of fan blades, belts, pulleys, and moving parts that can cause bodily injury during battery jump-start.
WARNING: Remove personal metal items such as rings, bracelets, necklaces, and watches while working with a lead-acid battery. It can produce a short-circuit high enough to cause a severe burn.
- Make sure fresh water & soap are available nearby in case battery acid contacts skin, eyes, or clothing.
- Do not submerge device in water, or expose it to heavy moisture or rain.
- Always keep the booster clamps in their storage holders to prevent sparking when recharging and when they are not in use.
- This device is not intended for use in the rain or temperatures above 104˚F.
- This device has no consumer-serviceable parts, except the inverter replaceable fuse.
- Do not attempt to remove or replace the battery used in this device. When the battery has reached the end of its useful lifetime, take the entire device to a battery recycling facility for proper disposal and/or battery replacement.
- It is highly recommended that this device be operated by two persons. Ensure that someone is available to give assistance, if needed.
- Wear complete eye and clothing protection. Do not touch eyes while working near battery.
- Do not operate this device while wearing vinyl clothing. Static electricity sparks may be generated when vinyl clothing is rubbed.
- Do not face the battery. Stay as far as possible from the vehicle battery being jumped when making final connection.
- This is not a toy. Keep out of reach of children!
Troubleshooting
| PROBLEM | POSSIBLE CAUSE | SOLUTION |
|---|---|---|
| Vehicle does not start. | Device booster switch in the Off position. | The green LED must be lit. Turn the device’s booster switch clockwise to the On position to allow power to the booster cables. |
| Bad clamp connection. Device red LED lit and alarm activated. | Stop! Do not turn the device booster switch to the On position! Carefully disconnect and reconnect device booster clamps to the proper battery polarity. | |
| Very low vehicle battery charge. | Maintain the device connected to the vehicle depleted battery. Wait 3 to 4 minutes before attempting to start the vehicle again. | |
| Device low charge. | Recharge the device to full charge. | |
| Vehicle battery defective. | Replace the vehicle with a new battery. | |
| 12 Volt DC accessory connected to the device 12 Volt DC socket does not operate. | No output power at the device 12 Volt DC socket. | Internal circuit breaker is Off. Turn Off the 12 Volt DC accessory and remove plug from the device socket. Wait approx. 60 seconds for automatic reset to regain power. |
| Bad connection to the device 12 Volt DC socket. | Insert the accessory 12 Volt DC plug properly into the device 12 Volt DC socket. | |
| Device low charge. | Recharge the device to full charge. | |
| 12 Volt DC accessory fuse blown. | Replace the fuse. To change the inverter fuse, locate it on the front panel of the unit. Using needle-nose pliers or fuse puller, remove the blown fuse and replace with a 15 AMP blade fuse. | |
| 120 Volt AC appliance does not operate with the device power inverter. | Bad connection with the 120 Volt AC appliance. | Check the connection of the 120 Volt AC appliance to the inverter 120 Volt power outlet. |
| Inadequate power or excessive power voltage drop. | Check for proper power inverter wattage range for given 120 Volt AC appliance. | |
| Device low charge. | Recharge the device to full charge. | |
| Compressor does not start. | Weak or low device charge. | Recharge the device to full charge. |
| Compressor does not inflate. | Hose nozzle not properly connected onto the air valve stem. | Ensure that the hose nozzle is properly seated and that the locking thumb lever is in the down position. |
| Compressor air hose leakage. | Repair the air hose if possible. | |
| Check object to be inflated for puncture(s). | Repair puncture(s) if possible. | |
| Compressor overheated/shutdown. | Allow 10 to 25 minutes for the compressor to cool down. |
APPLICATION LIST
120 VOLT AC ACCESSORIES POWERED BY THE PORTABLE POWER SOURCE 140 WATT INVERTER
| Accessory | Wattage Consumption | Estimated Continuous Operation at Full Battery Charge |
|---|---|---|
| Cordless Drill Charger 7 Volt | 15 watt | 6 hours & 24 min. |
| Glue Gun | 20 watt | 4 hours & 48 min. |
| Camcorder Charger 6 Volt | 25 watt | 3 hours & 48 min. |
| Cellular Phone Charger | 30 watt | 3 hours & 12 min. |
| VCR | 45 watt | 2 hours & 6 min. |
| CD Charger | 65 watt | 1 hour & 24 min. |
| 13” Color TV | 70 watt | 1 hour & 18 min. |
| Laptop Computer | 90 watt | 1 hour & 6 min. |
| Work Light | 100 watt | 57 min. |
| 1/4 hp Power Buffer | 110 watt | 52 min. |
| 20” Color TV/VCR | 120 watt | 48 min. |
| Soldering Gun | 135 watt | 42 min. |
TWO-YEAR WARRANTY
Rally Manufacturing is dedicated to making high quality products for every consumer. We are so confident in the quality of our merchandise that we offer a two year limited warranty with this product (except the rechargeable battery which is warranted for one year). That means should you find any defects with the item you purchased, we will repair it or replace it. Proof-of-purchase (receipt) is necessary to validate warranty.
Rally 8-in-1 Jumpstarter Hand Generator 7471 Pros & Cons
Pros
- Versatile and multi-functional design
- High-quality battery with 400 peak amps
- Bright LED flashlight and AM/FM radio with NOAA weather alerts
- Compact and lightweight for easy storage and transport
Cons
- May not be suitable for larger vehicles with higher power requirements
- Hand-cranking can be physically demanding for some users
Customer Reviews
Customers have praised the Rally 8-in-1 Jumpstarter Hand Generator 7471 for its versatility, reliability, and compact design. However, some have noted that the hand-cranking can be physically demanding, and the device may not be suitable for larger vehicles with higher power requirements.
Faqs
What is the peak amperage of the Rally 8-in-1 Jumpstarter Hand Generator 7471?
Can the Rally 8-in-1 Jumpstarter Hand Generator 7471 jumpstart larger vehicles?
How do you charge the Rally 8-in-1 Jumpstarter Hand Generator 7471?
How long does it take to charge the Rally 8-in-1 Jumpstarter Hand Generator 7471?
What is the lifespan of the battery in the Rally 8-in-1 Jumpstarter Hand Generator 7471?
How many times can the Rally 8-in-1 Jumpstarter Hand Generator 7471 be jumpstarted on a single charge?
Can the Rally 8-in-1 Jumpstarter Hand Generator 7471 be used as a power bank?
What is the weight of the Rally 8-in-1 Jumpstarter Hand Generator 7471?
Is the Rally 8-in-1 Jumpstarter Hand Generator 7471 waterproof?
What is the warranty on the Rally 8-in-1 Jumpstarter Hand Generator 7471?
Leave a Comment