Razor Electric Sport Bike RSF350 Owner Manual
Content
Introduction of Razor Electric Sport Bike RSF350
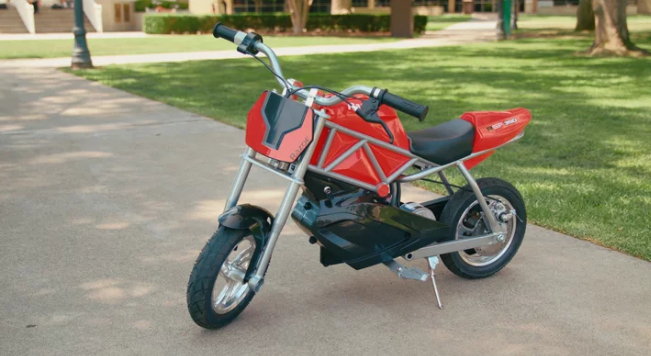
Introducing the Razor Electric Sport Bike RSF350, a high-performance electric bike designed for speed and style. This bike is perfect for thrill-seekers and commuters alike, with a top speed of 17 mph and a range of up to 40 minutes of continuous use. The RSF350 features a sleek, modern design with a lightweight aluminum frame and a high-torque, chain-driven motor. Estimated price for this electric bike is around $450 to $500, and it's now available in the market.
Detailed Specifications
The Razor Electric Sport Bike RSF350 boasts the following key features:
- High-torque, chain-driven motor with a top speed of 17 mph
- Lightweight aluminum frame and adjustable-height handlebars
- Hand-operated rear brake and front brake system
- Retractable kickstand and folding footpegs
- 10-inch pneumatic tires for a smooth ride
- Rechargeable 24V battery system with a charge time of 12 hours
- Dual disc brakes for secure stopping power
- Weighs only 50 lbs and can support a rider up to 170 lbs
BEFORE YOU BEGIN
Remove contents from box. Remove the separators that protect the components from damage during shipping. Inspect the contents of the box for scratches in the paint, dents or kinked cables that may have occurred during shipping. Because the RSF350 is 95 percent assembled and packed at the factory, there should not be any problems, even if the box has a few scars or dents.
MAKE SURE POWER SWITCH IS TURNED “OFF” BEFORE CONDUCTING ANY MAINTENANCE PROCEDURES.
Assembly and Set-Up Time
Razor recommends assembly by an adult. jfx Allow up to 15 minutes for assembly. Allow up to 12 hours for initial charge (see page 6 for charging information).
WARNING: DO NOT USE NON-RAZOR PRODUCTS WITH YOUR RAZOR RSF350. The RSF350 has been built to certain Razor design specifications. The original equipment supplied at the time of sale was selected on the basis of its compatibility with the frame, fork and all other parts. Certain aftermarket products may not be compatible and will void your warranty.
PRODUCT I.D. CODE
- Underneath Frame
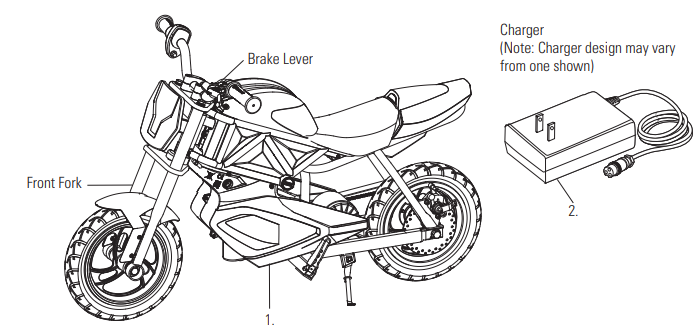
- Charger
- Battery Cover
- UPC Side of Box (not shown)
Required Tools
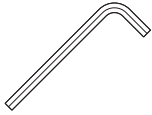
6 mm Allen Wrench
Plastic Bag Contents
- Charger
- Tool
- Handlebar Clamps
- Owner’s Manual
Attaching the Handlebars
Tool Required: 6 mm Allen Wrench
- Place the handlebars in the handlebar clamps.
Align parallel to the fork and tighten the bolts using a 6 mm Allen wrench. When properly tightened, the handlebars should not move forward or backward.

WARNING: Failing to properly adjust and tighten the bolts that affix the handlebars can cause you to lose control and crash.
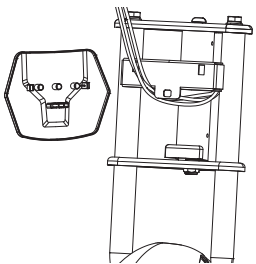
Attaching the Number Plate
No Tools Required
Slip the cables through the slit on the top of the number plate. Align the number plate with the holes on the fork and snap on the number plate.
Inflating the Tires
Tires are inflated when shipped, but they invariably lose some pressure between the point of manufacturing and your purchase. Inflate the tires to the correct PSI before first time use.
Note: Lower air pressure can result in a shorter ride time. Periodically check both tires. Reinflate when needed.
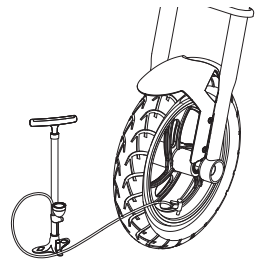
- Using a bicycle tire pump equipped for a Schrader valve, inflate both tires to the PSI indicated on the sidewall of the tire.
WARNING: Do not use the RSF350 for the first time until you have inflated the tires to the correct PSI. Failure to do so may damage your motor bike and void your warranty.
WARNING: Do not over inflate, as this could damage the tire or wheel.
Note: The pressurized air supplies found at gasoline stations are designed to inflate high-volume automobile tires. If you decide to use such an air supply to inflate your tires, first make sure the pressure gauge is working, then use very short bursts to inflate to the correct PSI. If you inadvertently over-inflate the tire, release the excess pressure immediately.

Razor Electric Sport Bike RSF350 Description
The Razor Electric Sport Bike RSF350 is a high-performance electric bike that is perfect for both recreational use and commuting. With its sleek, modern design and lightweight aluminum frame, this bike is easy to maneuver and fun to ride. The high-torque, chain-driven motor can reach speeds of up to 17 mph, making it one of the fastest electric bikes in its class. The 10-inch pneumatic tires provide a smooth, stable ride, while the dual disc brakes ensure secure stopping power. The RSF350 also features a rechargeable 24V battery system that provides up to 40 minutes of continuous use and can be fully charged in just 12 hours. The adjustable-height handlebars and folding footpegs make it easy to customize the bike to fit your riding style. The RSF350 is perfect for riders aged 16 and up and can support a rider weight of up to 170 lbs.
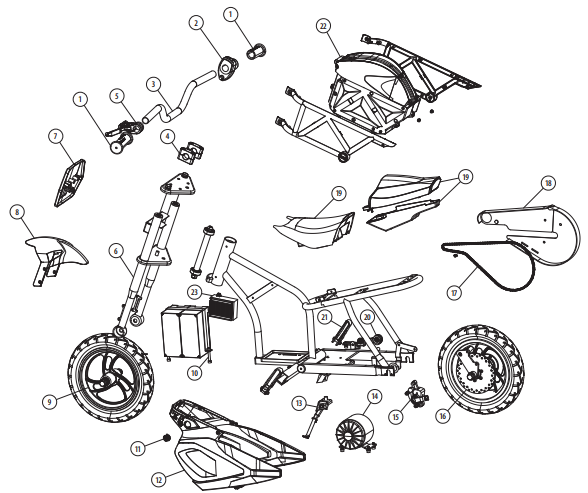
Parts
- Handlebar Grips (Right/Left)
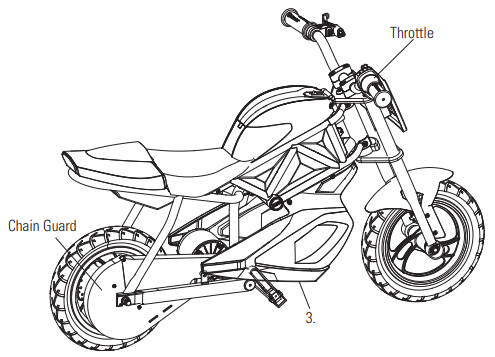
- Twist Grip Throttle
- Handlebar
- Handlebar Clamp (Upper/Lower)
- Brake Lever Assembly
- Front Fork
- Number Plate
- Front Fender
- Front Wheel Complete
- Battery with Fuse
- Charger Port
- Battery Cover
- Kickstand
- Motor (24V/250W)
- Caliper Brake
- Rear Wheel Complete
- Chain
- Chain Guard
- Seat with Body Fairing Complete
- Chain Tensioner
- Foot Pegs
- Storage Compartment
Control module
CHARGING THE BATTERY
Your RSF350 may not have a fully charged battery; therefore you must charge the battery prior to use.
- Initial charge time: 12 hours.
- Recharge time: up to 12 hours, even if the light turns green. Recommended maximum charging time is 24 hours.
- Always charge the battery immediately after riding.
- Fully charge battery before storing for extended periods of time.
- Unplug charger from the wall outlet when not in use.
- Failure to recharge battery periodically may result in a battery that will not accept a charge.
- Make sure the RSF350’s power switch is turned OFF when unit is not in use. If the power switch is left on for an extended period of time, the battery may reach a stage at which it will no longer hold a charge.
- To ensure long battery life, never store the product in freezing or below freezing temperatures! Freezing will permanently damage the battery.
- Run time: Up to 30 minutes of continuous ride time. Run time may vary depending on riding conditions, rider weight, climate, and/or proper maintenance.
- Constant stopping and starting may shorten ride time.
- Battery life can vary depending on proper maintenance and usage of the unit.
Note: Make sure power is turned OFF when unit is not in use. If the power switch is left on for an extended period of time, the battery may reach a stage at which it will no longer hold a charge.
- Plug the charger plug into wall outlet. The light on the charger should be green.
Note: If green light (LED) does not turn on, try a different outlet - Make sure the power switch is in the OFF position. Plug the charger into the charger port on the product. The light on the charger should turn red during charging. The light will turn green when the charging is complete.
WARNING: Use ONLY with the recommended charger. Batteries are only to be charged under adult supervision. The charger is not a toy. Always disconnect the charger before wiping down and/or cleaning the RSF350 with a damp cloth. The charger supplied with the RSF350 should be regularly examined for damage to the cord, plug, enclosure and other parts. In the event of such damage, the RSF350 must not be charged until it has been repaired or replaced. Chargers have built-in overcharge protection to prevent battery from being overcharged.
Note: If the charger gets warm during regular use, this is a normal response and is no cause for concern. If your charger does not get warm during use, it does not mean that it is not working properly. Wall outlet - Green (stand by) Wall outlet and Unit - Red (Charging) Charging complete - Green (Charged)
Note: Continue charging unit even if light turns green prior to 12 hours.
WARNING: Battery charge can deplete over time. Periodically recharge battery when not in use.
PRE-RIDE CHECKLIST
- Brake
Check the brake for proper function. When you squeeze the lever, the brake should provide positive braking action. When you apply the brake with the speed control on, the brake cut-off switch will stop the motor. - Tires
Periodically inspect the tires for excess wear and replace as needed. Regularly check the tire pressure and inflate as needed. If you get a flat tire, the inner tube can be patched or a new tube can be purchased from Razor or an authorized repair center. - Frame, Fork and Handlebars
Check for cracks or broken connections. Although broken frames are rare, it is possible for an aggressive rider to run into a curb or object and wreck, bend or break the frame. Get in the habit of inspecting your product on a regular basis. - Hardware/Loose Parts
Before every ride, check all parts, such as nuts, bolts, cables, fasteners, etc., to ensure they are secure and assembled correctly. There should not be any unusual rattles or sounds from loose parts or broken components. If the unit is damaged, do not ride. Reference “Safety Warnings” on pages 1 and 2 of this manual. - Safety Gear
Always wear proper protective gear, such as an approved safety helmet. Elbow pads, kneepads, pants and long sleeves are recommended. Always wear closed toe shoes (lace-up with rubber soles) and keep shoelaces tied and out of the way of the wheels, motor and drive system. NEVER RIDE BAREFOOTED OR IN SANDALS. - Laws and Regulations
Always check and obey any local laws or regulations. - Insurance
Do not assume that your existing insurance policies necessarily provide coverage for electric product use. Check with your insurance company for information regarding insurance.
Setup Guide
Setting up the Razor Electric Sport Bike RSF350 is easy and straightforward. First, make sure that the bike is fully charged before use. To charge the bike, plug the charger into a standard 110V outlet and connect it to the bike's battery system. The charging port is located on the top of the battery pack. Once the bike is fully charged, turn on the power switch located on the frame beneath the handlebars. To start riding, simply twist the throttle located on the right handlebar. To stop, use the hand-operated rear brake located on the left handlebar. The RSF350 also features a retractable kickstand, which can be used to stabilize the bike when not in use. The folding footpegs can be folded up or down depending on your preference. It is recommended to wear helmet and protective gear when riding the bike.
USAGE
Starting the RSF350
Place both hands on the handlebars. Slowly push forward with one foot and apply the throttle.
Note: Keep both feet on the foot pegs when unit is in motion.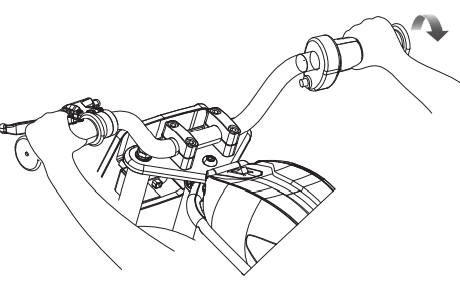
Stopping the RSF350
Release the throttle and apply the brake.
Note: When coming to a complete stop, place both feet on the ground to balance the unit.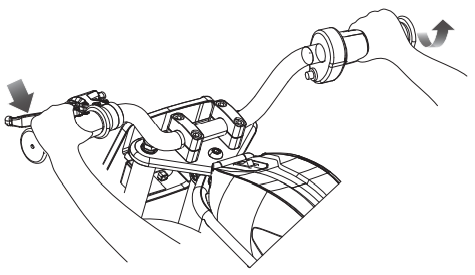
REPAIR AND MAINTENANCE
Turn power switch “OFF” before beginning repair or maintenance:
- Read the instructions
- Remove charger plug
- Turn the power switch off
- Secure the unit under repair
- Exercise caution around exposed parts
Testing the Brake
To use the brake, squeeze the lever to increase the pressure on the brake. The brake lever is fitted with a cable adjuster to compensate for cable stretch and/or to fine-tune the lever movement to engage the brake. If brake is not engaging properly, follow instructions for adjusting the brake outlined below.
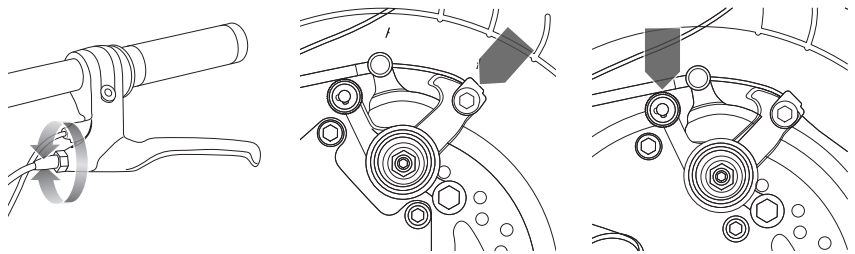
Adjusting the Brake
Tool Required: 5 mm Allen wrench
- To adjust brake cable play, thread the brake lever adjuster in or out 1/4 to 1/2 turn until the desired brake adjustment is attained. Most adjustments are complete at this step. If brake still needs further adjustment, proceed to step 2.
- If the brake has too much slack, loosen the rear anchor bolt with a 5 mm Allen wrench and pull the brake wire tighter. The distance of the brake wire between the end of the cable and the anchor bolt should be between 37 mm and 44 mm.
If the disc brake is dragging on the brake pads, use your fingers to twist the caliper adjuster in either direction until disc is centered between the brake pads.
WARNING: The brake is capable of causing the electric motorbike to skid the tire, throwing an unsuspecting rider. Practice in an open area free from obstacles until you are familiar with the brake function. Avoid skidding to a stop as this can cause you to lose control or damage the rear tire.
Note: The brake lever contains a safety switch to cut power to the motor when the brake is applied. In an emergency, applying the brake will always stop the product from moving. Do not disable or replace this lever with anything other than a genuine Razor replacement part.
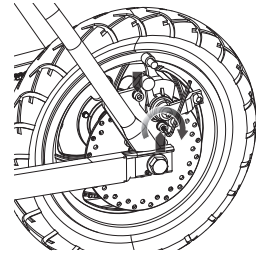
Chain and Rear Wheel Replacement
Tools Required: Phillips Screwdriver, 14 mm Wrench, 17 mm Wrench, 5 mm Allen Wrench.
- Loosen the two (2) 5 mm bolts on the brake caliper and remove brake caliper from disc brake.
- Loosen the four (4) Phillips screws and remove chain guard.
Using a 14 mm and 17 mm wrench, loosen the locknut and axle bolt on the rear wheel.
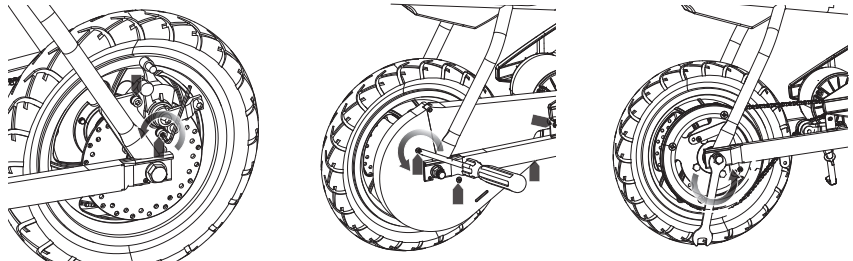
- Push the chain tensioner down to loosen the chain and remove the chain from the wheel sprocket and motor sprocket. Push wheel downward to remove.
- Install the new chain or wheel by slipping the chain around the axle bolt. Slide the axle bolt into the slots on the frame. Slide the chain tensioner down and maneuver the chain onto the rear sprocket and motor sprocket.
Re-attach the chain guard.
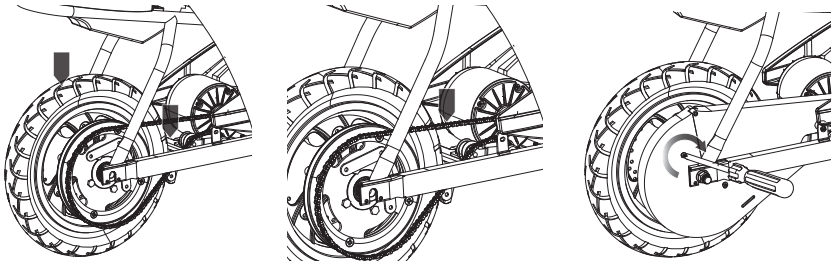
Re-attach the brake caliper to the disc brake and tighten securely in place with 5 mm bolts removed in Step 1.
WARNING: Failing to properly adjust and tighten the nuts and bolts that affix the front wheel can cause you to lose control and fall.
Note the hardware sequence
(from outside toward the center).
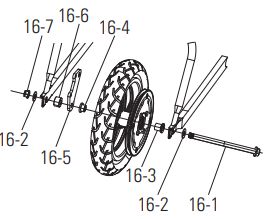
- Left Side (Brake)
16-7 17 mm Locknut
16-2 Flat Washer
Frame
16-6 Spacer
16-5 Caliper Bracket
16-4 Hat Spacer (Small) - Right Side (Throttle)
16-3 Hat Spacer (Large)
Frame
16-2 Flat Washer
16-1 Axle Bolt
WARNING: To avoid a pinch or injury, keep fingers away from moving sprockets and chain.
Front Wheel Replacement
Tools Required: 14 mm Wrench, 17 mm Wrench
Using 14 mm and 17 mm wrench loosen the locknut; slide axle bolt out and remove front wheel.

Replacing the Fuse
Tools Required: Phillips Screwdriver
Loosen the seven (7) Phillips screws from the battery cover and remove cover.
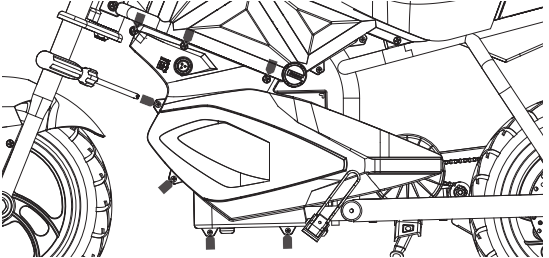
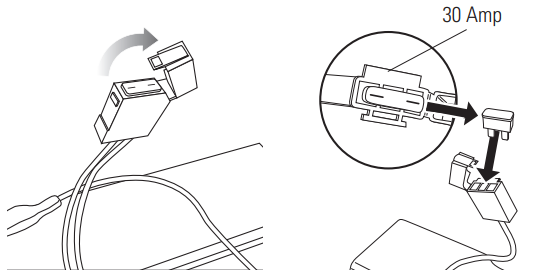
- Locate the fuse box attached to the batteries. Open cover to expose the fuse.
Remove the fuse and replace with a new one of equal amperage. Close the cover and reattach the battery cover.
Note: The arrangement of the hardware sequence:
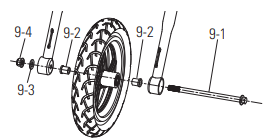
9-4 Locknut
9-3 Washer
Front Fork
9-2 Spacer
Wheel
9-2 Spacer
Front Fork
9-3 Washer
9-1 Axle Bolt
WARNING: Failing to properly adjust and tighten the nuts and bolts that affix the front wheel can cause you to lose control and fall.
WARNING: To prevent shock, please follow the instructions accordingly and do not skip or combine any steps.
WARNING: To avoid a pinch or injury, keep fingers away from moving sprockets and chain.
Troubleshooting
| Problem | Possible Cause | Solution |
|---|---|---|
| Electric motorbike does not run | Undercharged battery | Charge the battery for at least 12 hours before using the electric motorbike for the first time and up to 12 hours after each subsequent use. |
| Loose wires or connectors | Check all connectors and make sure the charger connector is tightly plugged into the charging port, and that the charger is plugged into the wall outlet which should be powered on. Check all wires and connectors to ensure they are secure. | |
| Electric motorbike was running but stopped suddenly | Burned-out fuse | Replace the fuse with a new one of the same amperage. Address the conditions that caused the fuse to burn out, such as reducing load or avoiding steep hills, to prevent recurrence. Contact your local Razor authorized service center if needed. |
| Short run time (less than 15 minutes per charge) | Motor or electrical switch damage | Contact your local Razor authorized service center for diagnosis and repair. |
| Undercharged battery | Charge the battery for at least 12 hours before initial use and up to 12 hours after each use. | |
| Tires are not properly inflated | Inflate tires properly as they may lose pressure from the point of manufacturing to purchase. Refer to page 5 of the manual for instructions. | |
| Battery is old and will not accept full charge | Replace with a Razor replacement battery. | |
| Brakes are not adjusted properly | Adjust brakes as per the instructions on page 7 of the manual. | |
| Electric motorbike runs sluggishly | Riding conditions are too stressful | Use the motorbike only on solid, flat, clean, and dry surfaces. Avoid excessive stress conditions. |
| Tires are not properly inflated | Inflate tires properly as per the instructions on page 5 of the manual. | |
| Electric motorbike is overloaded | Ensure the motorbike is not overloaded by adhering to the maximum weight limit, not allowing more than one rider at a time, avoiding steep hills, and not towing objects behind the product. | |
| Sometimes the product doesn’t run, but other times it does | Loose wires or connectors | Check all wires around the motor and all connectors to ensure they are tight. |
| Motor or electrical switch damage | Contact your local Razor authorized service center for diagnosis and repair. | |
| Electric motorbike does not stop when applying the brake | Brakes |
Razor Warranty
The manufacturer warranties this product to be free of manufacturing defects for a period of 90 days from date of purchase. This Limited Warranty does not cover normal wear and tear, tire, tube or cables, or any damage, failure or loss caused by improper assembly, maintenance, storage or use of the Razor RSF350.
Pros & Cons
Pros
- High-performance electric bike with a top speed of 17 mph
- Lightweight aluminum frame and adjustable-height handlebars
- Dual disc brakes for secure stopping power
- Rechargeable 24V battery system with a charge time of 12 hours
- Sleek, modern design and easy to maneuver
Cons
- May be too fast for some riders, especially inexperienced or young ones
- The charge time is relatively long at 12 hours
- The bike is not suitable for off-road use
- The bike is relatively expensive compared to other electric bikes in the market
Customer Reviews about Razor Electric Sport Bike RSF350
Customers have praised the Razor Electric Sport Bike RSF350 for its high-performance, sleek design, and easy maneuverability. Many reviewers have noted that the bike is fast and fun to ride, and that the dual disc brakes provide secure stopping power. However, some customers have criticized the long charge time and the high price point. Some common complaints include the bike being too heavy for some users, and not suitable for off-road use.
Faqs
In the Razor Electric Sport Bike RSF350, what is the maximum speed that it can reach?
How long does it take to charge the Razor Electric Sport Bike RSF350?
Can you tell me the maximum weight that the Razor Electric Sport Bike RSF350 can support?
In the Razor Electric Sport Bike RSF350, what kind of brakes does it have?
Could you please tell me how much the Razor Electric Sport Bike RSF350 weighs?
Could you please tell me how far the Razor Electric Sport Bike RSF350 can travel?
What is the recommended age for riding the Razor Electric Sport Bike RSF350?
What is the battery system of the Razor Electric Sport Bike RSF350?
What is the type of motor the Razor Electric Sport Bike RSF350 has?
What is the size of the tires of the Razor Electric Sport Bike RSF350?
Leave a Comment