
Setup: Remington Body Groomer BHT2000A User Manual
Content
Remington Body Groomer BHT2000A
Introduction
The Remington Body Groomer BHT2000A is a premium cordless trimmer designed for men who want precision and versatility in their grooming routine. With titanium-coated, self-sharpening blades and five adjustable length settings, this body groomer delivers a smooth, comfortable trim for beard, chest, back, and other body areas. Its waterproof design allows for both wet and dry use, making it ideal for shower grooming or quick touch-ups on the go.
Key benefits include up to 40 minutes of cordless operation, an easy-to-read length display, and a removable comb for precise shaping. The Remington Body Groomer BHT2000A is perfect for men seeking a reliable, easy-to-clean grooming tool that adapts to their lifestyle. Whether you're maintaining a stylish beard or keeping body hair neat, this trimmer offers professional results at home.
Available in silver and black, the Remington Body Groomer BHT2000A typically retails for around €65 and is widely available at major retailers and online stores. It’s a smart investment for anyone looking for a durable, multi-purpose grooming solution.
Specifications of the Remington Body Groomer BHT2000A
- Model: BHT2000A
- Blade Material: Titanium-coated, self-sharpening
- Length Settings: 5 pre-set levels (3–12 mm)
- Operating Time: Up to 40 minutes per charge
- Charging Time: Approximately 16 hours (840 minutes)
- Battery Type: Nickel-metal hydride (NiMH)
- Waterproof: Yes (showerproof, wet/dry use)
- Attachments: Foil shaver, hair trimmer, body-trimming comb
- Display: Easy View® window for length setting
- Indicator: Charging and battery low indicator
- Weight: Lightweight, ergonomic design
- Warranty: 2 years
Compared to similar models, the Remington Body Groomer BHT2000A stands out for its titanium blades, extended battery life, and versatile attachments, making it a top choice for body and facial grooming.
KEY FEATURES
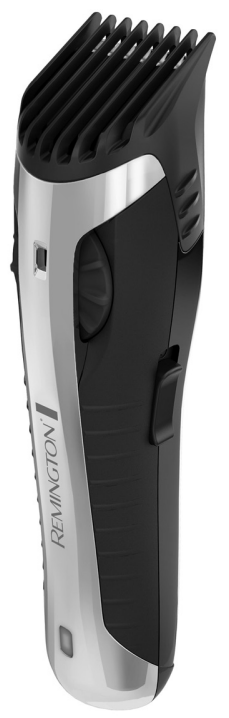
- 5 Position “Zoom wheel”
- Length position indicator
- Adjustable trimmer comb attachment
- Mini foil shaving attachment
- Cutting assembly
- On/off switch
- Charging indicator
- Charging adaptor (not shown)
CHARGING
- Before using your body trimmer for the first time, charge it for 14-16 hours.
- Ensure the appliance is turned off.
- Connect the charging adaptor to the product and then to the mains. The charging indicator will light up.
- Use the product until the battery is low.
- Your trimmer cannot be overcharged. However, if the product is not going to be used for an extended period of time (2-3 months), unplug it from the mains and store it. Fully recharge your body trimmer when you would like to use it again.
- To preserve the life of your batteries, let them run out every six months, then recharge for 14-16 hours.
INSTRUCTIONS FOR USE
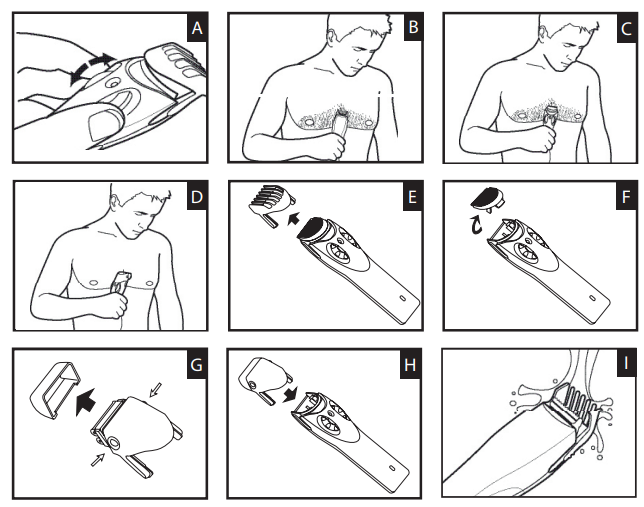
ADJUSTING THE TRIM LENGTH (Diagram A)
The trimmer comb can be adjusted to give you 5 different trim lengths, simply by turning the Zoom wheel to the desired setting. Turn the Zoom wheel clockwise for a shorter length, anticlockwise for a longer length. The wheel will click into place as it reaches each setting, and the setting number will appear on the length position indicator.
NOTE: Trimmer comb must be attached to the product in order to use the hair length selector.
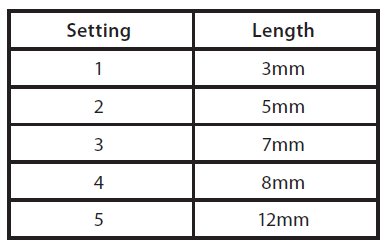
TRIMMING
- Use the zoom wheel to set the trimmer comb to the desired length setting.
- The setting will appear on the length position indicator. If you are trimming for the first time, start with the maximum trimming length setting (5).
- Turn the unit on.
- Place the flat top of the trimmer comb against the skin.
- Slowly slide the trimmer through the hair, in the direction of the growth.
- If hair builds up in the guide comb during the trimming process, switch the unit off, pull off the guide comb, and brush,, trimmer / rinse the comb.
- For a closer and precise shaping, remove the adjustable trimmer comb and trim the hairs along the outer edge.
- When you finish, turn the product off, clean it, and return it to its storage pouch.
EDGING AND SHAPING (Diagram C) - Remove the Trimmer Comb Attachment.
- Hold the Trimmer at a right angle to your skin and press down gently.
- Edge and shape the area as desired.
USING THE SHAVER ATTACHMENT (Diagram D) - Hold the shaving head to your skin
- Stretch the skin with your free hand so the hairs stand upright.
- Only apply light pressure on the shaving head while shaving.
- Shave against hair growth.
- The Microscreen shaving technology with circular foil holes is developed to give a controlled, close cut.
EXCHANGING THE ATTACHMENTS - Always ensure the trimmer is switched off before changing the trimmer and shaver attachments.
REMOVING THE TRIMMER COMB AND CUTTING ASSEMBLY - Hold the Trimmer in one hand with your thumb firmly on the Zoom wheel to keep it from turning.
- With your other hand, gently pull the trimmer comb attachment off the Trimmer.
- Remove the cutting assembly by firmly pushing up on the blade with your thumb (Diagram E & F).
REMOVING THE SHAVER ATTACHMENT - Hold the Trimmer in one hand with your thumb firmly on the Zoom wheel to keep it from turning.
- With your other hand, gently pull the Shaver Attachment off the Trimmer.
REMOVING THE SHAVER COVER (Diagram G) - Gently push the buttons on either side of the shaving foil. With the other hand, lift the shaver cover. Clean then replace.
REPLACING THE CUTTER ASSEMBLY - Hold the Trimmer in one hand. With your other hand, insert the lower part of the cutter assembly into the Trimmer, and push down the cutter until firmly attached.
REPLACING THE TRIMMER COMB AND SHAVER ATTACHMENT (Diagram H) - Hold the Trimmer in one hand with your thumb firmly on the Zoom wheel to keep it from turning. Ensure that the Length Position Indicator is at 1.
- Slide the comb/shaver down the grooves until it clicks into place.
NOTE: The trimmer comb and shaver attachment can only be attached in one way. If it does not go on correctly, turn it around and try again.
REPLACING THE FOILS & CUTTERS - To ensure the continued highest quality performance from your shaver, we recommend that the foil and cutter be replaced regularly.
Signs that your foils and cutters need replacing.
- Irritation: as foils get worn, you may experience skin irritation.
- Pulling: as the cutters wear, your shave may not feel as close , and you may feel the cutter pulling your hair.
- Wear through: You may notice that the cutters have worn through the foils.
Replacement cutters and foils available
CARE FOR YOUR TRIMMER
Care for your product to ensure a long-lasting performance. We recommend you clean your shaver after each use. The easiest and the most hygienic way to clean the shaver is by rinsing the product head after use with warm water.
Always keep the trimmer in the “off” position when not in use.
AFTER EACH USE
- Turn Trimmer off.
- Remove the adjustable trimmer comb and cutter assembly or shaver attachment.
- Gentle tap on a flat surface to remove hair particles, and brush the remaining hairs away/rinse under warm water (Diagram I).
CLEANING CAUTIONS
- Only the adjustable trimmer comb and cutter assembly may be removed from the Trimmer for cleaning.
- Cleaning should only be done with a soft brush, such as the brush supplied with the product.
- Only use the light-grade oil supplied or sewing machine oil on the blades.
- Do not use harsh or corrosive cleaners on the units or their cutters.
- Do not apply pressure or hard objects to cutters.
- Do not disassemble the cutter assembly.
- Do not submerge in water as damage will occur.
- WARNING:
- Detach the hand-held part from the supply cord before cleaning it in water. Shaver heads suitable for cleaning under an open water tap.
STORAGE
- Store this appliance and cord in a moisture-free area. Do not store it in temperatures exceeding 140°F (60°C).
- Do not wrap the cord of the charging adaptor around the appliance.
Troubleshooting the Remington Body Groomer BHT2000A
- Trimmer won’t turn on: Ensure the device is fully charged. Check for any visible damage to the charger or battery.
- Blades not cutting smoothly: Clean the blades and comb attachments. If the issue persists, the blades may need replacement.
- Charging indicator not lighting up: Try a different power outlet or charger. If the problem continues, contact customer support.
- Water damage: Although waterproof, avoid submerging the device in water for extended periods. Dry thoroughly after use.
- Preventive Measures: Regularly clean the trimmer, store it in a dry place, and avoid dropping or exposing it to extreme temperatures.
The Remington Body Groomer BHT2000A comes with a 2-year warranty. For further assistance, contact Remington customer support or your retailer for repair or replacement options.
Pros and Cons of the Remington Body Groomer BHT2000A
Pros
- Titanium-coated, self-sharpening blades for long-lasting sharpness
- 5 adjustable length settings for versatile grooming
- Waterproof design for wet and dry use
- Up to 40 minutes of cordless operation
- Easy to clean and maintain
- Includes multiple attachments for different grooming needs
Cons
- Long charging time (16 hours)
- No quick charge feature
- Some users report that the comb attachment can be tricky to remove
The Remington Body Groomer BHT2000A offers excellent value for money, especially for those who need a reliable, multi-purpose grooming tool. While it lacks quick charging, its durability and performance make it a strong competitor in the body groomer market.
Customer Reviews of the Remington Body Groomer BHT2000A
Customers consistently rate the Remington Body Groomer BHT2000A highly, with an average of 4.5 stars. Users praise its powerful performance, comfortable grip, and versatility for both body and facial hair. Many appreciate the waterproof design and easy cleaning process. Common complaints include the long charging time and occasional difficulty with the comb attachment. Overall, buyers recommend this trimmer for its durability, precision, and value, making it a top pick for men’s grooming needs.
Faqs
How do I set up the remington Body Groomer BHT2000A for the first use?
What should I do if the remington Body Groomer BHT2000A won't turn on?
Can the remington Body Groomer BHT2000A be used in the shower or with wet skin?
How do the adjustable cutting lengths work on the remington Body Groomer BHT2000A?
What maintenance is recommended to keep the remington Body Groomer BHT2000A performing optimally?
Are replacement blades or attachments available for the remington Body Groomer BHT2000A?
Why does the charging indicator LED sometimes blink on the remington Body Groomer BHT2000A?
How can I optimize the performance of my remington Body Groomer BHT2000A for sensitive body areas?
More remington manuals
- Setup: Remington Omniblade Precision HG4000 User Manual
- How to Use: Remington ColourCut Hair Clipper HC5038 User Manual
- Usage & Setup: Remington Omniblade Face & Body HG3000 User Manual
- How to Use: Remington QuickCut Hair Clipper HC4255 User Manual
- Setup: Remington Omniblade Face HG2000 User Manual
- Setup: Remington Pro Power Hair Clipper HC5150 User Manual
Leave a Comment