
Setup: Remington Easy Fade Hair Clipper HC500 User Manual
Content
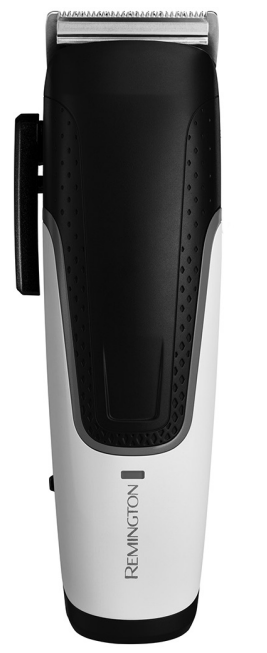
Remington Easy Fade Hair Clipper HC500
Introduction
The Remington Easy Fade Hair Clipper HC500 is a professional-grade grooming tool designed to deliver precise and smooth haircuts at home. Engineered for both beginners and experienced users, this clipper specializes in seamless fades and blending, making it ideal for achieving barber-quality hairstyles without the need for salon visits. Its key benefits include high-speed cutting performance, self-sharpening Japanese steel blades, and a versatile range of comb attachments to suit various hair lengths and styles.
Targeted at men who prefer DIY grooming or barbers looking for a reliable, easy-to-use clipper, the HC500 supports both corded and cordless operation with up to 50 minutes of runtime. Its ergonomic design ensures comfortable handling during extended use, while the taper lever and multiple fade combs simplify the fading process, a feature often challenging for home users.
Available in major online and retail stores, the Remington Easy Fade Hair Clipper HC500 is typically priced in the range of $30 to $45, offering excellent value for money given its advanced features and included accessories. This model caters to those seeking a practical, durable, and precise hair clipping solution for home use or professional touch-ups.
Specifications of Remington Easy Fade Hair Clipper HC500
- Manufacturer address and registration number: Spectrum Brands (UK) Limited, Regent Mill, Fir Street, Failsworth, Manchester M35 0HS
- Company number: 02394603
- Adapter model number: PA-3215U
- Input voltage: 100 - 240 V~ Input AC
- Frequency: 50/60Hz Output voltage 3.2 V D
- Output current: 1.5 A, Output power: 4.8 W
- Average active efficiency: ≥73.31%
- Efficiency at 10%: -
- No load power consumption: ≤0.1W
Compared to similar clippers in the price range, the HC500 stands out with its dedicated fade combs and Japanese steel blades, emphasizing fade precision and durability. Its performance benchmarks include consistent cutting speed and blade sharpness retention, ensuring smooth fades without snagging.
IMPORTANT SAFEGUARDS
- This appliance can be used by children aged from 8 years and above and persons with reduced physical, sensory, or mental capabilities or lack of experience and knowledge if they have been supervised/instructed and understand the hazards involved. Children shall not play with the appliance. Cleaning and user maintenance shall not be done by children unless they are older than 8 and supervised. Keep the appliance and cable out of reach of children under 8 years.
- Always check the appliance before you use it. Do not use the appliance if it is damaged, as this may cause injury.
- The adaptor contains a transformer. Do not cut off the adaptor to replace it with another plug, as this causes a hazardous situation.
- WARNING: Keep the appliance dry.
- Do not use the product with a damaged cord.
- WARNING: For recharging the battery, only use the charger supplied with the appliance - type reference PA-3215U.
- Always replace a damaged adaptor with one of the original type.
- The battery in this device is not replaceable.
- Do not use the appliance if it is damaged or malfunctions.
- Do not use attachments other than those we supply.
- This appliance should never be left unattended when plugged into a power outlet, except when charging.
- Keep the power plug and cord away from heated surfaces.
- Do not plug or unplug the appliance with wet hands.
- Do not twist or kink the cable, or wrap it around the appliance.
- This appliance is not intended for commercial or salon use.
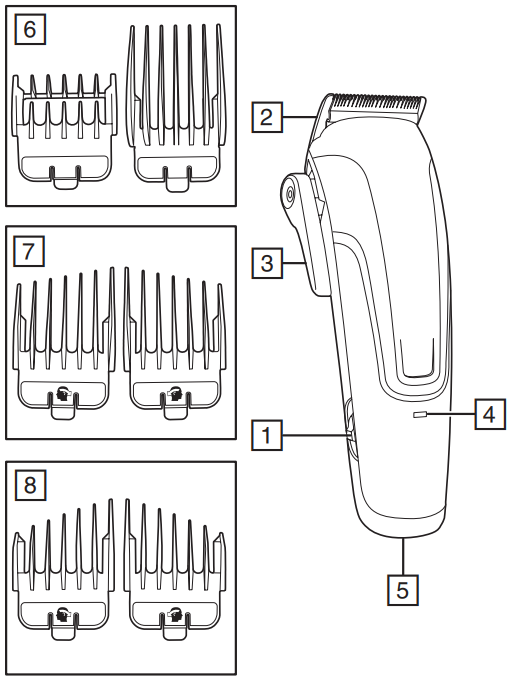
PARTS
- On/off switch
- Blade set
- Taper lever
- Charging indicator
- Charger connector
- #0—#8 grade combs (1.5 - 25mm)
- 5 pairs of fade combs
- Left and right ear combs
- Not shown:
- Travel pouch
- Cleaning brush
- Oil bottle
INSTRUCTIONS FOR USE
Before starting the cut
- Inspect the clipper, making sure that it is free from hair and dirt.
- Seat the person so that their head is approximately at your eye level.
- Before cutting, always comb the hair so it is tangle-free and dry.
TO ATTACH A COMB (Fig A)
- Hook the front side of the attachment to the front of the eeth.
- Press the battery omb downwards, until the tab clicks into place.
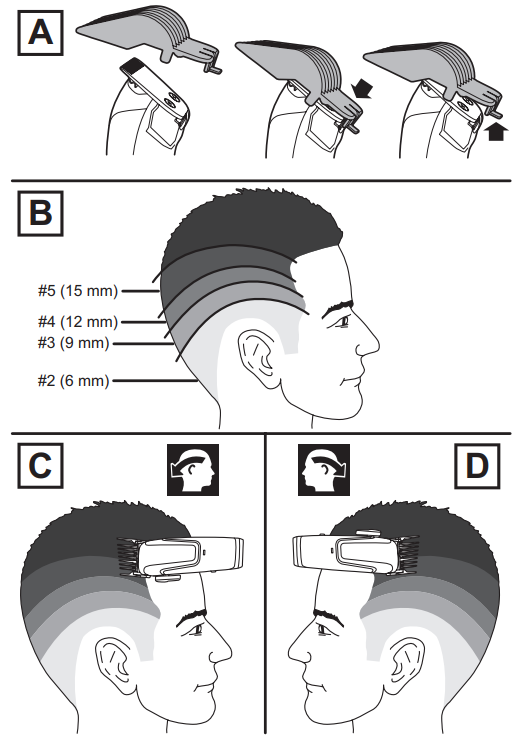
TO REMOVE THE COMB
- Press upward on the tab to release the comb.
- With the tab released, pull the comb away from the lipper and unhook the front of the blade.
INSTRUCTIONS FOR CUTTING HAIR
- For even cutting, allow the comb attachment/blade to cut its way through the hair. Do not force it through quickly. If you are cutting for the first time, start with the maximum comb attachment.
STEP 1 – Base of the neck
- Attach the 3mm or 6mm fixed comb.
- Hold the clipper with the blade teeth pointing upwards. Begin starting at the centre of the head at the base of the neck.
- Slowly lift the clipper, working upwards and outwards through the hair, trimming just a little at a time.
STEP 2 –Sides AND Back of Head
- With the 3 or 6mm grade comb attached (if a shorter cut is desired), start moving the comb from the base of the hairline on one side of the head, around the back, to the other side. Working the clipper comb flat against the head in an upwards motion until you reach halfway up the sides and back of the head.
- Then change to the next grade length comb (if used 3mm in the previous step, here you would use 6mm) and continue to cut towards the top, on each side, and back of the head.
STEP 3 – TOP of the head
- Use the longer grade combs between 16mm – 25mm as desired to cut hair on top of the head, against the direction in which your hair normally grows.
- Alternatively, using scissors, decide the amount of hair length you want to take off the top and hold this amount in between your index and middle finger, exposing the length you wish to trim above your fingers.
- Start at the front of your head and in rows snip into and along the hair, being careful not to catch your fingers. Snipping into the hair will give it a textured look.
- Work towards the back of the top of your head, moving your fingers as you work through the hair. Blending longer lengths into the back and sides already trimmed by the clipper.
STEP 4 – The finishing touches
- Use the clipper without an attachment comb for close trimming around the base and sides of the neck.
- To produce a clean, straight line at the sideburns, reverse the hair clipper. Place the reversed clipper at right angles to the head, tips of the blades lightly touching the skin, and then work downwards.
Short Cuts and Crew Cuts
- Starting with the longest fixed comb (25mm), cut from the back of the neck to the crown. Hold the guide comb flat against the head and slowly move the clipper through the hair.
- Use the same procedure from the lower side to the upper side of the head. Then cut the hair against the direction in which it grows and level with the sides.
- Use a closer guide comb to taper the hair down to the neckline as desired.
USING THE FADE COMBS
- Before you start, decide how many steps you want to fade the haircut over. This will determine the number of ‘zones’ and also the number of grade combs you will need. The example in Figure B shows 4 zones and therefore will need 4 grade combs (combs #2, #3, #4, and #5).
Select the lowest length grade comb first (#2 in this example). Attach the comb to your clipper. Work in an upwards direction from the base of the hairline and continue around to each side of the head to establish the first zone.
- Fit the next grade comb (#3 in this example), and continue from the first zone, cutting in an upwards and outwards motion to establish the second zone.
- Repeat this technique with the remaining grade combs until all necessary zones are established.
You will have ‘steps’ between each zone where the hair is at different lengths. The fade combs are used to blend or ‘fade’ hair that has been cut with two successive grade combs. For example, use the fade comb marked #2 – 3 (6 – 9 mm) to blend hair that has been cut using the #2 and #3 grade combs. Fade combs are marked with symbols showing which side of the head they are used on, and which direction to cut (fig. C and D). Fade combs marked with the symbol shown in Figure C are used to cut between zones on the right-hand side of the head from the front, moving towards the center line at the back. Combs marked with the symbol in Figure D, are for the left-hand side of the head.
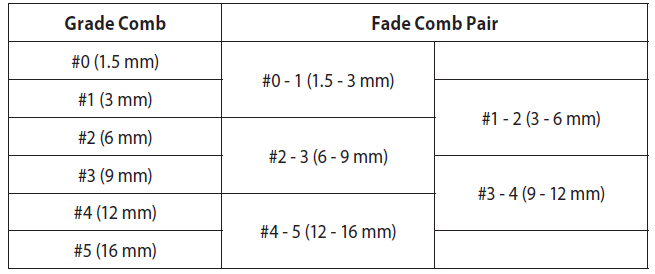
- Fit the appropriate fade comb and work horizontally from the side of the head to the centre at the back. Keep the clipper moving along the transition between the zones to blend the two lengths together. When you have done one side, fit the other fade comb and repeat on the other side of the head. Continue with the next pair of fade combs to blend between the next successive lengths.
- Use scissors to trim and cut hair on top of the head, making sure to blend this into the length left at the upper zone.
Troubleshooting Guide for Remington Easy Fade Hair Clipper HC500
- Clipper not turning on: Check battery charge; if cordless, ensure a full 16-hour charge. Try corded operation to isolate battery issues.
- Uneven cutting or snagging: Clean blades with the included T-brush regularly. Lubricate blades as advised in the manual. Adjust the taper lever and select the proper comb size.
- Clipper overheating: Avoid extended continuous use beyond 30 minutes; allow the clipper to cool down before resuming.
- Error codes: The HC500 does not display error codes; persistent problems indicate contacting support.
- Preventive tips: Clean blades after each use, store in the provided pouch, avoid wet use, and use only manufacturer-recommended accessories.
The HC500 comes with a comprehensive warranty and customer support. For assistance, users can contact Remington’s customer service via their official website or phone support channels, which provide guidance on repairs, replacements, and troubleshooting advice.
Pros and Cons of Remington Easy Fade Hair Clipper HC500
- Pros:
- Excellent fade control with 10 specialized fade combs for seamless blending
- High-quality, self-sharpening Japanese steel blades maintain sharpness longer
- Dual power operation supports cordless convenience and corded reliability
- Lightweight ergonomic design reduces hand fatigue for prolonged use
- Comprehensive accessory kit including travel pouch and cleaning brush
- Competitive price point with extended warranty coverage
- Cons:
- Charging time is relatively long (16 hours) for a 50-minute runtime
- Dry use only—cannot be used in wet conditions
- Not designed for extremely close zero-gap cuts, more suited for fades and standard trims
- Some users report that the taper lever can be stiff initially
Compared to alternatives like the Remington HC550 or other budget clippers, the HC500 emphasizes fading and ease of use but may not satisfy users seeking ultra-short or zero-gap trims.
Customer Reviews of Remington Easy Fade Hair Clipper HC500
The Remington Easy Fade Hair Clipper HC500 enjoys positive ratings averaging around 4.5 stars, with users praising its fade precision and ease of use for home haircuts. Many customers appreciate the variety of comb attachments and the sharpness of the Japanese steel blades. Common praises include the ergonomic design and the convenience of cordless operation.
However, some users mention the lengthy charging time as a downside and note that the clipper performs best on dry hair only. A few reviews highlight initial stiffness in the taper lever but acknowledge that it softens with use. Overall, buyers recommend this clipper for men seeking reliable home grooming tools and value the included accessories like the travel pouch and cleaning brush.
Typical customer feedback suggests the HC500 is best suited for fade styles and regular trims rather than detailed barber-level zero cuts, aligning with its design focus and features.
Faqs
How do I properly set up the remington Easy Fade Hair Clipper HC500 for first-time use?
What can I do if my remington Easy Fade Hair Clipper HC500 stops working or won’t turn on?
How do the taper lever and different comb attachments enhance the remington Easy Fade Hair Clipper HC500’s fading features?
Can the remington Easy Fade Hair Clipper HC500 be used both corded and cordless, and how long does the battery last?
What maintenance steps should I follow to keep my remington Easy Fade Hair Clipper HC500 performing optimally?
What should I do if the remington Easy Fade Hair Clipper HC500 blades become dull or pull hair during cutting?
Is the remington Easy Fade Hair Clipper HC500 suitable for all hair types and lengths?
How do I achieve professional fade results using the remington Easy Fade Hair Clipper HC500 at home?
More remington manuals
- How to Use: Remington QuickCut Pro Hair Clipper HC4300 User Manual
- Setup: Remington HC5780 Lithium Powered Hair Clipper User Manual
- How to Use: Remington ProPower Hair Clipper HC7130 User Manual
- How to Use: Remington HC5900 PrecisionCut Hair Clipper User Manual
- How to Use: Remington Body Hair Trimmer BHT300 User Manual
- How to Use: Remington Indestructible Hairclipper HC5880 User Manual
Leave a Comment