
Setup: Remington Reveal Manicure & Pedicure Set MAN3000 User Manual
Content
Remington Reveal Manicure & Pedicure Set MAN3000
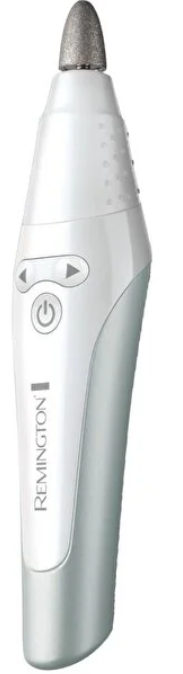
Introduction
The Remington Reveal Manicure & Pedicure Set MAN3000 is a premium at-home beauty solution designed for anyone seeking salon-quality results without the salon price tag. This versatile 12-piece set combines advanced technology with ergonomic design, making it ideal for both beginners and experienced users. Whether you're maintaining your nails between salon visits or pampering yourself at home, the MAN3000 delivers professional results with ease.
Key benefits include an LED lighted tip for precise visibility, a non-slip comfort grip for control, and bi-directional spinning for customizable performance. The set is perfect for manicures, pedicures, and cuticle care, offering a wide range of attachments for every nail care need. With two speed settings, you can adjust the intensity based on your comfort and the task at hand.
The Remington Reveal Manicure & Pedicure Set MAN3000 is suitable for men and women, making it a great addition to any household. It's available for purchase online and in select retail stores, with an estimated price range of $30–$50, depending on the retailer and region. The set is widely available in the US, UK, and other international markets, ensuring easy access for beauty enthusiasts worldwide.
Specifications of the Remington Reveal Manicure & Pedicure Set MAN3000
- Model: MAN3000
- Number of Accessories: 12 professional attachments
- Power Source: Corded (reliable, uninterrupted power)
- Power Output: 8W
- Speed Settings: 2 speeds (low and high)
- Spinning Direction: Bi-directional (left and right)
- LED Light: Yes, for enhanced visibility
- Grip: Non-slip comfort grip
- Attachments Included: Nail clipper, sapphire disk (fine), sandpaper barrel (10x refills), sapphire cone, cylindrical milling cutter, flame milling cutter, felt cone, tapered callus rasp, needle milling cutter, soft-tipped cuticle pusher, toe separators (x2), cleaning brush.
- Storage: Convenient storage pouch
- Weight: Lightweight for easy handling
- Dimensions: Compact design for travel and home use
Compared to similar products, the Remington Reveal Manicure & Pedicure Set MAN3000 stands out with its LED light, bi-directional spinning, and comprehensive accessory kit, offering more versatility and precision than basic models.
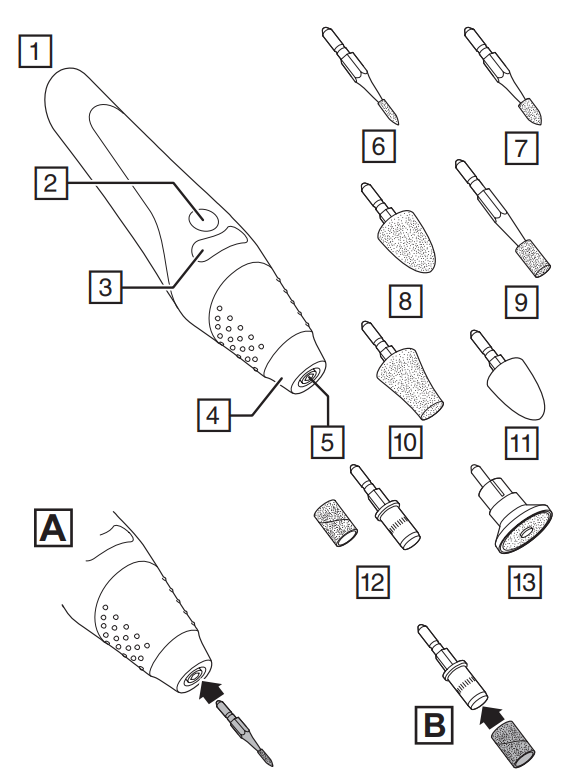
PARTS
- Power connector
- Power button
- Direction/speed controls
- Lighted tip
- Spindle
- Needle Milling Cutter
- Flame Milling Cutter
- Sapphire Cone
- Cylindrical Milling Cutter
- Tapered Callus Rasp
- Felt Cone
- Sandpaper Barrel Attachment (10x refills)
- Sapphire Disk (Fine)
Not shown: - Power Supply
- Nail Clipper
- Cuticle Pusher
- Toe Separators (x2)
- Cleaning Brush
- Storage Case
Setup Guide for the Remington Reveal Manicure & Pedicure Set MAN3000
Setting up the Remington Reveal Manicure & Pedicure Set MAN3000 issimpled:
- Unbox the set and lay out all components.
- Plug the corded power base into a standard electrical outlet.
- Select the desired attachment and securely insert it into the power base.
- Turn on the device and choose your preferred speed setting.
- Adjust the spinning direction (left or right) for optimal comfort.
- Use the LED light to illuminate the area for precise filing or polishing.
- After use, remove the attachment and store it in the provided pouch.
Troubleshooting Tips: If the device doesn't power on, check the outlet and ensure the attachment is properly inserted. For reduced performance, clean the attachment and power base.
Safety Warnings: Always unplug the device when not in use. Avoid using on broken or irritated skin. Keep out of reach of children.
INSTRUCTIONS FOR USE
IMPORTANT:
- During use, this device can create large amounts of heat through friction. Check the results regularly during treatment. Pay attention if you, or persons being treated, are sensitive to heat or have a lowered sensitivity to pain. If you have any doubts, consult a physician.
- Always start treatment on a low speed setting.
- When treating callus,s do not remove all of the callus so as not to compromise the natural protection of the skin.
- Connect the power supply to the power connector. Plug the power supplintoo the mains supply socket.
- Ensure that the device is switched off.
- Select the desired attachment and push it firmly into the spindle opening (FIG A).
- Press the power button (
 ). The light will come on.
 - The device can rotate clockwise or anticlockwise. Select the direction by pressing one of the direction/speed buttons (
 ). This will start the device in the direction chosen at low speed. Pressing the same button again will change the speed to high.
 - To stop the device, press the power button.
- To remove an attachment, ensure that the device is switched off , then pull the attachment straight out of the spindle.
TREATMENT TIPS
- Always guide the attachments carefully over the surface to be treated and without applying too much pressure.
- Slowly move the device over the areas to be treated and in circular movements.
- Always work from the outside of the nail towards the tip.
- The cutting attachments will not be as effective if the skin is softened or moist. Therefore,, always use on dry skin.
- After each use, apply moisturising cream to the treated areas.
ATTACHMENTS
- NEEDLE MILLING CUTTER
This is a precision attachment which is for the removal of ingrown nails and cutting away dead nail parts. Carefully remove the areas of nail as required and use on the lowest speed setting. - FLAME MILLING CUTTER
For the removal of ingrown nails. Use with care and on the lowest speed setting. - SAPPHIRE CONE
For filing and manicuring the nails, or removing dry skin. Ideal for use on larger areas. - CYLINDRICAL MILLING CUTTER
Use this attachment for the grinding and smoothing of lignified nails. Remove the layers by using in a circular motion. - TAPERED CALLUS RASP
For removing hard skin and calluses. - FELT CONE
For polishing and shining the nails after filing, this attachment can also be used for cleaning the surface of the nail. Use in circular movements. Do not use it in one area for too long, as heat can quickly build up. - SANDPAPER BARREL ATTACHMENT AND REFILLS
Slide a sandpaper refill onto the attachment (FIG B) before use. Best for removing hard skin and calluses on the sole of the foot and heel. Ten sandpaper refills are included. Discard each refill after use. - SAPPHIRE DISK (FINE)
For gentle filing of the nails. Can be used with precision as it is only the inner disk that rotates. Use on the low speed setting for better control. - SPARES
Contact your local service agent for information on how to purchase replacement parts. See the enclosed guarantee card for details.
CLEANING
- Never immerse the unit or power supply in water or any other liquid.
- Ensure the device is switched off and disconnected from the mains before cleaning.
- Wipe over the main unit with a damp cloth. Do not submerge the unit in water.
- Clean attachments with the supplied brush.
Troubleshooting the Remington Reveal Manicure & Pedicure Set MAN3000
Common issues and solutions:
- Device won't turn on: Check the power outlet and ensure the cord is securely plugged in.
- Attachment not spinning: Make sure the attachment is properly inserted,, and the device is set to the correct speed.
- Reduced performance: Clean the attachment and power base with the included cleaning brush.
- LED light not working: Inspect the connection and replace the attachment if necessary.
Preventive Measures: Regularly clean attachments and store the set in a dry place. Avoid exposing the device to water.
Warranty and Support: The Remington Reveal Manicure & Pedicure Set MAN3000 comes with a standard manufacturer's warranty. For assistance, contact Remington customer support at 1-800-736-4646 or visit remingtonproducts.com.
Pros & Cons of the Remington Reveal Manicure & Pedicure Set MAN3000
Pros
- Comprehensive 12-piece accessory kit for all nail care needs
- LED lighted tip for precise visibility
- Bi-directional spinning for customizable performance
- Non-slip comfort grip for control
- Corded power ensures uninterrupted use
- Compact and portable design
- Value for money compared to salon visits
Cons
- Not battery-powered (requires outlet)
- Some attachments may wear out over time
- Limited speed options compared to high-end models
The Remington Reveal Manicure & Pedicure Set MAN3000 offers excellent value for money, especially for those who prefer at-home nail care. It outperforms basic models with its advanced features and comprehensive kit.
Customer Reviews of the Remington Reveal Manicure & Pedicure Set MAN3000
Customers consistently praise the Remington Reveal Manicure & Pedicure Set MAN3000 for its ease of use, professional results, and durable build. Many users highlight the LED light and bi-directional spinning as standout features. The set has an average rating of 4.5 out of 5 stars across major retailers.
Common Praises: "Great for at-home manicures," "Attachments are easy to switch," "LED light is a game-changer."
Common Complaints: "Wish it were battery-powered," "Some attachments could be more durable."
Overall, the Remington Reveal Manicure & Pedicure Set MAN3000 is highly recommended for anyone seeking a reliable, versatile nail care solution.
Faqs
How do I set up the remington Reveal Manicure & Pedicure Set MAN3000 for first-time use?
What should I do if the remington Reveal Manicure & Pedicure Set MAN3000 is not spinning or powering on?
Can I use all 12 professional accessories included with the remington Reveal Manicure & Pedicure Set MAN3000 interchangeably on the power base?
How do the dual-speed and reversible spin features enhance the performance of the remington Reveal Manicure & Pedicure Set MAN3000?
What maintenance steps are recommended to keep the remington Reveal Manicure & Pedicure Set MAN3000 in optimal condition?
Is the remington Reveal Manicure & Pedicure Set MAN3000 suitable for sensitive skin or nails prone to damage?
What should I do if the sanding barrel attachment wears out quickly on the remington Reveal MAN3000?
Can I travel with the remington Reveal Manicure & Pedicure Set MAN3000, and how should I pack it?
More remington manuals
- Setup: Remington Durable Hybrid Groomer MB055 User Manual
- Setup: Remington Reveal Facial Cleansing Brush FC-500 User Manual
- Setup: Remington Heritage Foil Shaver HF9050 User Manual
- Setup: Remington Recharge Cleansing Brush FC2000 User Manual
- Setup: Remington Heritage Hair Clipper HC9105 User Manual
- Setup: Remington Reveal Facial Cleansing Brush FC1000GP Owner Manual
Leave a Comment