Reolink Wireless Camera Argus PT Pro User Manual
Content
Introduction
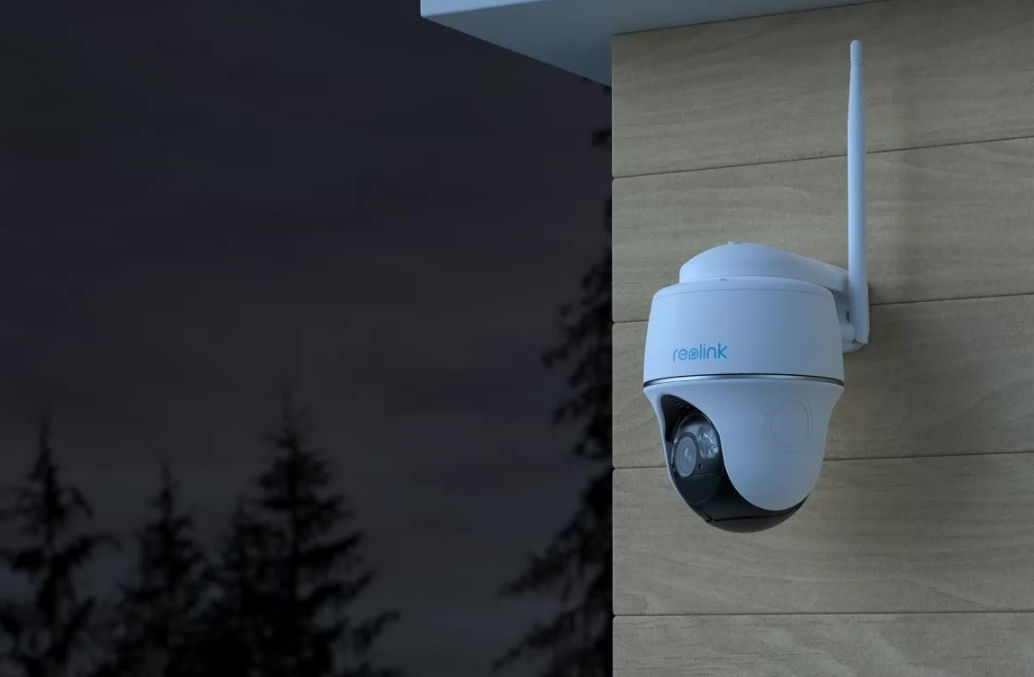
The Reolink Wireless Camera Argus PT Pro is an advanced security solution designed for both indoor and outdoor use, offering exceptional surveillance capabilities. With 2K HD video quality, infrared night vision, and a pan-tilt feature, it ensures comprehensive monitoring of your property. The camera supports two-way audio and is easily controlled via the Reolink app, allowing for real-time alerts and recordings. Priced at approximately $129.99, it provides a robust option for enhancing home security.
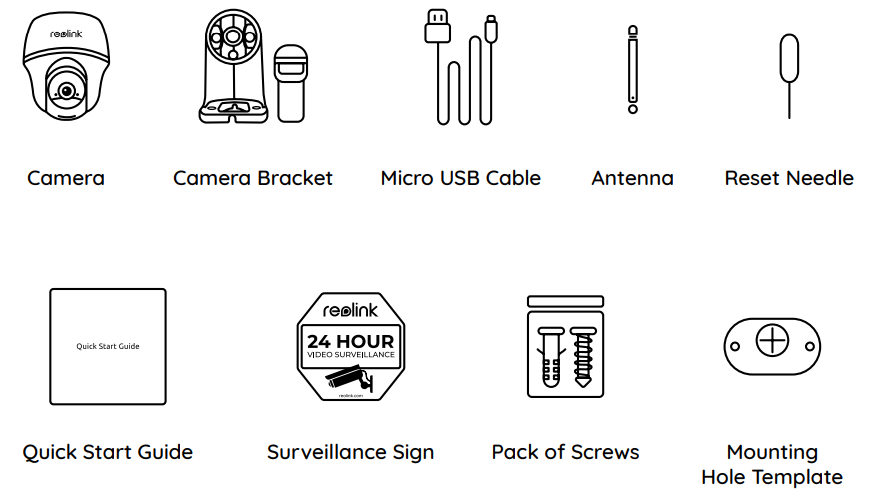
What's in the Box
Camera Introduction
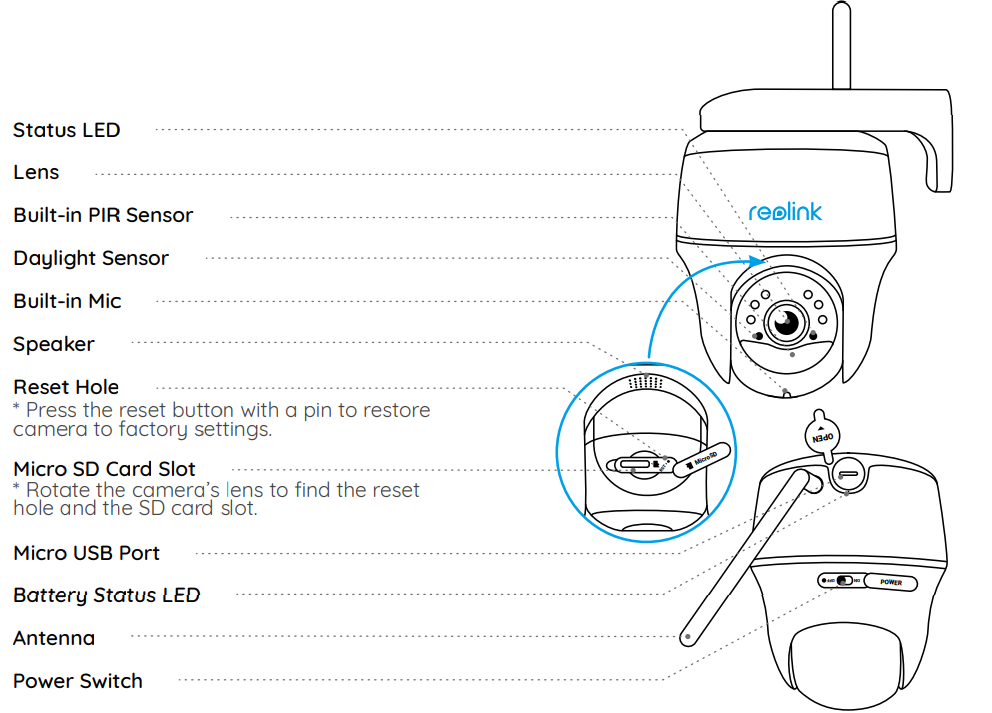
Different states of the status LED:
- Red Light: WiFi connection failed Blue
- Light: WiFi connection succeeded
- Blinking: Standby status
- On: Working status
Reolink Wireless Camera Argus PT Pro Specifications
Video
- Field of View: 105° diagonal
- Night Vision: Up to 10m (33 ft)
PIR Detection & Alerts
- PIR Detection Distance: Adjustable up to 10m (33ft)
- PIR Detection Angle: 90° horizontal
- Audio Alert: Customized voice-recordable alerts
- Other Alerts: Instant email alerts and push notifications
General
- Operating Temperature: -10°C to 55°C (14°F to 131°F)
- Size: 98 x 112 mm
- Weight (Battery included): 470g (16.5 oz)
Description
The Reolink Argus PT Pro is engineered for versatility and performance. The camera’s pan-tilt feature allows users to remotely adjust the viewing angle, ensuring no blind spots are left unmonitored. With its weather-resistant design, it can be placed both indoors and outdoors without compromising on functionality. The camera also features advanced night vision and motion detection capabilities, sending alerts directly to your smartphone or tablet via the Reolink app.
Install the Camera
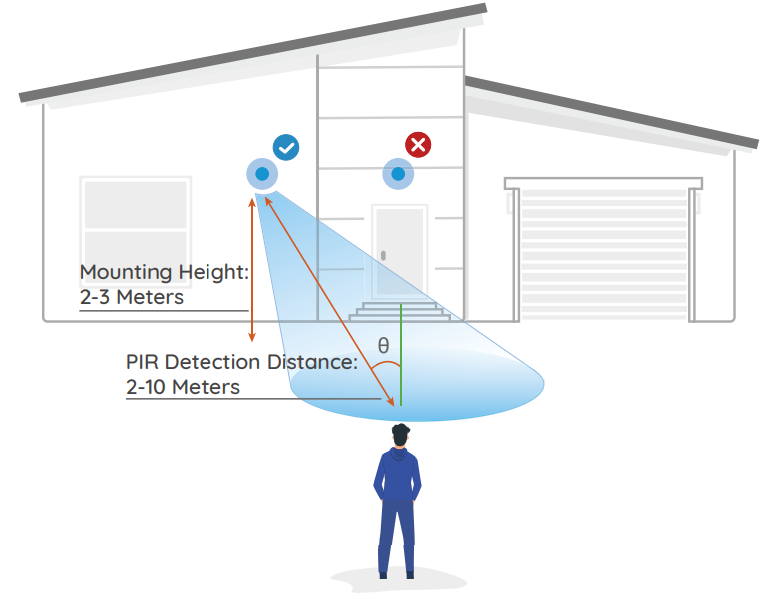
- For outdoor use, the camera MUST be installed upside down for better waterproof performance and better PIR motion sensor’s efficiency.
- Install the camera 2-3 meters (7-10 ft) above the ground. This height maximizes the detection range of the PIR motion sensor.
- For better motion detection performance, please install the camera angularly.
NOTE: If a moving object approaches the PIR sensor vertically, the camera may fail to detect motion.
Mount the Camera
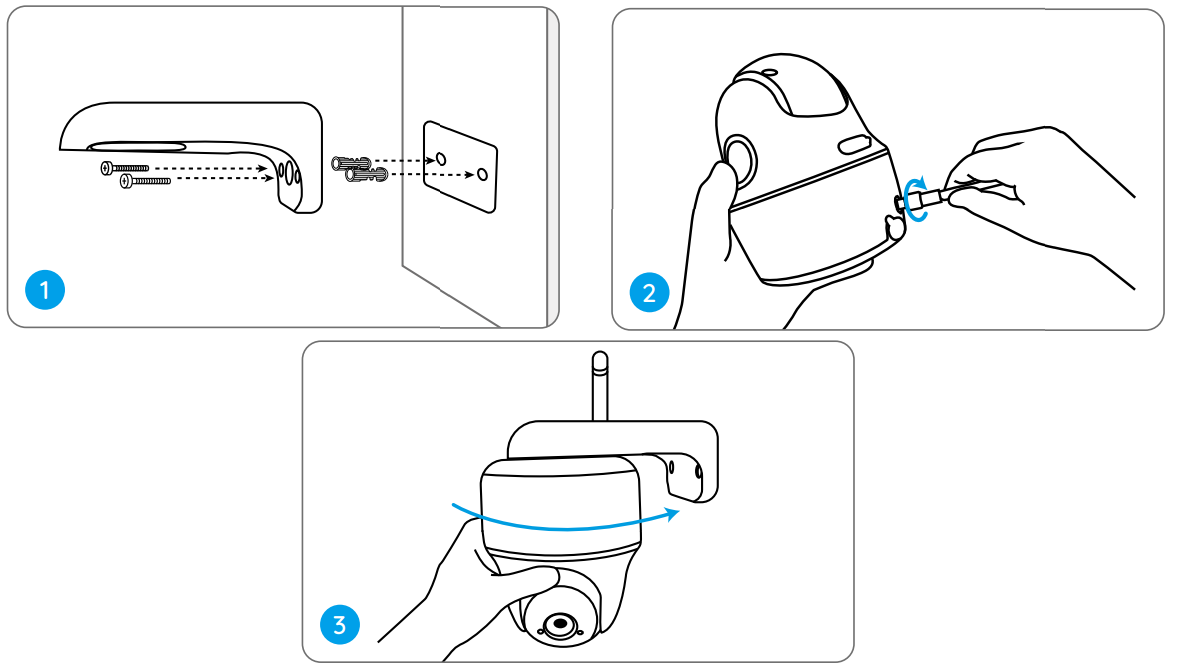
- Drill holes in accordance with the mounting hole template and screw the security mount to the wall.
NOTE: Use the drywall anchors included in the package if needed. - Install the antenna to the camera.
- Screw the camera to the security mount and adjust to the proper direction.
NOTE: For better WiFi connection, it is recommended to install the antenna upward or horizontally.
Mount the Camera to Ceiling
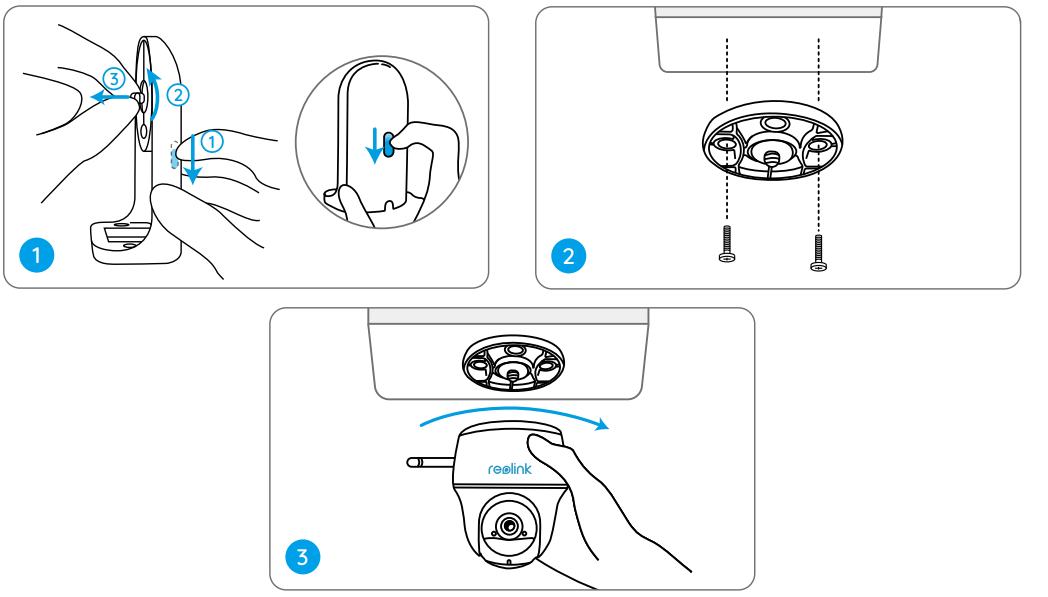
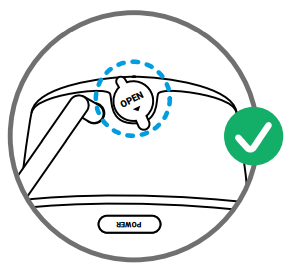
- Pull the button of the security mount and unscrew the bracket to separate the two parts.
- Install the bracket to the ceiling. Align the camera with the bracket and turn the camera unit clockwise to lock it in position.
Install the Camera with Loop Strap
You are allowed to strap the camera to a tree with both the security mount and ceiling bracket. Thread the provided strap to the plate and fasten it to a tree. Next, attach the camera to the plate and you are good to go.

Set up the Camera
Set up the Camera Using a Smartphone
Step 1 Scan to download the Reolink App from the App Store or Google Play store.

Step 2 Turn on the power switch to power on the camera.
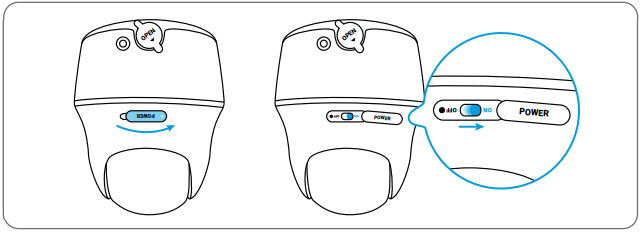
Step 3 Launch the Reolink App, click the “
 ” button in the top right corner to add the camera.
Scan the QR code on the device and follow the onscreen instructions to finish initial setup.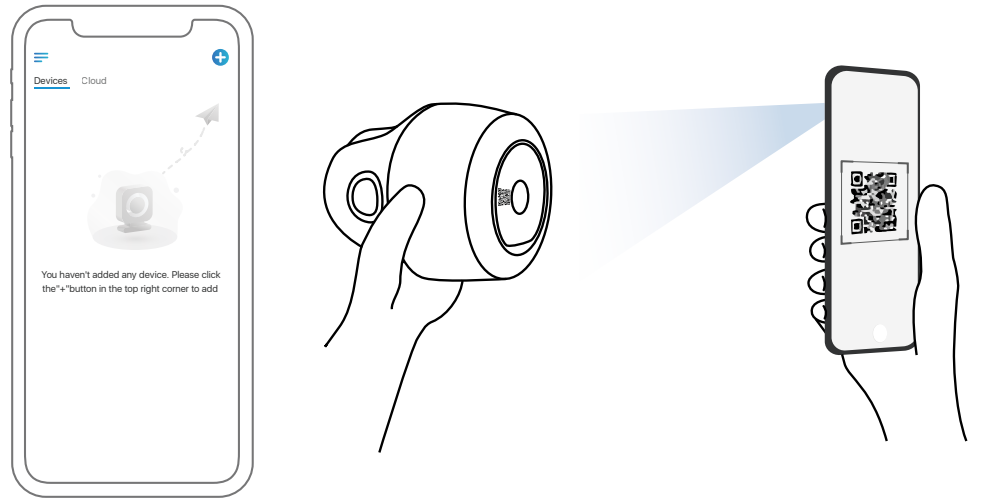
Set up the Camera on PC (Optional)
- Step 1 Download and install the Reolink Client: Go to https://reolink.com > Support > App&Client.
- Step 2 Launch the Reolink Client, click the “
 ” button, input the UID code of the camera to add it and follow the onscreen instructions to finish initial setup.
Charge the Camera
It’s recommended to fully charge the battery before mounting the camera outdoors.

- Charge the battery with a power adapter. (not included)
- Charge the battery with the Reolink Solar Panel (Not included if you only purchase the camera).
Charging Indicator:
- Orange LED: Charing
- Green LED: Fully charged
For better weatherproof performance, please always cover the USB charging port with the rubber plug after charging the battery.
Safety Instructions of Battery Usage
The camera is not designed for running 24/7 at full capacity or around-the-clock live streaming. It’s designed to record motion events and to live view remotely only when you need it. Learn useful tips on how to extend the battery life in this post:
https://support.reolink.com/hc/en-us/articles/360006991893
- The battery is built-in, so do not remove it from the camera.
- Charge the rechargeable battery with a standard and high-quality DC 5V/9V battery charger or Reolink solar panel. Do not charge the battery with solar panels from any other brands.
- Charge the battery when temperatures are between 0°C and 45°C and always use the battery when temperatures are between -20°C and 60°C.
- Keep the USB charging port dry, clean and free of any debris and cover the USB charging port with the rubber plug when the battery is fully charged.
- Do not charge, use or store the battery near any ignition sources, such as fire or heaters.
- Do not use the battery if it gives off an odor, generates heat, becomes discolored or deformed, or appears abnormal in any ways. If the battery is being used or charged, remove the battery from the device or the charger immediately, and stop using it.
- Always follow the local waste and recycle laws when you get rid of the used battery.
Troubleshooting
The camera is Not Powering On
If your camera is not powering on, please try the following solutions:
- Make sure the power switch is turned on.
- Charge the battery with a DC 5V/2A power adapter. When the green light is on, the battery is fully charged
If these won’t work, contact Reolink Support.
Failed to Scan QR Code on the Phone
If you cannot scan the QR code on your phone, please try the following solutions:
- Remove the protective film from the camera lens.
- Wipe the camera lens with a dry paper/towel/tissue.
- Vary the distance between your camera and the mobile phone so that the camera can focus better.
- Try to scan the QR code under sufficient lighting
If these won’t work, contact Reolink Support.
Failed to Connect to WiFi During Initial Setup Process
If the camera fails to connect to WiFi, please try the following solutions:
- Ensure that you have entered the correct WiFi password.
- Put the camera closer to your router to ensure a strong WiFi signal.
- Change the encryption method of the WiFi network to WPA2-PSK/WPA-PSK (safer encryption) on your router interface.
- Change your WiFi SSID or password and make sure that SSID is within 31 characters and password is within 64 characters.
If these won’t work, contact Reolink Support.
Reolink Argus PT Pro Warranty
This product comes with a 2-year limited warranty that is valid only if purchased from Reolink Official Store or a Reolink authorized reseller.
Learn more: https://reolink.com/warranty-and-return/
NOTE: We hope that you enjoy the new purchase. But if you are not satisfied with the product and plan to return, we strongly
Pros & Cons
Pros
- Battery-Powered Flexibility: No need for constant power outlets; ideal for remote areas.
- Pan-Tilt Functionality: Comprehensive coverage with remote adjustment capabilities.
- Weather Resistance: Durable against harsh weather conditions with IP65 rating.
- Affordable Price: Competitive pricing in the market segment.
Cons
- Battery Life Concerns: Requires periodic recharging depending on usage.
- Limited Storage Capacity: Maximum microSD support is 128GB; may require frequent data management.
- Potential Connectivity Issues: Can experience occasional drops in Wi-Fi connectivity.
Customer Reviews
Customers have praised the Reolink Argus PT Pro for its ease of installation and robust feature set. Many users appreciate the flexibility offered by its battery-powered design and pan-tilt functionality. However, some have noted concerns regarding battery life and occasional connectivity issues.
Most Common Complaints
- Battery life does not meet expected duration in some cases.
- Occasional drops in Wi-Fi connection require restarting devices.
This structure reflects the information clearly and aligns the headers and details as requested.
Faqs
What is the resolution of the Reolink Wireless Camera Argus PT Pro?
How long does the battery last on a single charge?
Is the Reolink Argus PT Pro weather-resistant?
Can I adjust the viewing angle remotely?
What type of storage does it support?
Does it have night vision capabilities?
Is two-way audio available on this Reolink Wireless Camera Argus PT Pro?
Can I customize motion detection settings?
What is included in the package?
How do I set up my Reolink Wireless Camera Argus PT Pro?
Leave a Comment
