Roborock Vacuum Cleaner R100007 User Manual
Content
Introduction
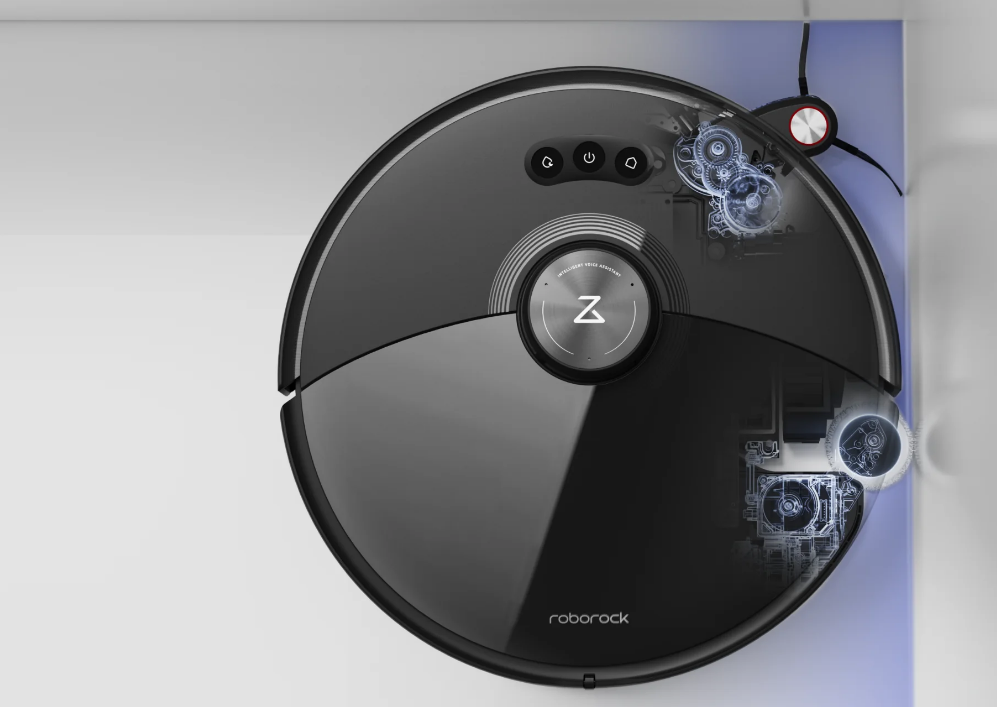
Vacuum Cleaner is a cutting-edge robotic vacuum designed to simplify your cleaning routine. Equipped with advanced laser navigation, it efficiently maps your home and optimizes its cleaning path for thorough coverage. With powerful suction capabilities of up to 2000 Pa, it effectively captures dust and debris from various surfaces. The device can be controlled via a mobile app, allowing for customized cleaning schedules. The price for the R100007 typically starts around $650, depending on the retailer.
Detailed Specifications
Vacuum boasts several key features that set it apart from other robotic vacuums on the market. Here are some of the most notable specifications:
- Suction Power: Up to 2000Pa for effective cleaning of various surfaces.
- Battery Life: Up to 2 hours of continuous cleaning on a single charge.
- Navigation System: Advanced LiDAR navigation for precise mapping and efficient cleaning routes.
- Filter Type: E11 HEPA filter for capturing 99.97% of dust, dander, and allergens as small as 0.3 microns.
- Noise Level: Quiet operation at just 58 dB.
- Dimensions: 13.9 x 13.8 x 3.8 inches, weighing approximately 7.9 lbs.
Overview
The main unit

Partial cleaning
- Press the button to activate the partial cleaning function.
Cleaning the room / turning off and turning on the device
- Press the button to turn on the cleaning function.
- Press and hold the button to turn the device on or off.
Ring-shaped indicator
- White color: level of charge> 20%;
- Red color: charge level <20%;
- Flashing indicator: in the recharge mode or in the on mode;
- Fast flashing red: malfunction.
Charging
- Press the button to recharge.
Note: during cleaning, charging or partial cleaning, press any button to pause the device.
Reset Wi-Fi settings
Simultaneously press and hold the Cleaning and Recharging buttons for 3 seconds.
Accessories
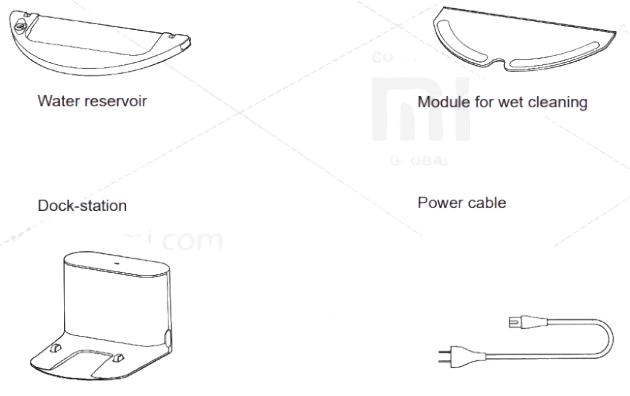
Dust Collector

Main Unit
Module for wet cleaning
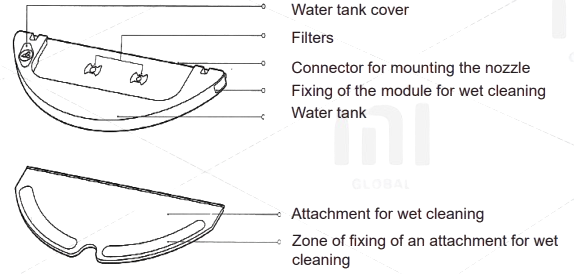
Docking station

Setting
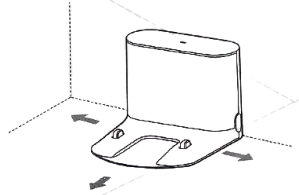

Connect the power cable, fold the excess cable and fix it with a special wire.
Attention:
- The device may become entangled or pull an extra cable lying next to the docking station, which may result in the dock being moved or disconnected from the power supply.
- During charging, the dock indicator lights constantly, if the indicator turns off, the device is charging.
The correct location of the docking station: More than 0.5 m of free space on the left; More than 0.5 m of free space on the right; More free space 1.5 m ahead.
Turn on the device and charge
Press and hold the Power button to turn on the device. Wait until the ring indicator turns on, after which you can connect the device to the docking station for recharging.
The color of the annular indicator indicates the level of charge
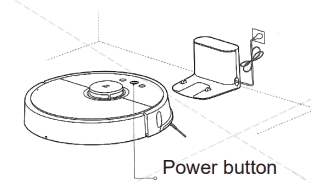
- White color: level of charge> 20%;
- Red color: charge level <20%;
Caution: If the charge level is too low, the device may not turn on. Please, timely charge the vacuum cleaner.
Quick settings
This device supports the Mi Smart Home platform, so you can use a smartphone to remotely control the vacuum cleaner by connecting to the Smart Home application. Also, the device supports the MIUI system, so it can synchronize and interact with other smart home devices.
- Downloading the application
In Mi Store, find the mobile application «Smart Home», scan the image of the QR-code below. - Adding new devices
Open the «My devices» window in the application, and in the upper right corner click the «+» button to add the necessary device. Then find the new device in the «My devices» list. Buy more
To purchase even more smart devices, download the mobile application «MiJia devices».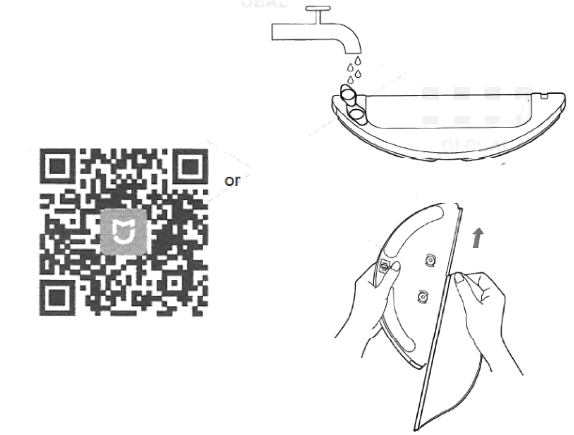
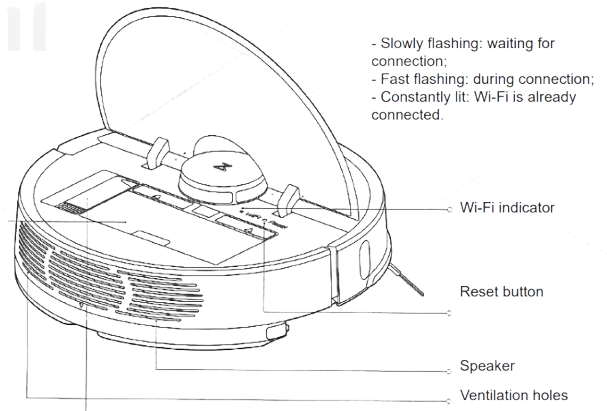
Wi-Fi indicator
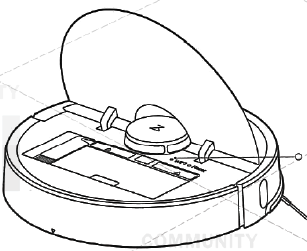
- Slowly flashing: waiting for connection;
- Fast flashing: during connection;
- The indicator is always on: Wi-Fi is already connected;
Attention: if the smartphone does not connect to the vacuum cleaner, see «Instructions for use» - «Resetting Wi-Fi settings».
Installing the attachments for wet cleaning
- Install the wet cleaning attachment: moisten the squeegee, squeeze it as much as possible and insert it into the special chute, pass along the water tank to the end and securely fix the other edges of the nozzle with the help of suitable adhesive tapes.
Attention:
Do not turn on the wet cleaning function when there is no one at home.
If the room is carpeted, include the function of removing from the walls. - Filling the water tank: open the lid of the water tank, fill it with water and close the lid. Caution: the least amount of floor cleanser or disinfectant may damage the filter.
- Installing the wet cleaning module: Slide the module along the back of the main unit until the special marks are aligned and you hear a distinctive sound indicating successful installation of the module.
Attention: for the best result of wet cleaning it is recommended to clean the cleaning attachment three times before using it again.
Start cleaning
When the flashing ring-shaped indicator starts to glow constantly, it means that the charging of the device is completely completed. Press the Power button, or use the mobile application to turn on the cleaning of the room.
Attention:
- Do not turn on the wet cleaning function when there is no one at home;
- It is recommended to rinse the nozzle for wet cleaning every 30 minutes of its use to ensure a high-quality and efficient cleaning.
Removing the wet cleaning module
After the vacuum cleaner has cleaned the necessary room and returned to the docking station, grip the handles on both sides with special clips and pull the module toward you.
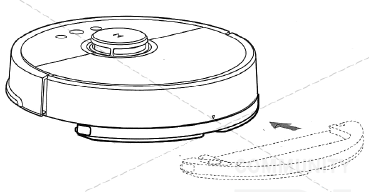
Attention:
- If the vacuum cleaner is being charged or not being used, remove the module for wet cleaning from the device.
- If you installed the docking station on a wooden floor, we strongly recommend that you use a waterproof mat to avoid damage to the floor as a result of water leakage.
On/Off
Press the Power button, then the ring-shaped indicator will light up. The device is ready for use. If the vacuum cleaner is in the process of cleaning, press and hold the Power button to turn it off, after which the unit stops cleaning.
Attention: do not turn off the vacuum cleaner during recharging.
Cleaning
- Press the Power / Cleaning button to start cleaning the room.
- During cleaning, press any button on the device to pause it.
Attention:
- If the device’s charge level is too low, the vacuum cleaner will not clean the room. First charge the device.
- If there is a significant decrease in charge during cleaning, the vacuum cleaner will automatically return to the docking station for recharging. When the vacuum cleaner is charged to the required level, the device will automatically continue cleaning the room.
- Before switching on the cleaning mode, please remove all excess cables from the floor (including the dock cable) so that the vacuum cleaner does not get tangled in the cables during cleaning, as this may result in power failure, damage to the devices and damage to the cables.
- If the cleaning time is less than 10 minutes, by default the device cleans the room twice.
Charging
- Automatic mode: after cleaning, the vacuum cleaner automatically returns to the docking station for recharging.
- Manual mode: when the device is paused, press the Charging button to return the device to the docking station for recharging.
During charging, an annular indicator flashes around the device.
Caution: If the device does not automatically find the dock, transfer the vacuum cleaner to the docking station by yourself.
Cleaning method
After turning on the device, the vacuum cleaner scans the room map and separates it to the zones. In each zone cleaning begins along the walls, after which the vacuum cleaner forms its route in a certain zone «along the serpentine», consistently qualitatively removing the entire room. After cleaning the room, the vacuum cleaner automatically returns to the docking station for recharging.
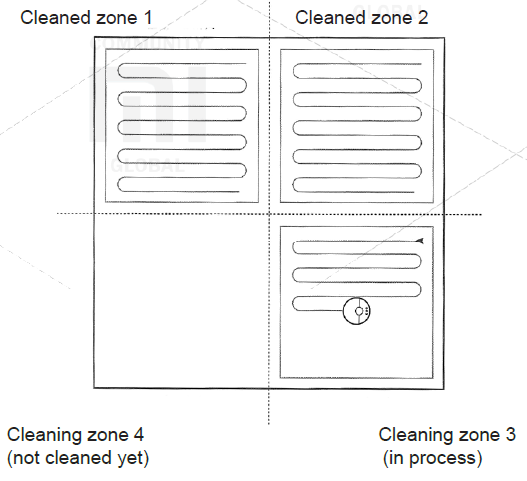
Using
Partial cleaning
When the device is in the standby mode or paused, press the button for partial cleaning, after which the device will remove the central area of the room with a size of 1.5x1.5 m. When the device finishes its work, it will automatically return to its original position, completing the cleaning of a certain zone.
Attention: if the device is paused, pressing the partial cleaning button stops cleaning the previous zone.
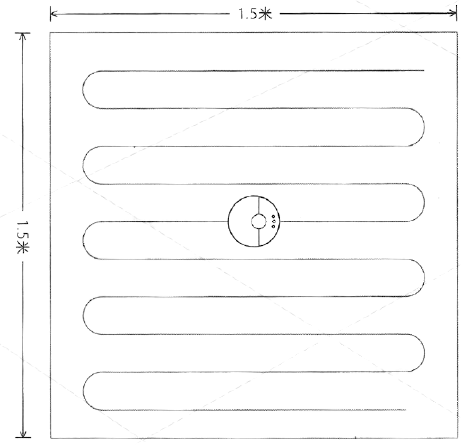
Pause
- While the device is operating, press any button on the vacuum cleaner to stop it. Press the Power / Cleaning button to continue cleaning;
- Press the Charging button to bring the vacuum cleaner back to the docking station for recharging and stop the current cleaning.
Attention: if the device is paused, you turn on the function of returning to the docking station, the current cleaning of the premises is over.
If cleaning is necessary, add water or rinse the wet cleaning attachment, first press any button to pause the device, then remove the wet cleaning module from the vacuum cleaner, add water or rinse an attachment. After this, install the module for wet cleaning back and press the Power / Clean button to continue cleaning.
Troubleshooting
If a malfunction occurs during the cleaning process, the ring-shaped indicator of the device will flash rapidly in red and the voice message will turn on. To solve this problem, see the «Troubleshooting» section.
Attention:
- If the device does not work for 10 minutes due to a problem, it automatically enters sleep mode.
- If a malfunction occurs during charging on the dock, the device stops pre-cleaning.
Sleep mode
- If the device does not perform any actions within 10 minutes, it can automatically switch to sleep mode. In this case, the ring-shaped indicator flashes once every few seconds.
- To awaken the device, press any button on the vacuum cleaner.
Attention:
- The device does not enter sleep mode if it is on recharging on the docking station.
- If the device is in sleep mode for more than 12 hours, it automatically turns off.
Setting cleaning time
Thanks to the mobile application, you can set the cleaning time of the room. In this case, the vacuum cleaner automatically starts to clean at the set time, and after the cleaning is completed, it automatically returns to the docking station.
Reset Wi-Fi settings
If you replace the router, forget the password, or if there are any other situations, that caused a problem with connecting the device to the mobile application, open the top panel of the vacuum cleaner to see the Wi-Fi indicator, simultaneously press and hold the Partial cleaning and Charging buttons, You will hear a voice alert when you reset your Wi-Fi settings. Wait until the Wi-Fi indicator starts flashing slowly, indicating a successful reset.
Setting cleaning zone
Using the mobile application, set the cleaning zone, after which the vacuum cleaner will clean only the zone, defined by you.
Setting the end point
Using the mobile application, set the desired point on the map of the room, the device will automatically determine the route to achieve the goal.
Cleaning mode
Using the mobile application, choose a quiet, normal, strong and maximum cleaning modes. The default mode is normal.
DND mode
In the Do Not Disturb mode, the device can not automatically continue cleaning or reproduce the audio message on its own, the brightness of the ring-shaped indicator decreases. By default, the Do Not Disturb mode is enabled from 22:00 - 08:00. Using the mobile application, turn off this function or set up the Do Not Disturb mode automatically.
Virtual wall
Not included in the standard configuration, please order it from https://www.roborock.com

Using a special tape, separate the area that you do not need to clean (for example, rooms, where there might be water on the floor (bathroom) or too small rooms, where the device can get stuck), creating a virtual wall for the vacuum cleaner. Attention: securely fix the special tape on the floor surface so that the vacuum cleaner can not move it, otherwise the effect of the virtual wall will not be achieved.
Docking station
Install the docking station on the floor along the wall, being sure that on both sides of the docking station there are more than 0.5 m of free space and more than 1.5 m in front, insert a plug into the socket. For optimal use of the mobile application, please install the docking station within the Wi-Fi coverage area.
Caution: do not install the dock under direct sunlight or in locations where other objects may interfere with the vacuum cleaner to identify its location. This can lead to the fact that the vacuum cleaner can not return to the docking station for recharging.
Maintenance
Main brush
* Recommended to clean weekly
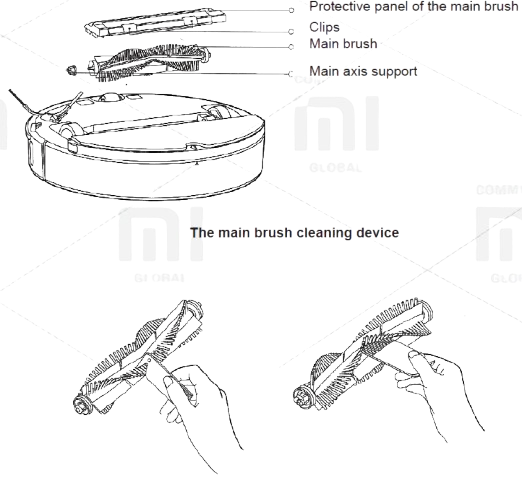
- Turn the vacuum cleaner around, hold the special clips on both sides and remove the brush guard.
- Pull out the main brush. On both sides, remove the supports of the main axis of the brush and remove the hair that could wind on its main axis.
- Using a special auxiliary device (included in the basic equipment) for cleaning the brush of the vacuum cleaner, remove the hair wrapped around the brush.
- Install the main brush back into the vacuum cleaner, securely install and secure the brush guard.
Attention: for optimal cleaning results it is recommended to change the main brush once every 6-12 months.
The main brush cleaning device
Dust collector and filter
Recommended to clean it weekly
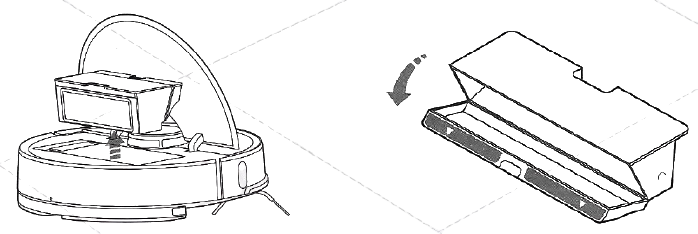
- Open the main top panel of the vacuum cleaner, hold down the latches and remove the dust bag.
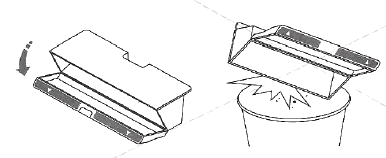
- Open the dust bag in the place where the arrow marks are located, discard the debris.
Cleaning the filter
recommended to clean every two weeks
- Open the dust bag at the point, where the arrow marks appear.
- Fill the dust bag with a small amount of water, close it and shake it. After this, pour out dirty water, repeat the procedure again. Now your filter is clean.
Attention:
Rinse the filter with clean water without adding any detergents.
When rinsing the filter, do not use brushes or wash with hands. It’s enough just to rinse the filter. Remove the filter, shake it off to remove any excess moisture, allow it to dry out in a well-ventilated, sunny location until it dries completely, after which the filter can again be used.
Press the catch to remove the filter.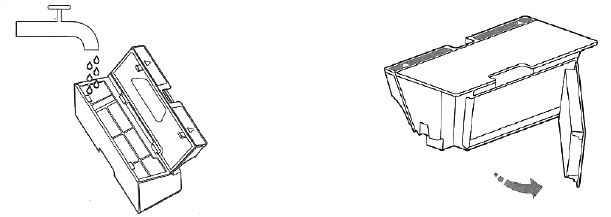
Attention:
- It is strongly recommended to dry the filter before using it (at least 24 hours to dry the filter).
- We recommend that you use two filters in turn.
Side brush
* recommended to clean it monthly
- Turn the vacuum cleaner to unscrew the screw.
- Remove and clean the side brush.
- Replace and tighten the screw.
Attention: for optimal cleaning results it is recommended to change the side brush every 3-6 months.

Battery
The device is equipped with a high-capacity lithium-ion battery. To save battery properties when using the device every day, we recommend maintaining a sufficient battery level. Caution: If the device is not used for a long time, turn it off, and the battery should be charged at least every three months to avoid loss of its properties and characteristics.
Attachment for wet cleaning
* recommended to rinsing after each use
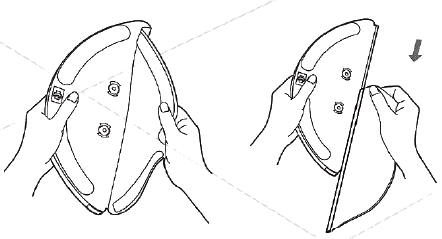
- Remove the attachment from the wet cleaning module.
- Rinse the attachment in water and allow it to dry.
Attention:
- It is strongly recommended to rinse the attachment for wet cleaning, otherwise dirty water from the module can get into the filter.
- If it is too dirty, this can affect the efficiency of its sliding on the floor. Please rinse the attachment , and then use it.
- For optimal cleaning results, it is recommended to change the attachment for wet cleaning once every 6-12 months.
Filter components
* recommended to renew every 1-3 month

- Remove two filter components (right and left) with your own hand;
- Install new filter components, make sure they are securely fixed;
Caution: It is recommended to change the filter components every 1-3 months, depending on the level of water contamination and the frequency of use of the device.
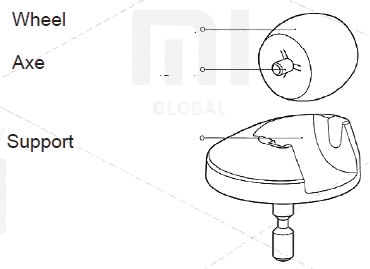
Wheel
* recommended to clean monthly
- Turn the vacuum cleaner to remove the wheel.
- Clean the wheel of excess dirt and hair.
- Install the wheel in the vacuum cleaner.
Caution: To clean the wheel, use clean water, dry it and install it in the device.
Sensors
Wipe the vacuum cleaner sensors using a soft, dry cloth, including:

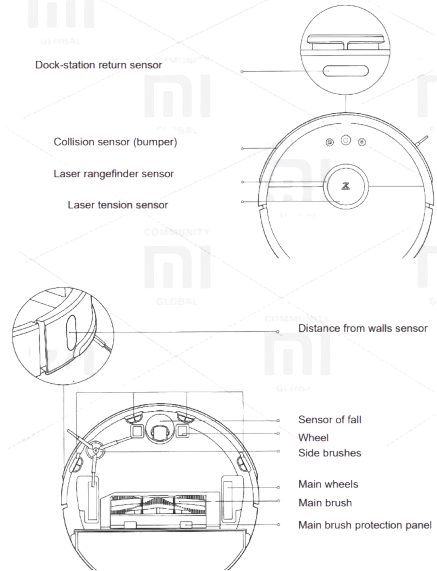
- Four drop sensors placed below.
- Distance sensors from the walls placed on both sides.
- Placed below the contact zones for recharging.
Dock station
* recommended to clean monthly
Using a dry soft cloth, wipe the contact areas for recharging docking station.
Update
You can update the software using the mobile application. Before performing the update, install the vacuum cleaner on the docking station and make sure that there is sufficient charge (more than 20%). During the software update process, the ring indicator flashes white.
Reset the system
If you have trouble reacting buttons to your actions or you can not turn off the device, try resetting the system settings. Press the reset button, the vacuum cleaner will reboot automatically. Also, reset the system settings in case of problems with the cleaning mode, Wi-Fi connection and the like.
Reset to factory settings
If after resolving the settings the problem with the device during the idle time was solved, when the mode is on, simultaneously press the «Charge» and «Reset system settings» buttons and keep them until you hear a voice message about «Restoring the factory settings». After that, all settings will be reset.
Parameters about Roborock Vacuum Cleaner R100007
| Name | Characteristic | |
| Dimensions | 353x350x96.5 rnm , | |
| Batterv | 14.4V / 5200mAh Rechameable Lii-ion Battlerv | |
| Weight of the vacuum cleaner | approximately 3.5 kg | |
| Wireless c.ormection | Wi-FiI | Smart hiqh-speed corrnection |
| Rated voltaqe | 14 .4V = | |
| Rated power | 58W | |
Dock station
| Dimensions | Rated Power | Rated Input Voltage | Rated Output Voltage | Rated Frequency |
|---|---|---|---|---|
| 151h x 130w x 96 mm | 42W | 100-240V ~ | 20V = 1.8A | 50 / 60Hz |
Description
The Roborock Vacuum Cleaner R100007 is built with a slim and compact design, allowing it to easily navigate under furniture and into tight spaces. Its advanced LiDAR navigation system ensures that it maps your home efficiently, avoiding obstacles and cleaning in a systematic pattern. The vacuum features multiple cleaning modes, including Spot Cleaning, Edge Cleaning, and Scheduled Cleaning, making it versatile for any cleaning task. Additionally, it is compatible with the Roborock app, allowing users to control and schedule cleanings remotely.
The R100007 also includes a self-emptying dock option, which can be purchased separately, making maintenance even more convenient. The device is also voice-controlled through integration with popular smart home systems like Amazon Alexa and Google Assistant.
Setup Guide
To set up your Roborock Vacuum Cleaner R100007, follow these steps:
- Charge the Device: Place the vacuum on its charging dock and let it charge for at least 2 hours before first use.
- Download the App: Download the Roborock app from your mobile device's app store.
- Pair the Device: Open the app, select "Add New Device," and follow the in-app instructions to connect your vacuum to your Wi-Fi network.
- Map Your Space: Allow the vacuum to map your home by running its initial cleaning cycle. You can then customize cleaning routes and schedules through the app.
- Adjust settings such as suction power, cleaning modes, and voice control preferences within the app.
Safety information
Limitations of using
- This device is intended for use at home, for cleaning the floor. Do not use the outdoorcleaning device (for example, on an open balcony), for cleaning furniture (for example, asofa) or for cleaning commercial and industrial premises;
- Do not use the device to clean uneven surfaces, open sun terraces, furniture andpremises without the presence of certain barriers and walls;
- Do not use the device indoors at temperatures below 0 ° C or to clean the floor on whichany liquid spilled
- Before using the device, remove all cables to avoid damaging them or entangling them inthe device;
- Remove fragile objects and massive debris from the floor (eg vases, bags, etc.) toprevent the vacuum cleaner from blocking or damaging other objects;
- Do not allow children, people with certain mental disabilities to use this device;
- During the operation of the device, watch closely children and pets. Do not allow childrento perceive the device as a toy;
- Do not leave the brush cleaner in places accessible to children;
- Do not put any objects (including children and pets) on the device, it does not matterwhether it is on or off;
- Do not allow hair, fingers or other parts of the body of a person or animal to come intocontact with the suction fan while the device is in operation;
- Do not use the device to clean any flammable objects (for example, cigarette butts)
- Do not use a machine for cleaning long-threaded carpets. The vacuum cleaner will not beable to clean such carpets qualitatively;
- Do not allow heavy or sharp objects (eg glass, nails, etc.) to enter the vacuum cleaner;
- Do not accept the laser range finder’s protective panel, the top panel of the vacuumcleaner or the panel of the distance sensor from the walls (bumper) as a handle for movingthe movingthe device;
- Clean or service the main unit and docking station in the off position;
- Do not wipe the device with any damp cloth or wash liquid;
- When cleaning the carpet, do not use the wet cleaning module;
- Please use the device in accordance with the instructions. Responsibility for any damageor injury is borne by the owners;
Battery and charging
- Do not use external batteries, chargers or docking stations;
- Do not disassemble, repair or replace the battery or docking station;
- Do not install the dock near sources of heat (such as a radiator)
- Do not wipe the contact areas of the docking station with a damp cloth or wash liquid;
- Do not dispose of the used battery, please contact special disposal units for similarproducts;
- If the power cord is damaged or broken, contact the service center immediately;
- Before transporting the device, make sure that the vacuum cleaner is turned off. It isrecommended to use packaging;
- If you do not use this unit for a long time, disconnect it from the power supply, after fullycharging it and keep it in a cool dry place. It is recommended to charge the device everythree months to prevent excessive discharge.
Laser safety information
The distance sensor meets the IEC 60825-1: 2014 class 1 standard and is not a sourceof hazardous laser radiation
Standard: GB 4706.1-2005, GB 4706.7-2014, GB 4343.1-2009, GB 17625.1-2012.
Toxic and harmful substances
| Name | To, x ic a11d hm mfu l s ub sta 11ces or e'l'eme11ts | ||||||
| Pb | Hg | Cdl | CrV1 ;
; | .P BB | PBDE | ||
| X | 0 | 0 | 0 | 0 | 0 | ||
| M otherboard | X | 0 | 0 | 0 | 0 | 0 | |
| M etal | l | 0 | 0 | 0 | 0 | 0 | 0 |
| components | |||||||
| External housing | 0 | 0 | 0 | 0 | 0 | 0 | |
| Battery | 0 | 0 | 0 | 0 | 0 | 0 | |
These tables are provi:ded i n accordance with SJ / T 11364. A: To, xi:c and harm ul substances 1i n a lll co mponents of this devIi ce are contained l:Jelow the threshold value in accmdance wIi t h GB / T 26572. X: the presence of toxic and noxious substances in at least one of the components of this device in an amount exceeding tlhe threshold value in acrn rd'anc e with GB I T 26572. | |||||||
Troubleshooting
If a malfunction occurs during a cleaning, the ring-shaped indicator of the device starts to flash rapidly in red and the voice message will turn on.
Recommendations
- Error 1: Slightly turn the laser (orange) rangefinder, to ensure unobstruction of its motion.
The normal operation of the laser distance sensor is prevented by other foreign objects. Please wipe the sensors, remove excess items; If you do not have the opportunity to remove excess items, move the vacuum cleaner to another location. - Error 2: Wipe and lightly press the collision sensor.
In the event of a malfunction of the collision sensor, repeatedly press it to remove all foreign objects; If there are no foreign objects, move the vacuum cleaner to another place. - Error 3: Move the vacuum cleaner to a different location.
The wheel is in a suspended state, move the vacuum cleaner to another location. - Error 4: Wipe the fall sensor and move the vacuum cleaner away from the edge (for example, from a step).
The fall sensor does not identify underneath the supports, move the vacuum cleaner to another place; The sensor of the fall is too dirty, so problems can occur. Please clean the dip sensor. - Error 5: Pull out the main brush. It is necessary to clean the brush and fix of the main axis of the brush.
Foreign objects can be wound around the main brush, it is necessary to clean the brush and fix the main axis of the brush. - Error 6: Pull and clean side brushes.
Foreign objects can be wound around the side brush; it is necessary to clean the brush. - Error 7: Make sure that no foreign objects have entered the main wheel and move the device to a new location.
Foreign objects can be wound around the wheel; remove and clean the wheel. - Error 8: Provide enough space around the vacuum cleaner.
It is possible to entangle the vacuum cleaner or it can get stuck between other objects, please provide enough space around the vacuum cleaner. - Error 9: Install the dust bag and filter.
Install the dust bag and filter, and make sure they are installed correctly; If the device continues to show an error, try replacing the filter; After rinsing the filter, leave it to dry for 24 hours. - Error 10: Make sure the filter is dry or rinse the filter.
It is possible to get foreign objects in the filter, make sure it is clean; if the problem persists, replace the filter. - Error 11: A strong magnetic field is detected, move the vacuum cleaner away from the special tape (virtual wall).
The vacuum cleaner is too close to the special tape (virtual wall), please move the device to a different location. - Error 12: Charge level is too low, charge the device.
Charge level is too low, charge the device. - Error 13: The problems with charging, make sure the contact between a vacuum cleaner and a docking station.
Using a dry cloth, wipe the contact areas of the device and the docking station. - Error 14: Problems with charging.
The battery temperature is too high or too low. Wait until the battery temperature is normal. - Error 15: Wipe the distance to the wall sensor.
A sensor for determining the distance to the wall can settle a lot of dust, carefully wipe it. - Error 16: Install the vacuum cleaner on a flat surface and turn on the device.
The device is on an uneven surface, move the vacuum cleaner to a flat surface and restart the computer. - Error 17: Problems with the operation of the side brushes, please reset the system settings.
Occurrence of problems with the operation of the side brushes, perform a system reset. - Error 18: Problems with the operation of the suction fan, reset the system.
If there are problems with the operation of the suction fan, reset the system. - Error 21: Malfunctions in the movement of the laser rangefinder, remove any foreign objects.
The laser rangefinder is pressed or its work is interfered with by foreign objects, move the device to another location. - Error 22: It is necessary to wipe the contact areas to charge the device.
On contact areas, dust may settle, which interferes with the normal operation of the device, wipe them. - Error 23: It is necessary to wipe the signal area of the docking station. Dust may settle on the contact areas of the docking station, or foreign objects may fall on them. Please remove all unnecessary items from the contact areas.
Internal error, please reset the system.
In case of an internal error, the device can not function normally, perform a system reset.
Warning: Resetting the system helps to solve some problems
If you can not solve the problem of the provided recommendations in the table, call Shitou Technology Service Center by number: 400-900-1755 or go to the official site of the company «Shitou Technology roborock».
List of faults
- problems with the operation of the device, as described in the instruction;
- the device does not turn on;
- the main brush does not work, or fault of side brushes, fan, wheel;
- problems with charging the main device;
- problems with the power supply of the docking station.
Roborock Vacuum Cleaner R100007 Pros & Cons
Pros:
- Advanced Navigation: Efficient LiDAR navigation ensures thorough and systematic cleaning.
- Strong Suction Power: Effective cleaning of various surfaces including carpets and hardwood floors.
- Quiet Operation: Low noise level makes it suitable for daytime use without disturbing others.
- Remote Control: Convenient app control allows scheduling and customization of cleaning tasks remotely.
- Compatibility with Smart Home Systems: Integrates seamlessly with Amazon Alexa and Google Assistant for voice control.
Cons:
- Higher Price Point Compared to Basic Models: While competitively priced, it may be out of budget for some users looking for entry-level models.
- No Self-Emptying Dock Included by Default: An additional purchase is required for the self-emptying dock feature.
- Initial Mapping Process Can Be Time-Consuming: Requires patience during the initial mapping cycle to ensure accurate navigation in the future.
Customer Reviews
Customers praise the Roborock for its exceptional cleaning performance, quiet operation, and user-friendly app interface. However, some users have noted that the initial mapping process can be lengthy and that additional features like the self-emptying dock add to the overall cost. Here’s a snapshot of common feedback:
- "The R100007 has been a game-changer for my daily cleaning routine. It's so quiet and efficient!" - Sarah R.
- "I love how easy it is to control through the app, but setting it up took longer than expected." - John D.
Faqs
How long does it take to charge the Roborock?
Can the Roborock clean carpets effectively?
Is the Roborock compatible with voice assistants like Alexa and Google Assistant?
How do I pair the Roborock with my Wi-Fi network?
Does the Roborock R100007 come with a self-emptying dock?
What type of filter does the Roborock use?
How quiet is the Roborock during operation?
Can I schedule cleanings using the Roborock app?
What are some common issues with the Roborock and how do I troubleshoot them?
Is there a warranty on the Vacuum?
Leave a Comment
