Presto Prcise 12-Quart Pressure Canner Manual
Content
Introduction of Presto Precise 12-Quart Pressure Canner
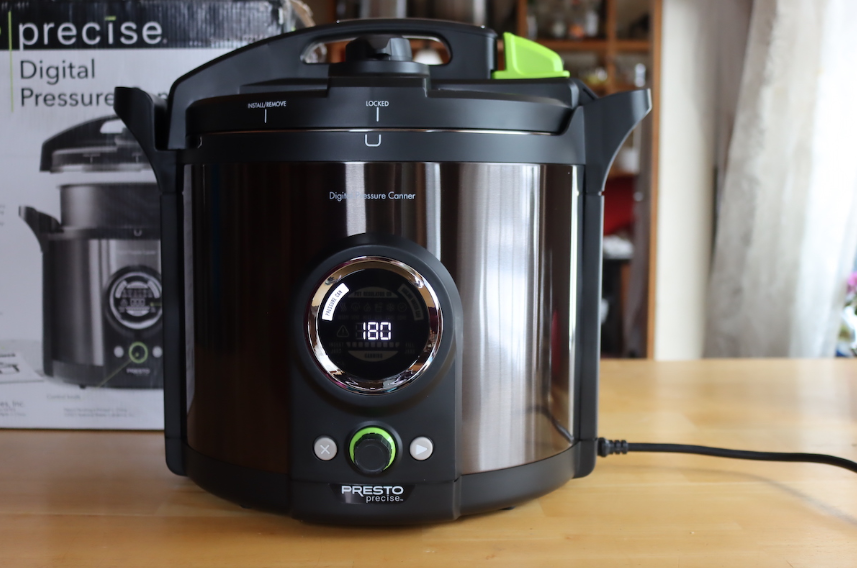
Introducing the Presto Precise 12-Quart Pressure Canner Manual, an essential tool for any home canner. This pressure canner is perfect for preserving fruits, vegetables, meats, and even fish, with a 12-quart capacity that can handle up to 7 quart jars at a time. The Presto Precise Pressure Canner is available for an estimated price of $100 to $150 and was launched in 2021. With its durable construction, easy-to-use design, and precise pressure control, this pressure canner is a must-have for anyone looking to preserve their food at home.
Getting Acquainted
NOTICE: This product is intended only for pressure canning and boiling water canning. Do not use it for cooking or preparing foods.
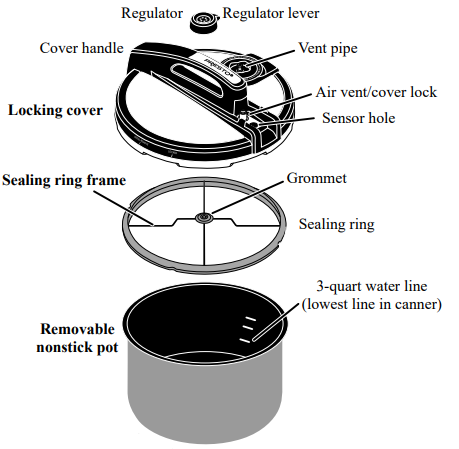
As received, your canner will be fully assembled. Disassemble and clean the canner parts (Fig. A) as directed on page 3. Read all instructions carefully. If you are new to canning or need some refresher training, refer to the “Canning Basics” section on pages 4–5.
Helpful Hint: To help yourself understand the operation of the electric canner, consider a test run. Using jars of water in place of food, follow the step-by-step instructions for Pressure Canning on.
Detailed Specifications
The Presto Precise 12-Quart Pressure Canner Manual comes with a variety of features to make home canning easy and efficient. Here are some of its key specifications:
- 12-quart capacity, enough to hold 7 quart jars or 16 pint jars
- Pressure control for precise temperature control
- Deluxe pressure dial gauge for easy reading
- Extended 12-year warranty
- Constructed of warp-resistant aluminum for durability
- Air vent/cover lock for safe operation
- Exclusive Included: Recipe book, instruction and time table pamphlet. Also includes a rack, a lid, a pressure regulator weight, and a gauge
Description
The Presto Precise 12-Quart Pressure Canner Manual is a versatile and durable pressure canner that is perfect for any home canner. Its 12-quart capacity is large enough to handle a variety of foods, while its precise pressure control ensures that your food is preserved at the right temperature. The pressure canner is constructed of warp-resistant aluminum, making it durable and long-lasting. The deluxe pressure dial gauge makes it easy to read the pressure, and the air vent/cover lock ensures safe operation. With an extended 12-year warranty, you can be confident that this pressure canner will last for years to come.
Presto Precise 12-Quart Pressure Canner Setup Guide
Setting up the Presto Precise 12-Quart Pressure Canner Manual is easy. Here's how to get started:
- Place the pressure canner on a level surface and ensure that it is not over a gas or electric burner.
- Place the rack in the bottom of the canner and add 2 to 3 inches of water.
- Place the jars on the rack, making sure they are not touching each other or the sides of the canner.
- Place the lid on the canner, aligning the cover lock.
- Turn the heat to high and allow the canner to vent for 10 minutes before putting the weighted gauge on.
IMPORTANT SAFEGUARDS
To reduce the risk of personal injury or property damage when using electrical appliances, basic safety precautions should always be followed, including the following:
- Read all instructions. Improper use may result in bodily injury or property damage.
- Before each use, check both the vent pipe (Fig. A, page 2) and vent filter (Fig. E, page 3) to be certain they are free of any blockage. Remove the filter and clean any debris from both the vent pipe and filter.
- Always check the air vent/cover lock to be sure it moves freely before use.
- To protect against electrical shock, do not immerse cord, plug, or canner body in water or other liquid.
- Do not let children handle or put electrical cords or plugs in their mouths.
- Always attach plug to appliance first, then plug cord into the wall outlet. To disconnect, press and hold the cancel button for 3 seconds, then remove plug from wall outlet.
- Unplug cord from unit and outlet when not in use and before cleaning. Allow unit to cool before putting on or taking off parts and before cleaning.
- Do not operate any appliance with a damaged cord or plug or in the event the appliance malfunctions or has been damaged in any manner. Return the appliance to the Presto Factory Service Department for examination, repair, or electrical or mechanical adjustment.
- WARNING! Contents are hot and can cause serious burns. Keep appliance and cord away from children. Do not let cord hang over edge of counter or table or touch hot surfaces.
- To guard against electrical shock, can only in the removable pot provided.
- The use of accessory attachments not recommended by the appliance manufacturer may cause injuries. Use only genuine Presto accessories and replacement parts.
- Intended for countertop use only.
- Do not place on or near a hot gas or electric burner or in a heated oven.
- This appliance operates under pressure. Improper use may result in scalding injury. Make certain canner is properly closed before operating (pages 6 and 16).
- Do not attempt to open the canner until all internal pressure has been released, the air vent/cover lock has dropped, and no steam escapes when the regulator is rotated to the VENT position. Any pressure in the canner can be hazardous. Never force open the temperature sensor arm.
- Extreme caution must be used when moving an appliance containing hot liquids. Do not touch hot surfaces. Always use appliance handles.
- To ensure safe operation and satisfactory performance, replace the sealing ring if it shrinks, becomes hard, deformed, cracked, or torn. Use only genuine Presto replacement parts.
- Close supervision is necessary when the canner is used near children. It is not recommended that children use the canner.
- Do not use this appliance for other than intended use.
- Do not use this appliance for deep fat frying.
- Do not use outdoors.
SAVE THESE INSTRUCTIONS
This appliance is for household use only.
Important Cord Information
- To reduce the risk of electric shock, this appliance has a 3-prong grounded plug. If the plug on this appliance does not fit into your outlet, contact a qualified electrician. Do not attempt to modify the plug in any way.
- A short, detachable power supply cord is provided to reduce the risk of becoming entangled in or tripping over a longer cord. An extension cord may be used if care is properly exercised in its use.
- If an extension cord is used, it should be a 3-wire grounded type cord, marked with a minimum electrical rating of 13 amps, and be no longer than 10 feet.
- The extension cord should be arranged so that it will not drape over the countertop or tabletop where it can be pulled on by children or tripped over unintentionally.
- Connect the power cord to a 120VAC electrical outlet only.
Remove the Canner Cover
- Before removing the cover, you will need to unlock the green latch. Begin by positioning the canner so the digital display faces you.
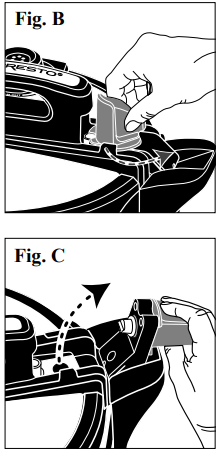
- To unlock the latch, grasp the sides of the latch and turn it towards you until it stops (Fig. B).
Lift the temperature sensor arm out of the sensor hole in the cover (Fig. C).
Once you have released the temperature sensor arm from the cover, rotate the cover counterclockwise until the INSTALL/REMOVE vertical mark is within the mark on the canner body (Fig. D). Then lift the cover straight up off the canner body.

Disassemble Canner Parts for Cleaning
It is recommended that the canner be thoroughly washed before first use to remove any manufacturing residue that may remain.
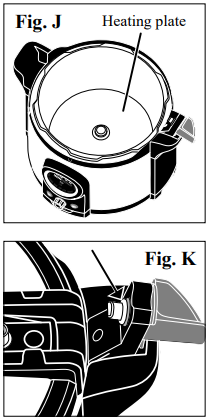
- Lift the canning rack and removable pot out of the canner body. Remove the protective liner on the heating plate (Fig. J, page 6).
Invert the cover and pull the sealing ring frame out from the cover (Fig. E). Then remove the vent filter for cleaning. To remove, place the inverted cover on the counter, then rest a table knife on the rim of the cover and insert the knife tip into one of the filter slots (Fig. F); gently lift the filter up.
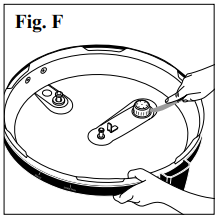
Note: Although you will not need to remove the filter after every use, you should periodically remove it for cleaning if it appears dirty or contains debris.
- Remove the sealing ring from the sealing ring frame. Wash the sealing ring, sealing ring frame, vent filter, cooking rack, and removable pot in warm, soapy water. Rinse and dry thoroughly. Only the removable pot is dishwasher safe.
- Clean the canner cover with a damp, soapy cloth. Do not immerse the canner cover in water.
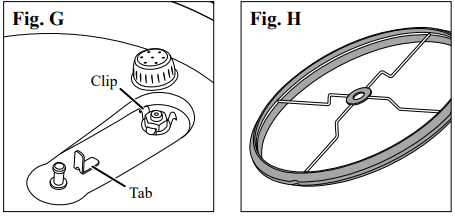
CAUTION! To prevent electrical shock, never pour water into the canner body or immerse it or the power cord in water. Always be sure the removable pot is completely dry before placing it back in the canner body. - After cleaning, reassemble the cover. When reattaching the vent filter, be sure to place it over all three clips (Fig. G). Then push it in place. You will hear a snap when it is in the proper position. It should fit tightly.
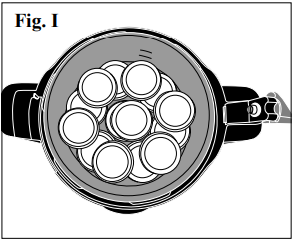
- Place the sealing ring back onto the sealing ring frame, making sure the sealing ring is positioned correctly on the metal frame; the circular frame must be completely inserted in the inner sealing ring groove (Fig. H). If any portion of the frame is outside the inner groove, the pressure canner may not seal.
Reattach the frame to the cover by fitting the grommet over the cover post (Fig. E) and rotate the frame so the bars do not interfere with the positioning tab (Fig. G). Then push the frame down until it is securely positioned in the cover.
Minimum Jar Capacity: When pressure canning, use at least 2 quarts, 4 pints, or 8 half-pints.
Maximum Mason Jar Capacity
| Jar Type | Pressure Canning Regular Mouth | Pressure Canning Wide Mouth | Boiling Water Canning Regular Mouth | Boiling Water Canning Wide Mouth |
|---|---|---|---|---|
| Half-Pints | 10 | 14* | 10 | 7 |
| Pints | 8 | 7 | 8 | 7 |
| Quarts | 5 | 4 | n/a | n/a |
It will be necessary to double-deck half-pint jars to achieve maximum jar capacity. Stagger the jars by placing one jar on top of two. Jars may touch. Only pints and half-pints can be processed using the boiling water method. The Presto Precise® Digital Canner is not tall enough to accommodate quart jars covered with the recommended 1-inch layer of water.
Canning Basics
The key to successful canning is to understand the acidity and spoilage factor of the food you wish to can, as well as the acceptable canning methods to process those foods. There are invisible microorganisms present all around us. Fruits, vegetables, and meat contain these microorganisms naturally and yet they are not a problem unless food is left to sit for extended periods of time, causing food spoilage. This is nature’s way of telling us when food is no longer fit to eat.
There are four basic agents of food spoilage: enzymes, mold, yeast, and bacteria. Canning interrupts the natural spoilage cycle so food can be preserved safely. Molds, yeast, and enzymes are destroyed at temperatures below 212°F, the temperature at which water boils (except in mountainous regions). Therefore, boiling water processing is sufficient to destroy those agents. Foods naturally high in acid and acidified foods having a pH of 4.6 or less may be safely processed using the boiling water method. Step-by-step instructions for Boiling Water Canning begin on page 15.
Bacteria, however, are not as easily destroyed. The bacteria Clostridium botulinum produces a spore that makes a poisonous toxin which causes botulism. This spore is not destroyed at 212°F. In addition, the bacteria thrive on low-acid foods in the absence of air. According to the United States Department of Agriculture (USDA), pressure canning is the only safe method of processing low-acid foods (vegetables, meats, poultry, fish, and seafood). In pressure canning, some of the water in the canner is converted to steam, which creates pressure. This pressure is what allows the canner to reach temperatures above boiling. At 240°F, this pressurized heat destroys the potentially harmful bacterial spores. Step-by-step instructions for Pressure Canning begin on page 6.
As jars cool after processing (by either the boiling water or pressure canning method), a vacuum is formed, sealing food within and preventing any new microorganisms from entering and spoiling the foods.
Before Beginning
Selecting a recipe
To produce home canned food that is safe for storage at room temperature, it is necessary to use a tested canning recipe. Recipes that have been handed down through the years or those found on the web are oftentimes unreliable and usually do not include scientifically tested processing procedures that are vital to a successful and safe canning project. Canning information published prior to 1994 may be incorrect and could pose a serious health risk. A tested canning recipe has been evaluated to determine the accurate processing method (boiling water canning or pressure canning) as well as the processing time. Always choose recipes from a reliable resource, such as the National Center for Home Food Preservation (nchfp.uga.edu), your local Cooperative Extension Service, or this instruction book.
Selecting Jars
Glass home canning jars, sometimes referred to as Mason jars, are made of heat-tempered glass for durability and reuse. These are the only jars recommended for safe home canning. They are available in standard sizes (half-pint, pint, and quart jars) and will withstand the heat of a pressure canner. The diameter of Mason jars may vary from one manufacturer to another. Before filling Mason jars, test load your canner. It may be necessary to double-deck half-pint jars to reach the maximum capacity of your canner, as indicated in the chart above. To double-deck, stagger the jars by placing one jar on top of two (Fig. I). Jars may touch.
The canning rack which accompanied your canner must be placed on the bottom of the canner to prevent jar breakage. Although it is not necessary to use a rack between layers of jars, if you wish to do so, a rack can be ordered from the Presto Consumer Service Department.
Canning Lids and Bands
The two-piece vacuum cap (lid and band) is the recommended closure for home canning. It consists of a flat metal lid with a sealing compound on the outer edge and a separate metal screw band that secures the lid during processing. The flat lid is for one use only while the bands can be used repeatedly if they remain in good condition. Do not use dented or rusty bands. Use only jars, lids, and screw bands in perfect condition so an airtight seal may be obtained.
Measuring Headspace
Headspace is the air space between the top of the food or its liquid and the lid. Leaving too much headspace can result in under processing because it may take too long to release the air from the jar. Leaving too little headspace will trap food between the jar and the lid and may result in an inadequate seal. As a general rule, allow ½-inch headspace for fruits and tomatoes and 1-inch for vegetables, meats, poultry, and seafood. All recipes will indicate the amount of headspace necessary for the food being canned.
Removing Air Bubbles
After food has been packed in jars, any air bubbles must be removed. Trapped air bubbles may rise to the top during processing, causing too much headspace. Work quickly to remove air bubbles that have become trapped between the pieces of food by moving a clean, nonmetallic spatula around the jar between the food and side of the jar.
Preparing Jar Rims and Adjusting Lids
Immediately wipe jar rims with a clean, damp cloth to remove any residue. Any food particles, such as seeds, grease, or syrup, on the rim of the jar may prevent the jar from sealing. Place flat lid on rim of jar, making sure sealing compound is touching glass. Position a band over the lid and, using fingertips, screw onto the jar just until resistance is met. Do not overtighten as air must release from the jars during processing and cooling.
Other Special Canning Tips
To prevent water stains on jars, add 2 tablespoons white vinegar to water in canner.
After Processing
Cooling Jars
After processing, remove jars to a dry towel on countertop away from drafts. Leave 1–2 inches of space between jars to allow for even cooling. Do not retighten bands. Do not invert jars or cover with a cloth. Allow jars to cool naturally. Check seals no earlier than 12 hours, but no later than 24 hours. Bubbles often appear in the jar after removal from the canner because food is still boiling in the jar. Ordinarily bubbles do not appear once the product has been allowed to thoroughly cool.
Testing Seals and Storing Canned Food
After jars have cooled a minimum of 12 hours, but no more than 24 hours, test the jar lids to be sure a vacuum seal has formed. Press down on the center of the flat lid to determine if it is concave (stays down when pressed). Remove the screw band and gently try to lift the lid with your fingertips. If the center does not flex up and down and you cannot lift the lid off, the lid has a good seal. Wipe off any food residue from jars and lids. Date and label jars. Store in a cool, dark, and dry place.
If a jar does not seal, the food can be refrigerated and used within two to three days. Other options include freezing the food or reprocessing for the full amount of time per the canning recipe. If choosing to reprocess, remove the lids and reheat the food and/or liquid. Pack food into clean, heated jars. Remove air bubbles and clean jar rims. Position new lids on jars and secure with bands. If more than 24 hours have elapsed since the canner registered DONE and the seal is faulty, the food is not safe. Discard at once.
Detecting Spoilage
If up-to-date instructions and processing times and pressures are followed carefully, spoilage is uncommon. However, it is still recommended to check for signs of spoilage before tasting any canned food. Check for a broken seal, gassiness when opening, mold, sliminess, cloudiness, or unpleasant odors. If any of these signs are present, discard the food.
As a safeguard against using canned low-acid and tomato products which may be affected with spoilage that is not readily detected, boil food 10 minutes for altitudes up to 1,000 feet above sea level. Extend the boiling time by 1 minute for each 1,000 foot increase in altitude. Many times odors that cannot be detected in the cold product will become evident by this method. After boiling, if food does not smell or look right, discard it without tasting.
Preparation Steps Before Canning
In order for the unit to function properly, always follow these instructions before each use:
- Place the electric canner on a dry, level surface. To avoid steam damage to cabinets, position it so the vent pipe and air vent/cover lock are not directly under cabinets.
WARNING! A fully loaded canner can weigh in excess of 42 pounds. To avoid damage to the counter, always place the canner on a surface that supports the weight of a fully loaded canner, such as the center of a kitchen counter or table. DO NOT place a canner near the edge of a surface or on an overhang. - Be sure the bottom of the removable pot and the heating plate within the canner body (Fig. J) are free of debris before placing the removable pot in the canner body.
CAUTION! To prevent electrical shock, never use the unit without the removable pot. Also, be sure the outside of the removable pot is completely dry before placing it into the canner body. - Check both the vent pipe and vent filter to be sure they are clear and do not contain any debris. In order to check the vent pipe, you will need to remove the regulator from the cover (Fig. A, page 2). Then hold the cover up to the light and make sure you can see light coming through the vent pipe. If you cannot, remove the sealing ring frame and vent filter (page 3) and clean the vent pipe with a small brush or pipe cleaner to remove the blockage. Reattach the sealing ring frame to the cover.
- Always verify that the sealing ring frame is attached to the canner cover before canning and make sure the sealing ring is positioned correctly on the metal frame (Fig. H,).
Always make sure the gasket is positioned on the sensor (Fig. K).
- Check Mason jars for nicks, cracks, and sharp edges. Check screw bands for dents or rust. Use only jars, lids, and screw bands in perfect condition so an airtight seal may be obtained.
- Wash and rinse the jars, lids, and screw bands. Follow the closure manufacturer’s directions for preparing the lids.
Pressure Canning
Getting Ready
- Complete the preparation steps starting on page 5. Select an approved canning recipe (pages 8–15) and gather needed supplies.
- Begin preparing the food that will be used for filling the jars in step 11.
Note: Any food that is described in a recipe as “Hot Pack” should be freshly prepared or, if made in advance, it should be reheated as instructed in the recipe. - Place the removable pot in the canner body. Put the canning rack in the removable pot.
Note: Jars will be placed on the rack in step 7. If set directly on the bottom of the removable pot, jars may break. Pour water into the removable pot up to the bottom fill line (Fig. A, page 2).
Tips: Use hot tap water to shorten the time to heat the water. To prevent water stains on jars, add 2 tablespoons of white vinegar to the water in the canner.
Note: 3 quarts of water are needed regardless of how many jars are being canned.
Attach the power cord to the canner body, making sure to fully insert it in the receptacle. Then plug into a 120VAC wall outlet. The default icon PRESSURE CAN will flash in the display window (Fig. L).
Press the control knob to select the pressure can mode; the default time 0I0 (10 minutes) will light up. The PRESSURE CAN icon will remain illuminated for the duration of the canning process.Rotate the knob to adjust the time for the specific canning recipe and jar size being used. The time adjusts in 5-minute increments up to 180 minutes.
Important: Verify you have set the right program and time.
Note: If the BOILING WATER CAN program is accidentally selected, or the wrong time is entered, press and hold for 3 seconds. The PRESSURE CAN icon will flash. Press the control knob and repeat step 6.Jar Warming
Press . INSERT JARS will light up. Fill the jars half full with water and place them on the canner rack.
Tip: Use hot tap water to speed the warming process.
Remove the regulator by pulling it firmly from the canner cover. It will not be needed until step 14 of the venting phase.
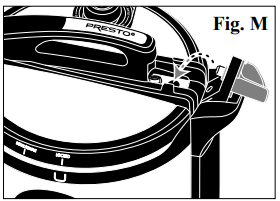
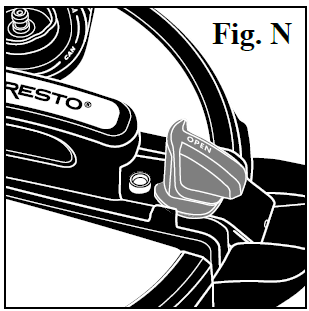
Place the cover on the body, aligning the INSTALL/REMOVE vertical mark on the cover within the mark on the body (Fig. D, page 3). Rotate the cover clockwise until it stops. The canner cover is properly installed when the LOCKED vertical mark is within the mark on the canner body (Fig. M). Lock the cover on by first lowering the temperature sensor arm and inserting the sensor into its hole in the cover (Fig. M, page 6). It may be necessary to rotate the cover slightly so the hole aligns with the sensor. Then, grasp the green latch and, using a slight downward pressure, turn the latch clockwise until it is aligned with the handle (Fig. N).
Press . WARM will light up and the progress bar will begin scrolling from left to right, indicating the unit is heating. Jar warming will take about 20 minutes. During this time, complete any necessary food preparation.
Fill Jars
When the canner beeps twice and FILL JARS lights up, the jars are preheated and ready for filling. The canner will continue to keep the jars warm until you are ready to fill them. Unlock the green latch and lift the sensor arm. Then unlock and remove the canner cover. Lift the cover toward you to keep any steam away from you.
Remove one jar at a time from the canner; discard the water from the jar and then immediately fill it with food and liquid, according to the specific recipe. Remove air bubbles by moving a clean, nonmetallic spatula around the jar. Clean jar rim with a damp cloth. Center flat lid on rim of jar, making sure sealing compound is touching glass.
Position a band over the lid and, using fingertips, screw onto the jar just until resistance is met. Do not overtighten as air must release from the jars during processing and cooling. Place the jar on the canning rack promptly after filling. Repeat this procedure for each jar.Venting
- Place the cover back on the canner and lock it on. Lower the sensor arm and turn the green latch clockwise, following the instructions in step 9, page 6. Important: Confirm the regulator is not on the cover. Press and HEAT will light up.
- Once the proper temperature is reached, the canner will proceed to the vent phase; VENT and 0I0 will light up. The venting timer will begin counting down. During venting, air/steam will release from the vent pipe and air vent/cover lock. This will be noticeable.
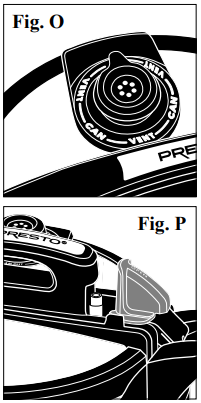
Throughout the venting and canning phases you will hear boiling. Depending on the number and size of the jars, the air vent/cover lock may lift during venting. The smaller the load, the more likely the air vent/cover lock will lift. When the time expires, the unit will start beeping and PUT REGULATOR ON will light up. Using a pot holder or silicone cooking glove, place the regulator on the vent pipe and push it down to snap it in place. Point the regulator lever to any of the CAN positions (Fig. O). Press to advance to the canning phase. The beeping will stop. If the air vent/cover lock did not lift during venting, air/steam will continue to release from the air vent/cover lock until it lifts (Fig. P).
Canning
- CAN will light up and the processing time programmed in step 6 will appear in the display. The progress bar will continue to scroll as the canner heats.
Once the required canning temperature is reached, the unit will beep twice and CANNING will light up. The canner is now processing and the timer will start to count down. The progress bar will stop scrolling and begin to light up in segments, increasing in length as the processing time counts down (e.g., if 15 minutes of a 20 minute processing time have elapsed, 75% of the bars will be illuminated).
Cooling
When the processing time expires, the canner will beep 4 times and COOL will light up. This is the final canning phase. The length of the cool-down period will depend on the canner load and may take about 1½ hours. 0I0 will light up in the display and the unit will start to count down. The progress bar will scroll from right to left to indicate the unit is cooling.
Done
- When the time expires, the unit will beep 10 times and DONE will light up. Press and hold for 3 seconds. If the air vent/cover lock remains in the up position when the display indicates DONE, wait for it to drop. Unlock the green latch and lift the sensor arm. Then unlock and remove the canner cover. Lift the cover toward you to keep any steam away from you.
- Using a jar lifter, remove jars by lifting them straight up. Be careful not to tilt the jars, which causes liquid to siphon out. Place jars upright on a board or dry towel, away from drafts. Do not retighten bands. Allow jars to cool naturally. Check seals no earlier than 12 hours, but no later than 24 hours. See page 5 for “After Processing” information.
- NOTICE: When processing consecutive batches, before warming the next batch of jars, allow the water in the canner to cool or replace with fresh water. Placing jars in hot water may cause the jars to break. If reusing the water, check the water level in the canner. Add water, if necessary, to keep water at the 3-quart mark (Fig. A, page 2).
- To can additional jars, repeat steps 6–19.
- When canning is complete, unplug the cord from the wall outlet and then from the canner base. Allow canner to cool completely, pour out water from removable pot, and clean according to the instructions on page 24.
Pressure Canning Tomatoes and Tomato Products
Tomatoes and tomato products may be safely processed using the pressure canning method (instructions start below) or boiling water method (instructions start on page 15). However, the pressure canning method may result in a more nutritious canned product for some tomato products.
Acidifying Tomatoes and Tomato Products
Tomatoes have a pH close to 4.6, which means it is necessary to take precautions to can them safely. First, carefully choose the tomatoes for canning. Use only tomatoes that are disease-free, preferably vine-ripened, and firm. Second, an acid must be added to tomatoes whether they are processed using the boiling water method or pressure canning method. To ensure the safety of whole, crushed, or juiced tomatoes, add 1 tablespoon bottled lemon juice (not natural juice) or ¼ teaspoon citric acid per pint jar; for quarts, add 2 tablespoons bottled lemon juice or ½ teaspoon citric acid.
Salt
Tomatoes and tomato products may be canned with or without salt. Salt is used only for flavor, as it is not used in a large enough quantity to prevent spoilage. If using salt, use only canning or pickling salt. Table salt contains anti-caking agents that may cause cloudiness in the liquid inside the jars. The recommended amount of salt is ½ teaspoon for each pint jar, 1 teaspoon for each quart jar.
Canning Recipes: Tomatoes
Tomatoes, whole or halved (packed in water) Wash smooth, firm, ripe tomatoes. Loosen skins by dipping tomatoes 1 minute in boiling water, then in cold water. Peel and remove core. Leave whole or halve, or, if using large tomatoes, quarter.
- Hot Pack: Place prepared tomatoes in a large pot and add just enough water to cover them. Bring to a boil and boil gently for 5 minutes. Add bottled lemon juice or citric acid to hot jars (see above). Add salt if using (see above). Pack hot tomatoes in hot jars, leaving ½-inch headspace. Fill jars with hot cooking liquid, leaving ½-inch headspace. Remove air bubbles. Clean jar rims. Position lids and secure with bands.
- Raw Pack: Add bottled lemon juice or citric acid to hot jars (see above). Add salt if using (see above). Pack prepared tomatoes in hot jars, leaving ½-inch headspace. Fill hot jars with boiling water, leaving ½-inch headspace. Remove air bubbles. Clean jar rims. Position lids and secure with bands.
Pressure canning: Process pints and quarts 10 minutes.
Tomatoes, whole or halved (packed raw without added liquid)
Wash smooth, firm, ripe tomatoes. Loosen skins by dipping tomatoes 1 minute in boiling water, then in cold water. Peel and remove core. Leave whole or halve. Add bottled lemon juice or citric acid to hot jars (see above). Add salt if using (see above). Fill jars
with raw tomatoes, pressing until spaces between them fill with juice. Leave ½-inch headspace. Remove air bubbles. Clean jar rims. Position lids and secure with bands.
Pressure canning: Process pints and quarts 25 minutes.
Presto Precise 12-Quart Pressure Canner Tomato Juice
- Wash ripe, juicy tomatoes. Remove stem ends. To prevent juice from separating, quickly cut about 1 pound of tomatoes into quarters and put directly into a large pot. Heat immediately to boiling while crushing. Continue to slowly add and crush freshly cut tomato quarters to the boiling mixture. Make sure the mixture boils constantly and vigorously while adding more tomatoes. Continue until the pot is three-quarters full. Simmer 5 minutes.
- If juice separation is not a concern, simply slice or quarter tomatoes into a large pot. Crush, heat, and simmer for 5 minutes before juicing.
- Press heated juice through a sieve or food mill to remove skins and seeds. Heat juice again to boiling.
- Add bottled lemon juice or citric acid to hot jars (see above). Add salt if using (see above). Fill hot jars with hot tomato juice, leaving ½-inch headspace. Remove air bubbles. Clean jar rims. Position lids and secure with bands.
Pressure canning: Process pints and quarts 15 minutes.
Boiling Water Canning
Your canner is designed for use as a boiling water canner to process half-pint and pint jars only. Do not use it for quart jars.
Getting Ready
- Complete the steps on pages 5–6. Select canning recipe (pages 17–21) and gather needed supplies.
- Begin preparing the food that will be used for filling the jars in step 12.
Note: Any food that is described in a recipe as “Hot Pack” should be freshly prepared or, if made in advance, reheated as instructed in the canning recipe. - Place the removable pot in the canner body. Put the canning rack in the removable pot.
Note: Jars will be placed on the rack in step 8. If set directly on the bottom of the removable pot, jars may break. - Pour water into the removable pot up to the bottom fill line (Fig. A, page 2).
- Tips: Use hot tap water to shorten the time to heat the water. To prevent water stains on jars, add 2 tablespoons of white vinegar to the water in the canner.
- Attach the power cord to the canner body, making sure to fully insert it in the receptacle. Then plug into a 120VAC wall outlet. The default icon PRESSURE CAN will flash in the display window.
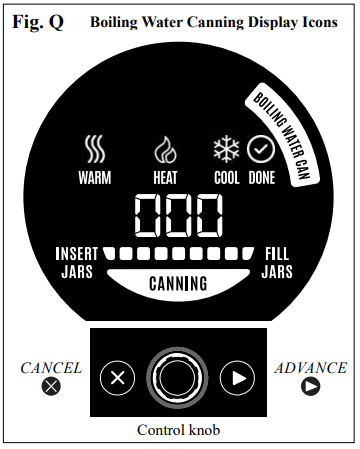
Slowly rotate the control knob until BOILING WATER CAN flashes in the display (Fig. Q). Press the control knob to select the BOILING WATER CAN mode; the default time 005 (5 minutes) will light up. The BOILING WATER CAN icon will remain illuminated for the duration of the canning process.
Rotate the knob to adjust the time for the specific boiling water canning recipe and jar size being used. The time adjusts in 5-minute increments up to 120 minutes.
Important: Verify you have set the right program and time. Make sure you have increased the processing time if you live at an altitude above 1,000 feet.
Note: If the PRESSURE CAN program is accidentally selected or the wrong time is entered, press and hold for 3 seconds. Then repeat steps 6 and 7.Jar Warming
- Press . INSERT JARS will light up. Fill the jars to be canned half full with water and place the jars on the canner rack.
Tip: Use hot tap water to speed the warming process. - Remove the regulator by pulling it firmly from the canner cover. Never use the regulator for boiling water canning.
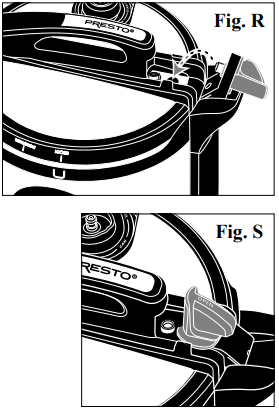
Place the cover on the body, aligning the INSTALL/REMOVE vertical mark on the cover within the mark on the body (Fig. D, page 3). Rotate the cover clockwise until it stops. The canner cover is properly installed when the LOCKED vertical mark is within the mark on the canner body (Fig. R). Lock the cover on by first lowering the temperature sensor arm and inserting the sensor into its hole in the cover (Fig. R). It may be necessary to rotate the cover slightly so the hole aligns with the sensor. Then, grasp the green latch and, using a slight downward pressure, turn the latch clockwise until it is aligned with the handle (Fig. S).
Press . WARM will light up and the progress bar will begin scrolling from left to right, indicating the canner is heating. Jar warming will take about 20 minutes. During this time, complete any necessary food preparation and heat at least 3 quarts of water to boiling in a large kettle for use in step 13. More water will be needed if canner is not filled to jar capacity.
Fill Jars
- When the canner beeps twice and FILL JARS lights up, the jars are preheated and ready for filling. The canner will continue to keep the jars warm until you are ready to fill them. Unlock the green latch and lift the sensor arm. Then unlock and remove the canner cover. Lift the cover toward you to keep any steam away from you.
Remove one jar at a time from the canner; discard the water from the jar and then immediately fill it with food and liquid, according to the specific recipe. Remove air bubbles by moving a clean, nonmetallic spatula around the jar. Clean jar rim with a damp cloth. Center flat lid on rim of jar, making sure sealing compound is touching glass. Position a band over the lid and, using fingertips, screw onto the jar just until resistance is met. Do not overtighten as air must release from the jars during processing and cooling. Place the jar on the canning rack promptly after filling. Repeat this procedure for each jar. - Pour the additional boiling water heated up in step 11 around the jars in the removable pot so the water level is at least 1 inch above the jars.
Place the cover back on the canner and lock it on. Lower the sensor arm and turn the green latch clockwise, following the instructions in step 10. Important: Verify that the regulator is not on the cover.
Canning
- Press HEAT will light up and the processing time programmed in step 7 will appear in the display. The progress bar will continue to scroll as the canner heats.
Once the required canning temperature is reached, the unit will beep twice and CANNING will light up. The canner is now processing and the timer will start to count down. The progress bar will stop scrolling and begin to light up in segments, increasing in length as the processing time counts down (e.g., if 15 minutes of a 20 minute processing time have elapsed, 75% of the bars will be illuminated). During canning there will be a noticeable amount of air/steam venting from the vent pipe and air vent/cover lock. You will also hear boiling.
Cooling
When the processing time expires, the canner will beep 4 times and COOL will light up. 005 will appear in the display and the unit will begin counting down. The progress bar will scroll from right to left to indicate the unit is cooling. At this time, unlock the green latch and lift the sensor arm. Then unlock and remove the canner cover.
CAUTION! To prevent burns, carefully lift the cover toward you to keep steam and bubbling water away from you.Done
- When the time expires, the unit will beep 10 times and DONE will light up. Press and hold for 3 seconds.
Using a jar lifter, remove jars by lifting them straight up. Be careful not to tilt the jars, which causes liquid to siphon out. Place jars upright on a board or dry towel, away from drafts. Do not retighten bands. Allow jars to cool naturally. Check seals no earlier than 12 hours, but no later than 24 hours. See page 5 for “After Processing” information. - NOTICE: When processing consecutive batches, before warming the next batch of jars, allow the water in the canner to cool or replace with fresh water. Placing jars in hot water may cause the jars to break. If reusing the water, check the water level in the canner. Remove water in excess of the 3 quarts (Fig. A, page 2) to a large kettle. Use this water to cover the filled jars.
- To can additional jars, repeat steps 6–19.
- When canning is complete, unplug the cord from the wall outlet and then from the canner base. Allow canner to cool completely,
Altitude Adjustments
When using the canner for boiling water canning at altitudes of 1,000 feet or below, process according to the specific recipe. When canning at higher altitudes, process according to the following chart.
Altitude chart Boiling Water canning
| Altitude Range | Additional Processing Time |
|---|---|
| 1,001–3,000 ft. | 5 minutes |
| 3,001–6,000 ft. | 10 minutes |
| 6,001–8,000 ft. | 15 minutes |
Boiling Water Canning Fruits
Your canner is designed for use as a boiling water canner to process half-pint and pint jars only. Do not use it for quart jars. Select firm, fully-ripened but not soft fruit. Do not can overripe foods.
Maintaining Color
Some fruits (apples, apricots, nectarines, peaches, and pears) tend to darken while they are being prepared. To prevent darkening, place fruit in a solution of 3 grams (3,000 milligrams) ascorbic acid to 1 gallon of cold water. Ascorbic acid is available in different forms: Pure Powdered Form: Use 1 teaspoon of pure powder, which weighs about 3 grams, per gallon of water.
Vitamin C Tablets: Buy 500 milligram tablets. Crush and dissolve 6 tablets per gallon of water.
Commercially Prepared Mixes of Ascorbic and Citric Acid: Available under different brand names. Use according to manufacturer’s directions found on the package.
Canning Liquids
Although fruit has better color, shape, and flavor when it is canned with syrup, it may be canned in juices (such as apple, white grape, or pineapple) or water. White sugar is preferable to brown sugar for canning. Light corn syrup or honey may be used to replace up to one-half the sugar.
If you wish to use sugar substitutes, follow the package instructions. The amount of sugar desirable to use in preparing syrups will depend upon the tartness of the fruit and on family preference. It should be remembered that fruit, when heated, releases some of its juices which will dilute the syrup in proportion to the juiciness of the fruit.
Use the syrup chart as a guideline for preparing the syrup needed for your canning recipe. Syrup recipe may be doubled or tripled depending on the packing method and amount of fruit being canned at one time.
Syrups for Canning Fruits
Combine sugar and water in a large pot. Bring to a boil and keep syrup hot while preparing fruit. Use as directed in recipe.
| Syrup Type | Sugar | Water | Yield |
|---|---|---|---|
| Very Light | ½ cup | 4 cups | 4½ cups |
| Light | 1 cup | 4 cups | 4¾ cups |
| Medium | 1¾ cups | 4 cups | 5 cups |
| Heavy | 2¾ cups | 4 cups | 5⅓ cups |
Canning Recipes: Fruits
Apples
Wash, peel, and core apples. Cut into ½-inch slices. Place apples in an ascorbic acid solution (see above) to prevent darkening during preparation. Drain well.
Hot Pack: Add apples and syrup (see above), juice, or water to a large pot and bring to a boil. Boil for 5 minutes, stirring occasionally to prevent scorching. Pack hot apples in hot jars, leaving ½-inch headspace. Cover apples with hot syrup, juice, or water, leaving ½-inch headspace. Remove air bubbles. Clean jar rims. Position lids and secure with bands.
Boiling water canning: Process pints 20 minutes. For processing above 1,000 feet altitude, see above for recommended time.
Applesauce
Wash, peel, core, and slice apples. If preferred, place apple slices into ascorbic acid solution (see above) to prevent darkening. Drain well. Place slices in a large pot. Add ½ cup water. Heat quickly until apples are tender, stirring occasionally to prevent scorching. Press through food mill or sieve; if chunk style sauce is preferred, omit this step. If preferred, sweeten to taste. Reheat sauce to boiling. Pack into hot jars, leaving ½-inch headspace. Remove air bubbles. Clean jar rims. Position lids and secure with bands.
Boiling water canning: Process pints 15 minutes. For processing above 1,000 feet altitude, see above for recommended time.
Issues with Canned Food
- Jar breakage during processing is caused by: (1) packing jar too solidly or overfilling; (2) weakened, nicked, or chipped jars; (3) jars touching bottom of canner; (4) failure to tighten screw bands according to manufacturer’s directions; or (5) use of jars other than Mason jars.
- Liquid lost from jars during processing is caused by: (1) packing jar too solidly or overfilling or (2) failure to tighten screw bands according to manufacturer’s directions. If liquid is lost during processing, do not open jar to replace liquid. Loss of liquid will not cause spoilage, but food above the liquid will discolor. If at least half of the liquid is gone, place the jar in the refrigerator and use the food within 2–3 days.
- Flat sour, a type of food spoilage, is caused by canning overripe food or allowing precooked foods to stand in jar too long before processing. It may be prevented by using fresh products and properly processing, cooling, and storing. Flat sour shows no indication of spoilage until jar is opened. Discard contents.
- Food spoilage or jars not sealing is caused by: (1) failure to follow exact time-tables and recipes; (2) failure to wipe sealing edge of jar clean before placing lid on jar; (3) foods, seeds, or grease lodged between lid and jar; (4) jars which are nicked, cracked, or have sharp sealing edges; (5) failure to tighten screw bands according to manufacturer’s directions; or (6) turning jars upside down while jars are cooling and sealing.
- If a jar does not seal by the time it is completely cool, and a minimum of 12 but no more than 24 hours have elapsed after canning, the food can be refrigerated and used within three days. Other options include freezing the food or reprocessing for the full amount of time per the canning recipe. If choosing to reprocess, remove the lids and reheat the food and/or liquid. Pack food into clean, heated jars. Remove air bubbles and clean jar rims. Position new lids on jars and secure with bands. If more than 24 hours have elapsed since the canner registered DONE and the seal is faulty, the food is no longer safe. Discard at once. Additionally, if or E3 appear during pressure canning, the food can be saved by refrigerating, freezing, or reprocessing.
- Mold can form only in the presence of air. Therefore, jars are not sealed if mold is present. Discard contents.
- The black deposit sometimes found on the underside of a lid is caused by tannins in the food or hydrogen sulfide which is liberated from the food by the heat of processing. This does not indicate spoilage.
- The loss of color from beets during canning is usually due to the variety of beets used. Two varieties that retain color well are Ruby Queen and Detroit Red. To reduce bleeding of color, precook beets with entire root and 1–2 inches of stem. Remove stem and root after precooking.
Presto Precise 12-Quart Pressure Canner Cleaning
After every use
- After the canner has cooled completely, remove the regulator from the vent pipe. Detach the sealing ring frame from the cover (Fig. E, page 3) and then the sealing ring from the frame. Do not remove the center grommet on the sealing ring frame. Thoroughly dry the sealing ring, the sealing frame, and the inside of the cover. If the vent filter appears dirty or contains debris, remove it from the underside of the cover, following the instructions on page 3. Wash it in warm, soapy water. If necessary, wipe the outside of the canner cover with a damp cloth and then dry completely. Do not immerse the canner cover in water or wash it or its parts in the dishwasher.
- To be sure the vent pipe is clear, hold the cover up to the light and look through the vent pipe. Clean it with a small brush or pipe cleaner if it is blocked or partially blocked. If necessary, clean the vent filter with a small brush to remove any food particles from the slots and holes. Rinse and dry all parts thoroughly and reassemble.
- Wash the canning rack in warm, soapy water. Do not wash in the dishwasher.
- Wash the removable pot in the dishwasher or in warm water and a mild detergent. Rinse and dry thoroughly.
CAUTION! To prevent electrical shock and damage to the canner, never pour water into the canner body or immerse it or the power cord in water. Always be sure the removable pot is completely dry before placing it back in the canner body.
As needed
- Remove the air vent/cover lock for cleaning. Place your finger over the top of the air vent/cover lock on the cover (Fig. T) and remove the gasket from the underside of the cover (Fig. U). Push the air vent/cover lock through the top of the cover. Wash both pieces in warm, soapy water. The metal shaft may be cleaned with a nylon mesh pad. Clean the cover hole with a small brush. After cleaning, reinsert the metal shaft from the top side of the cover down through the cover hole. Place a finger over the top of the air vent/cover lock and push the gasket onto the end of the metal shaft, fitting it into the groove.
- Gently clean the sensor, the sensor arm, and the plastic rim of the canner body with a damp cloth. Avoid getting water inside the canner body. Carefully remove the gasket on the sensor (Fig. V) and wash it in warm, soapy water. Clean the sensor with a damp cloth and place the gasket back on it.
- Wipe the outside of the canner body with a damp cloth.
Care and Maintenance
- When not in use, store your electric canner in a dry place. To prevent unpleasant odors from lingering, store the unit with the cover inverted on the canner body.
- Do not use metal utensils as they may scratch the nonstick surface.
- Do not strike the rim of the removable pot with any utensil. This could damage the rim which may allow steam to escape and prevent the canner from sealing.
- The sealing ring and gasket for the air vent/cover lock may shrink, become hard, deformed, cracked, or torn with normal use. When this happens, replace the sealing ring and/or the air vent/cover lock gasket. This is routine replacement and not covered under the warranty.
- Leakage between the cover and canner body is usually caused by deterioration of the sealing ring after prolonged use.
- Periodically check the vent pipe nut for looseness. If necessary, retighten with a ½ʺ wrench.
- Any maintenance required for this product, other than normal household care and cleaning, should be performed by the Presto Factory Service Department.
Troubleshooting
Error Codes
The pressure canner is programmed to display error codes in the event of a product malfunction or error in the processing procedure. See the following chart for explanation and remedies.
| Error Code | Description | Cause | Solution |
|---|---|---|---|
| E1, E2, E4, E5 | Canner has become damaged, been tampered with, or is defective. | Unplug canner and call Consumer Service Department (refer to page 26). | Unplug canner and contact Consumer Service as indicated on page 26 for further assistance. |
| E3 | Can appear in any phase of Pressure and Boiling Water Canning. Canner is overheated due to insufficient or no liquid. | • Unplug canner.<br>• Unlock and remove cover.<br>• Cool canner for 15 minutes.<br>• Add water to the 3-quart fill line.<br>• Lock on cover and plug in canner.<br>• Select program and processing time and press start.<br>• If E3 appears in Pressure Canning and the icon is lit, allow pressure to drop naturally until air vent/cover lock drops before unlocking and removing cover. Refer to page 23 for additional information. | |
| E10 | Can appear only in JAR WARMING phase of Pressure and Boiling Water Canning. Canner has developed pressure during the JAR WARMING phase because the regulator was put on with its lever in the CAN position. | • Unplug canner.<br>• Turn regulator lever to VENT and allow canner to release pressure.<br>• Remove regulator.<br>• Unlock and remove cover.<br>• Cool canner for 15 minutes.<br>• Add water, as necessary.<br>• Lock on cover and plug in canner.<br>• Select program and processing time and press start. | |
| E20 | Only in Pressure Canning. Canner has developed pressure during the VENTING phase because the regulator was put on with its lever in the CAN position. | See remedy for E10. | |
| E21 | Only in Pressure Canning. The regulator was not installed after the completion of the VENTING phase. | • Unplug canner.<br>• Unlock and remove cover.<br>• Cool canner for 15 minutes.<br>• Add water, as necessary.<br>• Lock on cover and plug in canner.<br>• Select program and processing time and press start. | |
| E30 | Only in Boiling Water Canning. Canner has developed pressure because the regulator was put on with its lever in the CAN position. | • Unplug canner.<br>• Turn regulator lever to VENT and allow canner to release pressure.<br>• Remove regulator.<br>• Unlock and remove cover.<br>• Cool canner for 15 minutes.<br>• Add water, as necessary.<br>• Lock on cover and plug in canner.<br>• Select program and processing time and press start. | |
| E50 | Only in Pressure Canning. Canner has sensed a release of pressure during CANNING phase due to: removing the regulator, turning the regulator lever to VENT position, or a leaking sealing ring. | • Unplug canner.<br>• Allow canner to release pressure until air vent/cover lock drops.<br>• Remove regulator, if still present.<br>• Unlock and remove cover.<br>• Reprocess food for the full amount of time for safety. See page 23 for additional information.<br>• Replace the sealing ring if necessary before using the canner again. Refer to page 26 for replacement parts. | |
| E60 | Only in Pressure Canning. Canner has sensed a premature release of pressure during COOLING phase due to: removing the regulator, turning the regulator lever to VENT position, or a leaking sealing ring. | See remedy for E50. |
Pros & Cons
Pros
- Large 12-quart capacity
- Precise pressure control for even cooking
- Constructed of durable warp-resistant aluminum
- Deluxe pressure dial gauge for easy reading
- Extended 12-year warranty
Cons
- May be too large for some stoves
- Can be heavy to move around
Customer Reviews about Presto Precise 12-Quart Pressure Canner
Customers love the Presto Precise 12-Quart Pressure Canner Manual for its large capacity, precise pressure control, and durable construction. However, some have noted that it can be too large for some stoves and may be heavy to move around. Overall, the Presto Precise Pressure Canner Manual is a highly-rated and recommended product for home canners.
Faqs
What is the capacity of the Presto Precise 12-Quart Pressure Canner?
What is the pressure range of the Presto Precise 12-Quart Pressure Canner?
What is the warranty on the Presto Precise 12-Quart Pressure Canner?
What materials is the Presto Precise 12-Quart Pressure Canner made of?
How many jars can the Presto Precise 12-Quart Pressure Canner hold?
What is the weight of the Presto Precise 12-Quart Pressure Canner?
What is the recommended heat source for the Presto Precise 12-Quart Pressure Canner?
What gauge does the Presto Precise 12-Quart Pressure Canner come with?
What is included with the Presto Precise 12-Quart Pressure Canner?
Can the Presto Precise 12-Quart Pressure Canner be used to can low-acid foods?
Leave a Comment