Royalbaby Children Rider Bicycle RB14B-6R User Guide
Content
Introduction
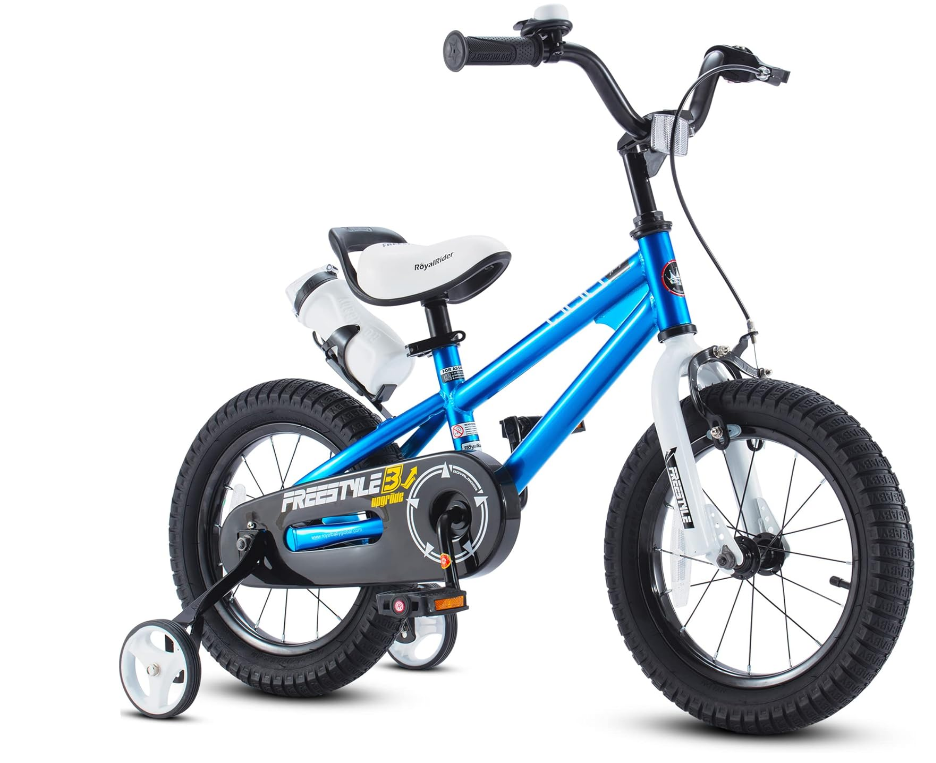
The Royalbaby Children Rider Bicycle RB14B-6R is designed specifically for young riders, combining safety and fun in a stylish package. Featuring a sturdy frame and adjustable seat, this bicycle ensures a comfortable fit as your child grows. The bike is equipped with training wheels for added stability, making it perfect for beginners. With vibrant colors and a playful design, the RB14B-6R encourages outdoor activity and adventure. This bicycle is priced at approximately $129.99.
Specifications
- Frame Material: Steel
- Wheel Size: 14 inches
- Brake System: Front and rear V-brakes
- Gears: 6-speed Shimano derailleur
- Training Wheels: Included and removable
- Seat Height Adjustment: Yes, to accommodate growing children
- Weight Capacity: Up to 70 lbs
- Color Options: Various colors such as blue, pink, red, and more
Description
The Royalbaby Children Rider Bicycle RB14B-6R boasts a robust steel frame that ensures durability and stability. The 14-inch wheels are perfect for young riders, providing a low center of gravity that helps prevent tipping. The bicycle features a 6-speed Shimano derailleur system, allowing children to learn how to shift gears as they progress in their riding skills.
The front and rear V-brakes offer reliable stopping power, and the adjustable seat height allows the bicycle to grow with the child. The training wheels can be removed as the child gains confidence, transitioning them smoothly from a beginner bike to a more advanced one.
Adjustment and Maintenance
Refer to the content of brake adjustment and maintenance in this manual and videos on brake adjustment.
Stem Assembly and Adjustment
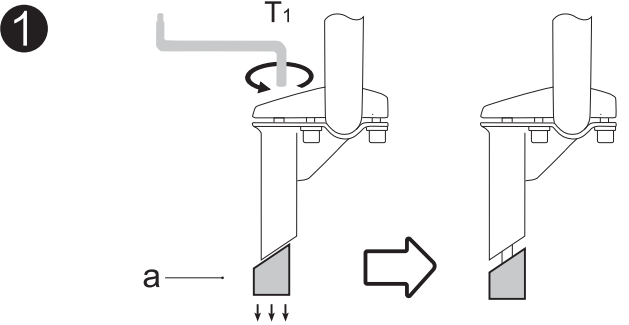
If the expander bolt cannot be screwed tightly, please take out the stem and check if the bottom wedge (a) (metal pieces of castings) falls into the head tube. If so, please tip out the wedge (a) from the head tube and then screw it to the expander bolt and insert it into the head tube again when the distance to the bevel connection of the stem is 2 3mm. Then use the spanner T1 to screw the stem tightly in a clockwise direction. The handlebar should be to be vertical with the front wheel before screwing. ( As shown in the figure 1)
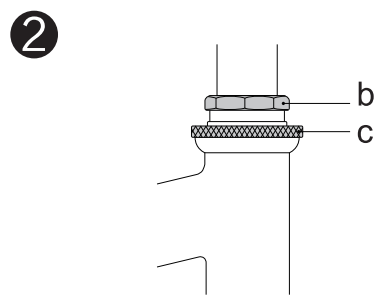
What to do if the handlebar is not flexible or too flexible when turned left and right? Unscrew the head lock nut (b) in a counter-clockwise direction by using an adjustable wrench, and slightly unscrew the top head race (c) in a counter-clockwise direction (or screw to tighten in a clockwise direction) to test the tightness when turning the handlebar. Repeat the steps if necessary until the tightness is appropriate the last step, screw the head lock nut (b) tightly. (As shown in figure 2)
Using and Adjusting the Brake
The left brake lever controls the front brake, and the rear brake is a coaster brake.
- Adjustment of V-Brake
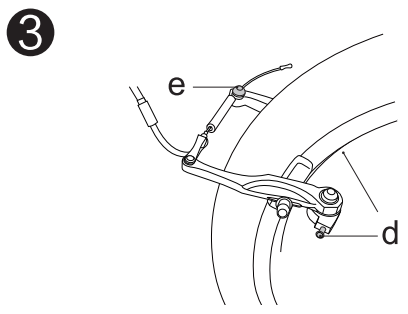
- If one side of the clearance of the brake block is smaller than that of the other side, screw in the adjustment bolt (d) or screw out the adjustment bolt (d) on the other side. Then test the brake lever to see the effect. Do the adjustment again if necessary, until the clearance of the two sides is the same and the brake works well.
If the clearance of both sides is too far or too close (should be within 1-3mm), the brake cable adjustment screw (e) should be loosened. Then use one hand to press the two brake blocks to the right position and pull the brake cable tight. Secure the brake cable adjustment screw (e). Test the brake. Do the adjustment again if necessary until the brake works well. (As shown in figure 3)
- Adjustment of Caliper Brake
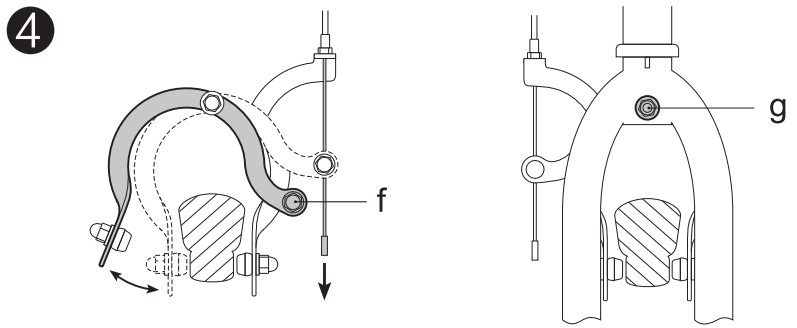
- If the clearance of both sides of the brake block is too far or too close to the rim, loosen the cable adjustment screw (f) fixing the cable end.
- Then use one hand to press the two brake blocks to the right position and pull the brake cable tight. Secure the brake cable adjustment screw (f).
- Test the brake.
- Do the adjustment again if necessary, until the brake works well.
- On the occasion that one side of the clearance of the brake block is smaller than that of the other side, tighten the brake fixing nut (g) on the rear side of the front fork below the head tube of the frame to get the brake block to the right position.
Test the brake lever to see the effect. Tighten the bolt again or slightly loosen the bolt if necessary until the clearance of the two brake blocks is the same. (As shown in figure 4)
- Adjustment of Band Brake
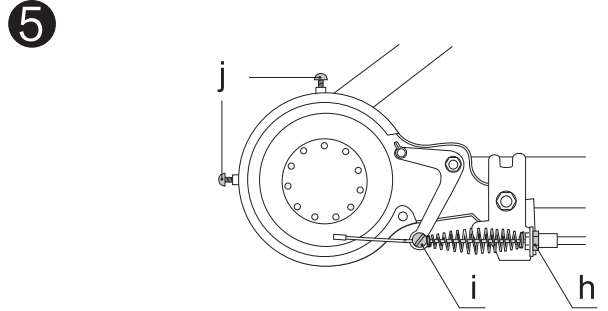
- If the rear wheel can still rotate when the brake lever is held tightly, firstly use the spanner to screw the adjusting nut (h) of the brake cable tightly, and then test the flexibility of the brake.
- If the brake is still not so flexible, use the screwdriver to loosen the cable adjustment screw (i), and then tighten the brake cable and the cable adjustment screw (i) at the same time.
- After that, release your hands and test the flexibility of the brake again. To get the optimum status, adjust it repeatedly to ensure a suitable length of the exposed brake cable.
- Since the working principle of the brake is to restrain the rotation of the wheels by drag force due to friction, the brake block may be worn out after a period of use, thus the brake would not be so flexible.
Under such conditions, adjusting nut of the brake block m should be adjusted by a screwdriver. The brake would be more flexible if you screw it more tightly. However, the brake block should not hold the brake drum when it is not braked. (As shown in figure 5)
How to Adjust Training Wheels
As shown in Figure 6)
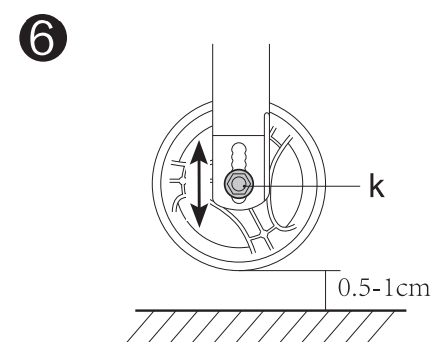
- You can adjust the position of the nut and bolt (k) which connect the training wheels and training wheel lever to an appropriate height.
- The clearance between each training wheel and the ground shall not exceed 25 mm with the bicycle supported upright on a flat horizontal surface. Low clearance between the training wheels and the ground may result in the rear wheels turning without moving forward when cycling on a rugged road or riding with low tire pressure.
Adjustment of Daraillaur
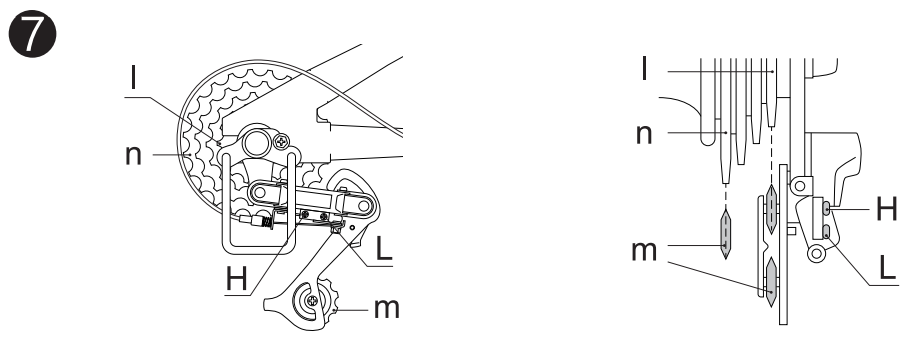
- Place the chain on the smallest sprocket (I), and adjust the High limit screw so the idler roller (m) and the smallest sprocket (I) are lined up vertically.
- Then place the chain on the largest sprocket (n), and adjust the Low limit screw until the idler roller (m) and the largest sprocket (n) are aligned vertically.
(As shown in figure 7)
Setup Guide
To assemble the Royalbaby Children Rider Bicycle RB14B-6R, follow these steps:
- Attach the front wheel and tighten the nuts securely.
- Install the handlebars and tighten the stem bolts.
- Attach the pedals and ensure they are securely tightened.
- Install the training wheels if necessary.
- Adjust the seat height to fit the child's riding position.
- Check all bolts and screws to ensure they are tightened properly before use.
Correct Method of Adjusting Chain Tension
The adjustment nut for the chain is assembled on the rear fork end, and the tension of the chain can be adjusted by loosening or tightening such nut.
Mind checking if all bolts and nuts in the bike are finally tightened regularly. You are suggested to tighten the bolts and nuts on relevant positions by torque wrench according to the torque data in the following table.
| Component | Torque (N.m) |
|---|---|
| Front wheel nuts | 22-27 |
| Rear wheel nuts | 24-29 |
| Seat binder nut | 12-17 |
| Seat pillar clamp nut | 15-19 |
| Brake anchor nut | 7-11 |
| Handle bar clamp nut | 17-19 |
| Head stem expander bolt | 10-14 |
| Crank cotter pin nuts | 9-14 |
| Brake centre bolt | 2-17 |
Special Declaration
- Please avoid riding in harsh environments and during the night. Please increase braking distance in case of rain and freezing weather.
- Please check the condition of your bike, especially for the brake, regularly.
- Figures in this manual are used to illustrate the structure of the product and its operation method. Please refer to the material object if it is not identical to the figures shown.
- This manual is for universal use, and some bikes may not have accessories such as water bottles, protection caps, baskets, etc. Please refer to the specific model.
- This bicycle cannot fit a luggage carrier or child seat.
- Friction components, such as the brake shoe and the rim, need to be replaced if overworn.
- Appropriate spares, such as tires, inner tubes, and brake friction components, should be prepared.
Royalbaby Children Rider Bicycle RB14B-6R Lubrication
| What | When | How |
Brake levers |
Every six months | Put one drop ofoll on the pivot point of each brake lever. (Lubricant: Oil) |
Caliper Brakes |
Every six months | Put one drop of oil on the pivot point of each Cilliper brake.(Lubricant: Oil) |
Brake Cables |
Every six months | Put four drops of oil into both ends of each cable. Allow the oll to soak back along the Cilblewlre. ( Lubricant: Lithium-based grease) |
Pedals |
Every six months | Put one drop of oil where the axles go into the pedals. ( Lubricant: Lithium based grease) |
Chain |
Every six months | Put one drop of oil on each roller of the chain. Wipe all excess oil off the chain. ( Lubricant: Chain lube or Light oil) |
- Name of Product : Bicycle
- Applicable Ages : 4 to 8
Safety Instructions
- Children should always use helmets when riding.
- To avoid personal injury, strictly forbid children to touch the chain, chain wheel, freewheel,, and other rotating components.
- Children must ride under the supervision of adults
- Do not ride on busy streets
- Riders should master how to use the brake before cycling
- Riders shall follow the local legal requirements when the bicycles are to be ridden on public roads
- The maximum load weight (rider together with the belongings) of this product is 75kg (165Ib)
Fitting the Rider to the Bicycle
There must be at least 1 inch (2.5cm) of clearance between the highest part of the top tube and the crotch of the rider with tires properly inflated. The minimum leg length for the rider is the highest part of the top tube plus 1 inch (2.5cm).
Before You Ride
If this is your child's first ride, parents or guardians should instruct your child on how to correctly use the bike and remind your child about relevant precautions, particularly the safe use of the braking systems.
- Please avoid riding in a harsh environment. Please avoid riding during the night.
- Please increase braking distance in case of rain and freezing weather.
- Please check the condition of your bike, especially for the brake, regularly according to the information in the Table of Maintenance and Cleaning.
- Please repair your bike according to the descriptions in this manual when a breakdown occurs. If the problem still cannot be settled, please resort to professionals. Children are strictly forbidden to repair bikes.
- For your safety in riding, please select original accessories. If the front fork needs to be replaced, the set-back and inner diameter of the new one should be consistent with the original one.
Before every ride, it is important to carry out the following safety checks.
- Ensure the handlebar and saddle height are appropriate for the rider.
- Ensure all components are assembled in place and screwed If any component goes loose, please screw it tightly before using.
- Ensure the front and rear brakes work properly.
- Ensure both ends of the handlebar are properly protected.
- Ensure tires are inflated in compliance with the pressure indicated on the tire sidewall.
- Check that the tires show no signs of excessive wear or flat spots, and that there are no cuts or other damage. Excessively worn or damaged tires should be adjusted when going loose, in case of falling off during cycling.
- Ensure the chain works properly The chain needs to be adjusted when going loose, in case of falling off during cycling.
- Ensure all accessories are assembled firmly and work properly.
Troubleshooting
If you encounter any issues with your Royalbaby Children Rider Bicycle RB14B-6R, here are some common problems and solutions:
- Brakes not functioning properly: Check if the brake pads are worn out or misaligned. Adjust or replace them as needed.
- Chain slipping off gears: Ensure the chain is properly aligned and adjust the derailleur if necessary.
- Training wheels loose: Tighten the nuts that hold the training wheels in place.
Always follow safety instructions and ensure the child wears a helmet while riding.
Pros & Cons
Pros
- Durable Construction: Made from a high-quality steel frame for long-lasting use.
- Adjustable Seat Height: Accommodates growing children without needing to purchase a new bike.
- Training Wheels Included: Helps beginners learn to ride safely.
- Reliable Brake System: Front and rear V-brakes provide effective stopping power.
- Multiple Color Options: Available in various colors to suit different preferences.
Cons
- Assembly Required: Some users may find the assembly process challenging.
- Weight Limitation: The weight capacity is limited to 70 lbs, which may not be suitable for older or heavier children.
- Maintenance Needed: Regular maintenance is required to keep the bike in good condition.
Customer Reviews
Customers have generally praised the Royalbaby Children Rider Bicycle RB14B-6R for its durability, ease of assembly, and overall performance. Many parents appreciate the adjustable seat height and removable training wheels, which make it an excellent choice for kids learning to ride. However, some users have noted that the assembly process can be a bit tricky and requires some patience.
Faqs
What is the recommended age range for the Royalbaby?
How do I adjust the seat height on the Bicycle?
Can I remove the training wheels from the Royalbaby?
What type of brakes does the Children Rider have?
Is assembly required for the Royalbaby Rider Bicycle RB14B-6R?
What is the weight capacity of the Royalbaby?
Can I customize or upgrade parts on my Royalbaby RB14B-6R?
How do I maintain my Rider Bicycle?
What colors are available for the Rider Bicycle?
Does the Royalbaby come with a warranty?
Leave a Comment
