Saeco Automatic Espresso Machine HD8645 User Guide
Content

Saeco Automatic Espresso Machine HD8645 Introduction
Introducing the Saeco Automatic Espresso Machine HD8645 is a high-performance appliance designed for coffee enthusiasts. It features a built-in grinder with 10 adjustable settings, allowing you to customize the grind size to suit your taste. The machine also offers pre-brewing and a 15-bar pressure pump for optimal extraction. With its sleek design and intuitive control panel, the Saeco HD8645 delivers consistently delicious espresso drinks.
To fully benefit from the support that Saeco offers, please register your product at https://www.saeco.com/welcome . This user manual applies to HD8645. The machine is suitable for preparing espresso coffee using whole coffee beans. It can also dispense steam and hot water. In this user manual, you find all the information you need to install, use and maintain your machine.
The price of the Saeco Automatic Espresso Machine HD8645 is $499.99.
Specifications
| Feature | Value / location |
|---|---|
| Nominal voltage | Inside of maintenance door |
| Power rating | Inside of maintenance door |
| Size (w x h x d) | 295mm x 325mm x 420mm |
| Weight | 6.9 kg |
| Material | Plastic |
| Cord length | 0.8m -1.2m |
| Water tank capacity | 1000ml |
| Cup size | Up to 95mm |
| Coffee bean container capacity | 170g |
| Coffee grounds container capacity | 8 cakes |
| Pump pressure | 15 bar |
| Boiler | Stainless steel |
| Safety devices | Thermal fuse |
General description
(Fig. 1)
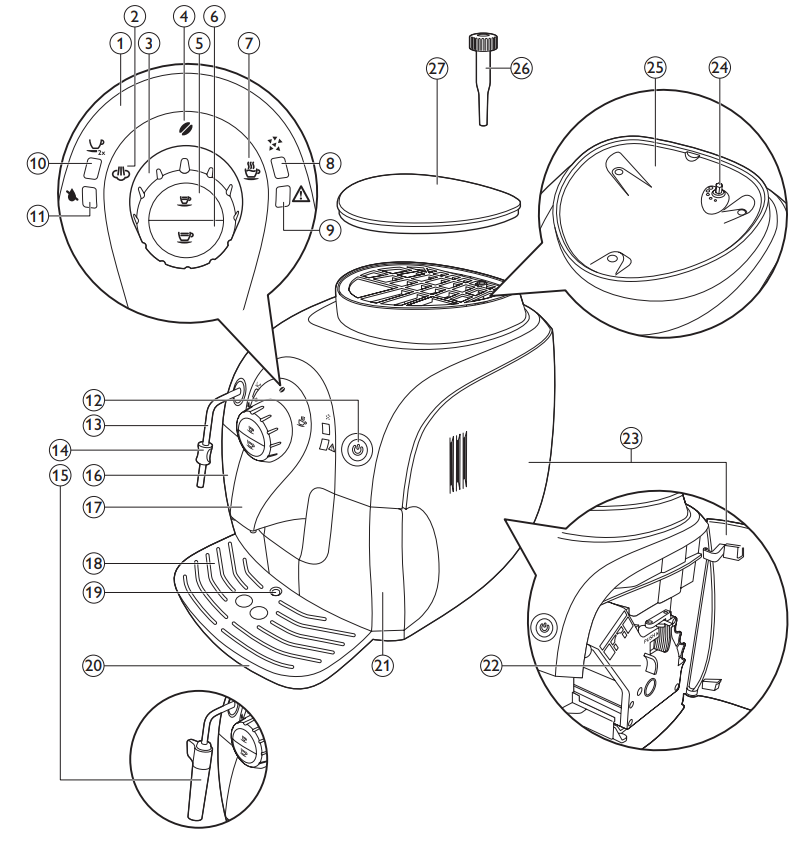
- Control panel
- Steam icon
- Control dial
- Coffee bean icon
- Espresso button
- Regular coffee button
- Hot water icon
- Descaling light
- Warning light
- 2-cup light
- ’Water tank empty’ light
- On/off button with light
- Hot water/steam wand
- Protective handle
- Classic milk frother (specific types only)
- Water tank
- Coffee spout
- Drip tray cover
- ’Drip tray full’ indicator
- Drip tray
- Coffee grounds container
- Brewing unit
- Maintenance door
- Grinding degree adjustment knob
- Coffee bean container
- Grinding degree adjustment tool
- The lid of the coffee bean container
Before first use
Installing the machine
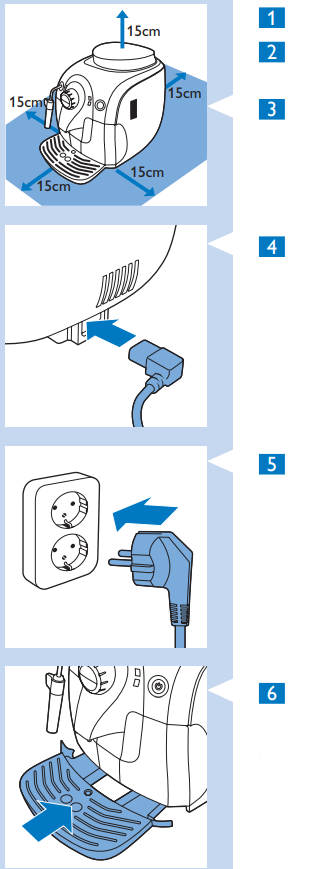
- Remove all packaging material from the machine.
- Place the machine on a table or worktop away from the faucet, the sink, and heat sources.
- Leave at least 15cm of free space above, behind, and on both sides of the machine.
- Insert the small plug into the socket located on the back of the machine.
- Insert the plug into the electrical outlet.
- Remove the protective sticker from the drip tray and slide the drip tray into the guiding grooves in the front of the machine.
Note: Make sure the drip tray is fully inserted.
Preparing for use
Filling the water tank
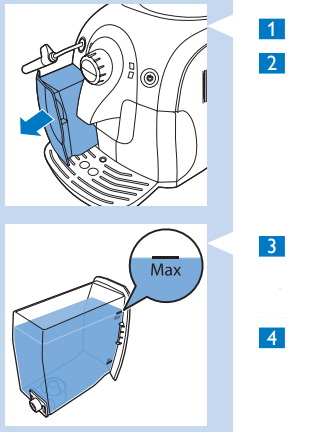
- Remove the water tank from the machine.
- Rinse the water tank under the faucet.
- Fill the water tank with fresh cold water up to the MAX indication.
Never fill the water tank with warm, hot, or sparkling water, as this may cause damage to the water tank and the machine. - Slide the water tank back into the machine.
Filling the coffee bean container
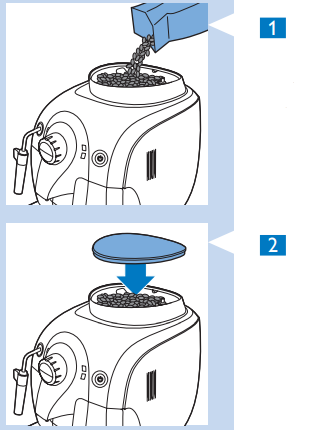
- Fill the coffee bean container with espresso beans. Only use espresso beans. Never use ground coffee, unroasted coffee beans or caramelized coffee beans, as this may cause damage to the machine.
- Put the lid on the coffee bean container.
Heating up the machine
During the initial heat-up process, fresh water flows through the internal circuit to heat up the machine. This takes a few seconds.

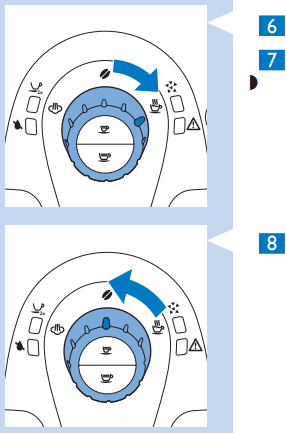
- Place a bowl under the hot water/steam wand or classic milk frother and the coffee spout. Make sure the control dial points to the coffee bean icon.
- Press the on/off button.
- When the warning light flashes quickly, turn the control dial to the hot water icon and wait a few seconds.
- The warning light goes out and some water comes out of the hot water/steam wand or classic milk frother.
- After a few seconds, when hot water stops coming out of the hot water/steam wand and the warning light flashes slowly, turn the control dial back to the coffee bean icon.
- The machine is heating up and the on/off button flashes slowly.
- When the machine has heated up, it performs an automatic rinsing cycle to clean the internal circuit with fresh water. Water flows from the coffee spout.
- When the on/off button illuminates continuously, the machine is ready for the manual rinsing cycle.
Note: You can stop the automatic rinsing cycle by pressing the espresso button or the regular coffee button.
Note: The automatic rinsing cycle also takes place 15 minutes after the appliance switches to standby mode or turns off.
Manual rinsing cycle
During the manual rinsing cycle, the machine brews one cup of coffee to prepare the inner circuit for use.
- Place a bowl under the coffee spout.
- Make sure the on/off button illuminates continuously.
- Press the regular coffee button.
- The machine starts to brew a cup of coffee to prepare the inner circuit for use. This coffee is not drinkable.
- Empty the bowl after the brewing cycle is finished.
Place a bowl under the hot water/steam wand or classic milk frother.
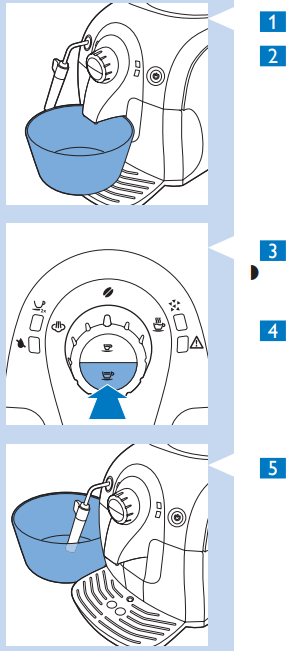
- Turn the control dial to the hot water icon.
- Let the water flow until the water tank is empty.
- The ‘water tank empty’ light illuminates continuously.
Turn the control dial back to the coffee bean icon.
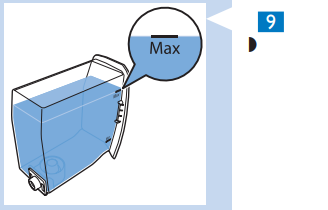
- Fill the water tank with fresh water up to the MAX indication.
The machine is ready for use.
Note: The first cups of coffee may be a bit watery, this is normal. The machine needs to complete a few brewing cycles to optimize its settings.
Installing the Intenza+ water filter
We advise you to install the Intenza+ water filter as this prevents scale build-up in your machine. You can buy the Intenza+ water filter separately. For more details, see chapter ‘Warranty and support’, section ‘Ordering maintenance products’.

- Remove the small white filter from the water tank and store it in a dry place.
Note: Please keep the small white filter for future use. You will need it for the descaling process. - Remove the filter from its packaging and immerse it in cold water with the opening pointing upwards. Press the sides of the filter gently to let out the air bubbles.
- Turn the knob of the filter to the setting that corresponds to the water hardness of the area you live in.
- Soft water
- Hard water (default)
- Very hard water
Note: You can test the water hardness with a water hardness test strip.
- Place the filter in the empty water tank. Press it down until it cannot move any further.
- Fill the water tank with fresh water up to the MAX indication and slide it into the machine.
- Let the machine brew hot water until the water tank is empty (see chapter ‘Using the machine’, section ‘Hot water’).
- Refill the water tank with fresh water up to the MAX indication and slide it back into the machine.
The on/off button illuminates continuously.
The machine is ready for use.
Description
The Saeco HD8645 Automatic Espresso Machine is a true testament to the fusion of technology and tradition. Its ceramic grinders and dual boiler system enable users to create barista-quality coffee with minimal effort. The HD8645 features an intuitive LCD display, allowing users to easily select their preferred coffee strength, temperature, and milk texture. The adjustable spout accommodates different cup sizes, from espresso to latte, while the height-adjustable coffee dispenser caters to travel mugs. With its integrated cleaning and descaling program, this machine ensures consistent performance and longevity. The Saeco HD8645 is not just an espresso machine; it's a statement piece designed to elevate your coffee experience.
Important
Read and follow the safety instructions carefully and only use the machine as described in this user manual to avoid accidental injury or damage due to improper use of the machine. Keep this user manual for future reference.
Warning
- Connect the machine to a wall socket with a voltage matching the technical specifications of the machine.
- Connect the machine to a grounded wall socket.
- Do not let the power cord hang over the edge of a table or counter, or touch hot surfaces.
- Never immerse the machine, the plug or power cord in water: Danger of electrical shock!
- Do not pour liquids on the power cord connector.
- Never direct the hot water jet towards body parts: Danger of burning!
- Do not touch hot surfaces. Use handles and knobs.
- Remove the plug from the wall outlet:
- if a malfunction occurs;
- if the machine will not be used for a long time;
- before cleaning the machine.
- Pull on the plug, not on the power cord. Do not touch the mains plug with wet hands.
- Do not use the machine if the mains plug, the power cord or the machine itself is damaged.
- Do not make any modifications to the machine or its power cord. Only have repairs carried out by a service center authorized by Philips to avoid any hazard.
- The machine should not be used by children younger than 8 years old.
- The machine can be used by children of 8 years and upwards if they have previously been instructed on the correct use of the machine and made aware of the associated dangers or if they are supervised by an adult.
- Cleaning and maintenance should not be carried out by children, unless they are older than 8 years old and supervised by an adult.
- Keep the machine and its power cord out of reach of children under 8 years old.
- The machine may be used by persons with reduced physical, sensory or mental capabilities or lacking sufficient experience and/or skills if they have previously been instructed on the correct use of the machine and made aware of the associated dangers or if they are supervised by an adult.
- Children should be supervised to ensure that they do not play with the machine.
- Never insert fingers or other objects into the coffee grinder.
Caution
- The machine is for household use only. It is not intended for use in environments such as canteens, staff kitchens of shops, offices, farms or other work environments.
- Always put the machine on a flat and stable surface.
- Do not place the machine on hot surfaces, directly next to a hot oven, heater units or similar sources of heat.
- Only put roasted coffee beans into the coffee beans hopper. If ground coffee, instant coffee, raw coffee beans or any other substance is put in the coffee bean hopper, it may damage the machine.
- Let the machine cool down before inserting or removing any parts.
- Never use warm or hot water to fill the water tank. Use only cold non-sparkling drinking water.
- Never clean with scrubbing powders or harsh cleaners. Simply use a soft cloth dampened with water.
- Descale your machine regularly. The machine indicates when descaling is needed. Not doing this will make your machine stop working properly. In this case repair is not covered under your warranty!
- Do not keep the machine at temperature below 0 °C. Residue water in the heating system may freeze and cause damage.
- Do not leave water in the water tank if the machine is not used over a long period of time. The water can get contaminated. Use fresh water every time you use the machine.
Setup Guide
Setting up the Saeco HD8645 is straightforward:
- Wash and dry all removable parts before the first use.
- Fill the water reservoir and bean hopper.
- Place a cup under the coffee dispenser and select your preferred coffee strength, temperature, and quantity.
- Run the machine without a coffee cup to purge any air from the system.
- Adjust the grind size and milk frother settings to your desired preference.
- Clean the machine regularly to maintain optimal performance and longevity.
Cleaning and maintenance
- Regular cleaning and descaling prolongs the lifetime of your machine and ensures optimum quality and taste of your coffee.
- Do not immerse the machine in water or any other liquid.
- Never use scouring pads, abrasive cleaning agents or aggressive liquids to clean the machine.
- Always unplug the machine and let it cool down before you clean it.
Note: None of the detachable parts are dishwasher-proof. Rinse them under the faucet.
Cleaning the hot water/steam wand or classic milk frother
Clean the hot water/steam wand or classic milk frother with a wet cloth after each use. Clean the hot water/steam wand or classic milk frother thoroughly once a week.
Remove the protective handle from the hot water/steam wand by pulling it downwards.
The hot water/steam wand or classic milk frother may be hot.
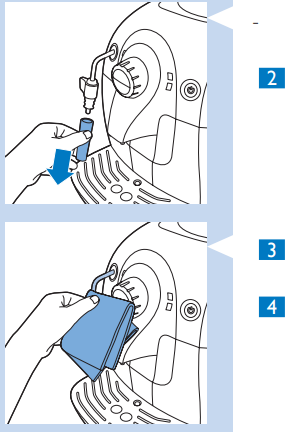
If your machine has a classic milk frother, remove the tube and upper part.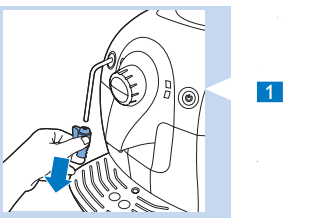
- Rinse the tube and upper part with fresh water and dry them with a dry cloth.
- Clean the hot water/steam wand with a wet cloth to remove milk residues.
Put the protective handle and classic milk frother (if present) back onto the hot water/steam wand. They are correctly positioned when you hear a click.
Lubrication
For optimal performance of the machine, lubricate the brewing unit after it has brewed 500 cups of coffee or once every 3 months. Contact the Philips Saeco hotline to buy lubricant.
- Turn off the machine and unplug it.
- Follow steps 2 to 4 in section ‘Cleaning the brewing unit’ to remove the brewing unit from the machine.
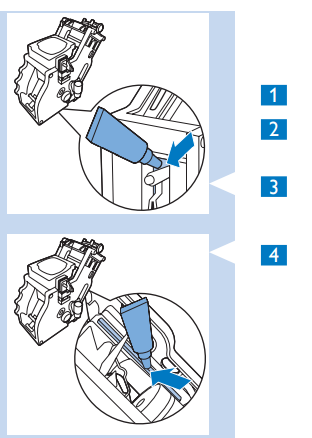
- Apply some lubricant around the shaft in the bottom of the brewing unit.
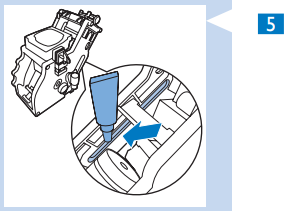
Apply some lubricant to both sides of the part shown in the illustration.
Follow steps 7 to 11 in section ‘Cleaning the brewing unit’ to place the brewing unit and the coffee grounds container back into the machine.
Important safeguards
When using electrical appliances, basic safety precautions should always be followed, including the following:
- Read all instructions.
- Do not touch hot surfaces. Use handles or knobs.
- To protect against fire, electric shock and injury to persons do not immerse cord, plugs or appliance in water or other liquid.
- Close supervision is necessary when the appliance is used by or near children.
- Unplug from outlet when not in use and before cleaning. Allow to cool before putting on or taking off parts, and before cleaning the appliance.
- Do not operate any appliance with a damaged cord or plug or after the appliance malfunctions, or has been damaged in any manner. Return appliance to the nearest authorized service facility for examination, repair or adjustment.
- The use of accessory attachments not recommended by the appliance manufacturer may result in fire, electric shock or injury to persons.
- Do not use outdoors.
- Do not let cord hang over edge of table or counter, or touch hot surfaces.
- Do not place on or near a hot gas or electric burner, or in a heated oven.
- Always attach plug to appliance first, then plug cord into wall outlet. To disconnect, turn any control to “off”, then remove plug from wall outlet.
- Do not use appliance for other than intended use.
Save these instructions.
Caution
This appliance is for household use only. Any servicing, other than cleaning and user maintenance, should be performed by an authorized service center. Do not immerse machine in water. To reduce the risk of fire or electric shock, do not disassemble the machine. There are no parts inside the machine serviceable by the user. Repair should be done by authorized service personnel only.
- Check the voltage to be sure that the voltage indicated on the nameplate corresponds with your voltage.
- Never use warm or hot water to fill the water tank. Use cold water only.
- Keep your hands and the cord away from hot parts of the appliance during operation.
- Never clean with scrubbing powders or harsh cleaners. Simply use a soft cloth dampened with water.
- For optimal taste of your coffee, use purified or bottled water. Periodic descaling is still recommended every 2-3 months.
- Do not use caramelized or flavored coffee beans.
Instructions for the power supply cord
- A short power-supply cord (or detachable power-supply cord) is to be provided to reduce risks resulting from becoming entangled in or tripping over a longer cord.
- Longer detachable power-supply cords or extension cords are available and may used if care is exercised in their use.
- If a long detachable power-supply cord or extension cord is used,
- The marked electrical rating of the detachable power-supply cord or extension cord should be at least as great as the electrical rating of the appliance.
- If the appliance is of grounded type, the extension cord should be a grounding-type 3-wire cord, and
- The longer cord should be arranged so that it will not drape over the counter top or table top where it can be pulled on by children or tripped over.
Warranty
If you need information or support, please visit https://www.saeco.com/support or read the separate worldwide guarantee leaflet.
To buy spare parts, visit https://www.philips.com/saeco or go to your Saeco dealer. You can also contact the Saeco hotline.
Ordering maintenance products
- Intenza+ water filter (CA6702)
- Lubricant (HD5061)
- Descaling solution (CA6700)
- Maintenance kit (CA6706)
Troubleshooting
This chapter summaries the most common problems you could encounter with the machine. If you are unable to solve the problem with the information below, visit www.saeco.com/support for a list of frequently asked questions or contact the Saeco hotline. You can find the contact details at https://www.philips.com/saeco
| Problem | Solution |
|---|---|
| The machine does not work. | Make sure the small plug is inserted into the socket. Plug in and turn on the machine. Make sure that the voltage indicated on the machine corresponds to the local mains voltage. |
| The machine is stuck in the descaling procedure. | Press the on/off button. You can restart the descaling procedure or follow the instructions in chapter ‘Descaling the machine’, section ‘If you are unable to finish the descaling procedure’. |
| The coffee is not hot enough. | Preheat the cups by rinsing them with hot water. Use thin-walled cups. |
| The coffee temperature decreases over time. | Descale the machine. |
| No hot water or steam comes out of the hot water/steam wand. | Check if the hole of the hot water/steam wand is clogged. If so, clean the hole. The classic milk frother may be dirty. Clean the classic milk frother. |
| The espresso does not have enough crema. | Use a different type of coffee beans or adjust the ceramic coffee grinder (see chapter ‘Using the machine’, section ‘Adjusting the grinding degree’). |
| The machine does not heat up fast enough and little coffee comes out. | Descale the machine (see chapter ‘Descaling the machine’). |
| The brewing unit cannot be removed. | Remove the coffee grounds container before you open the maintenance door. If you still cannot remove the brewing unit follow the next steps. Reinsert the coffee grounds container, close the maintenance door, turn on the machine. The machine prepares for use. Turn off the machine and try to remove the brewing unit again. |
| The brewing unit cannot be placed back. | Make sure that the lever is in contact with the base of the brewing unit. Also make sure that the hook of the brewing unit is in the correct position. See chapter ‘Cleaning and maintenance’, section ‘Cleaning the brewing unit’. If you still cannot place the brewing unit back, reinsert the coffee grounds container and leave the brewing unit out. Close the maintenance door, turn on the machine. The machine prepares for use. Turn off the machine and try to place back the brewing unit again. |
| The machine grinds the coffee beans but no coffee comes out. | Clean the coffee exit duct and set the grinder to a coarser setting. Clean the brewing unit (see chapter ‘Cleaning and maintenance’, section ‘Cleaning the brewing unit’). Fill the water tank with water. Clean the coffee spout. |
| The coffee is too weak. | Adjust the ceramic coffee grinder to a finer setting (see chapter ‘Using the machine’, section ‘Adjusting the grinding degree’). Brew a few cups of coffee to let the machine adjust itself to the new grinding settings. Use a different type of coffee beans. |
| Water ends up in the drip tray. | This is normal. To guarantee the perfect cup of coffee, the machine uses water to rinse the internal circuit and brewing unit. Some of the water flows through the internal system directly into the drip tray. Empty the drip tray regularly. |
| The machine seems to be leaking. | The drip tray is full and overflowed during brewing or the descaling procedure. Check if the water tank is leaking. The brewing unit or the drains behind or under the brewing unit may be blocked. Rinse the brewing unit with lukewarm water and clean the upper filter carefully. Also clean the inside of the machine with a soft, damp cloth. |
| There is not enough coffee in my cup. | Air may be present in the internal circuit. Rinse the internal circuit of the machine by turning the control dial to the hot water icon and letting some hot water flow out of the machine. Clean the brewing unit (see chapter ‘Cleaning and maintenance’, section ‘Cleaning the brewing unit’). |
Pros & Cons
Pros
- Professional-quality coffee
- Easy-to-use LCD display
- Integrated cleaning and descaling system
- Dual boiler system
- Adjustable grind size and milk froth
Cons
- Higher price point
- Requires regular maintenance
- Larger footprint compared to other home espresso machines
Customer Reviews
Customers rave about the HD8645's ability to create café-quality coffee at home. The machine's intuitive interface and adjustable settings make it a favorite among coffee enthusiasts. Common complaints include the machine's larger size and the need for regular cleaning.
Leave a Comment
