Sain-Smart Genmitsu PROVerXL 4030 CNC Router User Manual
Content
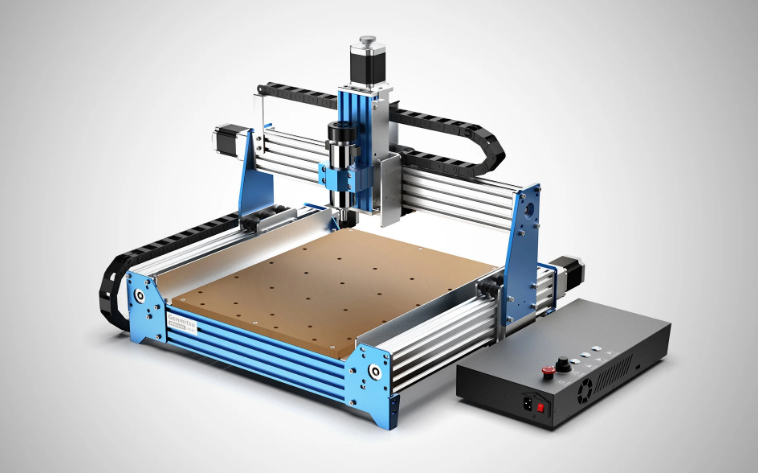
SainSmart Genmitsu PROVerXL 4030 CNC Router Introduction
The SainSmart Genmitsu PROVerXL 4030 CNC Router is a robust and adaptable tool made for professionals and enthusiasts alike that need accuracy and dependability in their work. This large 400 x 300 x 110 mm work surface makes this CNC router perfect for milling, engraving, and cutting a wide range of materials, such as soft metals, plastics, and wood. Its sturdy build, combined with its simplicity of installation and compatibility with well-known CNC software, make it a great option for anyone wishing to accurately and efficiently realize their designs. With the PROVerXL 4030, you can work on bigger projects or create elaborate drawings with the performance and flexibility you need to get professional results.
Included in your package will be a USB Stick, you will find:
- PDF version of this manual
- Windows USB Driver
- GrblControl/Candle software for Windows
- Sample files
Please visit the SainSmart Online Resource Center to install drivers and software for your CNC. https://docs.sainsmart.com/proverxl-4030
Disclaimer
Please be careful when using your CNC machine. This machine is an electrical device with moving parts and dangerous areas.
- Genmitsu CNC Machines are for Indoor Use Only.
- You must be 18 years or older to operate this machine, unless supervised by a knowledgeable adult familiar with the machine.
- Wear the proper Personal Protection Equipment (Safety Glasses etc.).
- Always place the CNC Machine on a stable surface.
- The SainSmart Genmitsu CNC Machine is supplied with Switchable Power Supply 230VAC or 115VAC. Never use a different power supply; it may cause malfunctions or damage to the machine.
- The PROVerXL 4030 utilizes a high amp power supply. It is recommended that you do not plug the CNC Router into an extension cord, or power strip as it may damage the machine.
- Ensure the Emergency stop button is easily accessible at all times.
- Never disassemble the Power Supply or Electrical Components. This will VOID the warranty.
- DO NOT TOUCH the machine spindle, or place any body part near the working area when the machine is operating. Serious injury may occur.
- DO NOT leave children unsupervised with the CNC Machine even when it’s not operating. Injury may occur.
- DO NOT leave the machine unattended while it's operating.
- Ensure your CNC Machine is in a well-ventilated area. Some Materials may discharge smoke or fumes during operation.
Specifications
| Work Area | 400x 300 x 110mm (15.75x 11.8 x 4.33inch) |
| Frame | CBeam Structure and Linear Rails |
| Drive System | ACME Leadscrew (T10) |
| Control BoardCompatibility | GRBL 1.1h |
| Stepper Driver | TB6560 |
| Stepper Motors | NEMA 23 (2 Phase,3A) |
| Spindle | 300W 6A, 12,000 RPM |
| Max speed | 2000mm/min |
| Extra Mount | Aluminum DeWalt DWP611 mount(DWP611 router not included) |
| Accuracy | 0.01mm (0.000393701inch) |
| Power Supply | 600W, 7A, 0-48V |
| CAM Software | Candle, Carveco Maker, Easel |
| Homing Switches | X,Y, Z Limit Switches + ESTOP |
| Leadscrew Size | X-658mm, Y-528mm, Z-208mm |
| Leadscrew Type | T102mm pitch, 5mmlead 5 start acme leadscrew |
| Overall machinesize | 641x 755.5 x 580mm (25.23x 29.74 x 22.83inch) |
| Controller box size | 400x 200 x 60.7mm (15.75x 7.87 x 2.39inch) |
| Machine Weight | 26kg (57lbs) |
| Shipping Weight | 30kg (66lbs) |
Unboxing
Mechanical Parts List
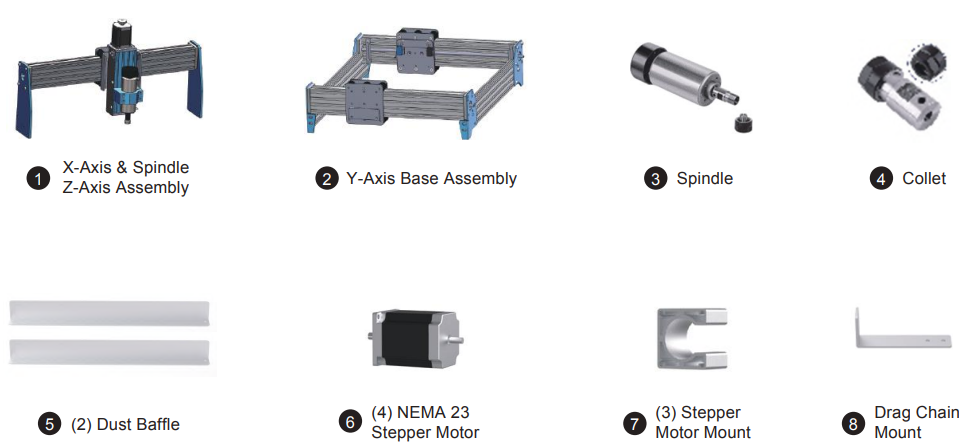
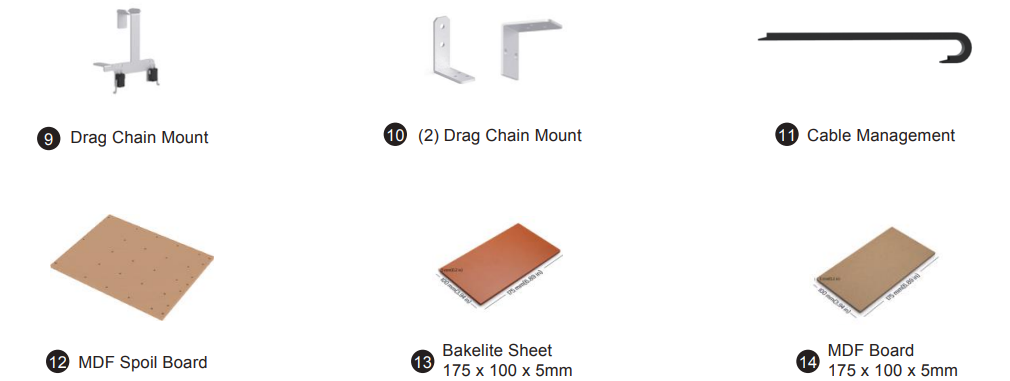
Electrical Parts List

Tools/Accessories Parts List
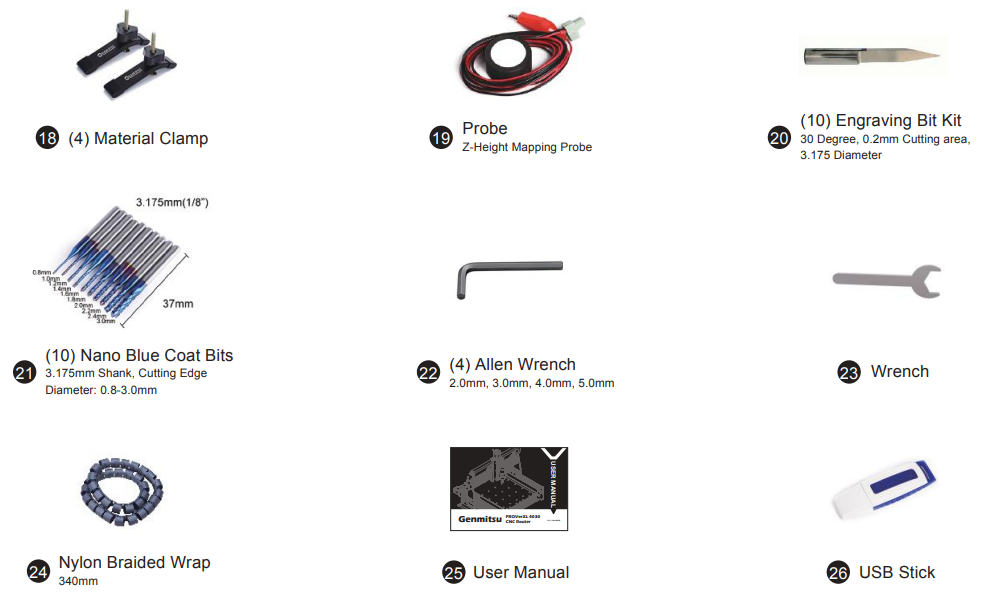
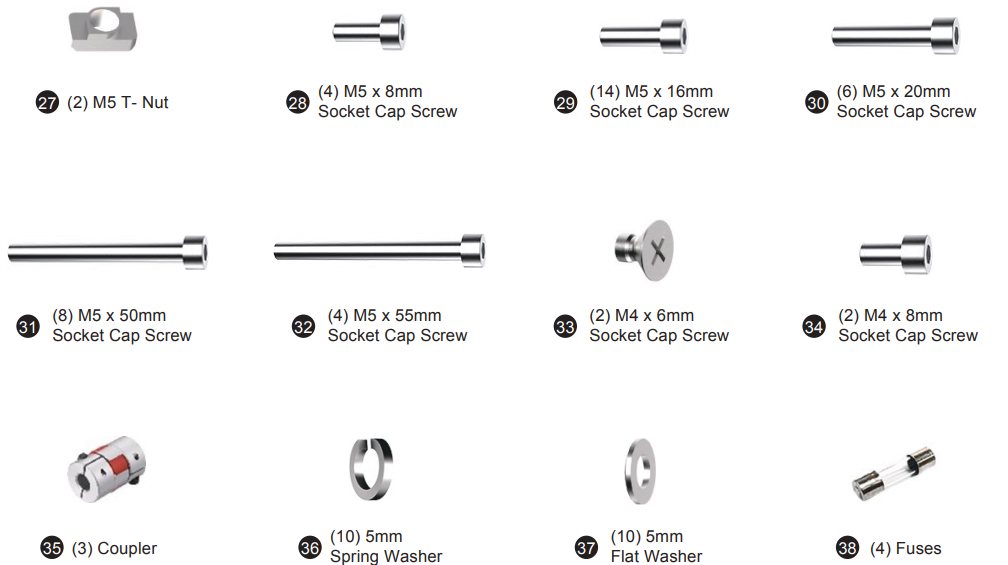
Screws/Other Parts List
Optional Accessories (Not Included)
Consider following optional upgrades or accessories to make your CNC experience better!You can find them on https://www.sainsmart.com . Save 10% with discount code PROVerXL
_sainsmart_genmitsu_proverxl_4030_cnc_router.png)
Scan QR codes to learn more
Mechanical installation
Preparing your Base Assembly
What you will need
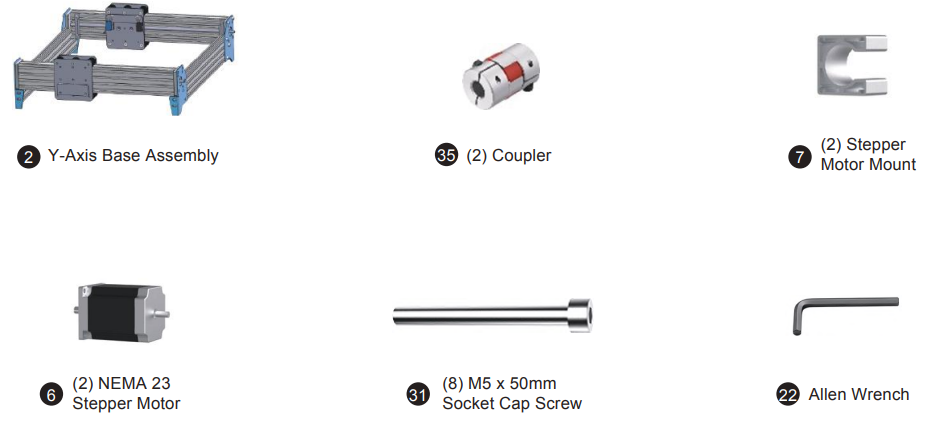
- Step 1: Inspect your Base Assembly after removing it from the packaging. Before starting assembly, verify the base is square by using a 90-degree straight edge, as shipping may have caused things to shift.
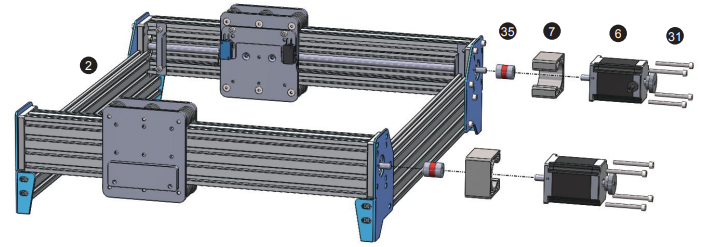
- Step 2: Install the flexible coupler onto each Y-Axis leadscrew. Loosen the small set screw to ensure the Lead Screw will completely seat inside.
- Step 3: Tighten (2) M6 x 16mm screws to secure the lead screw mount.
- Step 4: Next comes the Motor Mounts & Stepper Motor. Lay the Stepper Mount on your flat surface, positioning it so the open side will not face down when installed. Place the NEMA-23 Motor onto the mount aligning the screw holes. Insert the M5 x 50mm screws.
- Step 5: Holding the Mount & Motor together with the screws, install the assembly to base as shown in the diagram.
Finishing your Base Assembly
What you will need
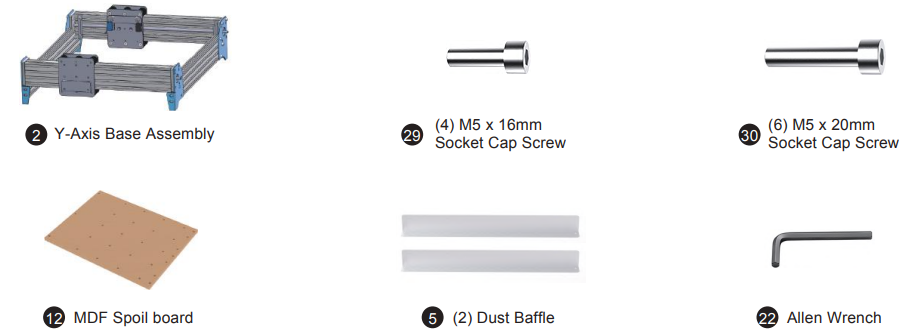
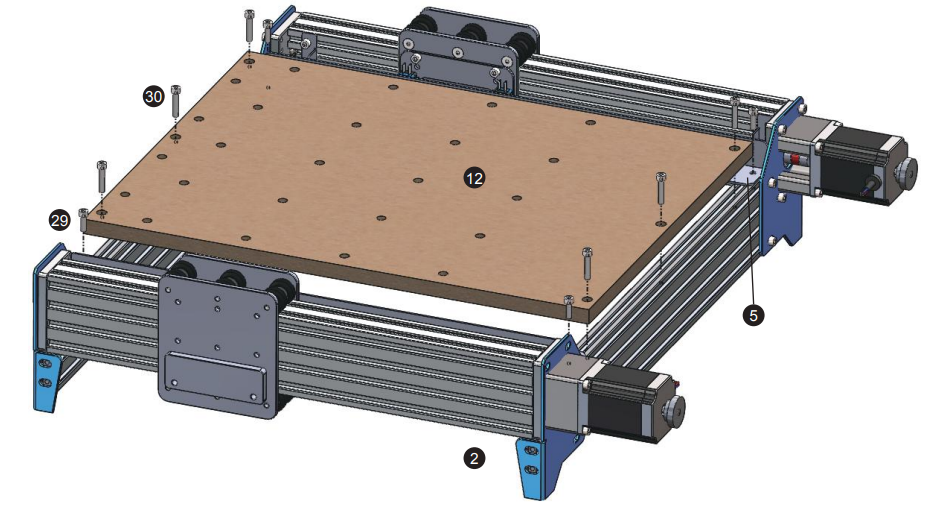
- Step 1: Position the MDF Spoilboard on the PROVerXL Base and align each Dust Baffle to the side of the spoilboard. Align with the screw holes and tighten down with the M5 x 16mm screws.
- Step 2: Align the MDF Spoilboard with the screw holes at the front and back of the machine. Be sure the board is right side up (Threaded Inserts should be towards the bottom. If you install it in reverse the mounting screws will protrude from the top of the spoil board). Tighten with M5 x 20mm crews.
Preparing your X-Axis Gantry
What you will need
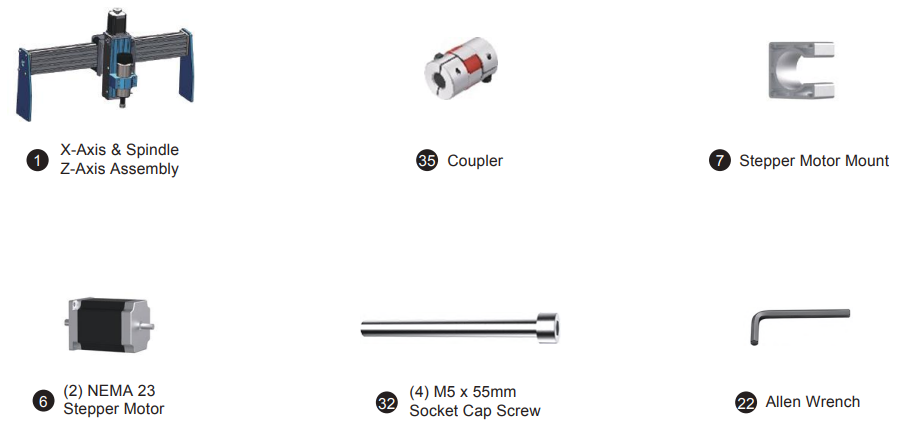
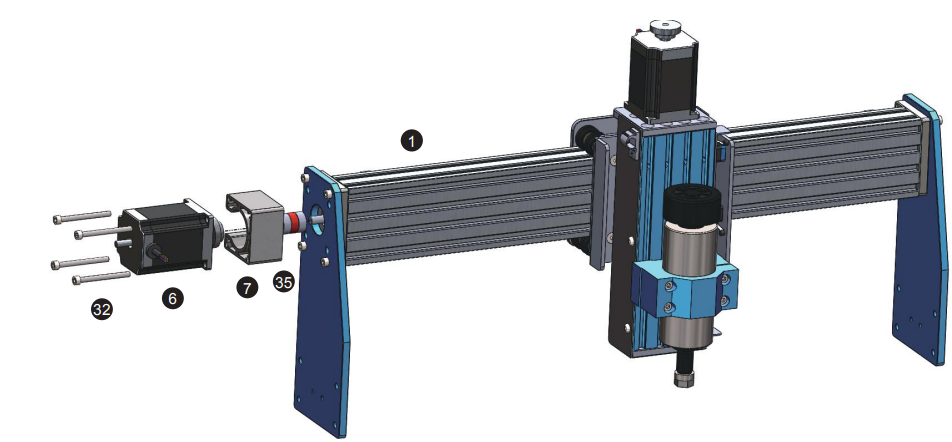
- Step 1: Install the flexible coupler to the X-Axis Leadscrew. Be sure to loosen the grub screws to ensure the shaft full seats inside.
- Step 2: Just like the Base preparation. Prep your Stepper Motor Mount + NEMA 23 Motor and 4 socket cap screws and remember to position the mount with the opening facing towards the rear of the gantry.
- Step 3: Mount the assembly to the X-Axis. Tighten the grub screws on the coupler. Manually twist the wheel on the Stepper Motor to verify smooth movement of the Gantry on the X-Axis.
Finishing your X-Axis Gantry
What you will need

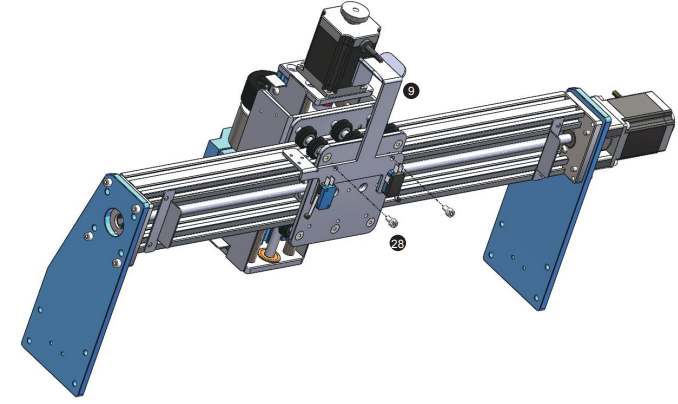
- Step 1: Position the X-Axis Limiter to the rear of the Spindle Carriage as shown in the diagram. Install the bracket and tighten the screws.
Finishing Frame Assembly
What you will need

- Step 1: Position the X-Axis gantry onto the Y-Axis carriage mounts as shown in the diagram. Each carriage has an acrylic plate that will hold the gantry at the appropriate height. Install the gantry using a 5mm washer, 5mm spring washer then M5 x 16mm screw as shown in the diagram.
- Step 2: Secure the opposite side to complete the installation.
- Step 3: Rotate both wheels on your Y-Axis stepper motors to ensure smooth movement of the X-Axis Gantry along the Y-Axis.
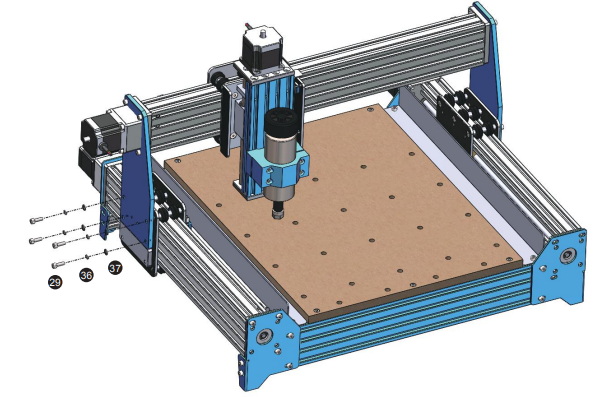
Installing the X-Axis Drag Chain
What you will need

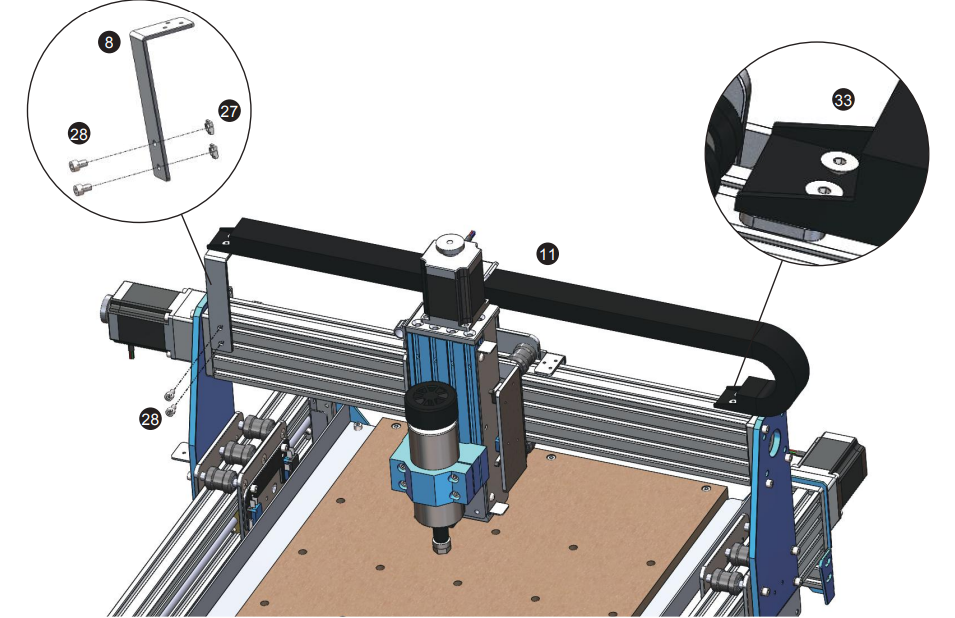
- Step 1: Per the diagram you will install the X-Axis drag chain mount. Align the T-Slot nuts with the bracket (the screws and nuts will be positioned on the top 2 channels of the C-Beam.) Secure the bracket with the screws.
- Step 2: Position the Drag Chain as shown in the diagram. Start with securing the side closest to the Spindle Gantry and secure with (3) M4 x 6mm screws.
- Step 3: Run the Drag Chain underneath the X-Axis limiter as shown in the diagram and secure to the Drag Chain Mount with your M4 x 6mm screws.
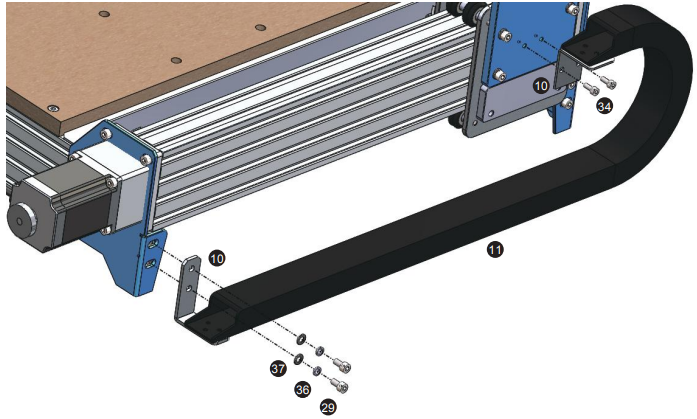
Installing the Y-Axis Drag Chain
What you will need

- Step 1: Position the narrow drag chain mount to the rear of the machine as shown in the diagram. Attach the bracket with (2) M6 x 10mm socket cap screws.
- Step 2: Install the bracket to the carriage as shown in the diagram using (2) M4 x 8mm socket cap screws.
- Step 3: Position the drag chain per the diagram using (6) M4 x 6mm screws. (The side with the Compression DIN Connector for the spindle goes to the Control Box.) While mounting the drag chain take care not to damage any of the cables or connectors.
Description
The SainSmart Genmitsu PROVerXL 4030 CNC Router is a versatile and powerful machine that is perfect for a wide range of applications, from engraving custom designs onto jewelry to creating detailed models and prototypes. The machine is easy to assemble and set up, and can be controlled via a user-friendly interface. The Genmitsu CNC & Laser 4030 is also highly customizable, and can be upgraded with a variety of accessories and upgrades to suit your specific needs. Whether you're a hobbyist looking to explore the world of CNC and laser engraving, or a small business looking for an affordable and versatile machine, the Genmitsu CNC & Laser 4030 is an excellent choice.
Z Probe Setup
Probe function introduction
Grblcontrol (Candle) Probe operating instructions
Step 1: Probe commands editing Z14 is the height of the tool setting block, which requires actual measurement, and Z25 is the height of the tool lifting, which can be configured as required
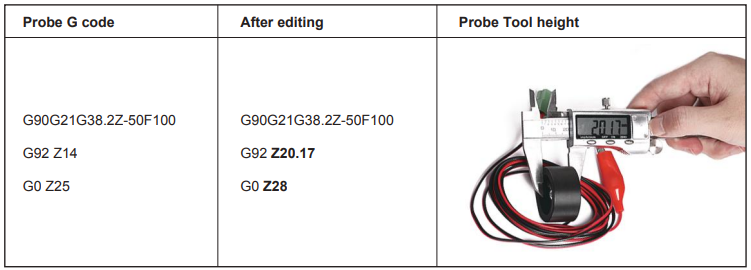
Step 2: Probe commands filled in Grblcontrol (Candle)
_sainsmart_genmitsu_proverxl_4030_cnc_router.png)
- Step 3: Connect the probe tool to the controller probe interface.
Step 4: Click the "Z-probe" button, Z-axis automatic tool to zero.
_sainsmart_genmitsu_proverxl_4030_cnc_router-.png)
Troubleshooting
If you encounter any issues with the SainSmart Genmitsu PROVerXL 4030 CNC Router, there are a few common solutions to try.
- First, make sure that the machine is properly assembled and connected to your computer.
- Check the software settings and make sure that everything is configured correctly.
- If the machine is still not working properly, try resetting the machine to its factory settings.
- If the issue persists, consult the user manual or contact SainSmart support for further assistance.
SainSmart Genmitsu PROVerXL 4030 CNC Router Pros & Cons
Pros
- Versatile and powerful 2-in-1 machine
- High-precision stepper motor and laser module
- User-friendly interface and easy setup
- Affordable price point
- Variety of accessories and upgrades available
Cons
- May be too small for some applications
- Laser module may not be powerful enough for some materials
- Assembly and setup can be time-consuming
- May require additional software and hardware for advanced functionality
Customer Reviews
Customers have generally been positive about the SainSmart Genmitsu PROVerXL 4030 CNC Router, praising its versatility, ease of use, and high-quality construction. Some users have noted that the laser module may not be powerful enough for some materials, and that the assembly process can be time-consuming. However, overall most users have been very satisfied with their purchase, and have recommended the machine to others looking for an affordable and versatile CNC and laser engraving solution.
Faqs
What is the CNC router SainSmart Genmitsu PROVerXL 4030?
Which materials are compatible with the Router?
How precise and accurate is the SainSmart Genmitsu PROVerXL 4030 CNC Router?
Is a spindle part of the Router?
What safety features does the PROVerXL come with?
Where do I get spare parts or extra accessories for the CNC Router?
Is there a warranty for the SainSmart Genmitsu Router?
Leave a Comment
