Samsung Wall Mount UA32N4100 User Manual
Content
Samsung Wall Mount UA32N4100
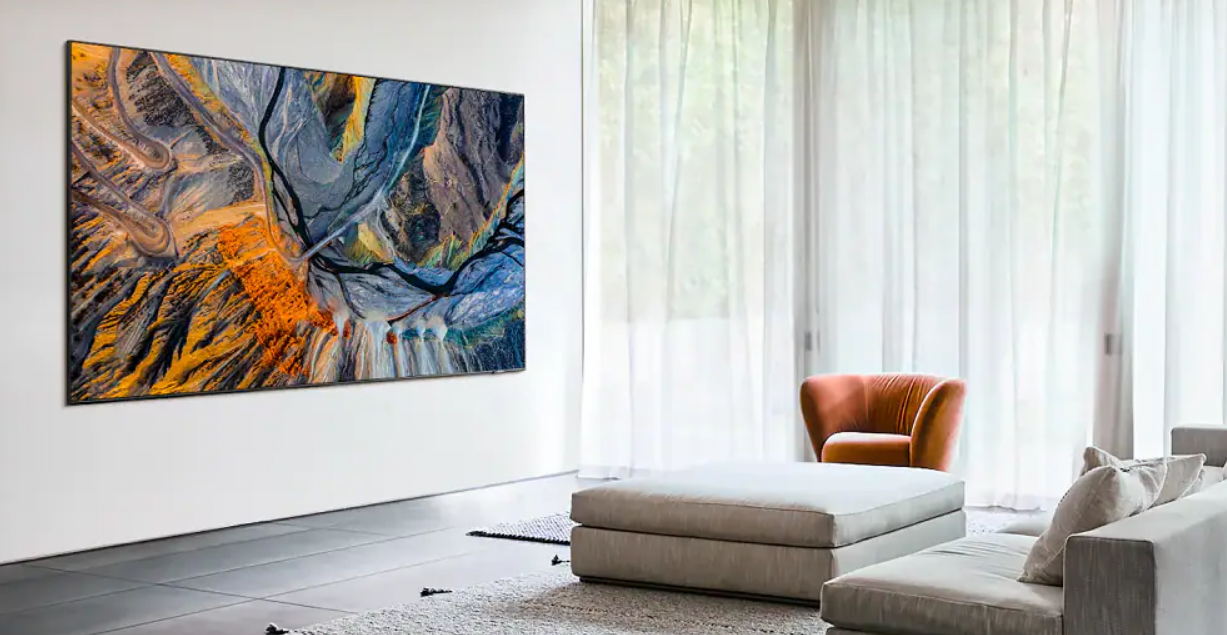
Introducing the Samsung Wall Mount UA32N4100 is a sleek and practical solution for securely mounting your television to the wall, optimizing your living space. Designed for the Samsung 32-inch TV models, it provides a sturdy support system while allowing for a clean, modern aesthetic. The mount features easy installation with all necessary hardware included, ensuring a hassle-free setup. Priced at approximately $49, it combines affordability with functionality for an enhanced viewing experience.
What's in the Box?
Make sure the following items are included with your TV. If any items are missing, contact your dealer.
- Remote Control
- Batteries (AAA x 2) (Not available in some locations)
- User Manual
- Warranty Card/ Regulatory Guide (Not available in some locations)
- TV Power Cable (Depending on the country and model)
- Power Adapter
(Depending on the country and model)

WARNING

- The items' colours and shapes may vary depending on the models.
- Cables not included can be purchased separately.
- Check for any accessories hidden behind or in the packing materials when opening the box.
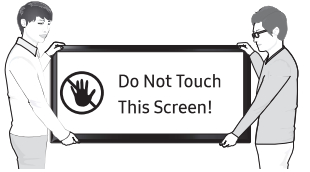
Warning: Screens can be damaged from direct pressure when handled incorrectly. We recommend lifting the TV at the edges, as shown.
Specifications and Other Information
TV Specifications
Model Names
- UA32N4000 / UA32N5000 / UA32N4100
- UA40N5000
- UA43N5000
- UA43N5100
- UA49N5000
Display Specifications
- Display Resolution:
- UA32N4000 / UA32N5000 / UA32N4100: 1366 x 768
- UA40N5000 / UA43N5000 / UA43N5100 / UA49N5000: 1920 x 1080
- Screen Size (Measured Diagonally):
- UA32N4000 / UA32N5000 / UA32N4100: 80 cm
- UA40N5000: 100 cm
- UA43N5000: 108 cm
- UA43N5100: 108 cm
- UA49N5000: 123 cm
Sound Output
- UA32N4000 / UA32N5000 / UA32N4100: 40W
- UA40N5000: 20W
- UA43N5000: 20W
- UA43N5100: 40W
- UA49N5000: 20W
Dimensions (W x H x D)
- Body:
- UA32N4000 / UA32N5000 / UA32N4100: 73.74 x 43.80 x 7.41 cm
- UA40N5000: 91.71 x 52.77 x 7.70 cm
- UA43N5000: 97.99 x 57.19 x 7.73 cm
- UA43N5100: 97.99 x 57.19 x 7.73 cm
- UA49N5000: 111.28 x 64.65 x 7.87 cm
- With Stand:
- UA32N4000 / UA32N5000 / UA32N4100: 73.74 x 46.54 x 15.05 cm
- UA40N5000: 91.71 x 55.24 x 17.03 cm
- UA43N5000: 97.99 x 59.66 x 17.03 cm
- UA43N5100: 97.99 x 59.66 x 17.03 cm
- UA49N5000: 111.28 x 67.36 x 18.75 cm
Weight
- Without Stand:
- UA32N4000: 3.8 kg
- UA32N5000: 4.0 kg
- UA32N4100: 4.0 kg
- UA40N5000: 7.0 kg
- UA43N5000: 8.0 kg
- UA43N5100: 8.0 kg
- UA49N5000: 10.3 kg
- With Stand:
- UA32N4000: 3.9 kg
- UA32N5000: 4.1 kg
- UA32N4100: 4.1 kg
- UA40N5000: 7.2 kg
- UA43N5000: 8.2 kg
- UA43N5100: 8.2 kg
- UA49N5000: 10.6 kg
Environmental Considerations
- Operating Temperature: 50°F to 104°F (10° C to 40° C)
- Operating Humidity: 10% to 80%, non-condensing
- Storage Temperature: -4°F to 113°F (-20° C to 45° C)
- Storage Humidity: 5% to 95%, non-condensing
Additional Notes
- The design and specifications are subject to change without prior notice.
- For information about the power supply and power consumption, refer to the label rating attached to the product.
- The label rating is attached to the back of the TV. (For some models, the label rating may be found inside the cover terminal.)
Decreasing Power Consumption
When the TV is turned off, it enters Standby mode and continues to draw a small amount of power. To decrease power consumption, unplug the power cord when you do not intend to use the TV for a long time.
Description
The Samsung Wall Mount UA32N4100 is a sturdy wall mount made from high-quality materials to ensure durability and strength. It features a sleek design that complements the aesthetic of Samsung's LED TVs. The mount includes all necessary hardware for installation, such as screws and wall anchors, making it easy to set up. It supports a weight capacity of up to 32 inches, making it perfect for the UA32N4100 model.
The mount allows for tilt and swivel adjustments, enabling you to adjust the viewing angle according to your preference. This feature enhances the overall viewing experience by allowing you to position the TV in a way that minimizes glare and optimizes picture quality.
TV Installation
Mounting the TV on a Wall
If you choose to mount this TV on a wall, follow the manufacturer's instructions exactly. Incorrect installation may cause the TV to slide or fall, resulting in serious injury to children or adults, as well as significant damage to the TV.
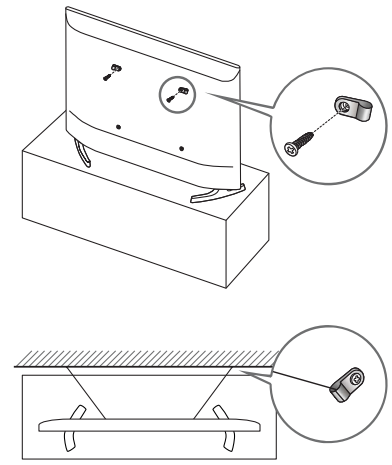
For models that provide wall mount adapters, install them as shown in the figure below before proceeding with the wall mount kit installation.
Refer to the installation manual included with the Samsung wall mount kit.

- Please note that Samsung Electronics is not responsible for any damage to the product or injury to yourself or others if you install the wall mount independently.
- Ensure the wall mount is installed on a solid wall that is perpendicular to the floor. If you plan to attach the wall mount to surfaces other than plasterboard, contact your nearest dealer for further information. Installing the TV on a ceiling or slanted wall may result in it falling and causing severe personal injury.
- The standard dimensions for wall mount kits are shown in the table on the next page.
- If using a third-party wall mount, note that the length of screws you can use to attach the TV to the wall mount is detailed in column C of the table on the next page.
- When installing a wall mount kit, we recommend fastening all four VESA screws.
- If you intend to install a wall mount kit that attaches to the wall using only the two top screws, ensure you are using a Samsung wall mount kit specifically designed for this type of installation. Availability of this type of wall mount kit may vary by geographical region.
Model Name | VESA screw hole specs (A* B) in millimetres | C(mm) | Standard Screw | Quantity | 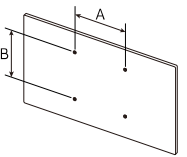 |
UA32N4000 UA32N5000 |
100 x100
200 X 200 | 26.0-28.0 |
M4
M8 |
4 | |
UA32N4100 UA40N5000 | 21.9-23.9 25.7-27.7 | ||||
UA43N5000 UA43N5100 | 25.2-27.2 21.1-23.1 | ||||
UA49N5100 | 21.6-23.6 | ||||
UA49N5000 | 25.5-27.5 |
Safety Precautions
- Do not install your wall mount kit while your TV is turned on. This may result in personal injury from electric shock.
- Avoid using screws that are longer than the standard dimension or that do not comply with the VESA standard screw specifications. Screws that are too long may cause damage to the inside of the TV set.
- For wall mounts that do not comply with the VESA standard screw specifications, the length of the screws may differ depending on the wall mount specifications.
- Do not fasten the screws too firmly. Over-tightening may damage the product or cause it to fall, leading to personal injury. Samsung is not liable for these kinds of accidents.
- Samsung is not liable for product damage or personal injury when a non-VESA or non-specified wall mount is used or when installation instructions are not followed.
- Do not mount the TV at an angle greater than 15 degrees.
- Always have two people mount the TV onto a wall.
Providing Proper Ventilation for Your TV
When installing your TV, maintain a distance of at least 10 cm between the TV and other objects (walls, cabinet sides, etc.) to ensure proper ventilation. Failing to maintain proper ventilation may result in a fire or issues with the product due to increased internal temperature.
When installing your TV with a stand or wall mount, we strongly recommend using parts provided by Samsung Electronics only. Using parts from another manufacturer may cause difficulties with the product or result in injury due to the product falling.

Attaching the TV to the Stand
Make sure you have all the accessories shown and that you assemble the stand following the provided assembly instructions.
Securing the TV to the Wall to Prevent Falling
Caution: Pulling, pushing, or climbing on the TV may cause it to fall. In particular, ensure that your children do not hang on or destabilize the TV, as this may cause it to tip over, leading to serious injuries or death. Follow all safety precautions provided in the Safety Flyer included with your TV. For added stability and safety, you can purchase and install the anti-fall device as described below.
WARNING: Never place a television set in an unstable location. The television may fall, causing serious personal injury or death. Many injuries, particularly to children, can be avoided by taking simple precautions such as:
- Using cabinets or stands recommended by the manufacturer of the television set.
- Only using furniture that can safely support the television set.
- Ensuring the television set is not overhanging the edge of the supporting furniture.
- Not placing the television set on tall furniture (for example, cupboards or bookcases) without anchoring both the furniture and the television set to a suitable support.
- Not placing the television set on cloth or other materials that may be located between the television set and supporting furniture.
- Educating children about the dangers of climbing on furniture to reach the television set or its controls.
If you are retaining and relocating the television set that you are replacing with this new set, you should apply the same precautions to the old set.
Preventing the TV from Falling
- Using the appropriate screws, firmly fasten a set of brackets to the wall. Confirm that the screws are securely attached to the wall.
- You may need additional materials such as wall anchors, depending on the type of wall.
- Using the appropriately sized screws, firmly fasten a set of brackets to the TV.
- For screw specifications, refer to the standard screw part in the table under "Mounting the TV on a wall."
- Connect the brackets fixed to the TV and the brackets fixed to the wall with a durable, heavy-duty string, then tie the string tightly.
- Install the TV near the wall to ensure it does not fall backward.
- Connect the string so that the brackets fixed to the wall are at the same height as or lower than the brackets fixed to the TV.
Remote Control
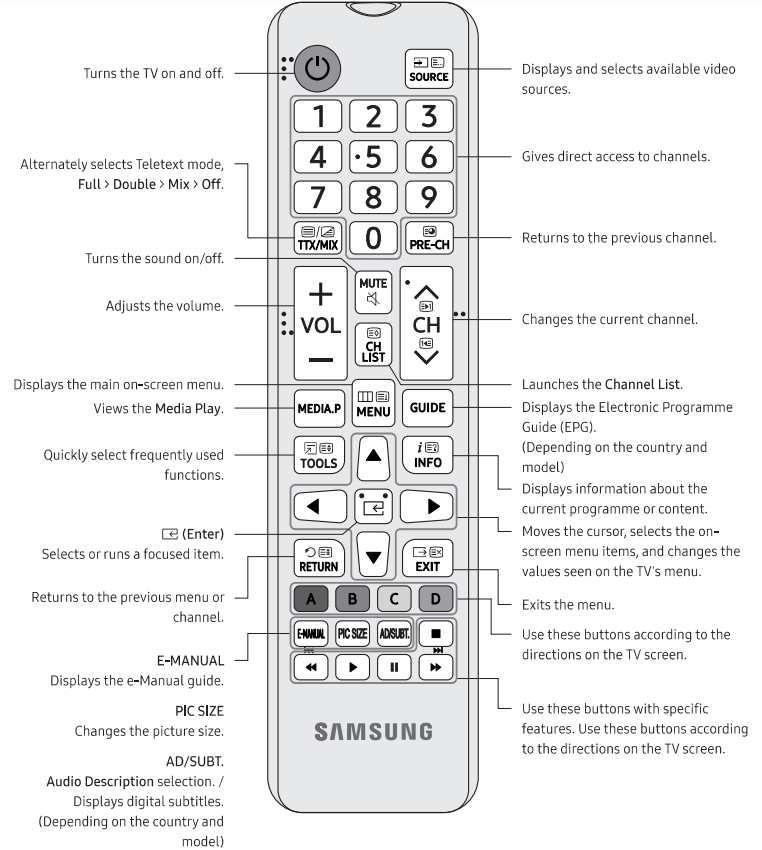
About the Buttons on the Remote Control
- This remote control has Braille points on the Power, Channel, Volume, and Enter buttons and can be used by visually impaired persons.
- The images, buttons, and functions of the remote control may differ depending on the model.
Installing batteries into the remote control (Battery size: AAA)
Match the polarity of the batteries to the symbols on the battery compartment.
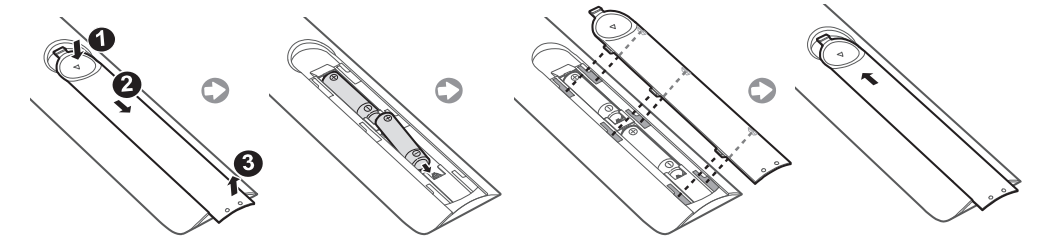
- The colour and shape of the remote may vary depending on the model.
- Use the remote control within 7 m of the TV.
- Bright lights may affect the performance of the remote control. Avoid using the remote control near special fluorescent lights or neon signs.
Running the Initial Setup
When you turn on your TV for the first time, it immediately starts the Initial Setup. The Initial Setup allows you to configure the basic settings for the TV to operate, such as broadcast reception, channel search, and network connection, all at once.
- Before starting the Initial Setup, be sure to connect external devices first.
You can also start the Initial Setup using the TV's menu: MENU [Il] > System > Setup. Follow the instructions displayed on the Initial Setup screen and configure the TV's basic settings to suit your viewing environment.
If You Want to Reset This Feature...
- Select System ➔ Setup (Initial Setup).
- Enter your 4-digit PIN number. The default PIN number is "0000".
- If you want to change the PIN number, use the Change PIN function.
You should perform the Setup (MENU [Il] ➔ System) again at home, even if you completed it in the shop already.
- If you forget the PIN code, press the remote control buttons in the following sequence while in Standby mode to reset the PIN to "0000": MUTE ➔ 8 ➔ 2 ➔ 4 ➔ POWER (on).
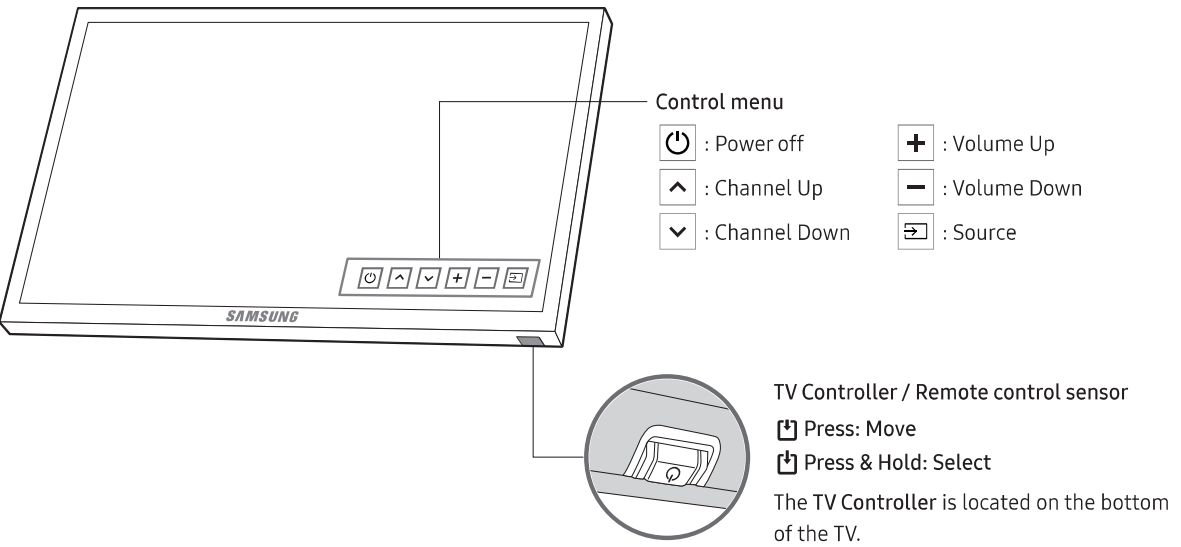
Using the TV Controller
You can turn on the TV using the TV Controller button located at the bottom of the TV, and then access the Control menu. The Control menu appears when the TV Controller is pressed while the TV is on. For more information about its usage, refer to the figure below.
HDMI (ARC) Connection
- This function is not available on certain models in specific geographical areas. Before connecting any external devices and cables to the TV, first verify the model number of the TV you purchased. A sticker showing the model number is attached to the back of the TV. The connection method varies depending on the model. ARC (Audio Return Channel) enables digital sound output using just an HDMI cable. However, ARC is only available through the HDMI IN 1 (ARC) port and only when the TV is connected to an ARC-enabled AV receiver.
- Some models may not support ARC.
The number of connectors and their names and locations may vary depending on the model.
_connection_samsung_wall_mount_ua32n4100.png)
Connect an HDMI cable to the TV's HDMI IN 1 (ARC) connector and the device's HDMI OUT connector.
Changing the Input Source
Source
Use to select TV or other external input sources such as DVD/ Blu-ray players/ cable box/ STB satellite receiver connected to the TV.
- Press the SOURCE button on your remote.
- Select a desired external input source.
How to use Edit Name
In the Source, press the TOOLS button, and then you can set an external input sources name you want.
Information
You can see detailed information about the connected external device.
Anynet+ (HDMI-CEC)
Displays a list of Anynet+ (HDMI-CEC)-compliant devices that are connected to the TV.
- This option is only available when Anynet+ (HDMI-CEC) is On.
- This function is not available on certain models in specific geographical areas.
Setup Guide
To set up the Samsung Wall Mount UA32N4100, follow these steps:
- Locate the wall studs using a stud finder to ensure a secure installation.
- Mark the spot where you want to install the mount and drill pilot holes.
- Insert the wall anchors into the holes and screw in the mounting bracket.
- Attach the TV mounting plate to the back of your UA32N4100 TV.
- Hang the TV on the wall bracket and adjust the tilt and swivel as needed.
Ensure all screws are tightened securely to prevent any accidents or damage to your TV.
Caring for the TV
- If a sticker was attached to the TV screen, some debris can remain after you remove the sticker. Please clean the debris off before watching TV.
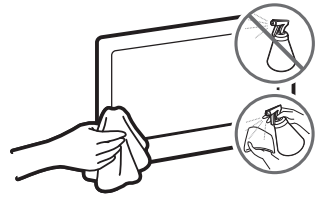
- The exterior and screen of the TV can get scratched during cleaning. Be sure to wipe the exterior and screen carefully using a soft cloth to prevent scratches.
- Do not spray water or any liquid directly onto the TV. Any liquid that goes into the product may cause a failure, fire, or electric shock.
- To clean the screen, turn off the TV, then gently wipe away smudges and fingerprints on the panel with a micro-fiber cloth.
- Clean the body or panel of the TV with a micro-fiber cloth dampened with a small amount of water. After that, remove the moisture with a dry cloth. While cleaning, do not apply strong force to the surface of the panel because it can damage the panel. Never use flammable liquids (benzene, thinner, etc.) or a cleaning agent.
- For stubborn smudges, spray a small amount of screen cleaner on a micro-fiber cloth, and then use the cloth to wipe away the smudges.
Samsung Wall Mount UA32N4100 Troubleshooting
If the TV seems to have a problem, first try this list of possible problems and solutions. If none of these troubleshooting tips apply, visit http://www.samsung.com , then click on Support, or call the Samsung customer service center.
Picture Quality
- Picture Test: First, perform the Picture Test to confirm that your TV is properly displaying the test image.
- Go to MENU [Il] > Support > Self Diagnosis > Picture Test.
- If the test image is properly displayed, the poor picture may be caused by the source or signal.
- TV image quality: If the TV image does not look as good as it did in the store:
- Upgrade to a digital cable box or satellite box if you have an analogue box.
- Use HDMI or Component cables for HD picture quality.
- Cable/Satellite subscribers: Try digital stations from the channel lineup.
- Aerial connection: Try HD stations after performing Auto tuning.
- Many HD channels are upscaled from SD (Standard Definition) contents.
- Adjust the cable box or satellite box video output resolution to 1080i or 720p.
- Ensure you are watching the TV at the minimum recommended distance based on the size and definition of the signal.
- Distorted picture: If the picture is distorted (macro blocks, small blocks, dots, pixelization error):
- Compression of video contents may cause picture distortion, especially in fast-moving scenes.
- Low signal level or poor quality can cause picture distortion; this is not a TV issue.
- Mobile phones used close to the TV (approximately 1m) may cause noise in the picture on analogue and digital TV.
- Color issues: If the color is wrong or missing:
- Ensure the component cables are connected to the correct jacks if using a component connection.
- Poor color or brightness:
- Adjust the Picture options in the TV menu (go to Picture Mode > Colour > Brightness > Sharpness).
- Adjust the Energy Saving option in the TV menu (go to MENU [Il] > System > Eco Solution > Energy Saving).
- Try resetting the picture to view the default picture settings (go to MENU [Il] > Picture > Reset Picture).
- The dotted line on the edge: If there is a dotted line on the edge of the screen:
- If the picture size is set to Screen Fit, change it to 16:9.
- Change the cable box or satellite box resolution.
- Black and white picture: If the picture is black and white:
- If using an AV composite input, connect the video cable (yellow) to the Green jack of component input 1 on the TV.
- Freezing or distorted picture when changing channels:
- Reset the cable box or satellite box by reconnecting the AC cord and waiting until it reboots (may take up to 20 minutes).
- Set the output resolution of the cable box or satellite box to 1080i or 720p.
Sound Quality
- Sound Test: First, perform the Sound Test to confirm that your TV audio is properly operating.
- Go to MENU [Il] > Support > Self Diagnosis > Sound Test.
- If the audio is okay, the sound problem may be caused by the source or signal.
- No sound or low sound at maximum volume:
- Check the volume of the connected device (cable box, satellite box, DVD, Blu-ray, etc.).
- Good picture but no sound:
- Set the Sound Output option to TV Speaker in the sound menu.
- Ensure audio cables are connected to the correct audio input jacks on the TV.
- If using an external device, check its audio output option (e.g., you may need to change your cable box's or satellite box's audio option to HDMI when connected to your TV).
- A separate audio cable is required if using a DVI to HDMI cable.
- Reboot the connected device by reconnecting its power cable.
- Inappropriate noise from speakers:
- Check cable connections to ensure a video cable is not connected to an audio input.
- For aerial or cable connections, check the signal strength, as low signal levels may cause sound distortion.
No Picture, No Video
- TV will not turn on:
- Ensure the AC power cord is securely plugged into the wall outlet and the TV.
- Verify that the wall outlet is working.
- Try pressing the POWER button at the bottom of the TV to ensure the problem is not with the remote. If the TV turns on, refer to "The remote control does not work".
- TV turns off automatically:
- Ensure the Sleep Timer is set to Off in the Time menu.
- If your PC is connected to the TV, check your PC power settings.
- Ensure the AC power cord is securely plugged in.
- No Signal Power Off turns off the TV if no signal has been received for a specified time. Auto Power Off turns off the TV after four hours of no user input.
- No picture/video:
- Check cable connections (remove and reconnect all cables connected to the TV and external devices).
- Set the external device's (cable box, satellite box, DVD, Blu-ray, etc.) video outputs to match the connections to the TV input.
- Ensure connected devices are powered on.
- Select the correct source on the TV by pressing the SOURCE button on the remote control.
- Reboot the connected device by reconnecting its power cable.
- Not receiving all channels:
- Ensure the Aerial cable is connected securely.
- Try Setup (Initial setup) to add available channels to the channel list (go to MENU [Il] > System > Setup (Initial setup)).
- Verify the Aerial is positioned correctly.
Others
- Picture not displaying in full screen:
- HD channels may have black bars on either side when displaying upscaled SD (4:3) contents.
- Black bars may appear on top and bottom during movies with different aspect ratios.
- Adjust the picture size options on your external device or TV to full screen.
- Remote control issues:
- Replace the remote control batteries, ensuring the poles (+/-) are in the correct direction.
- Clean the sensor's transmission window on the remote.
- Try pointing the remote directly at the TV from 1.5 - 1.8 m away.
- Cable box or satellite box remote control problems:
- Program the cable box or satellite box remote control to operate the TV. Refer to the cable box or satellite box user manual for the Samsung TV code.
- "Mode Not Supported" message:
- Check the supported resolution of the TV and adjust the external device's output resolution accordingly.
- Plastic smell from the TV:
- This smell is normal and will dissipate over time.
- TV Signal Information unavailable in the Self Diagnosis Test menu:
- This function is only available with digital channels from an Aerial/RF/Coax connection.
- TV tilted to the right or left side:
- Remove the stand base from the TV and reassemble it.
- Difficulties assembling the stand base:
- Ensure the TV is placed on a flat surface. If you cannot remove the screws from the TV, use a magnetized screwdriver.
- Broadcasting menu greyed out (unavailable):
- The Broadcasting menu is only available when the TV source is selected.
- Settings lost after 5 minutes or when the TV is turned off:
- If the TV is in Store Demo mode, it will reset audio and picture settings every 5 minutes. To change from Store Demo mode to Home Use, press the SOURCE button to select TV mode, then go to MENU [Il] > Support > Use Mode.
- Intermittent loss of audio or video:
- Check cable connections and reconnect them.
- Loss of audio or video can be caused by using overly rigid or thick cables. Ensure the cables are flexible for long-term use. If mounting the TV to the wall, we recommend using cables with 90-degree connectors.
- Small particles at the edge of the frame:
- This is part of the product's design and is not a defect.
- PIP menu not available:
- PIP functionality is only available when using an HDMI or component source.
- TV turning on after being off for 45 minutes:
- This is normal; the TV operates the OTA (Over The Aerial) function to upgrade firmware downloaded while watching TV.
- Recurrent picture/sound issues:
- Check and change the signal/source.
- Reaction between rubber cushion pads and furniture:
- To prevent this, use felt pads on any surface of the TV that comes in direct contact with furniture.
- Message "This file may not be playable properly.":
- This may occur due to high bit rate content. Content will generally play but could experience some playability issues.
- Keeping TV in optimum operating condition:
- Upgrade to the latest firmware at http://www.samsung.com ➔ Support by USB.
- TFT LED panel note:
- This TFT LED panel uses sub-pixels requiring sophisticated technology to produce. A few bright or dark pixels on the screen may exist but will not impact product performance.
- Specific functions and pictures:
- Some functions and pictures shown in this manual are available on specific models only.
Pros & Cons
Pros
- Durable Construction: Made from high-quality materials to support the weight of your TV securely.
- Adjustable Viewing Angles: Allows for tilt and swivel adjustments to optimize your viewing experience.
- Easy Installation: Comes with all necessary hardware and clear instructions for a straightforward setup process.
- Space-Saving Design: Keeps your floor clear and adds a modern touch to your room's decor.
Cons
- Limited Compatibility: Specifically designed for the UA32N4100 model, limiting its use with other TV sizes or models.
- No Additional Features: This does not include advanced features like motorized adjustments or cable management systems.
- Wall Type Limitation: This may not be suitable for all types of walls (e.g., plaster or certain types of drywall) without additional support.
Customer Reviews
Customers have praised the Samsung Wall Mount UA32N4100 for its ease of installation and sturdy construction. Many users appreciate the adjustable viewing angles, which enhance their overall TV-watching experience. However, some users have noted that it might not be compatible with all types of walls and that it lacks advanced features compared to more expensive mounts.
Common complaint
Is that the mount could be more versatile in terms of compatibility with different TV sizes and models. Despite these minor drawbacks, the majority of customers are satisfied with the product's performance and value for money.
Faqs
What is the weight capacity of the Samsung Wall Mount?
Is the Samsung easy to install?
Can I use the Samsung Wall Mount with other TV models?
What types of walls is the Samsung Wall Mount suitable for?
Can I adjust the height of the TV once it's mounted?
Is there a warranty available for the Samsung Wall Mount?
How long does it take to set up the Mount?
Leave a Comment