Sanyo XT-49S8200U Led TV Owners Manual | Connection
Content
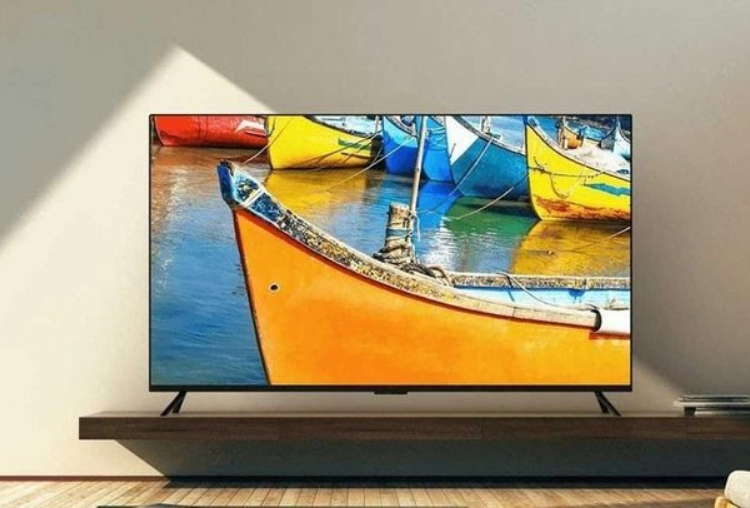
Sanyo XT-49S8200U LED TV Introduction
The Sanyo XT-49S8200U LED TV is a high-definition television designed to provide an enhanced viewing experience. Launched in 2020, this model boasts a 49-inch screen size, making it an ideal choice for both small and medium-sized rooms. The estimated price of this TV ranges from $400 to $600, depending on the retailer and any sales or promotions.
This LED TV is engineered for those seeking a balance between quality and affordability. It supports various multimedia formats and offers multiple connectivity options, ensuring that users can connect to a range of devices seamlessly. Whether it's for watching movies, playing games, or enjoying favorite TV shows, the Sanyo XT-49S8200U is designed to deliver vibrant colors and clear visuals.
With its energy-efficient design and eco-friendly features, this TV appeals to consumers who are conscious about their carbon footprint. The user-friendly interface and intuitive controls make it easy for anyone to navigate and customize their viewing experience.
Warning: Handling the mains plug and lead
Insert the mains plug fully into the socket outlet. (If the mains plug is loose, it could generate heat and cause fire.)
Ensure that the mains plug is easily accessible.
Do not touch the mains plug with a wet hand. (This may cause electrical shock.)
Do not use any mains lead other than that provided with this TV. (This may cause fire or electrical shock.)
Do not damage the mains lead. (A damaged lead may cause fire or electrical shock.)
Do not move the TV with the lead plugged in the socket outlet.
Do not place a heavy object on the lead or place the lead near a high-temperature object.
Do not twist the lead, bend it excessively or stretch it.
Do not pull on the lead. Hold onto the mains plug body when disconnecting the lead.
Do not use a damaged mains plug or socket outlet.
Use the TV in moderate climates.
Power source
This TV is designed to operate on 100 – 240V ~ 50/60 Hz
Table-top use / Wall hanging
Do not use an external voltage stabilizer with the TV set
An inferior quality stabilizer may cause damage to the TV.
The warranty is not valid if an external stabilizer is used.
Do not remove covers and never modify the TV by yourself
Do not remove the rear cover as live parts are accessible when it is removed. There are no user-serviceable parts inside. (High-voltage components may cause serious electrical shock.)
Have the TV checked, adjusted, or repaired at your local Sanyo dealer.
Please refer to the information on the exterior back enclosure for electrical and safety information before installing or operating the apparatus.
The mains plug is used as a disconnect device, the disconnect device shall remain readily operable.
Do not expose to rain or excessive moisture
To prevent damage that might result in electrical shock or fire, do not expose this TV to rain or excessive moisture. This TV must not be exposed to dripping or splashing water and objects filled with liquid, such as vases, must not be placed on top of or above the TV.
Do not insert external objects into the TV
Do not allow any objects to drop into the TV through the air vents. (Fire or electrical shock may result)
Do not place the TV on sloped or unstable surfaces, and ensure that the TV does not hang over the edge of the base
The TV may fall off or tip over.
Use only the dedicated pedestals/mounting equipment
Using an unapproved pedestal or other fixtures may make the TV unstable, risking injury. Be sure to ask your local Sanyo dealer to perform the setup.
When mounting the TV on a wall or ceiling, be sure to install the product according to the methods recommended by the manufacturer. This is a safety feature.
Only use attachments/accessories specified or provided by the manufacturer (such as the exclusive supply adapter, battery, etc.).
Do not expose to direct sunlight and other sources of heat
Avoid exposing the TV to direct sunlight and other sources of heat.
To prevent the spread of fire, keep candles or other open flames away from this product at all times.
Use Environment
Warning: Never place a television set in an unstable location. A television set may fall, causing serious personal injury or death. Many injuries, particularly to children, can be avoided by taking simple precautions such as:
- Do not place the set on an unstable cart, stand, or table.
- Place the set in a place that allows good ventilation.
- Do not use the set near damp, and cold areas. Protect the set from overheating.
- Keep the set away from direct sunlight.
- The apparatus shall not be exposed to dripping or splashing and no objects filled with liquids, such as vases, shall be placed on the apparatus.
- Do not use the set near the dust place.
If your existing television set is being retained and relocated, the same considerations as above should be applied. (Only for the TV with a mass exceeding 7 kg)
Cleaning
- Clean the set by wiping the screen and the cabinet with a soft, clean cloth or some special liquid cleaner.
- Do not apply excessive force to the screen when cleaning.
- Do not use water or other chemical cleaner to clean the screen as this may damage the surface of the TV screen.
Hanging the TV Set on the Wall
- Check that the wall can support the weight of the TV set and wall mount assembly.
- Follow the mounting instructions provided with the wall mount.
The TV set must be installed on a vertical wall.
- Make sure to use only screws suitable for the material of the wall.
- Make sure that the TV set cables are placed so that there is no danger of tripping over them.
All other safety instructions about our TV sets are also applicable here.
Note: Graphics contained within this operating instructions are for presentation only.
WARNING: The batteries shall not be exposed to excessive heat such as sunshine, fire,, or the like.
Base Installation
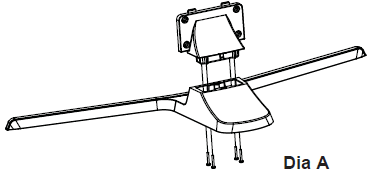
To fix the middle support onto the stand base, put it as shown in the Dia A and fix the screws from the bottom side of the stand base.
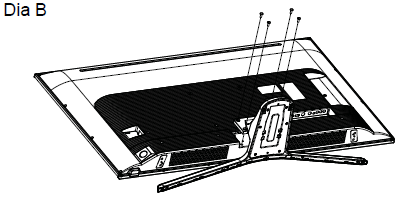
To fix the base lay your TV flat (screen down) on the edge of a table or bench. Make sure to put down a soft cushion or cloth so that your TV is not scratched.
To bring you a better visual experience, please remove all labels, if any, from the TV front panel and screen before use.
Figures and illustrations in this User Manual are provided for reference only and may differ from athe ctual product appearance. Product design and specifications may be changed without notice.
Specifications
Model No. | XT-49S8200U | XT-55S8200U | |
Power Source | 110 – 240 V ~ 50/60 Hz | 110 – 240 V ~ 50/60 Hz | |
Power Consumption | Power Rating | 160 W | 165 W |
Standby condition | 0.5 W | 0.5 W | |
Display panel | Visible screen size | 123 cm | 139 cm |
Number of pixels | 8,294,400 (3840(W) x 2160 (H)) | 8,294,400 (3840(W) x 2160 (H)) | |
Dimensions (L x B x H) | 110.2cm × 33.3cm × 70.3cm (With Pedestal) 110.2cm × 8.3 cm × 64.2cm (TV only) | 124.2cm X 33.3cm X 78.2cm (With Pedestal) 124.2cm X 8.3 cm X 72.1cm (TV only) | |
Net weight | 13.9 kg Net (With Pedestal) 12.2 kg Net (TV only) | 16.4 kg Net (With Pedestal) 14.7 kg Net (TV only) | |
Gross Weight | 19.2 kg | 22.7 kg | |
Sound | Speaker | 16 | 16 |
Audio output | 20 W ( 10 W + 10 W ) | 20W ( 10 W + 10 W ) | |
TV System | PAL B/G,D/K,I; NTSC(AV);DVB-T/T2 | PAL B/G,D/K,I; NTSC(AV);DVB-T/T2 | |
Connection terminals |
AV IN | AUDIO L - R RCA PIN Type x 2 | AUDIO L - R RCA PIN Type x 2 |
VIDEO RCA PIN Type x 1 | VIDEO RCA PIN Type x 1 | ||
HDMI input | HDMI connector x 3 | HDMI connector x 3 | |
LAN | RJ45 x 1 | RJ45 x 1 | |
USB | USB 2.0 TYPE A Connector x 1 (DC 5 V, MAX. 500 mA) USB 3.0 TYPE A Connector x 1 (DC 5 V, MAX. 900 mA) | USB 2.0 TYPE A Connector x 1 (DC 5 V, MAX. 500 mA) USB 3.0 TYPE A Connector x 1 (DC 5 V, MAX. 900 mA) | |
ANTENNA |
Aerial connector x 1 |
Aerial connector x 1 | |
AUDIO OUT |
AUDIO OUT (L - R) RCA PIN Type x 2 |
AUDIO OUT (L - R) RCA PIN Type x 2 | |
HEADPHONE | HEADPHONE x 1 | HEADPHONE x 1 | |
DIGITAL AUDIO OUT | DIGITAL AUDIO OUT x 1 | DIGITAL AUDIO OUT x 1 | |
NOTE: Design and Specifications are subject to change without notice. The weight and Dimensions shown are approximate.
Standard accessories

- Accessories may not be placed all together. Take care not to throw them away unintentionally.
- This product contains possibly dangerous parts (such as plastic bags), that can be breathed in or swallowed by young children accidentally. Keep these parts out of reach of young children.
Optional accessories
Please contact the Sanyo service center to purchase the recommended optional accessories. For additional details please read the manual of the optional accessories.
Wall-hanging bracket
- Holes for wall-hanging bracket installation

Rear of the TV
- 49"/55* class
- a: 200mm
- b: 200mm
Warning
- Failure to use a Sanyo bracket or choosing to mount the unit yourself will be done at the risk of the consumer. Always be sure to ask a qualified technician to carry out the setup. Incorrect fitting may cause equipment to fall, resulting in injury and product damage. Any damage resulting from not having a professional installer mount your unit will void your warranty.
- When any optional accessories or wall hanging brackets are used, always ensure that the instructions provided are followed fully.
- Do not mount the unit directly below ceiling lights (such as spotlights or halogen lights) which typically give off high heat. Doing so may warp or damage plastic cabinet parts.
- Take care when fixing wall brackets to the wall. Wall-mounted equipment shall not be grounded by metal within the wall. Always ensure that there are no electrical cables or pipes in the wall before hanging the bracket.
- To prevent falls and injury, remove the TV from its fixed wall position when it is no longer in use.
Basic Connection
Terminals
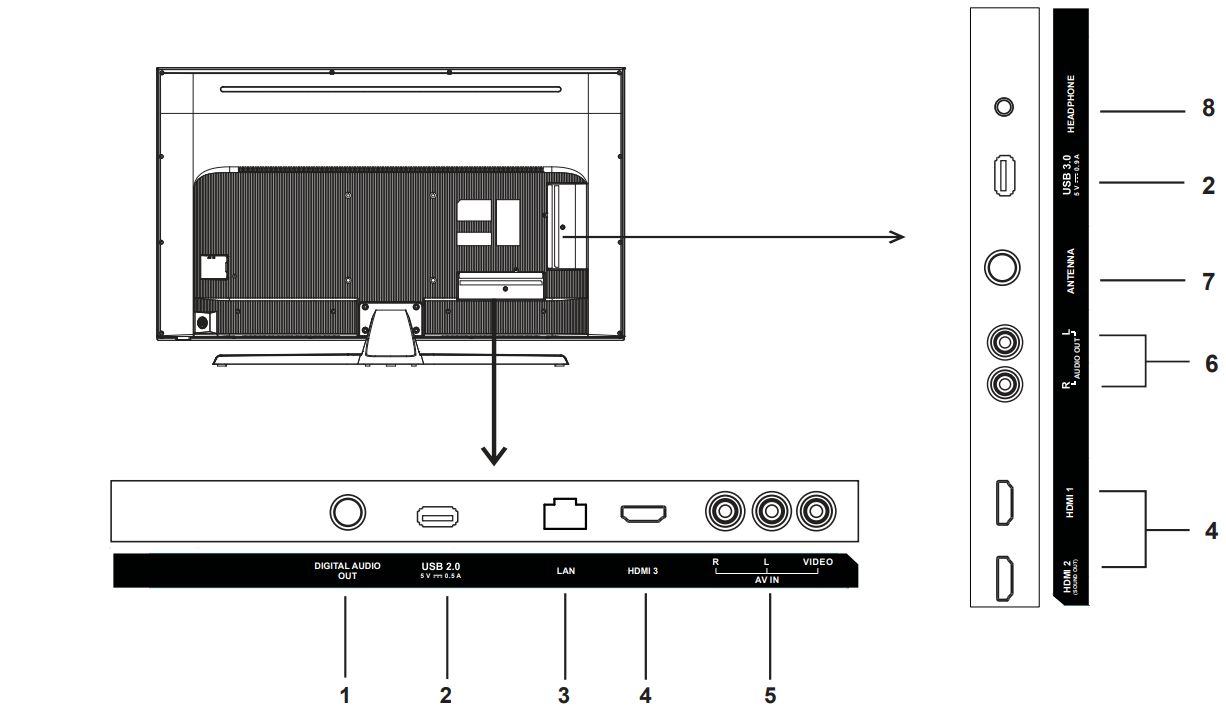
- DIGITAL AUDIO OUT
- USB 2.0/3.0
- LAN
- HDMI 1/2/3
- AV IN
- AUDIO OUT
- ANTENNA
- HEADPHONE
Power connection and aerial

110 - 240 V ~50/60 Hz
Note
- Do not place the RF cable under the TV.
- To obtain optimum quality picture and sound, an aerial, the correct cable(750 coaxial), and the correct terminating plug are required
- If a communal aerial system is used, you may require the correct connection cable and plug between the wall aerial socket and the TV.
- Your Sanyo Service Centre or dealer may be able to assist you in obtaining the correct aerial system for your particular area and the accessories required.
- Any matters regarding aerial installation, upgrading of existing systems or accessories required, and the costs incurred, are the responsibility of you, the Customer.
External Equipment
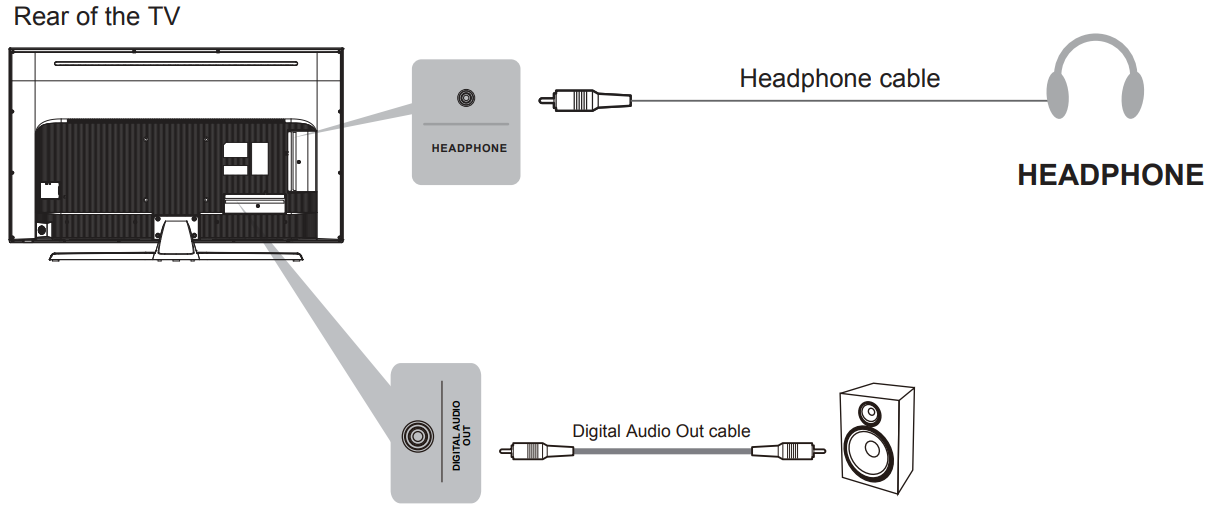
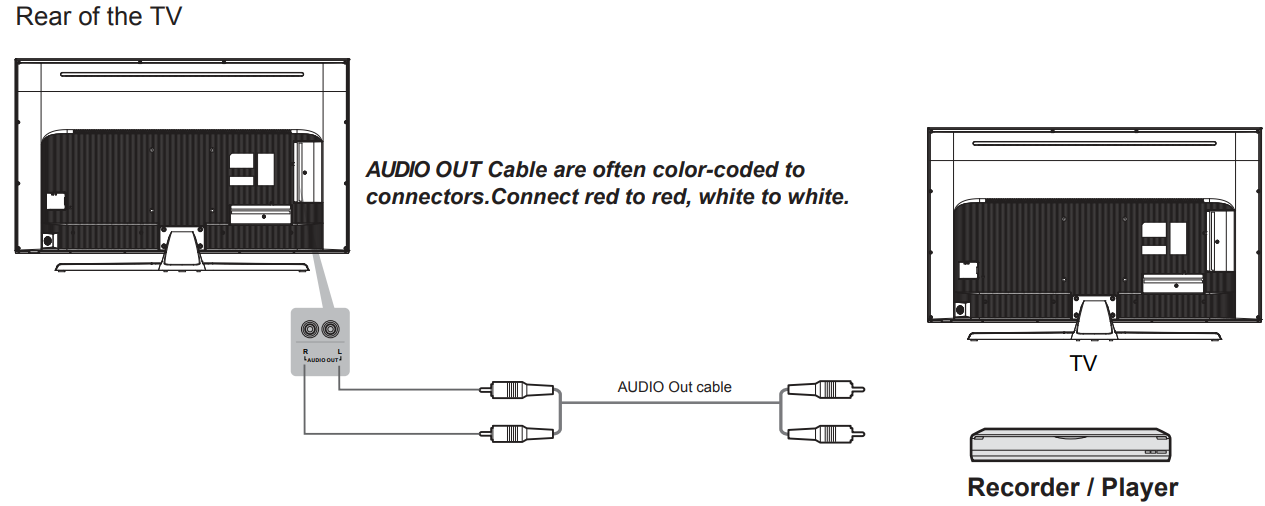
These diagrams show our recommendations for the connection of your TV to various pieces of equipment.
- Check the type of terminals and cable plugs are correct when connecting.
- Please also read the manual of the equipment being connected.
- Keep the TV away from electronic equipment (video equipment, etc.) or equipment with an infrared sensor. Otherwise, distortion of image/sound may occur or the operation of other equipment may be interfered.
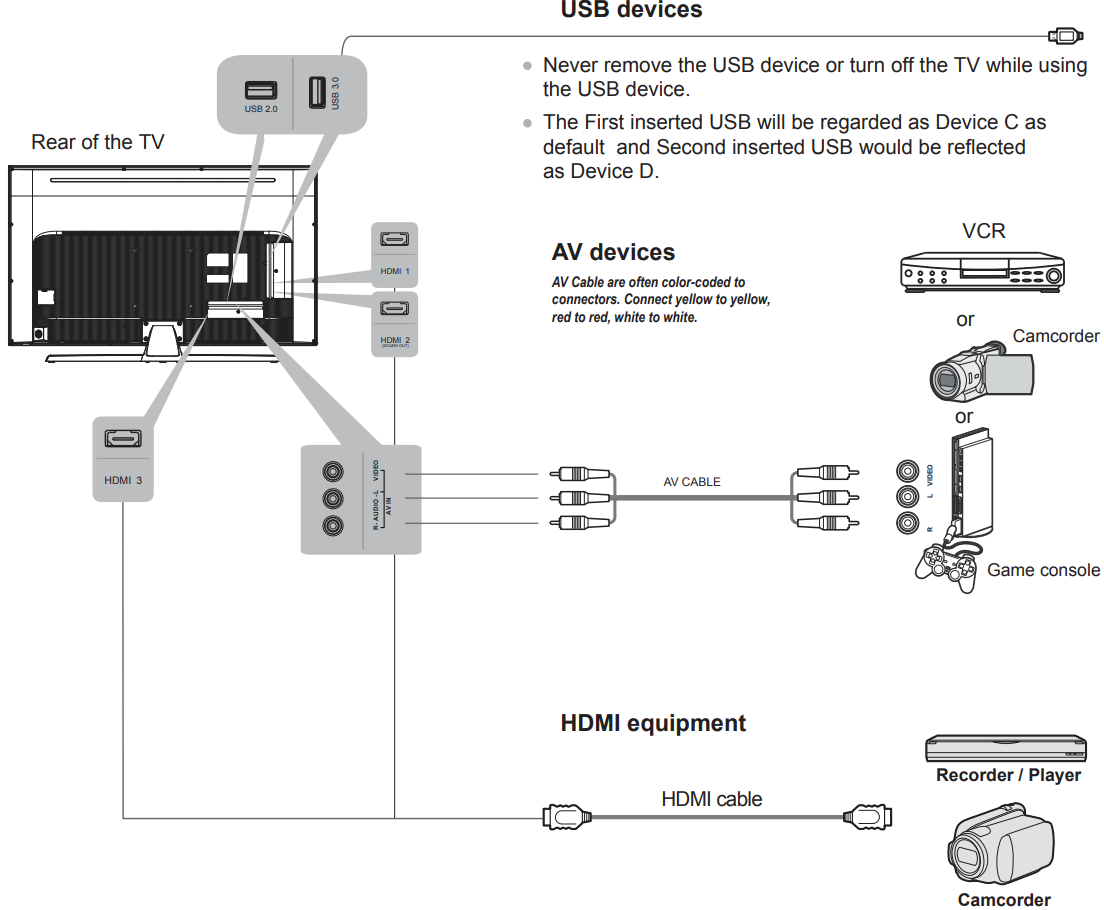
Note: If your device has an HDMI connection, we recommend you use that to get the best quality possible. If the external device has a DVI output only, use a DVI to HDMI adapter cable to connect to the HDMI terminal.
Note: For the audio receiver to control Sound Out, firstly you must have a device that supports HDMI Sound Out, then connect it to the HDMI2 port. When the "Soundbar Setting" is enabled on your TV, the TV set's speakers will mute automatically and the audio will be outputted on your sound device system.
Remote Control Function

Most of your television's functions are available via the menus that appear on the screen. The remote control supplied with your set can be used to navigate through the menus and to configure all the general settings.
 POWER
POWER
(On/Off button) Turns the TV on or off.- INPUT
When pressed, opens the Input source list. Use ◄/► to select the desired option, then press the OK button to select. - 0-9
(Numeric buttons) Enters channel numbers. 
Goes to the YouTube homepage.- VOL +/-
Increases or decreases the TV's volume. - CH v/^
Scans up or down through the current channel list. - MUTE

(MUTE) Reduces the TV's volume to its minimum level. Press again to restore the volume. - MEDIA PLAYER
Goes to the USB menu. - TV
Press to access the TV mode. - MENU
Brings up the menu system. - 🌐
Goes to the browser's's Home Page. - HOME
Goes to the smart TV Home Page. - INFO i
Displays the status information. - EXIT
Exits the menu system. - ▲/▼/◄/►
(Up, down, left, and right direction buttons) Highlights different items in the menu system and adjusts the menu controls. - OK
Confirm your selection. - OPTION

Brings up the options menu. - RETURN
Exit the menu and return to the previous menu. - NETFLIX
Goes to the Netflix Home Page. - Red(R) button
In the corresponding mode, press it to enter the right function as hinted. - Green(G) button
In the corresponding mode, press it to enter the right function as hinted. - Yellow(Y) button
In the corresponding mode, press it to enter the right function as hinted. - Blue(B) button
In the corresponding mode, press it to enter the right function as hinted. - OFF TIMER
Select the sleep timer. - SOUND
Opens the sound modes: Standard, Cinema, Speech, Music, and User. - PICTURE
Opens the picture preset settings: Standard, Cinema, User, Game, and Vivid. - ASPECT
Aspect Ratio: Selects the picture size Auto, 16:9, 4:3, and Just Scan.
Note: Some options may not be selectable for certain signal sources. - TEXT
Not Supported. - LIST
Displays the channel list menu. - PRE-CH
To return to the previous channel. - FAV
Brings up your favorite channel list.
Note: You should set your favorite channel(s) first. - ◀◀
This key will function as a backward play in USB. - ▶▶
This key will function as a forward play in USB. - ❚◀
This key will function as a previous song, video, and picture in USB. - ▶❚
This key will function as the next song, video, or picture on USB. - ■
This key will function as a pause in USB mode. - ▶
This key will function as play & pause in USB mode. - ■
This key will function as a stop in USB mode. - SUBTITLE
Press Subtitle SUBTITLE to choose subtitle language and AD Switch in DTV mode.
Buttons on the TV
Take a certain model for an example:
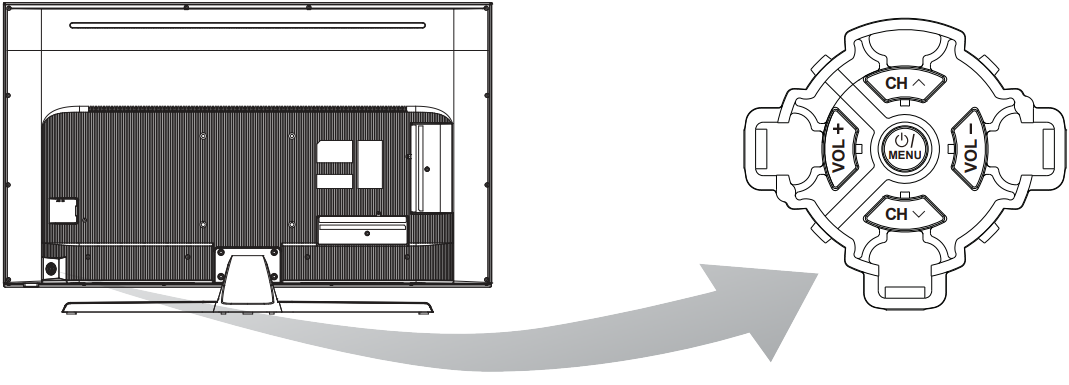
- /MENU button
Turn the TV on or on standby. If the TV is on, press it, bring it up to the selection menu,, or press to return to the previous menu. - VOLUME UP/DOWN button
Increases/decreases the volume. In the menu system, they act like the right/left direction buttons on the remote and adjust menu controls.
(Note: In some menus, VOLUME UP also acts like the OK button on the remote.) - CHANNEL UP/DOWN button
Scans up/down through the channel list. In the menu system, they act like the up/down direction buttons on the remote and adjust menu controls.
Note: The location and names of the function buttons and power buttons on the TV may vary according to the TV model.
Detailed Specifications
The Sanyo XT-49S8200U features a 49-inch LED display with a Full HD resolution of 1920x1080 pixels. It has a refresh rate of 60Hz and supports HDR (High Dynamic Range) for enhanced color accuracy and contrast. This TV also includes built-in Wi-Fi for streaming content directly from popular platforms like Netflix and Hulu.
Other key features include multiple HDMI ports (3), USB ports (2), and an optical audio output. The TV is equipped with Dolby Digital Plus sound technology, ensuring a rich audio experience. Additionally, it supports voice control through compatible devices such as Amazon Alexa or Google Assistant.
Connections and Setup
Switching on
Follow the instructions on this page on how to switch on your TV set and the remote control before going on to the following pages describing how to use the channel set-up procedure.
- Insert two AAA batteries in the remote control.
Precautions on using batteries:- Only use the battery types specified.
- Make sure you use the correct polarity.
- Do not mix new and used batteries.
- Do not use rechargeable batteries.
- Do not expose batteries to excessive heat such as sunshine, fire, or the like, throw them in a fire, recharge them, or try to open them, as this could cause them to leak or explode.
- Remove the batteries from the remote control if you are not using it for a long period.
Connect the power cable FIRST to the television, then to a mains socket.
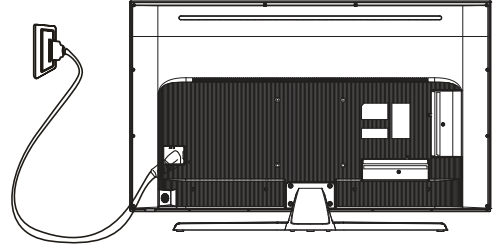
(Note: If the power cable is connected to the television, please only connect the power cable to the main socket.)
Your TV set should only be connected to an AC supply. It must not be connected to a DC supply. If the plug is detached from the cable, do not, under any circumstances, connect it to a mains socket, as there is a risk of electric shock.
Note: The figures are for representation only. The location of the power socket of the television might differ depending on the model.- Connect an outside aerial to the ANTENNA/CABLE IN socket at the back of the TV set.
The aerial socket (75 OHM - VHF / UHF / cable) can be used for connecting an external aerial or other equipment fitted.
Note: If you want to receive the signal from your cable or cable box, please connect a coaxial cable to the ANTENNA/CABLE IN socket at the back of the TV set. When powered on, the TV will be turned on directly or be in standby mode.
If the power indicator lights up, the TV set is in standby mode. Press the button on the remote control or on the TV set to turn on the TV. Switching off
To put the TV set into standby mode, press the d button on the remote control. The TV set remains powered up, but with low energy consumption.
To switch off the TV set, unplug the mains socket from the mains outlet.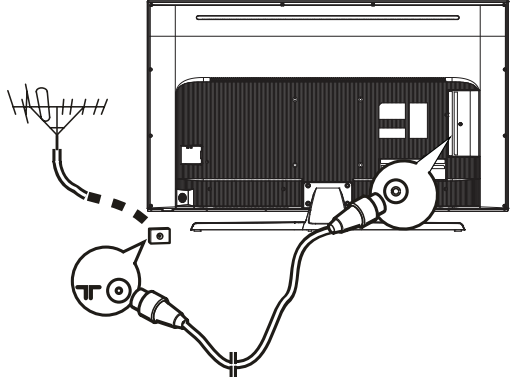
Network Connection
Your TV will require an internet connection to operate all functions. Data usage charges may apply. Please refer to your Internet Service Provider (ISP) for additional information. To access the internet, you must subscribe to high-speed broadband internet service from your internet service provider.
Your TV can be connected to your home network in two ways:
- Wired, using the RJ45 (LAN) connector on the back panel.
- Wireless, using the internal wireless to your home wireless network.
Note: The following instructions are just the usual ways to connect your TV to the wired or wireless network. The connection method may be different depending on your actual network configuration. If you have any questions about your home network, please refer to your ISP(Internet Service Provider).
Connecting to a wired network

To connect to a wired network:
- Ensure you have:
- An ethernet cable long enough to reach your TV
- A router or modem with an available Ethernet port
- A high-speed internet connection
- An Ethernet (LAN) port on the back of the TV
- Connect your ethernet cable to the router and to the Ethernet port on the back of the TV.
- Use the Network Settings to configure the TV.
Connecting to a wireless network
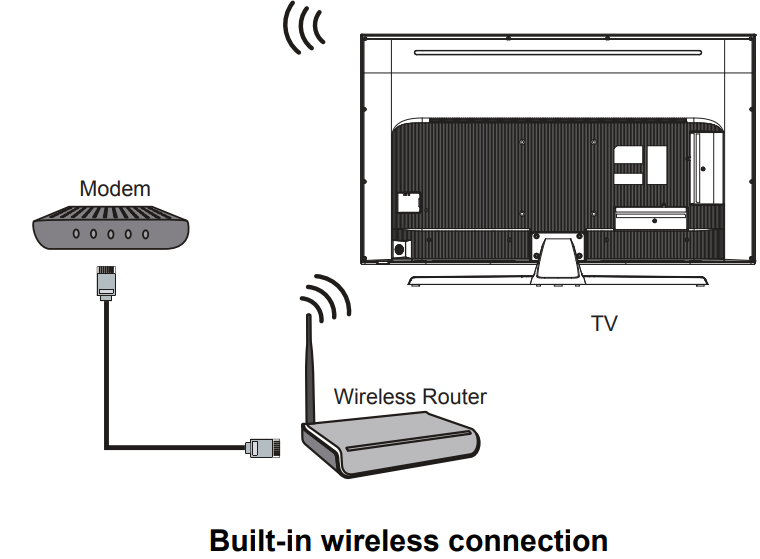
To connect to a wireless network
- Ensure you have:
- A router broadcasting a high-speed wireless signal
- A high-speed internet connection
- Use the Network Settings to configure the TV.
Note: Some models may have no internal wireless module, you can use a wireless network by inserting an external wireless adapter into the USB socket of the TV. Some external wireless adapters can't be compatible with the TV.
ESD regulation
This apparatus meets ESD performance criteria. In case the apparatus does not recover in Ethernet connection mode due to electrostatic discharge, user interference is required
Initial Setup
Initial setup involves selecting all the settings required to be able to search for and store all the analog channels you can receive. Make sure that the television is switched on and follow all the steps in turn specified hereafter.
Note: If the channel search retrieved only a few channels it could be caused by poor broadcasting and therefore is not covered by the manufacturer's warranty. Manufacturers cannot be held responsible for lack of or poor broadcasting in some areas. The first time you switch the set on, the Initial Setup wizard opens, which guides you through the initial setup process.
Step 1: Language
Press ▲ /▼ to select your language. Press OK to confirm and move to the next step.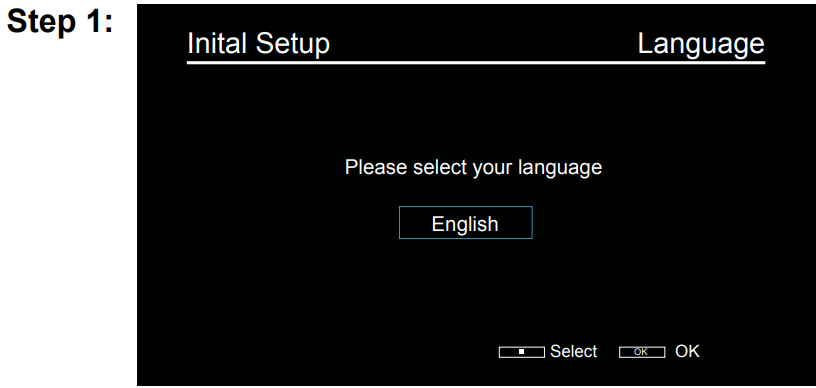
- Step 2: Location
Press ▲ /▼ to select your location. Then press OK to enter the next step.- Home Mode: You will be able to view the standard settings for Picture and sound modes.
Shop Mode: You can enjoy enhanced settings for Picture and Sound modes.
Note: Picture menu settings will not be accessible when you select Shop Mode.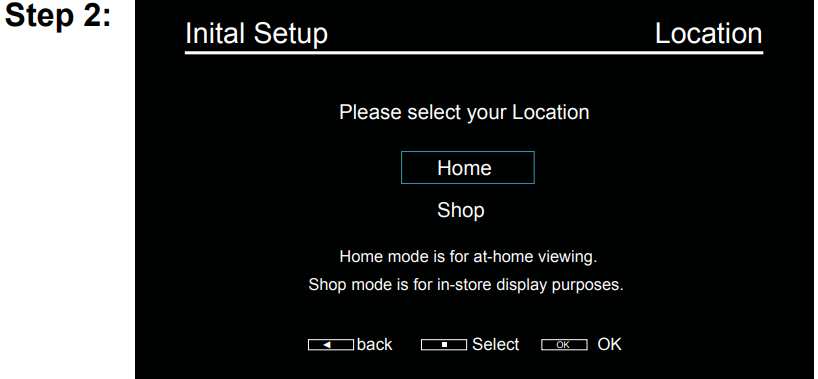
Step 3: Disclaimer
Use ▲ /▼ to read the disclaimer, then press OK to confirm and move to the next step.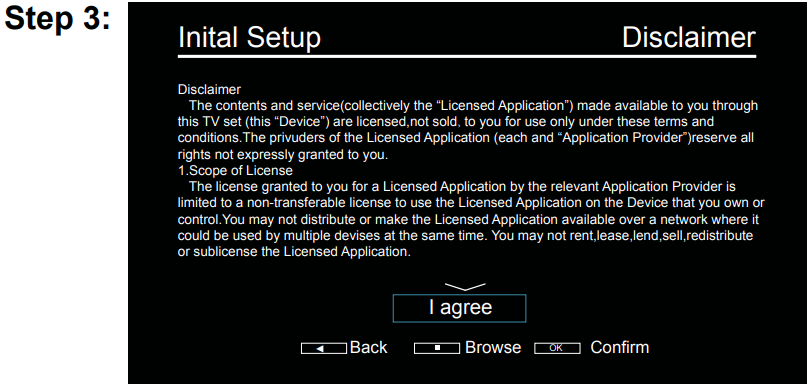
- Step 4: Network Type
- Press ▲ /▼ to select your network connection type(Wired or wireless, then press OK to enter the next step.
Follow the guides on the screen and press the corresponding buttons on the remote control to proceed.
Note: You can also skip this set p .For details please refer to the section Network Connection.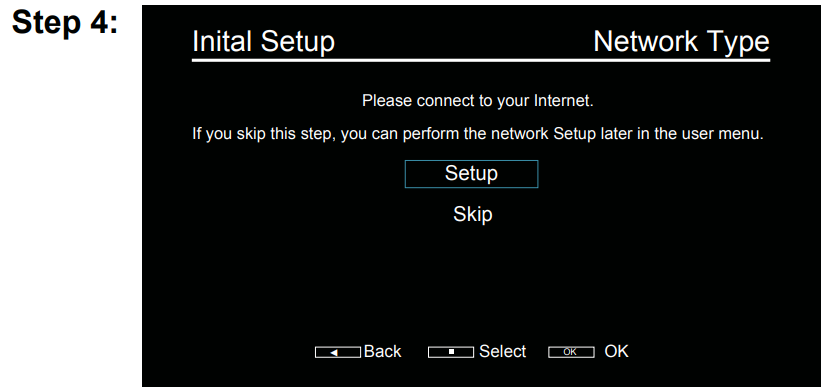
Step 5: Time Zone
Use ▲ /▼ to select your desired Time Zone, then press OK to confirm and move to the next step.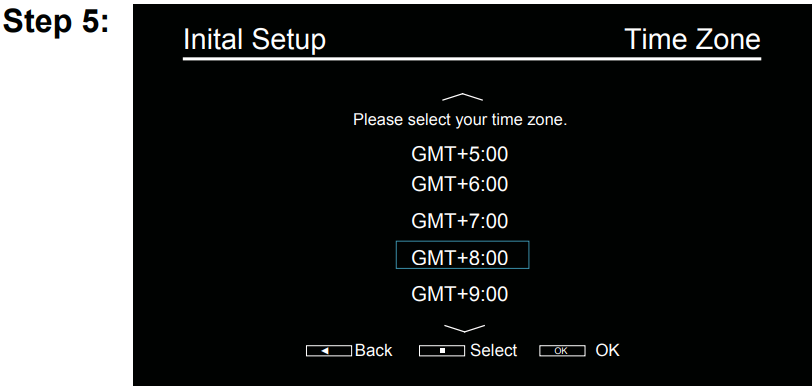
Step 6: Tuner Type
Use ▲ /▼ to select DVBT+ATV or DVBC+ATV, then press OK to confirm and move to the next step.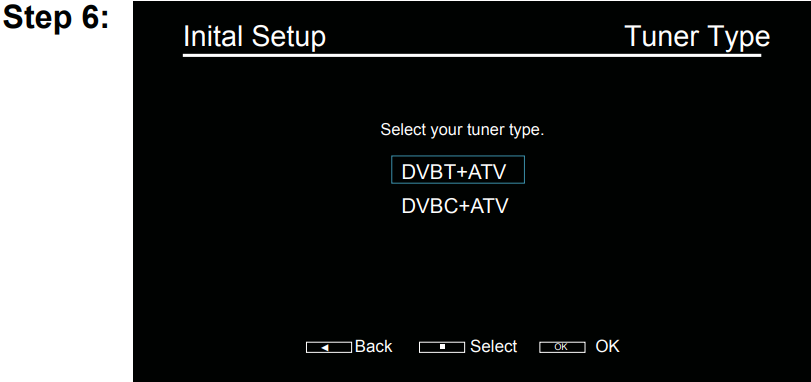
Step 7: Channel Scan
Use ▲ /▼ to select Scan, then press OK to confirm and move to the next step.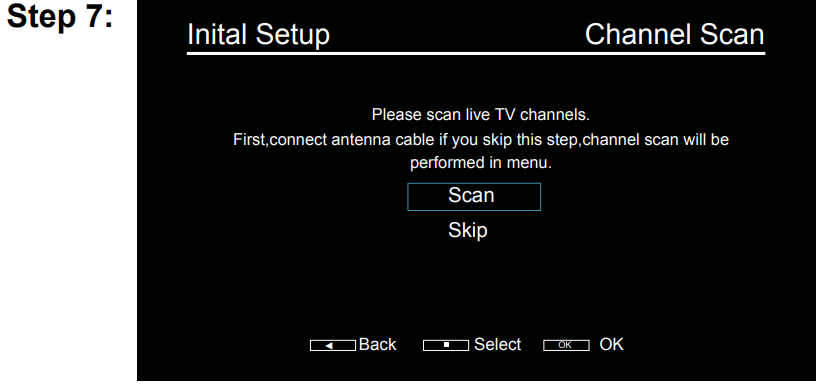
Follow the guides on the screen and press the corresponding buttons on the remote control to proceed.
Note: To prevent the channel installation process from being interrupted, wait for the message indicating that the installation is complete. You can also skip this step by selecting "skip".In this case, to search and store you may do an automatic channel search by follwing the instructions in the next section.
Description
The Sanyo XT-49S8200U LED TV is built with a sleek and slim design, making it a stylish addition to any room. The Full HD display offers crisp visuals with deep blacks and vivid colors, making it perfect for watching movies or playing games. The TV's compact size allows for easy wall mounting or placement on a TV stand.
Using your TV
The user interface is straightforward, with clear menus and settings that are easy to navigate. The remote control is ergonomically designed for comfort and includes quick access buttons to popular streaming services.
Accessing channels
- Using the numeric buttons: press the corresponding numeric buttons on the remote control to access the channels.
- Using the CH v/Abuttons: press the CH v/^ buttons on the remote control or the corresponding buttons on the
- TV set to scroll through the channels.
- Using the LIST buttons: press the LIST buttons on the remote control to display the channel list and press▲ / ▼ / ◄ / ► and OK to select channels.
Watching connected devices
- Press Input then press ◄ / ► to select your desired source, and then press OK to confirm.

Volume
- Volume control: press the VOL +/- buttons on the remote control or the corresponding buttons on the TV set to increase or decrease the volume.
- Sound mute: press the
 button to temporarily mute the sound. Press this button again or the vol + button to restore the sound.
Using Menu System
This section explores the system settings menu of your TV. Each menu is outlined and detailed to help you get the most from your TV. Please note that some functions might be unavailable in certain input sources. To access the menu system:
- Press MENU on the remote control to display the main menu.
- Press ◄ / ► to select TV, PICTURE, SOUND, TIME, SYSTEM and LOCK. Then press OK to enter the submenu.
- In the submenu, press ▲ / ▼ to select menu options, press ▲ / ▼ / ◄ / ► to set functions or change values, and press OK to open the corresponding submenu or activate a setting.
- To return the previous menu, press RETURN. To close the menu, press EXIT.
Note: Figures and illustrations in this User Manual are provided for reference only and may differ from actual product appearance. For some models, certain options are not available.
TV
Select MENU> TV, then the TV menu appears on the screen with the following options. Press ▲ / ▼ to choose an option.
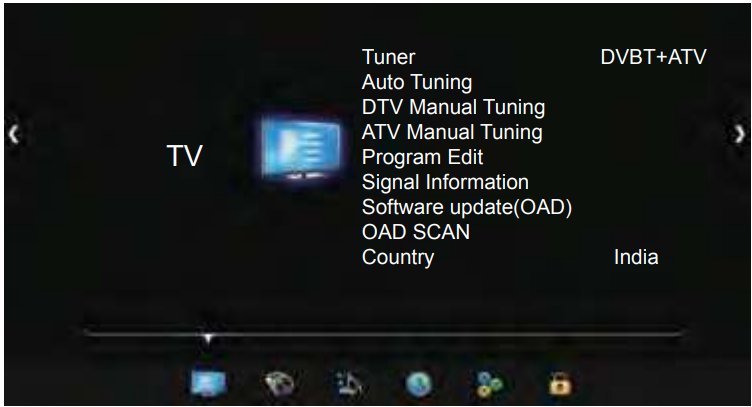
- Tuner: Press OK to enter and use ▲ / ▼ to choose DVBT+ATV or DVBC+ATV.
- Auto Tuning: Press OK to enter and use ◄ / ► to choose DVBT+ATV or DVBC+ATV.
- DTV Manual Tuning: This allows you to scan with a range of channels.
Note: This function is only for digital channels.- Select TV > DTV Manual Tuning, and then press ok to enter.
- Press ◄ / ► to select the channel number.
- Press OK to start the channel scan.
- Press MENU to return or EXIT to close the menu.
- ATV Manual Tuning: This allows you to scan with a range of channels. Operations are similar to that of DTV Manual Search.
Note: This function is only for analog channels.
Program Edit
- Select Channel > Channel Edit and press OK to display the Channel Edit menu.
- Press ▲ / ▼ to select the channel as you desire, then press the RED button on the remote control to set your favorite channel and the green button to skip the channel.
- Press RETURN to return or EXIT to close the menu.
- Signal Information: To show the Signal Information on TV.
- Software update(OAD): The function includes On and Off.
- OAD SCAN: Press OK to enter in OAD Scan. Country: The default mode is India.
Picture
The menus for adjusting the picture are used to obtain the best picture settings according to your preference, the type of program you are watching, and the ambient lighting.
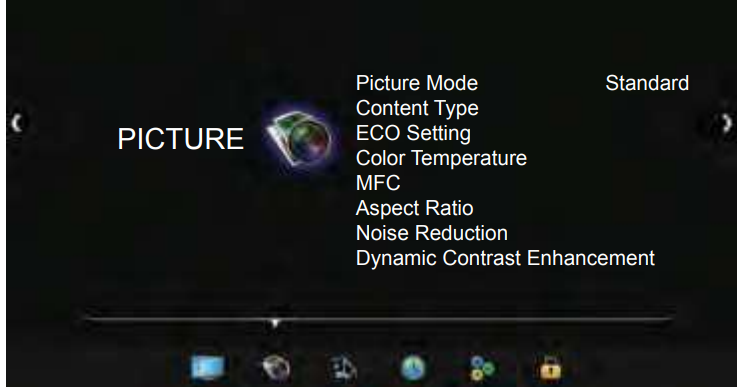
- Picture mode: Press OK to enter, and then press ◄ / ► picture mode: Standard, Cinema, User, Game,, and Vivi .
Note: Picture Mode may be automatically set to User if you make any adjustment to the following picture options. - Content Type: Press OK to enter, and then press ▲ / ▼ to select Video, PC, and Game.
- ECO Setting: Press OK to select On or Off.
- Color Temperature: Adjust the color temperature of the picture. Press ▲ / ▼ to select the color settings: Cool for a more blue palette of picture colors; Normal and Warm for a more red palette of picture colors.
- MFC: Press OK to enter, and press ▲ / ▼ to select Off, Low, Middle, and High.
- Aspect Ratio: Press OK to enter, and press ▲ / ▼ to scroll through the picture mode settings: Auto,4:3, 16:9, Just Scan
- Noise Reduction: Improves the quality of the picture in the case of poor reception. Press ▲ / ▼ to select off, Low, Middle, High, and Auto.
- Dynamic Contrast Enhancement: Press OK to enter and press ▲ / ▼ to select Off/On.
Sound
This menu allows you to adjust each option to obtain the best sound settings to optimize audio output.
- Press MENU to display the main menu and select Sound, then press OK to confirm.
The Sound options are as follows:
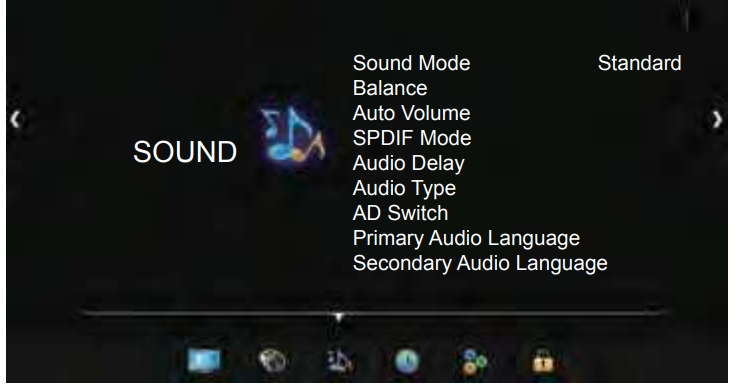
- Sound mode: Press OK to enter, and then press ◄ / ► to choose Standard, Cinema, Speech, Music, and User.
- Balance: Press ◄ / ► to balance the sound between the left and right speakers
- Auto Volume: Press OK to select On or Off.
- SPDIF Mode: Press OK to select PCM, Auto,, or Off
- Audio Delay: This option is used to synchronize the sound with the If the sound is slower/quicker than the action of the picture, you can press ◄ / ► to turn down/up the numerical value.
- Audio Type: Press OK to select Normal or Visual Impaired.
- AD Switch: Press OK to enter, and then press ◄ / ► to choose On or Off.
- Primary Audio Language: Press ▲ / ▼ / ◄ / ► to choose your desired Primary Audio Language.
- Secondary Audio Language: Press ▲ / ▼ / ◄ / ►to choose your desired Secondary Audio Language.
Time
Press the MENU key of the remote to select the TIME menu, which appears on the screen with the following options. Press ▲ / ▼ to choose an option.
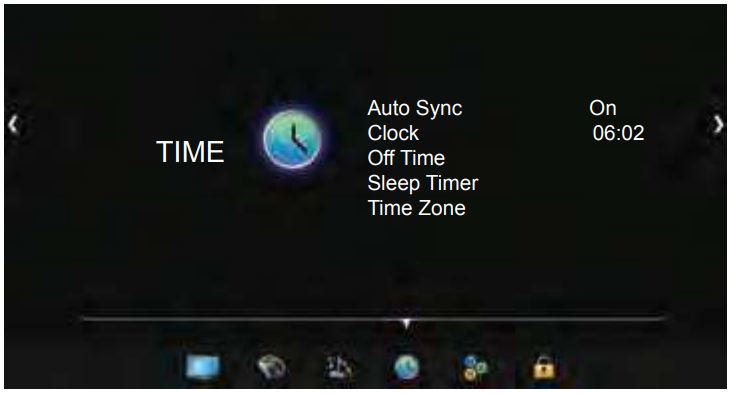
- Auto Sync: Press OK to choose On/Off.
- Clock: Press OK to enter in time and date set menu. Use ▲ / ▼ to select which item will be set and use ◄ / ► to set the item you select. After setting, press the menu to save and return.
- Off time: The function includes Off, Once, Every Day. If you select Once or Daily, then use ▲ / ▼ and ◄ / ►to set off time just as the clock setting menu.
- Sleep Timer: Use ▲ / ▼ to select:Off, 10Min,20Min,30Min, 60Min,90Min, 120Min, 180Min and 240Min.
- Time Zone: Press ▲ / ▼ / ◄ / ► to select the local zone as you want to choose.
Note: The time option will not be memorized when turning on the TV next time. and the TV's time will start from the default.
System
Press the MENU key to select the System menu, which appears on the screen with the following options. Press ▲ / ▼ to choose an option.
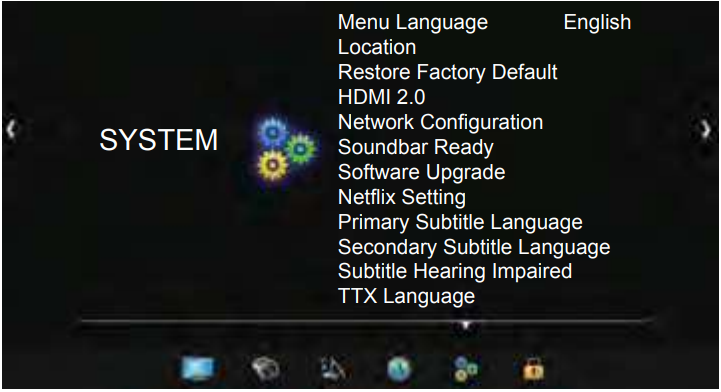
- Menu language: The default mode is English.
- Location: Sets the location of your TV. Press OK to select Home or Shop.
- Home Mode: You Would be able to view the standard settings for Picture and Sound Modes.
- Shop Mode: You can enjoy enhanced settings for Picture and Sound Modes.
Note: Picture menu settings will not be accessible when you select Shop Mode.
- Restore Factory Default: Press OK to display the Lock menu. Use the numeric buttons to enter the password. Select Yes to restore all the settings to factory defaults, or select No to return to the previous menu.
Note: The default password is "0000". And "0812" is the super password. If you forget your password, enter it to override any existing ones. - HDMI 2.0: The functions include On and Off. Note: Only available in HDMI mode.
- Network Configuration: The function includes wired and Wireless. Your TV set supports both Wired and Wireless to access the Internet.
- Soundbar Ready(SOUND OUT): The functions include On and Off.
- Software Upgrade: The function includes Software Version, USB upgrade,, and Network upgrade.
- Software Version: You can check the Software Version in this function.
- USB upgrade: Enables you to install the latest version of the software from your USB ports if available. Select USB upgrade and press OK to enter. Follow the on-screen instructions to continue your installation.
- Network upgrade: Enables you to download and install the latest software version from the Internet. Make sure to set up a wired or wireless network connection first, then select By network and press OK to enter. Follow the on-screen instructions to continue. When a new version of the software is available, a progress bar appears. When the download finishes, the TV will go black and upgrade the software.
(Note: Do not switch off or unplug the TV until the upgrade is completed. Keep a successful network connection during the upgrade.
- Netflix Setting: In the Netflix Settings menu, Netflix Deactivation can deactivate your device from Netflix.
- Primary Subtitle Language: Press ▲ / ▼ / ◄ / ► to choose your desired Primary Subtitle Language.
- Secondary Subtitle Language: Press ▲ / ▼ / ◄ / ► to choose your desired Secondary Subtitle Language.
- Subtitle Hearing Impaired: The function includes On and Off.
- TTX Language: The options include: Russian, East, Arabic, Farsi,, and West.
LOCK
Press MENU to display the main menu and select LOCK then press OK to confirm.Press ▲ / ▼ to choose an option.
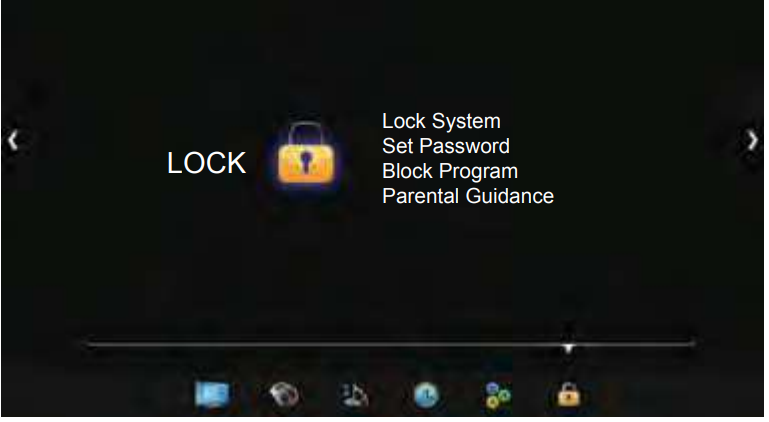
This function allows you to effectively stop anyone without the correct password from watching TV. When you select the Lock System is On, the menu is changed, the options include Set Password, Block Program, and Parental Guidance.
- Set Password: Set a new password for operating the TV. The default password is "0000".
- Block Program: Lock the program you set.
- Parental Guidance: limits the age of watching TV. Options include Off, 4,5,6,7,8,9,10, 11, 12, 13, 14, 15, 16,17, 18.
Note: It is only available in digital mode.
OPTION Menu
Press the OPTION Key of the remote to select the available OPTION Menu.

- Wireless Display: Mirror your Android device onto your Smart TV screen in high definition along with audio Steps
- Go to your cast function/option
- Enjoy the seamless experience
Note- Wireless display creates its own Wi-Fi range, thus it will disconnect from your home Wi-Fi. After exiting the app please give your Smart TV a few seconds to again automatically connect to your home Wi-Fi.
- Some of smartphone versions are not supported due to different technology platforms.
- Enjoy Music: Select this option to enter into Audio Only mode.
- Sleep Timer: The options include: Off, 10Min,20Min,30Min, 60Min,90Min, 120Min, 180Min and 240Min. Soundbar Ready(SOUND OUT): Press OK to select On or Off.
Note: For the audio receiver to control Sound Out, firstly you must have a device that supports HDMI Sound Out, then connect it to the HDMI2 port. When the Soundbar Setting is enabled on your TV, the TV set's speakers will mute automatically and the audio will out outputted on your sound device system. - Sport Mode: Press OK to select On or Off.
NOTE: When you select sport mode on, the Picture and Sound menu will not be accessible. WIFI: Press OK to select On or Off.
Home Page
Press the "Home" key on the remote control to enter into Home Page.

- Source: If you select this icon and press an OK key on the remote, it will show the list of input sources. You can select and enter into the source you want to enter.
- Option: Press this icon to open the Options menu. This Option menu includes features like Wireless display, Enjoy Music, Sleep timer, Soundbar ready,
- Sports Mode: You can select and Press the OK key of the remote to use these options
- App Store: You can select and Press OK to enter into App Store. This will allow you to enjoy internet Applications for your TV.
- Netflix: Press this icon to enter into Netflix application. Netflix is a streaming service that allows users to watch a wide variety of award-winning TV shows, movies, documentaries,, and many more
- YouTube: Press this icon to enter into the YouTube application. Browse this application to watch a wide variety of online videos.
- Hungama: Bollywood Hungama is India's premier Hindi movie portal that provides Bollywood news, movies, songs, videos , and wallpaper.
- YUPPTV: Yupptv is a TV show aggregator. Subscription is required to use this APP.
- Browser: Press this icon to enter into the Brower application. This will allow you to browse the web pages you like
Note- If the current page is not fully opened then please allow progress to complete the loading. Some pages & websites may not be compatible with due to unsupported plug-ins. We recommend a good high-speed internet connection for better accessing of websites, watching Videos & more.
- Some web pages & websites may not be compatible with the browser. For Ex. Login to popular websites, credit card payments, etc
- Eros Now: Press this icon to enter into the Eros Now application.
- Wireless Display: Mirror your Android device onto your
Smart TV screen in high definition along with audio Steps
- Go to your cast function/option
- Search for TV ****
- Enjoy the seamless experience
Note:- Wireless display creates its own Wi-Fi range, thus it will disconnect from your home Wi-Fi. After exiting the app please give your Smart TV a few seconds to again automatically connect to your home Wi-Fi.
Some of smartphone versions are not supported due to different technology platforms.
- GoLive TV: Press this icon to enter into the GoLive TV application. Golive TV is a live HD online cloud service that offers its excellent copyrighted content including a large amount of HD live TV shows and many more.
Note: Changes in applications may be made without prior notice to the customer.
WARNING:
- Configure the network settings before using Smart TV applications.
- Slow responses and/or interruptions may occur, depending on your network conditions.
- If you experience a problem using an application, please contact the content provider.
- According to the circumstances of the content application, sell mica discontinuities or the application itself may be discontinued.
- Depending on your country's regulations, some applications may have limited service or not be supported.
- Changes in application content may be made without prior notice by the service provider.
Multimedia
Connect a USB device to a USB socket and press the MEDIA PLAYER key on the remote to enter USB input mode. You can also select USB input by selecting the input AV button. In the USB state, if no USB device is connected, the USB interface will be displayed.
My Picture
- Select the Picture icon, then press the OK button to view the picture.
- Press the Up, Down, Left,, or Right direction buttons to select your desired picture file and press OK to show.
- While showing the picture, press the Menu key of the remote to display the play console. For the Play console, Left or Right direction button to select an icon, then press the OK button to confirm.
- The Play console includes Play/Pause, Previous, Next, Rotate, Zoom, Volume, Pictrue, BGM, Repeat and Return. For Previous and Next use the remote left and Right keys.
My Movie
- Select the Movie icon, then press the OK button to view movie file.
- Press the Up, Down, Left,, or Right direction buttons to select your desired file and press OK to Play.
- While playing a Video, press the OK Menu of the remote to display the play console. For the Play console, Press the Ok key of the remote to Play and Pause the video file.
- The Play console includes Play/Pause, Fast Backward, Fast Forward, Previous, Next, Mode, Picture, Zoom, Info, Volume, Sound and Return. Use the Left key of the remote to Fast Backward and the right key of the remote to Fast forward.
- Press the Return key of the remote to Stop playing and Press Return to Exit.
My Music
- Select the Music icon, then press the OK button to listen to Music.
- Press the Up, Down, Left,, or Right direction buttons to select your desired file and press OK to Play.
- The Play console includes Play/Pause, Fast Backward, Fast Forward, Previous, Next, Sound, Mode, Info, and Return.
- Press the Return key of the remote to Stop playing.
Notes
- Under the following conditions, this system cannot decode the file and the file cannot be played normally:
- The parameters of the file, such as the pixel of the picture, the code rate of audio and video files, and the sampling rate of an audio file, exceed the limit of the system;
- The format of the file is not matched or the file is harmed
Note: The code rate of this system does not support exceed 20Mbps.
- Hot plug: Do not disconnect when the system is reading or transmitting data, avoid damaging the system or the device.
- Pay attention to the power supply of the device when you are using a mobile hard disk or a digital camera. If the power supply is not sufficient or not stable, you may encounter problems during operation or can not operate at all. In this case, please restart the device, or unplug the device and plug it again, and ensure that its power supply is normal
- The system supports standard USB1.1, USB2.0, and USB3.0 devices, such as standard U-disks, MP3 players, mobile hard disks, etc..
- For obtaining better audio and video quality, It is suggested to use an external device that accords with USB2.0/USB3.0 standard.
- When playing the video with a high compression ratio, these phenomenons, such as picture standstill and menu long time response, are normal.
- For some USB devices with power supply, such as large-size hard disks, MP4, etc., Suggest using it with power to avoid electric power shortage. The parameters of the file, such as the pixel of the picture, the code rate of the audio and video file, and the sampling rate an of an audio file, exceed the limit of the system.
Supported file format in Media Player
Video : | ||||
Video codec | Resolution | Bit Rate | Profi e | Container |
MPEG1/2 | 1080P@30fps | 40Mbps | MP@HL | MPEG program stream (.DAT, .VOB, .MPEG) MP4 (.mp4, .mov) AVI (.avi) MKV (.mkv) |
MPEG4 | 1080P@30fps | 40Mbps | .Simple Profile .Advanced Simple Profi e@Level 5 .GMC is not support | MPEG program stream ( .MPG , .MPEG) MP4 (.mp4, .mov) AVI (.avi) MKV (.mkv) |
H.263 | 1080P@30fps | 40Mbps |
| MP4 (.mp4, .mov) AVI (.avi) MKV (.mkv) |
H.264 | 1080P@30fps | 62.5Mbps | .Main Profi e .High Profi e@Level 4.2 | MP4 (.mp4, .mov) AVI (.avi) MKV (.mkv) |
VC1 | 1080P@30fps | 40Mbps | .Advanced Profile@Level 3 .Simple Profile .Main Profi e | MPEG program stream (.MPG, .MPEG) AVI (.avi) MKV (.mkv) |
Audio : | ||||
Audio codec | Sample rate | Channel | Bit Rate | Container |
MPEG1/2 Layer1 | 16KHz~48KHz | Up to 2 | 32Kbps~448Kbps | Music: MP3 (.mp3) |
MPEG1/2 Layer2 | 16KHz~48KHz | Up to 2 | 8Kbps~384Kbps | Music: MP3 (.mp3) |
MPEG1/2 Layer3 | 16KHz~48KHz | Up to 2 | 8Kbps~320Kbps | Music: MP3 (.mp3) MP4 (.mp4) |
AAC-LC | 8kHz~ 48KHz | Up to 5.1 |
| Music: AAC(.aac) MP4(.mp4) |
AC3 | 32KHZ,44.4KHZ, 48KHZ | Up to 5.1 | 32Kbps~640Kbps | Music: AC3(.ac3) MP4(.m4a) |
Photo : .jpg, .jpeg, .bmp, .png. |
|
|
| |
Setup Guide
To set up your Sanyo XT-49S8200U LED TV, follow these steps:
- Unbox the TV carefully and ensure all components are included.
- Mount the TV on a wall or place it on a TV stand according to the manufacturer's instructions.
- Connect your devices (cable box, gaming console, etc.) using HDMI cables.
- Plug in the power cord and turn on the TV.
- Follow the on-screen instructions to complete the initial setup, including setting up Wi-Fi and configuring your preferred settings.
For pairing with voice control devices, refer to the specific instructions provided by your voice assistant service provider.
Sanyo XT-49S8200U LED TV Troubleshooting
Most problems you encounter with your TV can be corrected by consulting the following troubleshooting list.
No picture, no sound
- Check if the fuse or circuit breaker is working.
- Plug another electrical device into the outlet to make sure it is working or turned on.
- The power plug is in a bad contact with the outlet.
- Check the signal source.
No color
- Change the color system.
- Adjust the saturation.
- Try another channel. The black-white program may be received.
The remote control does not work
- Change the batteries.
- Batteries are not installed correctly.
- The main power is not connected.
No picture, normal sound
- Adjust the brightness and contrast.
- Broadcasting failure may happen.
Normal picture, no sound
- Press the Vol+ button to increase volume.
- Volume is set to mute, press the mute button to restore sound.
- Change the sound system.
- Broadcasting failure may happen.
Unorderly ripples on the picture
It is usually caused by local interference, such as cars, daylight lamps,, and hair driers. Adjust the antenna to minimize the interference.
Blank screen when connected to a computer system
Perhaps the TV cannot recognize the resolution set by the PC. Suggest to change to the best resolution or other standard resolutions of the Windows system.
Snowy dots and interference
If the antenna is located in the fringe area of a television signal where the signal is weak, the picture may be marred by dots. When the signal is extremely weak, it may be necessary to install a special antenna to improve the reception.
- Adjust the position and orientation of the indoor/outdoor antenna.
- Check the connection of the antenna.
- Fine-tune the channel.
- Try another channel. Broadcasting failure may happen.
Ignition
Black spots or horizontal streaks appear, or the picture flutters or drifts. This is usually caused by interference from car ignition systems, neon lamps, electric drills, or other electrical appliances.
Pros & Cons
Pros
- Affordable Price: Offers great value for its price range.
- Full HD Display: Provides clear and vibrant visuals.
- Multiple Connectivity Options: Supports various devices through multiple HDMI and USB ports.
- Energy-Efficient: Designed to be eco-friendly with low power consumption.
Cons
- Limited Viewing Angles: Best viewed from directly in front of the screen.
- No 4K Resolution: Only supports Full HD resolution.
- No Dolby Vision Support: Does not support Dolby Vision technology.
Customer Reviews
Customers generally praise the Sanyo XT-49S8200U for its excellent picture quality and user-friendly interface. However, some users have noted that the viewing angles could be better and that there is no support for 4K resolution or Dolby Vision. Common complaints include limited sound quality without an external soundbar and occasional issues with Wi-Fi connectivity.
Faqs
How big is the Sanyo screen?
Can HDR content be played on the Sanyo?
What kind of smart TV platform does the Sanyo use?
Is there a USB port on the Sanyo?
Can I put the Sanyo on the wall?
How often does the Sanyo XT-49S8200U LED TV flash?
How long does the Sanyo guarantee last?
Leave a Comment
