Scyan Fingerprint Door Lock X5 User Manual
Content
Introduction
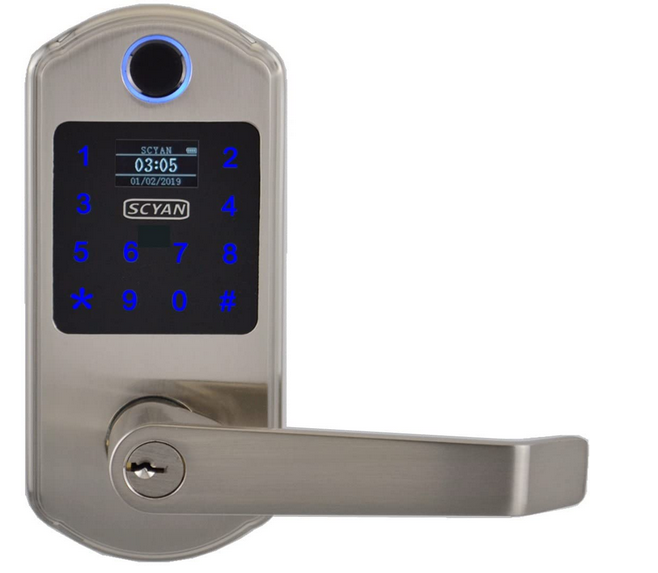
Modern households and companies can benefit from the cutting-edge security solution that is the Scyan Fingerprint Door Lock X5. For safe and speedy entry, this high-tech lock uses biometric fingerprint recognition the X5 guarantees both security and ease of use with its dependable keyless entry system. Featuring state-of-the-art technology, the Scyan Fingerprint Door Lock X5 is perfect for increasing security without sacrificing style.
No more worries about losing your keys—one touch to unlock! The fingerprint sensor in the lock is combined with the touch activating sensor, allowing for easy and fast fingerprint entry. This lock has a self-learning ability, enabling it to update user fingerprint templates after every fingerprint entry, significantly reducing rejection rates compared to other fingerprint lock systems on the market. Equipped with an OLED display, visual menu-based operation becomes a reality. The Audit Trail feature allows lock owners to track entry records, and the double verification feature significantly increases security levels. Enjoy the latest biometric fingerprint technologies, bringing you a convenient and secure lock system.
Specifications
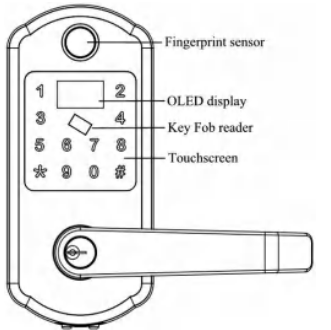
- Fingerprint Sensor: Semiconductor sensor with a sensing array of 160 x 160 pixels. High recognition rate for dry, wet, light texture, and older fingerprints.
- Touchscreen: Virtual 12-key keypad.
- Latch: Single latch, adjustable backset (2 ½" or 2 ¾").
- Door Thickness: Fits doors between 1 ½" and 2 ¼".
- Operating Temperature: -4°F (-20°C) to 151°F (66°C).
- Weather Resistance: Suitable for all weather conditions.
- Power Source: Powered by 4 AA alkaline batteries (not included).
- Warranty: One-year limited manufacturer's warranty.
Features
- Unlock Options: Fingerprint, Code, Key Fob, Fingerprint + Code, Fingerprint + Fingerprint, Fingerprint + Key Fob, or Key.
- User Capacity: Store up to 120 fingerprint users (5 administrators, 115 users).
- Code Capacity: Store up to 300 user codes and 10 one-time codes.
- Key Fob Capacity: Store up to 50 key fobs.
- Audit Trail Logs: Store up to 16384 logs.
- OLED Display: Visual menu and instruction display for easy operation.
- Individual Deletion: Delete individual fingerprint users, user codes, or key fobs.
- Touch Active Sensor: One touch to unlock.
- Self-Learning Ability: Fingerprint template is updated after every fingerprint entry.
- System Login: Two ways to log in—programming code or administrator fingerprint.
- Beeper Sound Option: Option to turn off the beeper sound.
- Double Verification Mode: Unlock by Fingerprint + User Code, Fingerprint + Different Fingerprint, or Fingerprint + Key Fob.
- Passage Mode: Stay at "unlock" during passage mode.
- Memory Function: "Power run-out" will not cause the loss of enrolled fingerprints, user codes, and key fobs.
- Reversible Lever: Fits both left-handled and right-handed doors, controlled by a key.
- Override Key: Uses "Schlage C key" as an override key.
- Additional Power Source: 9V battery may be attached.
- Heavy Duty Construction: Double-shell heavy-duty design.
- Battery Level Display: OLED shows battery level.
How to Scan Your Fingerprint
When scanning your fingerprint, ensure that the core of the fingerprint makes direct contact with the sensor. Apply medium pressure, just enough to flatten the skin on your finger. It is recommended to enroll thumbs or fingers with a visible fingerprint image.
Rules of Operation
Login: Touch the screen with the back of your hand or multiple fingers until digits illuminate, then press *. The login page will appear. Log in with the administrator code or fingerprint. The default administrator code is 1234. Fingerprints with ID 1, 2, 3, 4, or 5 are administrators. After logging in, follow the menu to program fingerprints, user codes, key fobs, one-time codes, or set up the lock.
- "9j" means press 9 to scroll cursor up.
- "0t" means press 0 to scroll cursor down.
- "# Enter" means press # to confirm.
- "* Back" means press * to go to the previous page.
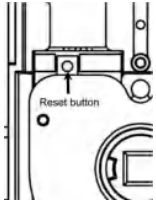
Reset System
To reset the system, press and hold the reset button until you hear a long beep. The reset button is located on the back of the inside unit. If the lock is already installed on a door, you will need to remove the lock to locate the reset button. All fingerprints, user codes, key fobs, and audit trail logs will be removed after reset. The administrator code will revert to the default code 1234, and all settings will revert to factory defaults.
Door Preparation
Tools Needed for New Installation
- Pencil
- Chisel
- Tape Measure
- Hammer
- Phillips Screwdriver
- 1" (25 mm) & ½" (3 mm) Drill Bits
- 2 ½" (54 mm) Hole Boring Bit
- Power Drill
Marking the Door
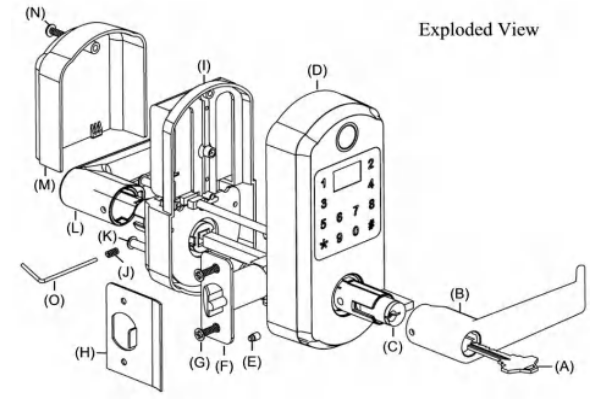
- Mark the centerline of the door and jamb (frame) (see fig. 1).
- Stand so the door swings towards you.
Drilling Holes on Door
- Drill holes on the door (see fig. 2).
Installing the Latch
- Move the latch spindle (with a square hole) to adjust backset to fit either 2 ¾" (60 mm) or 2 ¾" (70 mm) (see fig. 3).
Use the faceplate as a pattern for mortise and pilot hole. The faceplate should fit flush (see fig. 4).
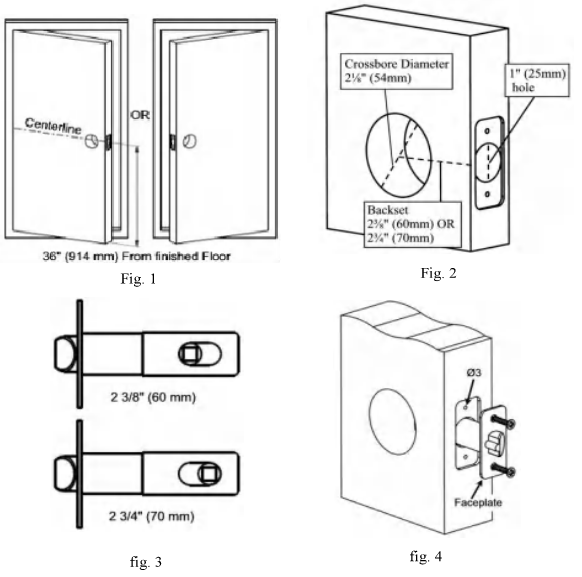
- Install as shown for the appropriate latch type. Ensure bevel faces doorjamb.
Preparing the Door Jamb (Frame)
(see fig. 5)
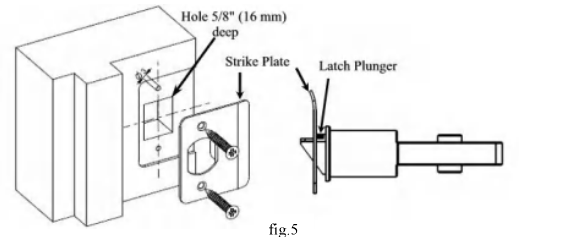
- Mark centerlines on jamb exactly opposite the center of the latch hole.
- Make rectangular holes as shown.
- Use the strike as a pattern for the mortise and pilot hole. Strike should fit flush.
Description
The Scyan Fingerprint Door Lock X5 is a sleek and modern smart lock that is easy to install and provides advanced security for your home or office. Its fingerprint recognition technology ensures that only authorized users can enter, while app control through Bluetooth and Wi-Fi allows for remote access and management. The lock's built-in battery provides up to 6 months of use on a single charge, and its tamper-proof and weather-resistant design ensures long-lasting durability. Additional features such as automatic locking and unlocking, an integrated alarm system, and optional key fob access make the Scyan Fingerprint Door Lock X5 a top choice for smart home enthusiasts.
Lock Installation
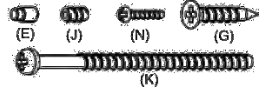
Accessories for Installation
- (A) Key
- (B) Outside Lever
- (C) Cylinder
- (D) Outside Chassis
- (E) Lever Catch
- (F) Latch
- (G) Latch/Strike Screws
- (H) Strike
- (I) Inside Chassis
- (J) Allen Screw
- (K) Mounting Screws
- (L) Inside Lever
- (M) Cover
- (N) Cover Screw
- (O) Allen Wrench
The lock comes with two (K) Mounting Screws M5x60 2¾" (60 mm) long, one (N) M4x25 1" (25 mm) long Cover Screw, one (J) Allen Screw, one (E) Lever Catch, and four (G) Latch/Strike Screws.
Note: The lock fits door thicknesses between 1¾" and 2¼". Contact the manufacturer to order M5x50 (2", 50 mm) screws if your door thickness is less than 1¾".
Important Notes
- Use a Phillips screwdriver. Do not use a power drill for lock installation!
Install and test the lock with the door open to avoid being locked out.
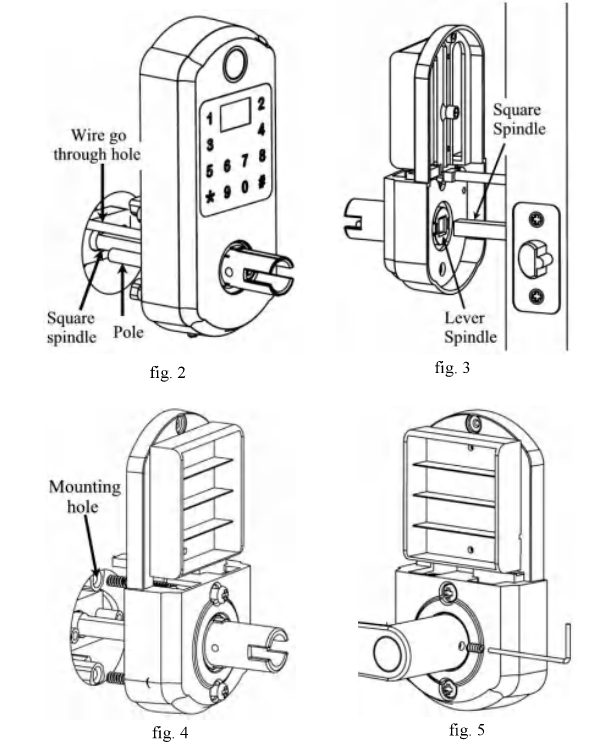
Installing the Lock on the Door
The dent should be in the 12 o'clock position (see fig. 1). If not, rotate the square spindle to position it correctly.
- Install the outside chassis unit (see fig. 2). Slide the wire through the hole in the door. Slide the square spindle and poles smoothly through the holes in the latch. Ensure the outside chassis is vertically aligned during installation. Check latch settings and door dimensions if there are any problems.
- Ensure the inside chassis is vertically aligned during installation. Connect and arrange the wires to ensure they are not pinched or crushed at any point. The square spindle should slide smoothly into the square hole on the lever spindle (see fig. 3).
- Insert mounting screws into the mounting hole on the inside chassis (see fig. 4). Screws should slide smoothly through the hole in the door. Use a Phillips screwdriver to drive the screws into the mounting hole on the mounting poles.
Setting Up Inside Lever
Put the lever on the lever spindle, then use the Allen wrench to insert the Allen screw (see fig. 5). Remove the Allen screw to pull out the lever when necessary.
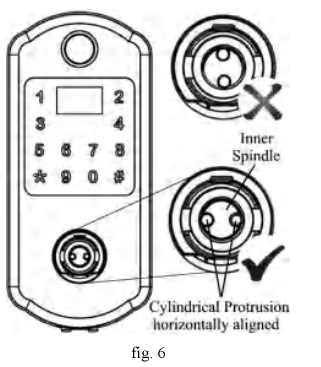
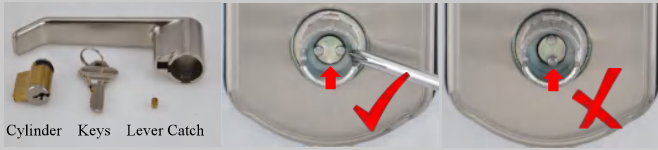
Setting Up Outside Lever
Rotate the inner spindle by screwdriver to make the cylindrical protrusions horizontally aligned (see fig. 6).
Insert the lever catch into the right side hole of the lever spindle completely if your door is left-handed (see fig. 7a), otherwise put it in the left side hole (see fig. 8a). The big end of the lever catch goes into the hole first.
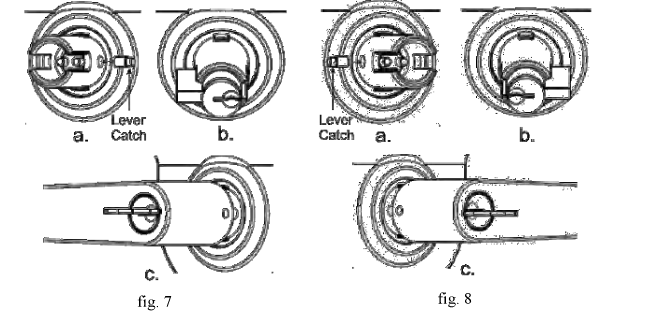
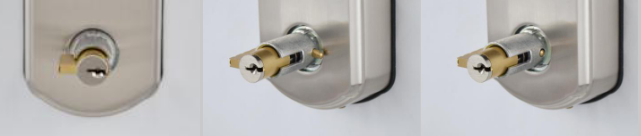
- Insert the cylinder into the lever spindle. The cylinder's tail should be pointed towards the left if you want to set the lock as left-handed (see fig. 7b), otherwise the cylinder's tail should point right (see fig. 8b).
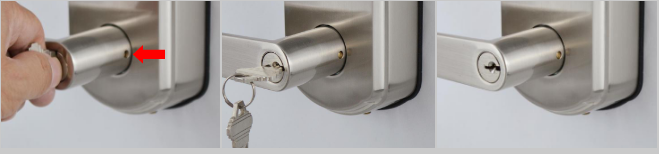
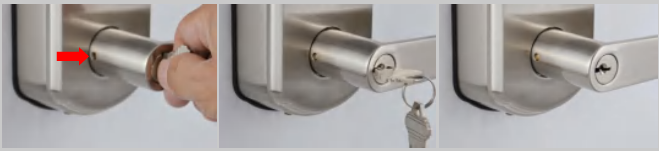
- Put the lever on the lever spindle (see fig. 7c or 8c). The lever should stop halfway when you push it in. Insert the key into the cylinder, rotate the key clockwise 90° (see fig. 9a). Continue rotating the key while pushing the lever until it is pushed in (see fig. 9b). The key range of rotation is from 80° to 120°. Rotate the key counterclockwise (see fig. 9c) then remove the key (see fig. 9d). The lever will stay on the lock and cannot be pulled out after proper setup.
Removing the Lever (if necessary)
Insert the key into the cylinder, then rotate the key CLOCKWISE 90°. Using an Allen wrench or a paper clip, push the lever catch in and pull the lever out (see fig. 10). Rotate the key COUNTER CLOCKWISE 90°, then remove the key. Use a screwdriver to rotate the cylindrical protrusions, causing the lever catch to protrude. Take the lever catch out and keep it in a safe place.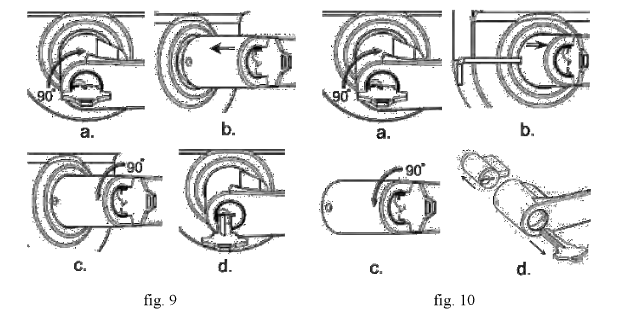
- Switching Levers (if necessary)
Levers can be reversed to extend toward the hinges. Refer to step 3.5 to remove the lever, then follow steps 3.1 to 3.4 to set up the lever.
Install Batteries
Install 4 brand new AA alkaline batteries (NOT included). Do not use rechargeable batteries.
Warning: Do not install backwards, charge, put in fire, or mix with other battery types, as these may explode or leak, causing injury. Replace all batteries at the same time.
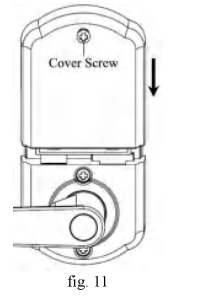
Slide Cover
Slide the cover down, then tighten the cover screw (see figure 11).
Testing Lock
The rear lever should be pushed down and lifted up. Enter the default code 1234, then press #. If the lock is in an unlocked status, it will lock by itself after 5 seconds; otherwise, check if the latch is broken.
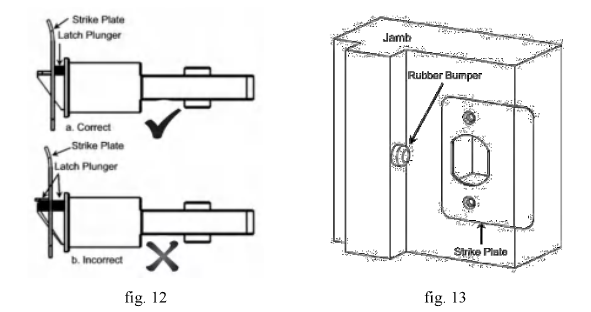
Caution
Please install the strike plate included in the package. Remove any existing strike plate from the door jamb (frame). Check the operation of the latch by ensuring that the latch plunger stops against the strike plate and does not slide into the strike opening when the door is closed (see fig. 12). If this occurs, a total lockout may occur, voiding the warranty of the complete lock mechanism. If necessary, correct door over-travel by using a rubber bumper (see fig. 13), which can be purchased from a local hardware store.
Lock Removal
Reverse steps 5, 4, and 2. Refer to step 3.5 to remove the outside lever. Reverse steps 1.4 and 1.3 to remove the outside chassis and inside chassis from the door.
Setup Guide
Setting up the Scyan Fingerprint Door Lock X5 is simple and straight forward
- Charge the lock's built-in battery to full capacity.
- Install the lock on your door using the included hardware.
- Register your fingerprint and up to 99 additional fingerprints using the lock's touchscreen interface.
- Download the Scyan app and connect the lock to your smartphone via Bluetooth.
- Activate Wi-Fi connectivity for remote access and management.
Product Return
Refer to the installation instructions to remove the lock from the door and remove the levers from the lock. Use mounting screws to put the outside and inside chassis together, and insert the outside and inside lever on the lever spindle. Put them back in the original package. All accessories go in the small box.
Lever setup for Left-Handed Door
Rotate the inner Spindle by using a Screwdriver to make the Cylindrical Protrusions horizontally aligned. This is a very important step.
Insert the Cylinder into the Lever Spindle. Insert the Lever Catch, the big end of the Lever Catch goes into the hole first. Push the Lever Catch in the hole completely.

Put the Lever on the Lever Spindle. The Lever will stop halfway when you push the Lever in. Insert the Key into the Cylinder, rotate the Key CLOCKWISE 90°.
- Push the Lever toward the lock, if the Lever cannot be pushed in, rotate the Key between 80° to 120° while pushing the Lever until the Lever is pushed in completely. Rotate the Key COUNTER CLOCKWISE 90°, take the Key out.
Lever setup for Right-Handed Door
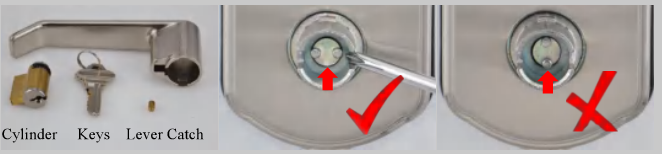
Rotate the inner Spindle by using a Screwdriver to make the Cylindrical Protrusions horizontally aligned. This is a very important step.
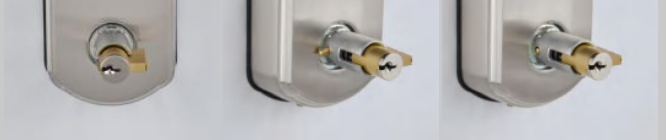
Insert the Cylinder into the Lever Spindle. Insert the Lever Catch, the big end of the Lever Catch goes into the hole first. Push the Lever Catch in the hole completely.
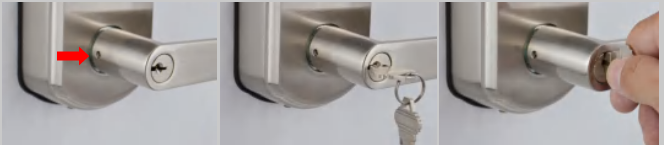
Put the Lever on the Lever Spindle. The Lever will stop halfway when you push the Lever in. Insert the Key into the Cylinder, rotate the Key CLOCKWISE 90°.
- Push the Lever toward the lock, if the Lever cannot be pushed in, rotate the Key between 80° to 120° while pushing the Lever until the Lever is pushed in completely. Rotate the Key COUNTER CLOCKWISE 90°, take the Key out.
Troubleshooting
Problem | Solution |
System crash. The system doesn't accept any command. | Take one battery out, Use multiple fingers to touch keypad for 2 seconds,then place the battery back. |
Battery hot or battery compartment melt. | Remove battery immediately. Take off lock from door, check wire ifit is pinched or crushed. Contact manufacturer. |
No power after placing battery in. | Check wire connection and check battery if it is put in backward. |
Lock stays as unlock. | Unlock by a User Code, a Fingerprint or Key Fob. |
Can't rotaterear lever up or down. | fustallation error,please refer to the installation instruction and re-install the lock. |
Front lever was pulled out |
|
Can notopen door from inside. | Latch broken, change latch. |
Can not open door from outsideafter verification and hear motor noise. | Latch broken if door can beopened when you lift lever up, otherwise contact manufacturerfor help. |
Can not open door from outsideafter verification and no motor noise. | Clutch has problem, contactmanufacturer for help. |
Pros & Cons
Pros:
- Keyless entry and advanced security features
- App control and management through Bluetooth and Wi-Fi
- Long-lasting battery and durable design
- Integrated alarm system and optional key fob access
Cons:
- Slightly higher price point than traditional locks
- Requires occasional battery replacement or charging
Customer Reviews
Customers love the Scyan Fingerprint Door Lock X5 for its sleek design, easy installation, and advanced security features. Some common complaints include occasional connectivity issues and the need for occasional battery replacement or charging.
Faqs
What is the estimated price range of the Scyan?
What is the expected launch date of the Fingerprint Door Lock X5?
How many fingerprints can the Scyan Fingerprint Door Lock X5 recognize?
Can the Scyan Fingerprint Door Lock X5 be controlled remotely?
How long does the Scyan Fingerprint Door Lock X5's battery last?
Is the Scyan Fingerprint Door Lock X5 weather-resistant?
Can the Scyan Fingerprint Door Lock X5 be integrated with a home security system?
How do I reset the Scyan Fingerprint Door Lock X5?
What should I do if my Scyan Fingerprint Door Lock X5 won't unlock?
Can I use a key to unlock the Scyan Fingerprint Door Lock X5?
Leave a Comment