How to Attach: Sekonic LifeMaster Pro Light Meter L-478 Owners Manual
Content
Introduction
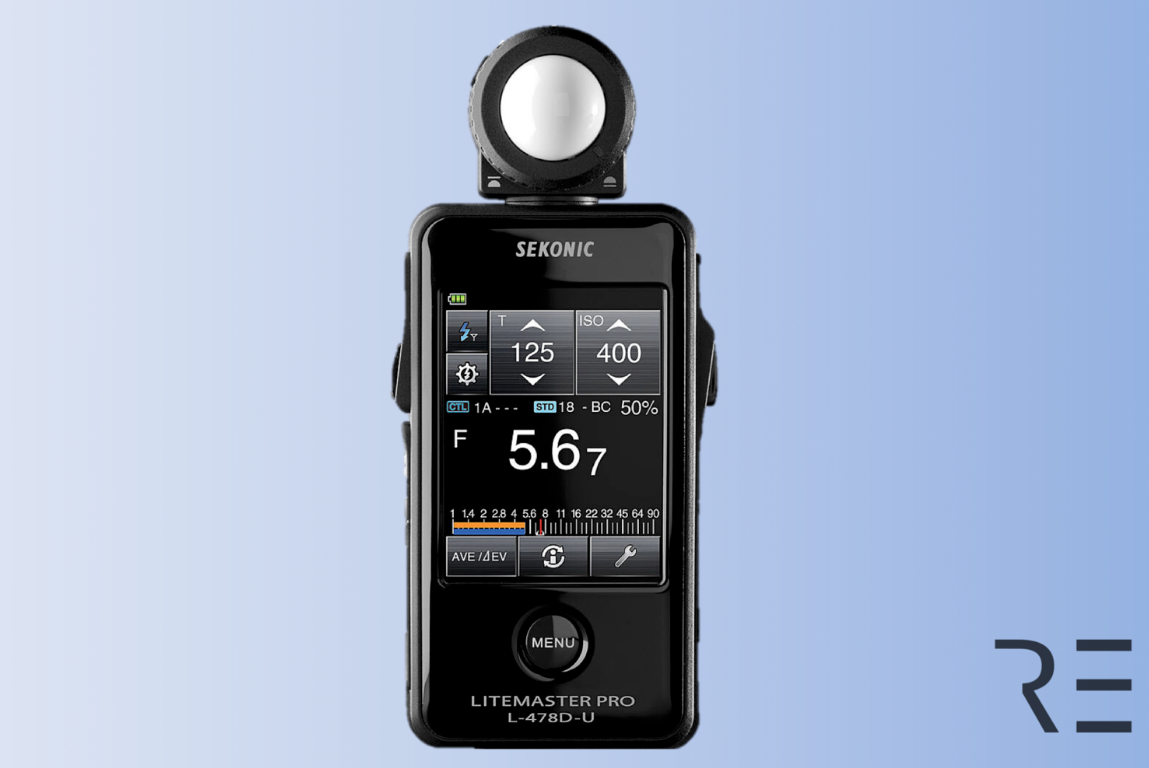
The Sekonic LifeMaster Pro Light Meter L-478 is a versatile and advanced tool designed for photographers and cinematographers. It features a touch-screen interface, built-in PocketWizard technology for wireless flash control, and a wide range of measurement modes including T (shutter speed) priority, F-stop priority, and HD Cine mode. The L-478 offers precise exposure control and is compatible with various camera profiles for repeatable results. The price of the Sekonic LifeMaster Pro Light Meter L-478 is $379.00.
Accompanying Accessories
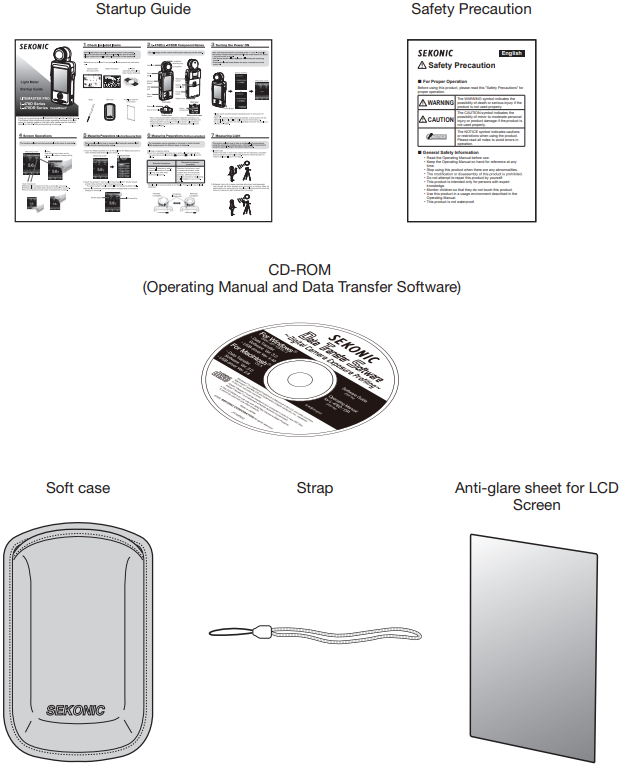
The following items are included with the L-478 Series. After opening the package, please be sure that everything is included. If any of the following items should be missing, please contact your local camera store or retail organization.
Parts Designations
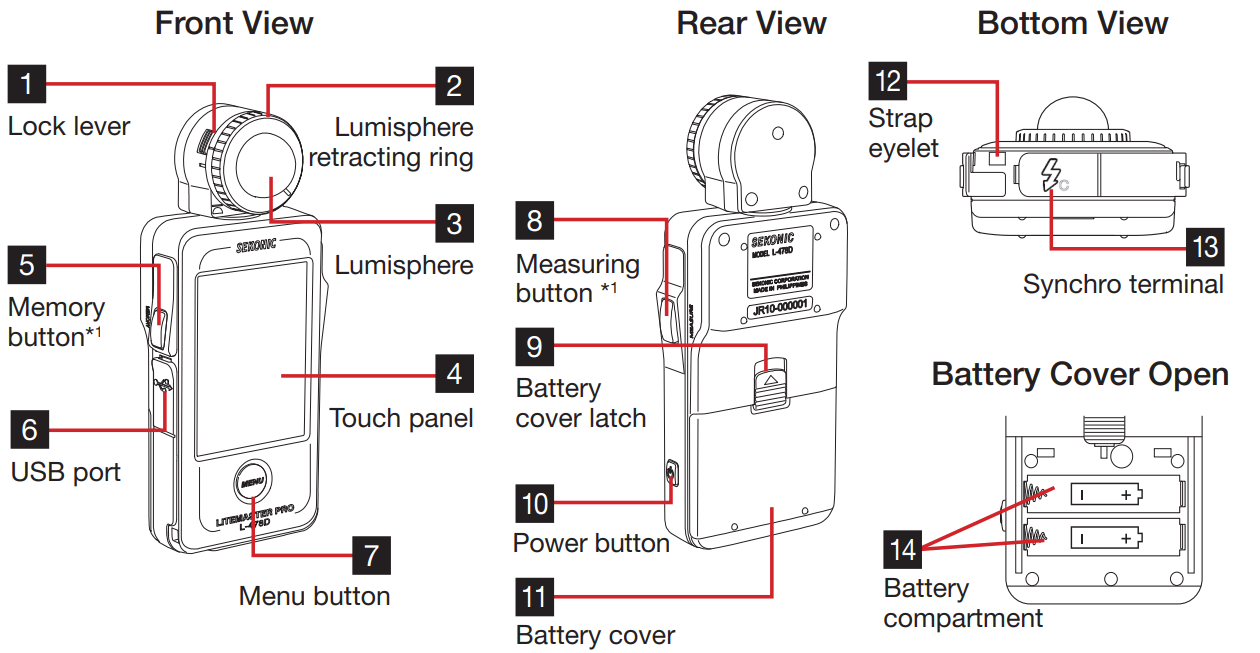
The following table lists the functions of each part.
No. | Part Name | Explanation | ||
1 | Lock lever | Slide back when removing the lumisphere from the meter. (See P24 for details.) | ||
2 | Lumisphere retracting ring | Turn to switch between extended and retracted lumisphere. (See P23 for details.) | ||
3 | Lumisphere | Extend to measure exposure. Retract to measure contrast. Can be freelyrotated through 270°toreceive light. | ||
4 | Touch panel | Displays measuring screens and setting screens. Touch this panel to perform settings and operations. (See P12 for details.) | ||
5 | Memory button*1 | Press to memorize current measured value. Press in multi (cumulative) mode to clear memorized measurements. | ||
6 | USB port | Accepts USB MiniB cable forconnection to computer for use withData Transfer Software. | ||
7 | Menu button | Press to enterMenumode from any of thescreens. Press again to return to the previous screen. (See P21 for details.) | ||
| 8 |
| Measuring button*1 | Press when the Measuring screen is displayed to implement measuring. |
9 | Battery cover latch | Slide up to open battery cover. | ||
10 | Power button | Use to turn power ON and OFF. Hold down (approximately one second) when turning power ON and OFF. | ||
| 11 |
| Battery cover | Lift up to reveal 2x AAA batteries that power the meter. |
12 | Strap eyelet | Attach accessory strap here. | ||
13 | Synchro terminal | Plug in synchro cord (sold separate) connected to separate flash here when using Cord (PC) Mode. | ||
14 | Battery compartment | Hold 2x AAA size batteries. Insert as indicated in compartment. | ||
*1 Using Custom Setting Function, the Memory button 5 and the Measuring button 8 can be switched (See P51 for details.)
Sekonic LifeMaster Pro Light Meter L-478 Specifications
Type:
- Digital light meter for flash and ambient light
Light Receiving Method:
- Incident light and reflected light
Light Receptor:
- Incident light: Lumisphere convertible to flat diffuser (with retracted lumisphere)
- Reflected light: 5-degree spot metering with optional viewfinder
Light Receptor Element:
- Silicon photo diodes
Measuring Mode:
- Ambient Light: Aperture priority measuring, Shutter speed priority measuring, TF priority measuring, Cine measuring, HD Cine camera measuring, Illuminance measuring (lux, foot-candle), Luminance measuring (foot-lambert, cd/m²), Cord Mode (with/without multiple cumulative), Cordless Mode (with/without multiple cumulative), Radio Flash Mode (with/without multiple cumulative) (for L-478DR Series only)
- Flash: Flash priority measuring
Measuring Range (ISO100):
- Ambient Light: Incident light EV-2 (F2.0, 15 sec) to EV22.9 (Approx F22.9, 1/8000 sec), Reflected light EV3.0 to EV19.9, Incident light F1.0 to F128.9, Reflected light F2.8 to F128.9
- Flashlight: 0.63(EV-2.0) to 2,000,000 (EV19.6) lux, 0.10 (EV-2.0) to 180,000 (EV19.6) foot candle, Luminance (Reflected light) 1.0 (EV3) to 980,000 (EV22.9) cd/m², 0.29 (EV1.5) to 290,000 (EV22.9) foot-lambert
Repeat accuracy:
- ±0.1EV or less
Calibration Constant:
- Incident light: Lumisphere C = 340, Flat C = 250
- Reflected light: K = 12.5
Display Range:
- ISO: ISO 3 to 409600 (in 1/3 steps) including 850 as the setting
- Shutter speed: Ambient Light: 30 min to 1/64000 sec (in 1, 1/2 and 1/3 steps), Other possible settings: 1/200, 1/400 sec, Flash light: 30 min to 1/1000 sec (in 1, 1/2 and 1/3 steps), Other possible settings: 1/7.5, 1/8.0, 1/9.0, 1/100, 1/200, 1/400
- Aperture: F0.5 to F161.2(in 1/3steps)
- Frame rate (f/s): 1 to 1000, other possible settings: 20 types
- Shutter angle: 1°to 358°other possible settings: 20 types
- EV value: EV-27.9 to EV55.8 (only effective with Ambient Light)
- Analog display: T scale 4s to 1/8000(in 1/3 steps), F scale F1.0 to F90(in 1/3 steps)
- EV scale: -3EV to +3EV (incident light, in 1/3 steps), -7EV to +7EV (reflected light, in 1/3 steps)
- Illuminance lux: 0 to 50,000 lx
- Illuminance fc (foot candle): 0-5,000 fc
- Luminance cd/m² (candela per square meter): 0~2,500 cd/m²
- Luminance fl (foot-lambert): 0.1~1,000 fl
- Contrast display: -9.9EV to +9.9EV (in 1/10 steps)
- Filter compensation: -12EV to +12EV (in 1/10 steps)
- Filter compensation selection: Maximum of 4 types can be used simultaneously
- Cumulative count: 0 to 99 times (Maximum of 99 times is displayed)
- Compensation display: -9.9EV to +9.9EV (in 1/10 steps)
Other Functions:
- Exposure Compensation: -9.9EV to +9.9EV(in 1/10 steps)
- Exposure profile: Max 10 profiles
- Flash analyzing function: 0 to 100% (in 10% increments)
- Memory function: 9 readings
- Memory clear/recall function
- Average function
- Exposure out of range and display: Under, Over warning display
- Battery power indicator display: 4 stages
- Auto power OFF function: Can be selected at Custom Setting
- Liquid crystal backlight (EL): ON (OFF after set time elapses)
- Touch Panel lock function
- Custom setting function: 13 items
- Battery: Two AAA batteries (alkaline, manganese, lithium or nickel hydride)
Operating temperature range:
- -10°C to 50°C (no condensation)
Storage temperature range:
- -20°C to 60°C (no condensation)
Dimensions:
- Approx 57(W)x140(H)x26(D)mm (excluding protrusions)
Weight:
- Approx 130g (L-478D Series without batteries), 140g (L-478DR Series without batteries)
Standard accessories:
- Soft case, strap, Startup Guide, CD-ROM [Operating Manual (this manual) and Data Transfer Software], Safety Precaution, Anti-glare sheet for LCD Screen
Description
The Sekonic LifeMaster Pro Light Meter L-478 combines accuracy and versatility in a compact, ergonomic design. The device offers multiple measurement modes, including incident, reflected, and cordless flash metering, making it suitable for a wide range of photography and cinematography applications. Additionally, the L-478 features a large, transflective LCD display that allows for easy reading in various lighting conditions. The device supports filter compensation, enabling users to achieve accurate exposure readings even when using polarizing or graduated filters.
Before Using Sekonic LifeMaster
Attaching the Strap
Pass the strap included through the outer hole of the Strap eyelet 12 .
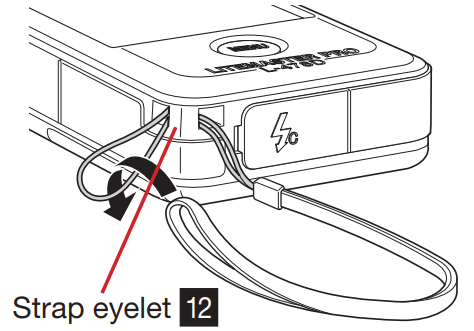
- Pass the opposite end of the strap through the loop at the end of strap.
- Infants or toddlers may accidentally wrap the strap around their neck, so please place it in a location out of their reach. There is a danger of suffocation.
- This neck strap is made of polyester fiber. Please refrain from using the product if synthetic fibers cause your skin to become irritated, inflamed or itchy in order to prevent worsening your symptoms.
Inserting the Batteries
- Requires two AAA alkaline manganese batteries.
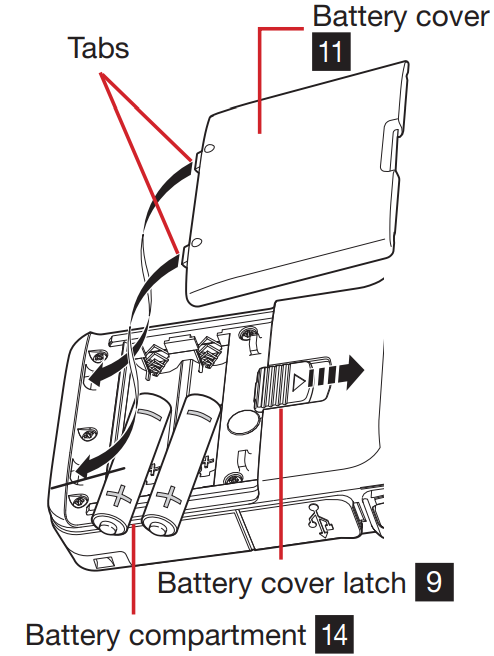
- Slide the Battery cover latch 9 in the direction of the arrow and remove the Battery cover 11 .
- Insert the batteries according to the “+” and “–” symbols in the Battery compartment 14 .
As shown in the diagram to the right, please note both positive sides of the batteries are facing in the same direction. - While lining up the two tabs on the Battery cover 11, press the Battery cover 11 back into place from above.
WARNING
Do not place batteries in open fl ame, attempt to short them, disassemble them, apply heat to them, or recharge them (except rechargeable batteries). They may burst and cause fi res, serious injury, or damage to the environment.
CAUTION
- Insert the batteries minus (-) side first. When removing batteries, pull out plus (+) side first.
- Do not use batteries with any other rating than the one specifi ed. Also, do not mix old and new batteries.
- If the meter will not be used for an extended period of time, it is recommended to remove the batteries to avoid possible damage caused by battery leaking.
Power ON/OFF
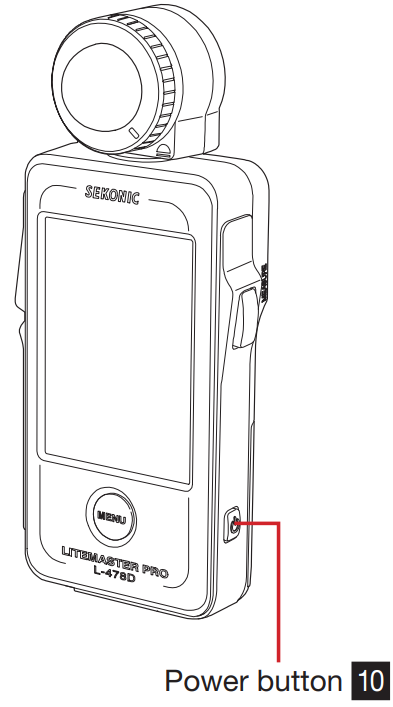
- Power ON: Press the Power button 10 for one second.
The meter will turn on, and after the title screen is displayed, the Measuring screen appears. - Power OFF: Press and hold the Power button 10 for one second or longer.
The meter will turn off and the display disappears.
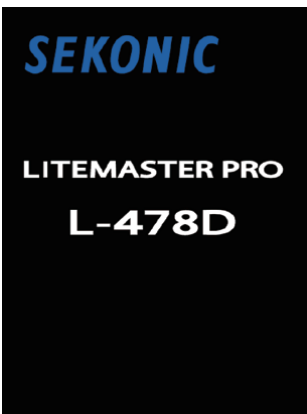
Title Screens L-478D
NOTE
- Please wait 3 seconds between repeated power on and power off sessions.
- Directly after replacing the batteries, a white screen with the SEKONIC logo in blue will be displayed, followed by the appropriate title screen above.
- An L-478 Series memory check is being executed while the blue bar graph is moving when the Logo screen is displayed, so please do not turn OFF the power, as doing so may cause damage.
Logo Screen

REFERENCE
- If the LCD screen shows no display, check the battery capacity indicator. Also check for proper battery insertion (Pos/Neg positioning).
- All settings and measurements made during use are saved in memory even after the meter is powered off.
Checking the Battery Capacity
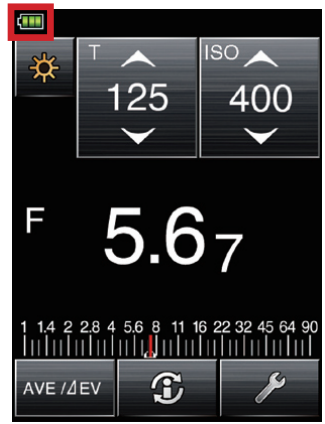
When the power is turned on, the battery power indicator is displayed at the upper left of the LCD.
 Full battery power remaining.
 Sufficient battery power remaining.
 Low battery power remaining. Have spare batteries ready.
  When the indicator blinks, replace batteries immediately.
REFERENCE
- When the batteries are out of power and the meter is turned ON, the LCD screen will appear and then turn off immediately. This is an indication that the batteries are depleted and they should be replaced immediately. Having spare batteries on hand is recommended.
- When the meter is continuously used at room temperature, the battery life with alkaline batteries will last 10 hours
(based on our testing).
Cautions about Changing the Batteries during Measurement
- Always turn off the power before replacing batteries.
- If an unexpected display appears on the LCD during battery replacement or measurement, ie. settings other than selected, or if the meter does not respond when a button is pressed, remove the batteries, wait at least 10 seconds, and then re-install them.
Auto Power OFF Function
To save battery power, the meter will automatically turn off five minutes after the last button is pressed.
REFERENCE
- All settings and measurements are saved in memory even after the meter has automatically turned off. When the power is turned ON, they will be displayed again.
- Default Auto Power OFF is 5 minutes. Select longer time in Custom Setting. (See P51 for details).
- To prevent battery drain during transport, the meter will switch OFF after approximately one mnute if the Power Button 10 is held down continuously.
Setup Guide
- Insert two AA alkaline or lithium batteries into the battery compartment.
- Turn on the device by pressing the power button.
- Select the desired measurement mode using the mode button.
- If using incident metering, point the white dome of the meter toward the light source. For reflected metering, aim the meter at the subject.
- Press the measure button to get the exposure reading.
- If using flash metering, ensure the flash unit is connected via the PC sync terminal or use cordless flash metering.
- Make necessary adjustments to camera settings based on the exposure reading.
Functions
Memory Function
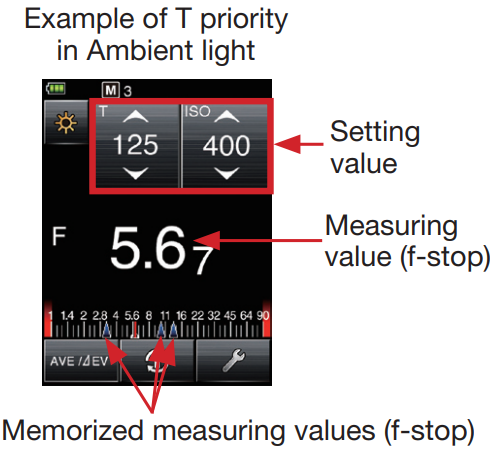
This meter can store up to nine measured values in memory for incident light and reflected light simultaneously. This function can be used in all modes except Illuminance/Luminance measuring and Multiple (cumulative) Flash modes.
Memory
- Press the Measuring button 8 on the side of meter to take a measurement and display a value on the measuring screen.
- Press the Memory button 5 to memorize measured value. And M 1 will appear at the top of the screen to indicate one value has been memorized and an indicator will appear on the analog scale.
- Repeat steps 1 and 2 as desired to memorize up to 9 values for comparison.
NOTE
- Memory Function cannot be used with the following modes.
- Illuminance Measuring Mode (lux, fc)
- Luminance Measuring Mode (cd/m2, fl)
- Cord Flash Accumulative Mode
- Cordless Flash Accumulative Mode
- Radio Flash Accumulative Mode (for L-478DR Series only)
- The tenth or more measurement will be displayed but can not be memorized.
Memory Recall
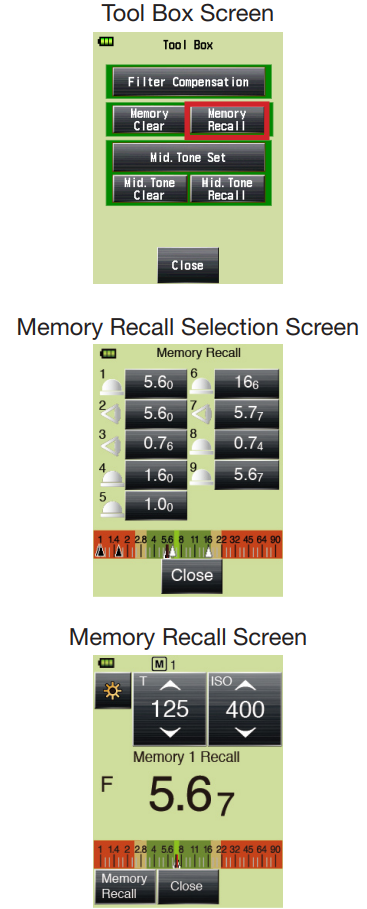
Memorized measurements can be recalled to view each value in detail. The memorized measurements appear in the order they were recorded and incident light or reflected light icons indicate the type of reading made. An analog scale also displays each reading in relationship.
- Touch the Tool Box icon at the bottom of the Measuring screen.
- Touch the [Memory Recall] on the Tool Box screen to view the Memory Recall screen.
- Meaurements will appear, numbered in the order they were made. Touching one of the numbered values will display a Green Measuring Recall screen that indicates all settings made for that measurement.
- Touching the Memory Recall button at the bottom of the screen will return to the Memory Recall screen with all memorized readings displayed.
- Touching the Close button on any screen will return the display to the Measuring screen.
Memory Clear
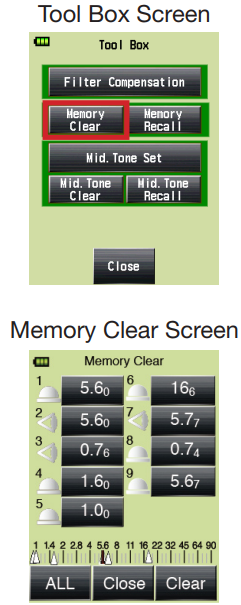
Memorized measuring values can be cleared individually or collectively. The memorized measurements appear in the order they were recorded and incident light or reflected light icons indicate the type of reading made. An analog scale also displays each reading in relationship.
- Touch the Tool Box icon () at the bottom of the Measuring screen.
- Touch the [Memory Clear] on the Tool Box screen to view the Memory Clear screen.
- Measurements will appear, numbered in the order they were made. Touch the measurements you want to clear to see it highlighted. Touch the [Clear] at the bottom of the screen to begin clearing the reading. A Selected Memory Clear Confirmation screen will appear. Press the [OK] to clear the value and return to the Memory Clear screen.
- Repeat steps 2. and 3. above to clear other memorized measurements as desired.
REFERENCE: Touch the [ALL] in step 3) above to begin clearing all readings. A Selected Memory Clear Confirmation screen will appear. Touch the OK button to clear all items and return to the Measuring screen. - Touch the [Close] to return to the Measuring screen.
Optional Accessories
(Sold Separately)
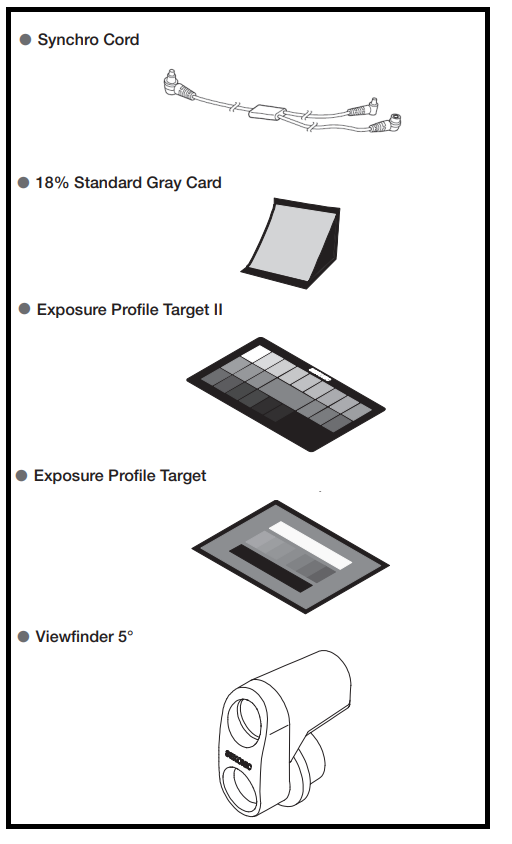
- Synchro Cord
This is a five-meter-long cord with three plugs. An exposure meter, a camera and a flash can all be connected at the same time without the need to plug or unplug the cord during a shooting. Also, one of the terminals has a locking mechanism to ensure connection with a meter.
The cord has two male connectors and one female one. The connector with the lock function is a male one. - 18% Standard Gray Card
This is a gray card (125mm × 130mm = 4.3” x 4”) with 18% reflection ratio, and folds to 72mm x 125mm (=2.8” x 4.9”) to fit in a shirt pocket. Use this for proper reflected light measurements of mostly bright (white) or dark (black) subjects. - Exposure Profile Target II
Simpler to use, this is the test target (350mm × 210mm = 13.8” × 8.3”) used to create camera exposure profiles. One side consists of a central 18% gray patch that is surrounded by 25 patches arranged in 1/6th stop values that are successively brighter and darker, while the other side is 18% gray card, so it can be used to determine digital camera white balancing and spot metering. - Exposure Profile Target
This is a more economical test target (280mm x 180mm = 11” x 7”) used to create camera exposure profiles. One side is nine gray patches including black and white, and the other side is an 18% gray card for digital camera white balancing and spot metering. - Viewfinder 5°
This is a viewfinder with a five-degree light receiving angle for spot metering in reflected light. It is useful for distant subjects such as landscapes, when you cannot go to the position of the subject , or for metering subjects that generate light (neon signs, etc), highly reflective surfaces or translucent subjects (stained glass, etc). (See P24 for details.)
Registered Filters
Preset filters can be displayed in the Filter Compensation Setting. The following are the registered filters name and factor values.
These Filter Name and Filter Factor values are preset, however, can be edited for your preferences.
No. | Filter Name | Filter Factor |
1 | CTO Double | -2.1 |
2 | CTO Full | -1.1 |
3 | CTO Three-Quarter | -0.8 |
4 | CTO Half | -0.5 |
5 | CTO Quarter | -0.3 |
6 | CTO Eighth | -0.1 |
7 | No.85 | -0.8 |
8 | CTB Double | -3.3 |
9 | CTB Full | -1.5 |
10 | CTB Three-Quarter | -1.3 |
11 | CTB Half | -0.9 |
12 | CTB Quarter | -0.4 |
13 | CTB Eighth | -0.3 |
14 | Minusgreen Full | -0.9 |
15 | Minusgreen Half | -0.5 |
16 | Minusgreen Quarter | -0.3 |
17 | Minusgreen Eighth | -0.2 |
18 | Plusgreen Full | -0.4 |
19 | Plusgreen Half | -0.2 |
20 | PlusgreenQuarter | -0.1 |
21 | Plusgreen Eighth | -0.2 |
22 | ND0.3 | -1.0 |
23 | ND0.6 | -2.0 |
24 | ND0.9 | -3.0 |
Safety Precautions
Before using this product, please read this “Safety Precautions” for proper operation.
WARNING: The warning symbol indicates the possibility of death or serious injury if the product is not used properly.
CAUTION: The caution symbol indicates the possibility of minor to moderate personal injury or product damage if the product is not used properly.
NOTE: The note symbol indicates cautions or restrictions when using the product. Please read all notes to avoid errors in operation.
REFERENCE: The reference symbol indicates additional information about the controls or related functions. Reading these is recommended.
WARNING
- Infants or toddlers may accidentally wrap the strap around their neck, so please place it in a location out of their reach. There is a danger of suffocation.
- Do not place batteries in open fl ame, attempt to short them, disassemble them, apply heat to them, or recharge them (except rechargeable batteries). They may burst and cause fi res, serious injury, or damage to the environment.
- Do not look directly at the sun via the viewfinder (sold separately), as doing so may damage eyesight.
- For L-478DR Series only: If user intentionally modifies or converts the L-478DR Series, there is a risk that doing so may violate the Radio Law, which may make the user liable to punishment according to the law.
- Do not touch the sensor inside directly when the light receiving part is detached, as it may cause the damaged parts and/or incorrect measurement.
- This neck strap is made of polyester fiber. Please refrain from using the product if synthetic fibers cause your skin to become irritated, inflamed or itchy in order to prevent worsening your symptoms.
CAUTION
- Do not handle this product with wet hands, leave it in the rain or in a location where it may be splashed with water or come into contact with moisture. There is a danger of electric shock if the “Cord Flash Mode” is used. This may also result in damage to the product.
- Do not disassemble this product for modification or parts replacement. Refer servicing only to qualified and authorized personnel in case of product’s malfunction.
- Do not play the accompanying CD-ROM in a music-type CD player, as there is a risk of hearing damage as well as damage to speakers and/or earphones.
- Use fingers to lightly touch the LCD when operating. Do not use sharp objects such as ballpoint pens or pencils, as doing so may damage the LCD or cause malfunction.
Sekonic LifeMaster Pro Light Meter L-478 Troubleshooting
Condition | Possible reasons | What to do |
The powerdoesn’t turn on. (No display) | Was the power button pressed and held in for more than one second? | Hold the power supply button downfor more than one second. |
| Batteries installed properly ( )? | Check the display ( ). (Referto page 9.) | |
| Batteries dead? | Replace the batteries. (Refer to page 9.) | |
| Battery terminals dirty? | Wipe them with a dry cloth. | |
| Correct batteries being used? | Check the batteries. (Refer to page 9.) | |
TheLCD screen doesn’t respond. | Is thescreen locked? | Hold down the Menu button to release the screen lock. (Refer to page 14.) |
Can’t measure. | Is it connected to a PC with the USB cable? | Remove the USB cable. (Refer to page16.) |
| Have measuring button and memory button functions been switched? | Check the custom setting function (refer to page 51) and switch the buttons if necessary. | |
Measured value doesnot look correct. | Is the lumisphere retracting ring at an intermediate position? | Rotate the lumisphere retracting ring untilit clicks into place. (Referto page 23.) |
| +/- values in ADJ (Exposure Compensation) or Filter area of Information Screen in use? | Touch Info iconto check theexposure compensation (referto page 48) or filter compensation (refer to page 44) are set correctly. | |
| Exposure Profile in use? | Check if correct exposure profile is selected inTool Box, or properly created (refer to page52). | |
| Is an user calibration set with the hardware setting function? | Check the usercalibration (refer to page 59), and check whether the set value is correct or not. | |
| Measuring mode setfor type of light being measured? | Check measuring mode Icon. To change, touch Icon to go to Measuring Mode Selection screen. | |
Flash being measured in cordless mode set for TTL or Auto? (Preflash being measured instead of exposure flash.) | Select manualmodes for flashin use. Exposure meters cannot measure TTL flash. | |
In HD Cine mode, cannot set lowershutter speed. | Normal function. Shutterspeeds cannot be set lower thanthe selected framerate. (For example, if the framerate is set to 15 f/s, the shutter speed can only be set up to 1/15s.) | Select lower frame rate. Increase brightness to get desired F-number. |
Displayed shutter speedand aperture valuesdo not look like camera’s settings. | Are display stepsset for full or 1/2 or 1/3 equal to your camera? | Press MENU button. Select 3. Custom Setting. SelectIncrements of T+F to set display properly. |
| Can’t use the memory | The memory function can’t be used in the following measuring modes.
| Use the memory function in modes other than those on the left. |
Is “Memory Full” displayed when you press the memory button? The memory can be used 9 times. | If you can’t put the 10th or later measured value into the memory, clearunnecessary memory valueson the memoryclear screen, and then measure and store the value again. | |
The EV value isn’tdisplayed. | The EV value is displayed in the following measuring modes.
| Use a measuring mode which displays the EV value. |
The EV scale isn’t displayed even though it is selected. | The EV scale can’tbe displayed in the following measuring modes.
| Use the EV scalein a flash mode otherthan a cumulative mode. The measuring value scale (f-stop value) can be used in cumulative modes. |
Flash doesnot trigger evenwhen radio triggering mode is set. | Is the radio receiver in the flash compatiblewith the meter’s transmitter. That is, is the receiver made by PocketWizard, Elinchrom, or Phottix Strato II. | Use a receiver whichhas the same radio wave system. Elinchrom: www.elinchrom.com PocketWizard: www.pocketwizard.com Phottix: www.phottix.com |
Are themeter transmitter andreceiver set for the same channel number? | Set thesame channel numberand group number on the transmitter and receiver. | |
<Elinchrom> Are themeter and receiver both set for Normal or Speed Mode? | Check that the transmitter and receiver are both setto the samemode (either thenormal mode or speed mode). | |
<PocketWizard> Are the meter and receiver set for the same ControlTL and/or Standard Channel and Zone? | Check thatthe transmitter andreceiver are both set to the same system (either the standard system or ControlTL system). | |
<PocketWizard> Are themeter transmitter andreceiver set for the same frequency? | As thereare two typesof frequency (FCC&IC (344 MHz band)and CE (433MHz band)), ensure that the transmitter and frequency have the same specifications (frequency). | |
<Phottix> Are the receivers StratoII compatible? | The meter includes Strato II only. Indra and Mitros+ flashes can be set to receiveStrato II transmission. | |
Error 10 is displayed. | Did you turn the power supply off or remove the USB cable while updating the firmware on the data transfer software “Update” screen? | Overwrite the firmware on the data transfer software “Update” screen. |
Pros & Cons
Pros
- High precision and versatility
- Large transflective LCD display
- Supports filter compensation
- Multiple measurement modes
Cons
- Price may be prohibitive for some users
- Slightly larger and heavier than some competing meters
Faqs
What is the warranty period for the Sekonic LifeMaster Pro Light Meter L-478?
How do I get the Sekonic to work right?
There is an ISO setting on the Sekonic LifeMaster Pro Light Meter L-478. How do I change it?
What's the difference between the L-478's ambient and flash sensing modes?
The Sekonic has a tablet. How do I use it?
How do I make the Sekonic L-478's code stand up to date?
In what way does the Sekonic LifeMaster Pro Light Meter L-478 film mode work?
How do I figure out how long the flash lasts on the Sekonic?
What's the big difference between the L-478D and L-478DR?
On the Sekonic L-478, is it possible to save my own profiles?
Leave a Comment
