
How To Setup: Sena Motorcycle BT Camera 10C-PRO User Guide
Content
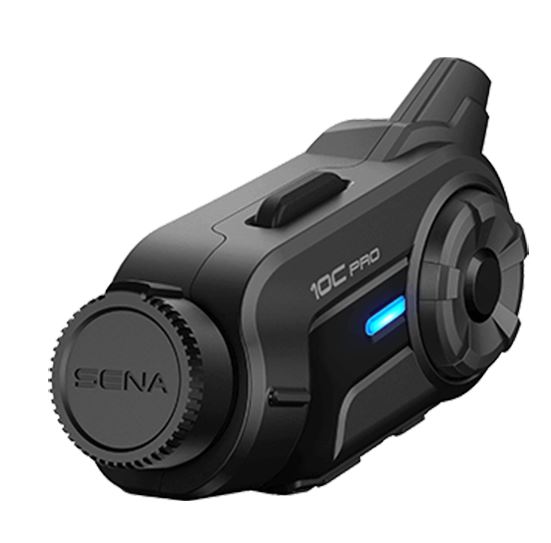
Sena Motorcycle BT Camera 10C-PRO
Introduction
The Sena Motorcycle BT Camera 10C-PRO is a cutting-edge device designed to enhance the riding experience for motorcyclists. This camera is part of Sena's renowned 10C series, known for its high-quality video and audio capabilities. The 10C-PRO is specifically tailored for motorcycle use, offering a unique blend of functionality and durability.
This camera serves multiple purposes, including capturing ride footage, providing evidence in case of an accident, and offering a live view for rear or blind-spot monitoring. With its Bluetooth integration, riders can pair it with Sena headsets or other compatible devices to stream video and audio in real-time.
The estimated price for the Sena Motorcycle BT Camera 10C-PRO is around $399, although prices may vary depending on the retailer and any bundles or promotions. The product was launched in early 2023, making it one of the latest additions to Sena's lineup of motorcycle accessories.
Detailed Specifications
- Resolution: 1080p at 30fps, 720p at 60fps
- Field of View: 135 degrees
- Memory: MicroSD card slot (up to 128GB)
- Battery Life: Up to 2 hours of recording time
- Bluetooth: Integration with Sena headsets and other Bluetooth devices
- Dimensions: 95 mm x 59 mm x 31 mm (3.74 in x 2.32 in x 1.22 in)
- Weight: Approximately 120 grams (4.3 oz)
Installation
Installing the Main Unit
- Using the Clamp Unit
- Loosen the two screws on the back plate of the clamp unit with the included allen wrench.
Insert the back plate of the clamp unit between the internal padding and external shell of the left side of the helmet.
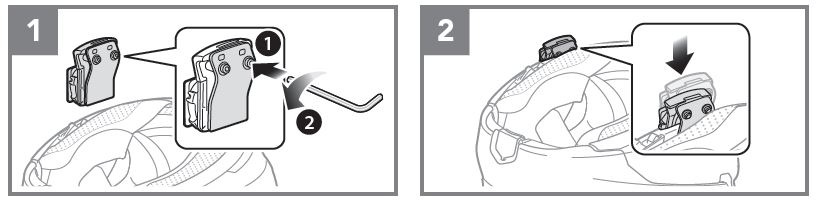
- Tighten the two screws until the clamp unit is fastened firmly to the helmet.
Insert a microSD card into the card slot to use camera.
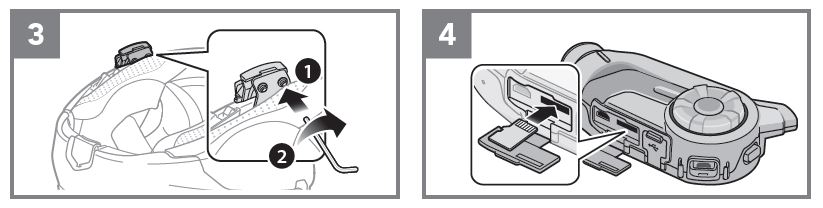
Attach the main unit to the clamp unit until you hear a click.
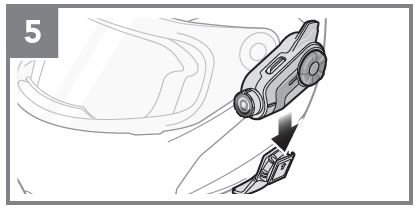
- Using the Glued Surface Mounting Plate: If you cannot install the clamp unit on the helmet, you can use the glued surface mounting plate to attach the clamp unit to the surface of the helmet.
- Attach adhesive tape of the glued surface mounting plate to the helmet.
Make sure that the glued surface mounting plate sticks on the helmet firmly. Maximum adhesion occurs after 24 hours.
Attach the main unit to the glued surface mounting plate until you hear a click.
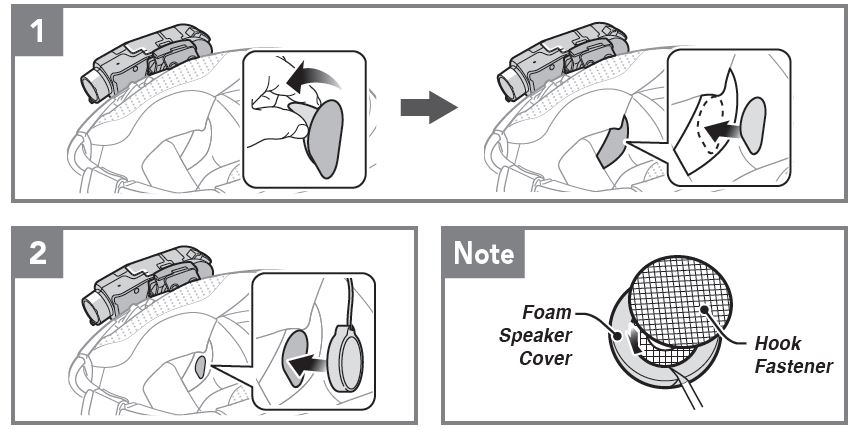
Installing the Speakers
- Attach the hook and loop fasteners for speakers to ear pockets inside the helmet.
- Attach the speakers to the hook and loop fasteners for speakers inside the helmet.
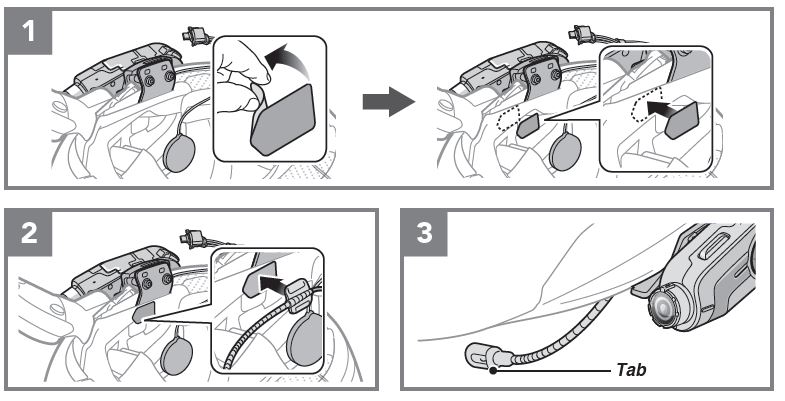
Installing the Microphone
- Using the Attachable Boom Microphone
- Attach the hook and loop fastener for attachable boom microphone on the inside surface of the left external shell.
- Attach the attachable boom microphone’s mounting plate to the hook and loop fastener.
Adjust the head of the microphone so that the tab is facing away from your mouth.
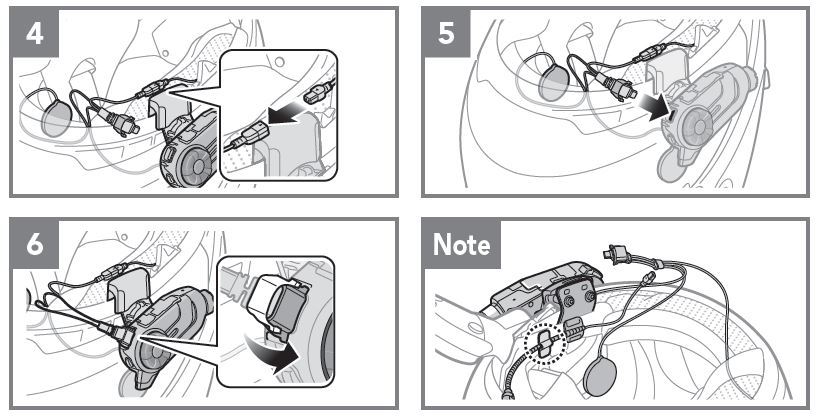
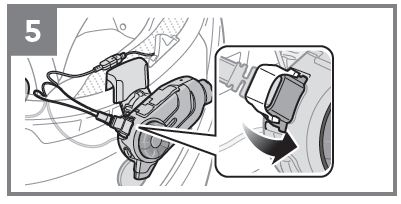
- Align the arrows on the microphone and speaker cables and insert the microphone cable into the speaker cable.
- Insert the speaker connector into the speaker port to connect it to the main unit.
Close the cover of the speaker cable to lock the cable to the port.
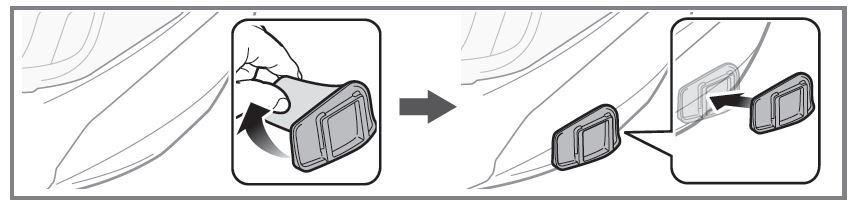
- Using the Wired Microphone: If you have a full face helmet, you can use the wired microphone.
- Attach the included hook and loop fastener for wired microphone to the inside of the helmet’s chin guard.
Attach the wired microphone to the hook and loop fastener for wired microphone.
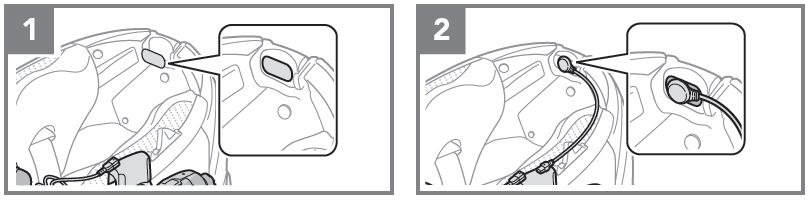
- Align the arrows on the microphone and speaker cables and insert the microphone cable into the speaker cable.
Insert the speaker connector into the speaker port to connect it to the main unit.
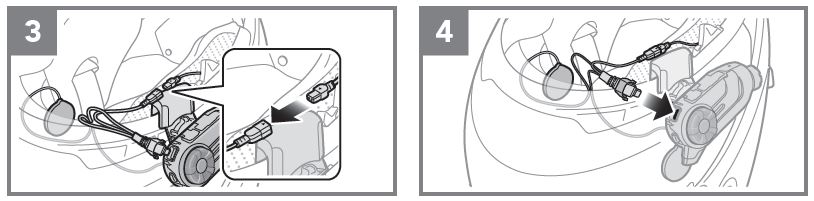
Close the cover of the speaker cable to lock the cable to the port.
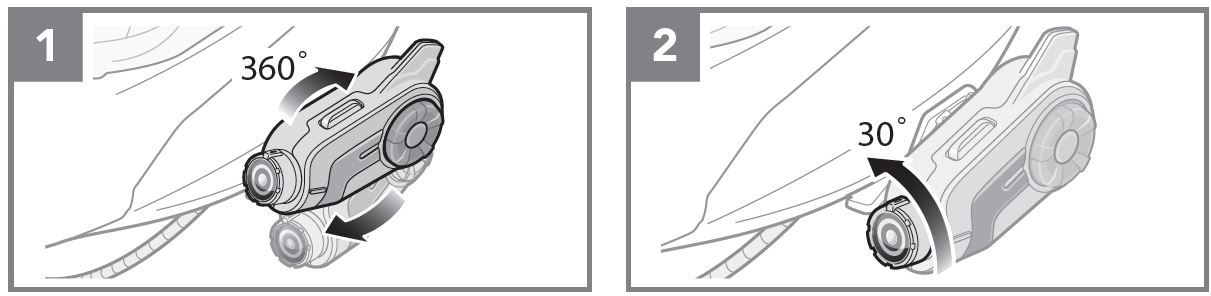
Adjusting the angle
You can adjust the angle for taking photos or recording videos.
- You can rotate the vertical angle by 360º. Loosen the wheel next to the main unit and rotate the main unit to set the desired angle. Tighten the wheel to lock it into position.
You can rotate the horizontal angle by 30º. Open the cover of the lens and rotate the lens to set the desired angle. The red tip of the lens should be perpendicular to the ground.
Getting Started
Product Details
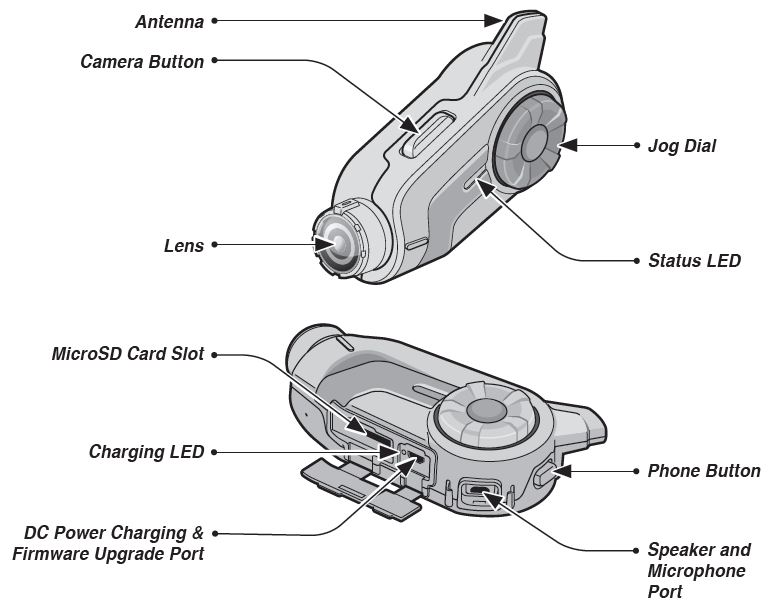
Powering On and Off
Press the Jog Dial and the Phone Button for 1 second to power on. Tap the Jog Dial and the Phone Button to power off.
Charging
The headset can be charged using many common methods via the supplied USB power & data cable. The LED turns red while the headset is charging and turns blue when it is fully charged. Depending upon the charging method, the headset will be fully charged in about 3.5 hours.
Checking the Battery Level
- LED Indicator: When the headset is powering on, the red LED flashes rapidly indicating the battery level.
- 4 flashes = High, 70~100%
- 3 flashes = Medium, 30~70%
- 2 flashes = Low, 0~30%
- Voice Prompt Indicator: When you power on the headset, keep pressing the Jog Dial and the Phone Button simultaneously for about 5 seconds until you hear high tone triple beeps. Then you will hear a voice prompt indicating the battery level is high, medium, or low.
Volume Adjustment
You can raise or lower the volume by rotating the Jog Dial. Volume is set and maintained independently at different levels for each audio source, even when the headset is rebooted.
Sena Softwares
- Sena Device Manager: You can upgrade the headset’s firmware and configure its settings directly from your PC or Apple computer. Download the Sena Device Manager, please visit sena.com.
- Sena Smartphone App: You can configure its settings directly from your smartphone. Download the Sena Smartphone App for Android or Apple operating systems from sena.com.
- Sena Camera App: You can see a live preview from the camera, manage recorded videos as well as configure the video settings using the built-in WiFi feature. When the camera and the Sena Camera App are connected, the camera is synchronized with the smartphone’s date and time. Download the Sena Camera App for Android and Apple operating systems from sena.com.
Note:
- When the camera is powered on, WiFi is automatically powered on and set to its default settings.
- WiFi will automatically be ter minated if:
- You do not use WiFi on the pr oduct for 3 minutes.
- You do not use the Sena Camera App for 3 minutes.
- If you want to reactivate the WiFi after it is terminated, you will need to restart the camera.
Camera Operation
Camera On or Off
To turn on the camera, tap the Camera Button. The camera turns off automatically after 5 minutes of inactivity. To turn off the camera manually, tap the Camera Button and the Phone Button simultaneously.
Camera Modes
| Mode | Application | Button |
|---|---|---|
| Video | Record video (normal recording, timelapse, loop recording) | Press and hold the Camera Button for 1 sec |
| Photo | Capture a single photo (Single Shot) | Press and hold the Camera Button for 1 sec |
| Settings | Adjust camera settings | Press and hold the Camera Button for 5 secs |
Video Recording
Press and hold the Camera Button for 1 second to start video recording. The green LED will flash and you will hear a voice prompt, “Recording”. Press and hold the Camera Button for 1 second to stop recording. You will hear a voice prompt, “Recording stopped”.
Below is a table of approximate video recording times to microSD card size in specific resolutions and frame rates.
| 1440p/30fps | 1080p/60fps | 1080p/30fps | |
|---|---|---|---|
1GB | 4 min | 4 min | 9 min |
2GB | 8 min | 8 min | 18 min |
4GB | 16 min | 16 min | 36 min |
8GB | 33 min | 33 min | 1h 12 min |
16GB | 1 h 5 min | 1 h 5 min | 2 h 24 min |
32GB | 2 h 11 min | 2 h 11 min | 4 h 48 min |
64GB | 4 h 24 min | 4 h 24 min | 9 h 30 min |
Note:
- MicroSD cards up to 64GB are compatible. Using a Class 10 microSD card is suggested. Your microSD card needs to be formatted using the camera.
- The camera gives a warning and automatically stops recording when the microSD card is full or the batter y becomes low.
- The maximum size per video is limited to 4GB. Therefore, when the video reaches the 4GB size limit during recording, it saves and creates a new video to continue recording.
Video Mode
- Timelapse Video Mode: Timelapse video records series of photos at timed intervals and makes it into a video.
- Loop Recording Mode: Loop Recording mode continuously records videos to create footages of assigned length of time (3 minutes). If the memory reaches maximum, then the oldest footage will be deleted to store the most recent footage.
Photo Taking
To take a single photo, tap the Camera Button to take a photo. The green LED will flash and you will hear a shutter sound.
Note: The camera resolution is fixed to 3.7MP with 16:9 aspect ratio. However, when you take a photo during video recording, the photo resolution is the same as the video resolution.
Video Tagging
Video Tagging allows the camera to record video continuously, but save only the important events.
It creates video files of past, present, and future with each footage having an assigned length of time (3 minutes).
- When you encounter an event that is worth saving, press and hold the Camera Button for 3 seconds. You will hear a voice prompt, “Video tagging”.
- When Video Tagging is completed, you will hear a voice prompt, “Tagging complete”.
Note:
• Video Tagging can be operated only in the Loop Recor ding mode.
• Video Tagging recorded files are stored in TAGGING folder.
Troubleshooting
Fault Reset
When the headset is not working properly, you can easily reset the unit:
- Locate the pinhole reset button at the back of the headset main unit.
- Gently insert a paperclip into the hole and tap the Fault Reset Button with light pressure.
- The headset will shut down.
Note: Fault Reset will not restore the headset to factor y default settings.
Factory Reset
- To restore the headset to factory default settings, press and hold the Phone Button for 10 seconds until the LED shows solid red and you hear “Factory reset”.
- Within 10 seconds, press the Jog Dial to confirm reset. The headset will be restored to factory setting and switched off automatically. You will hear “Headset reset, good-bye”.
Pros & Cons
Pros:
- High-Quality Video: Captures clear 1080p footage at 30fps.
- Durable Design: IP67 rating ensures it is dust-proof and waterproof.
- Bluetooth Integration: Seamless pairing with Sena headsets and other devices.
- Voice Commands: Hands-free operation for convenience and safety.
- Versatile Mounting: Multiple mounting options for easy installation.
Cons:
- Up to 2 hours of recording time may not be sufficient for long rides.
- Cost: Priced at around $399, which may be expensive for some users.
- Complex Setup: Initial setup and configuration can be somewhat complex for novice users.
Customer Reviews
Customers have generally praised the Sena Motorcycle BT Camera 10C-PRO for its excellent video quality and robust build. Many riders appreciate the ease of integration with their existing Sena headsets and the convenience of voice commands.
Some common complaints include the limited battery life and the initial complexity of setting up the device. However, overall satisfaction with the product remains high among motorcyclists who value high-quality recording and real-time video streaming.
Faqs
What is the resolution of the Sena Motorcycle BT Camera 10C-PRO?
Is the Sena Motorcycle BT Camera 10C-PRO waterproof?
How long does the battery last on the Sena Motorcycle BT Camera 10C-PRO?
Can I use the Sena Motorcycle BT Camera 10C-PRO with other Bluetooth devices?
What type of memory card does the Sena Motorcycle BT Camera 10C-PRO support?
How do I set up the Sena Motorcycle BT Camera 10C-PRO?
What if I encounter video quality issues with my Sena Motorcycle BT Camera 10C-PRO?
Can I control the Sena Motorcycle BT Camera 10C-PRO using voice commands?
What mounting options are available for the Sena Motorcycle BT Camera 10C-PRO?
Where can I find troubleshooting guides for the Sena Motorcycle BT Camera 10C-PRO?
Tags
More sena manuals
Leave a Comment