
Sena Wireless Bluetooth Headset SMH10 User Guide
Content
Sena Wireless Bluetooth Headset SMH10
Introduction
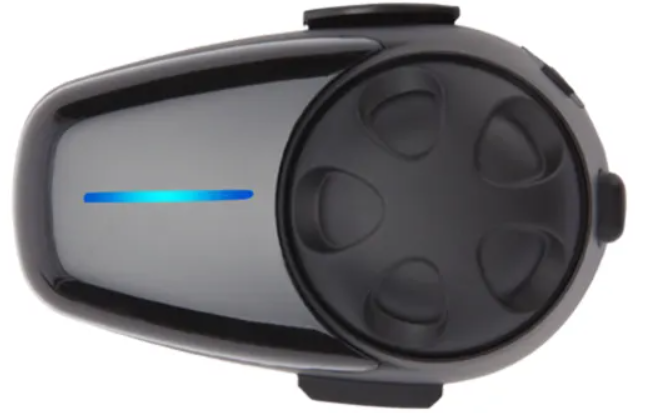
The Sena Wireless Bluetooth Headset SMH10 is a cutting-edge communication device designed for motorcyclists, outdoor enthusiasts, and anyone needing hands-free communication. Launched in 2010, this headset has been a staple in the market due to its robust features and reliability. The SMH10 is priced around $200, making it a competitive option in the wireless headset market.
The SMH10 serves multiple purposes, including phone calls, music streaming, and intercom conversations with up to four riders. It is known for its clear audio quality, long battery life, and durable construction. Whether you're cruising on a motorcycle, skiing down slopes, or working in noisy environments, the SMH10 provides seamless communication and entertainment.
Specifications
- Bluetooth 3.0 Technology
- Up to 8 hours of talk time and 7 days of standby
- Intercom range up to 900 meters (980 yards)
- Universal Intercom protocol allows communication with other brands
- Wind noise reduction and echo cancellation
- Water-resistant design
- Integrated FM radio with RDS AF (Alternative Frequencies)
- Support for phone, GPS, and music streaming
- VOX (Voice Operated eXchange) for hands-free operation
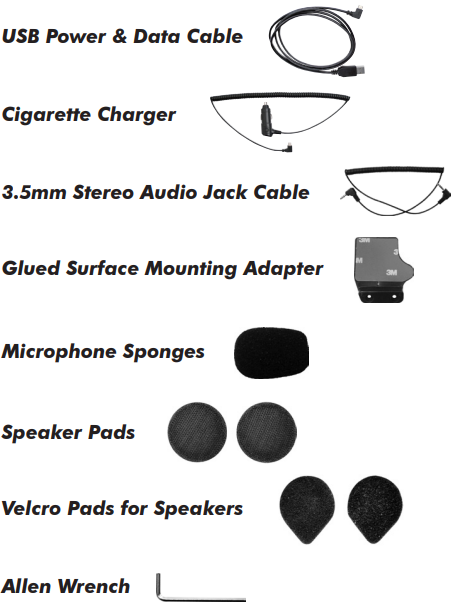
PACKAGE CONTENTS
Clamp Unit
Speaker-Microphone Clamp Unit - Basic Kit (SMH10-10/SMH10D-10)
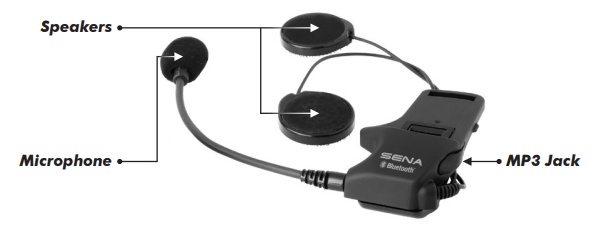
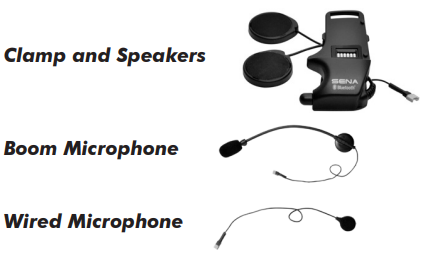
Speaker-Microphone Clamp Unit with Universal Microphone Kit (SMH10-11/SMH10D-11)
INSTALLING THE SMH10 ON YOUR HELMET
To securely install the SMH10 on the helmet, please follow the procedure.
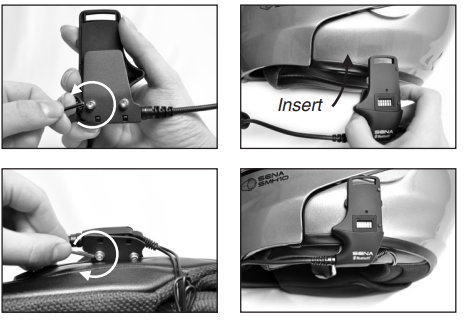
Loosen the two screws on the back plate of the speaker-microphone clamp unit using the enclosed Allen Wrench. Insert the back plate of the clamp unit between the internal padding and external shell of the helmet, and tighten the two screws. Please make sure that the microphone is located properly close to your mouth when you wear the helmet.
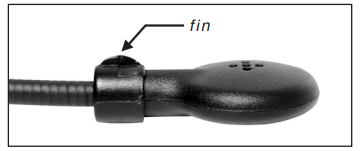
Please adjust the direction of the microphone so that the fin side of the microphone is facing outward; away from your lips. You can easily recognize it by touching the fin with your fingers.
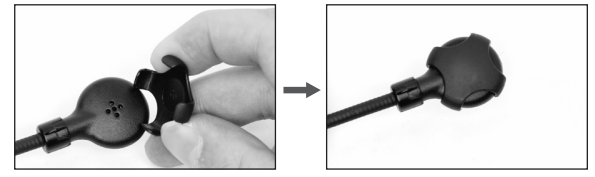
The microphone cap helps you to cut down incoming microphone wind noise by protecting the microphone from the wind and provide clearer voice audio sound. Put the microphone cap on the side of the microphone that has the fin on it.
When installing the boom microphone included in the “Universal Microphone Kit”, place the velcro end of the boom microphone between the internal helmet cheek pad and the internal wall of the helmet shell. The boom microphone should be mounted so it is facing close to your mouth when you wear the helmet. You can use the enclosed velcro pad and holder for the boom microphone to ensure secure placement.
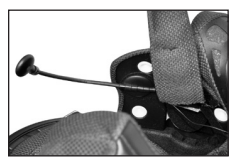
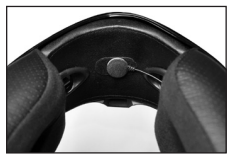
In the case of the wired microphone also included in the “Universal Microphone Kit”, attach the enclosed velcro pad for wired microphone to the inside of the chin guard for full-face helmets. Place the wired microphone on the velcro pad and connect it to the connector of the clamp unit.
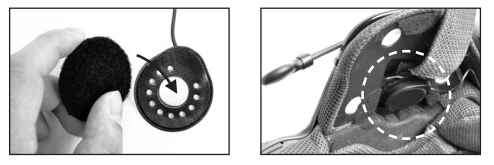
Place the helmet speakers along with the velcro pads, centered to your ear, in the ear pockets of the helmet. If the helmet has deep ear pockets, you can use the speaker pads to place the speakers closer to your ears.
If you have any problem to clamp the speaker-microphone unit on the helmet for any reason, you may use the glued surface mounting adapter to attach the speaker-microphone clamp unit on the external surface of the helmet.
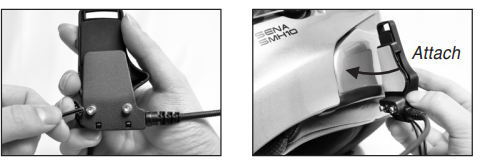
- Remove the back plate of the speaker-microphone clamp unit by loosening the two screws with the enclosed Allen Wrench.
- Attach the glued external adapter to the speaker-microphone clamp unit by tightening the two screws instead of the removed back plate.
- Locate a proper surface on the helmet to attach the unit, clean the helmet surface location with a moistened towel, and allow to dry thoroughly.
- Peel off the cover of the adhesive tape of the adapter and attach the unit on the proper surface of your helmet.
- Sena recommends the clamp unit over the glued surface mounting adapter. Even though the glued surface mounting adapter is provided for convenience, Sena does not assume any responsibility for use of it. Users may have to use the glued adapter at their own risk and responsibility.
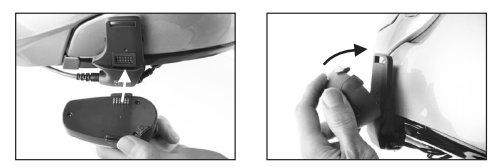
Attach the headset main unit to the speaker-microphone clamp unit. Insert the bottom part of the main unit completely into the lower slot of the clamp unit first. Then push the upper part of the main unit until it clicks into the upper holder of the clamp unit.
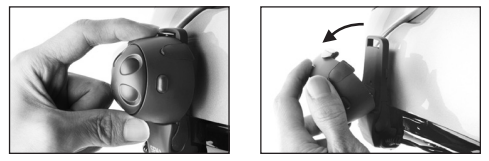
To remove the main headset from the speaker-microphone clamp unit, hold the lower part of the speaker-microphone clamp unit with your thumb and gently press down the hook on the upper part of the headset main unit with your index finger until it clicks out. You may have to do this to charge up or to carry the headset main unit.
POWERING ON/OFF AND CHARGING
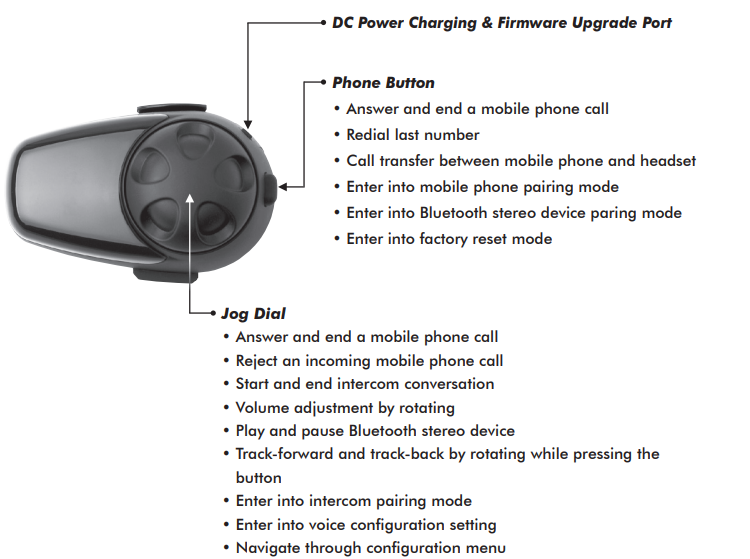
To power on and off the headset, you don’t need to press and hold any button for several seconds. Just short-press the Jog Dial and the Phone Button simultaneously, and you will get quick on-and-off convenience.
Powering On
Press the Jog Dial and the Phone Button at the same time for about 1 second to power on. The blue LED turns on, and you will hear ascending beeps.
Powering Off
Just short-press the Jog Dial and the Phone Button simultaneously; you don’t need to press and hold for a few seconds. The red LED turns on for a while until it turns off completely, and you will hear descending beeps.
Charging
The LED turns on red while charging, and turns to blue when the headset is fully charged. It takes about 2.5 hours to be completely charged.
Low Battery Warning
When the battery is low, the blinking blue LED in stand-by mode turns to red,d and you will hear mid-tone triple beeps and a voice prompt saying “Low battery”.
Checking the Battery Level
You can check the battery level in two different ways when the headset is powering on.
LED Indicator
When the headset is powering on, the red LED flashes rapidly, ly indicating the battery level.
- 4 flashes = High, 70~100%
- 3 flashes = Medium, 30~70%
- 2 flashes = Low, 0~30%
Voice Prompt Indicator
When you power on the headset, keep pressing the Jog Dial and Phone Button simultaneously for about 3 seconds until you hear high-tone triple beeps. Then you will hear a voice prompt indicating the battery level. However, if you release the buttons as soon as the headset turns on, you will not hear the voice prompt for battery level indication.
VOLUME ADJUSTMENT
You can easily adjust the volume by rotating the Jog Dial. You will hear a beep when the volume reaches the maximum or minimum level. The volume is set and maintained independently at different levels for each audio source, even when you turn off and on the headset. For example, once you set the volume for the mobile phone handsfree, it will not change even if you adjust the volume when you hear Bluetooth MP3 music. So you can always maintain the preferred optimum volume level for each audio source.
INTERCOM FAILURE
When you try to start an intercom conversation with an intercom friend who is already having a conference intercom with other riders or a mobile phone call, you will hear a low tone double beep signifying an intercom busy signal. In this case, you have to try again later.
INTERCOM RECONNECTION
If your intercom friend goes out of range while having an intercom conversation, you may hear static noise, and eventually the intercom will be disconnected. In this case, the SMH10 automatically tries to reconnect the intercom every 8 seconds, and you will hear high-tone double beeps until the intercom is reestablished. If you don’t want to make a reconnection, tap the Jog Dial to stop the attempt.
RESET TO FACTORY DEFAULT SETTINGS
- To restore the SMH10 to factory default settings, press and hold the Phone Button for 12 seconds until the LED shows solid red and you hear double beeps. You will hear a voice prompt saying “Factory reset”.
- Within 5 seconds, press the Jog Dial to confirm reset. The headset will be restored to factory settings and switched off automatically. You will hear a voice prompt saying “Headset resetgoodbyeye”.
- If you don’t press the Jog Dial within 5 seconds, the reset attempt is canceled and the headset returns to stand-by mode. You will hear a voice prompt saying “Canceled”.
FAULT RESET
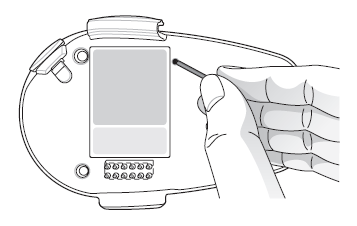
When the SMH10 is not working properly or is in a faulty status for any reason, you may reset it by pushing the pin-hole reset button at the back of the headset main unit. Insert a paper clip into the reset pin-hole and press the reset button for a second with light pressure. The SMH10 will be switched off, and you have to turn the system back on and try again. However, this will not restore the headset to factory default settings.
FIRMWARE UPGRADE
The SMH10 supports the firmware upgrade function. Please visit the Sena Bluetooth website at www.SenaBluetooth.com to check the latest software downloads.
MAINTENANCE AND CARE
The SMH10 should be treated with care , and the following suggestions will help you protect your warranty coverage.
- Do not use or store the device in dusty, dirty areas. Its moving parts and electronic components can be damaged.
- Do not store the device in hot areas. High temperatures can shorten the life of electronic devices, damage batteries, and warp or melt certain plastics.
- Do not store the device in cold areas. When the device returns to its normal temperature, moisture can form inside the device and damage electronic circuit boards.
- Do not attempt to open the product.
- Do not drop or knock the device. Rough handling can break internal circuit boards and fine mechanics.
- Do not use harsh chemicals, cleaning solvents, or strong detergents to clean the device.
- Do not paint the device. Paint can clog the moving parts and prevent proper operation.
These suggestions apply equally to the headset main unit, speaker-microphone clamp unit, or power charger.
Troubleshooting
If you encounter issues with connectivity, ensure that your devices are fully charged and within range. Restart both devices if necessary. For poor audio quality, check the microphone positioning and adjust as needed. If you experience frequent disconnections, update your headset’s firmware to the latest version.
Always follow safety instructions when using the headset while riding or engaging in other activities. Avoid using the headset in extreme weather conditions or submerging it in water.
Two-Year Limited Warranty
Sena Technologies, Inc. (“Sena”) warrants that this product (“Product”) shall conform to and perform in accordance with published technical specifications and the accompanying written materials, and shall be free of defects in materials and workmanship, for a period of two (2) years from the date of purchase by the first consumer purchaser of the Product. The limited warranty extends only to the original consumer purchaser of the Product and is not assignable or transferable to any subsequent purchaser/end-user.
This warranty is limited to the repair and/or replacement, at Sena’s discretion, of defective or non-conforming Product, and Sena shall not be responsible for the failure of the Product to perform specified functions, or any other non- conformance caused by or attributable to: (a) any misapplication or misuse of the Product; (b) failure of Customer to adhere to any of Sena’s specifications or instructions;
(c) neglect of, abuse of, or accident to, the Product; or (d) any associated or complementary equipment or software not furnished by Sena.
Limited warranty service may be obtained by delivering the Product to Sena or to the international distributor it was purchased through and providing proof of purchase or receipt date. Customer agrees to insure the Product or assume the risk of loss or damage in transit, to prepay shipping charges to Sena, and to use the original shipping container or equivalent.
Pros & Cons
Pros:
- Long battery life and extended standby time
- Clear audio quality with effective noise reduction
- Robust and water-resistant design
- Easy setup and pairing process
- Supports multiple features including phone calls, music streaming, and FM radio
Cons:
- Slightly bulky compared to newer models
- No advanced noise cancellation features like active noise control
- Volume buttons can be stiff to operate
- Occasional connectivity issues if not properly paired
Customer Reviews
Customers praise the Sena SMH10 for its reliability and clear audio quality. Many motorcyclists appreciate the ease of use and the ability to communicate clearly with fellow riders over long distances. However, some users have noted that the headset can be a bit bulky and that occasional software updates are necessary to maintain optimal performance.
Faqs
How do I pair the Sena SMH10 with my phone?
What is the range of the intercom feature on the Sena SMH10?
Is the Sena SMH10 waterproof?
How long does it take to fully charge the Sena SMH10?
Can I use the Sena SMH10 with other Bluetooth headsets?
Does the Sena SMH10 support voice commands?
How do I update the firmware of my Sena SMH10?
What kind of noise reduction does the Sena SMH10 have?
Can I listen to FM radio on the Sena SMH10?
How do I troubleshoot connectivity issues with my Sena SMH10?
More sena manuals
Leave a Comment