Sew-Mighty Mini Sewing Machine 2270 User Manual
Content
Introduction
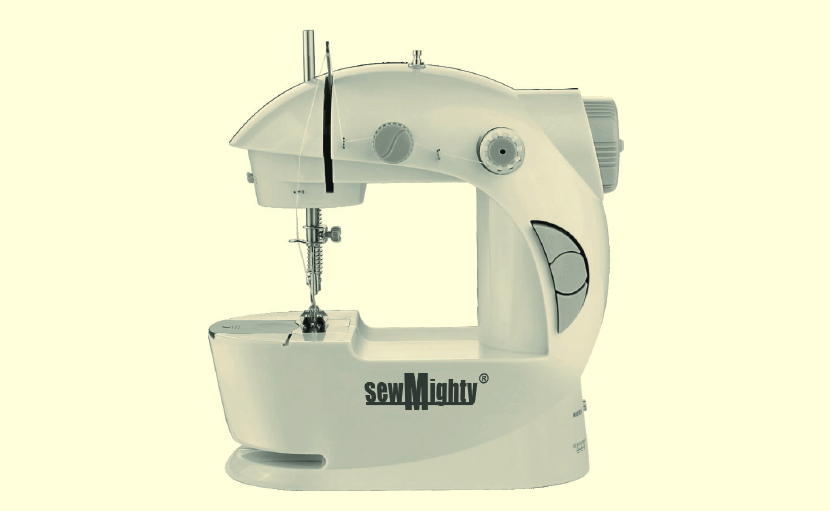
For those just starting out in the sewing world or who enjoy sewing for fun, the Sew-mighty Mini Sewing Machine 2270 is the perfect portable option. This straightforward machine is ideal for beginner sewers and smaller projects due to its easy straight and zigzag stitch options. The Sew-mighty Mini Sewing Machine 2270 is a lightweight, versatile machine with features including an integrated LED light, foot pedal control, and dual power options (AC adaptor or 4 AA batteries). With the included equipment, you'll have all you need to get stitching in no time.
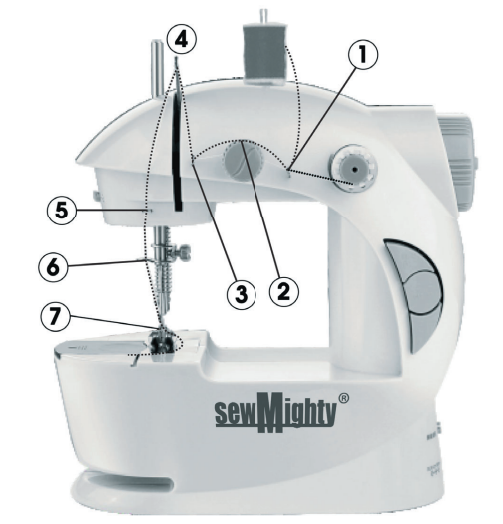
PARTS & ACCESSORIES
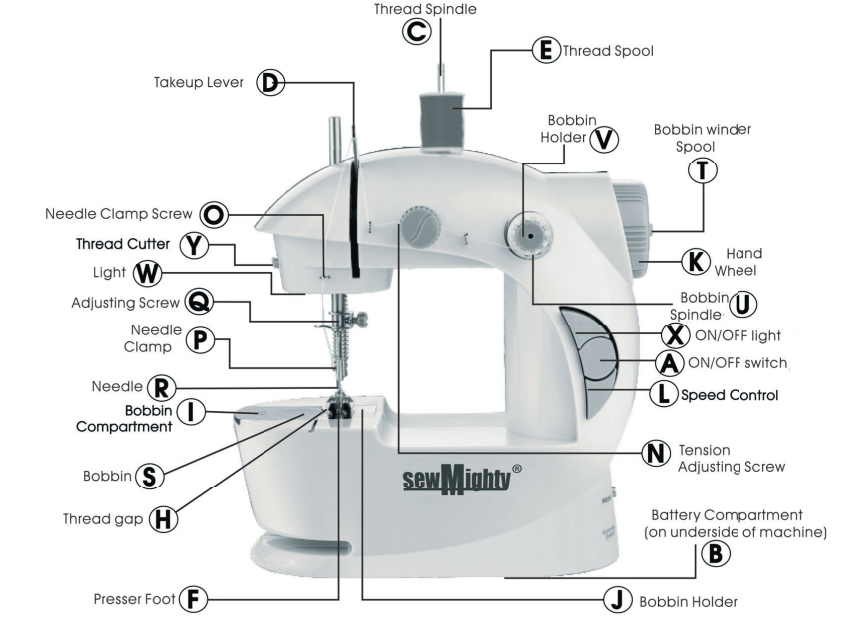
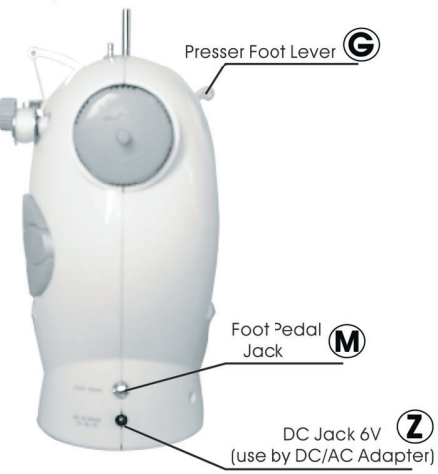
BACK OF UNIT
ACCESSORIES

Sew-mighty Mini Sewing Machine 2270 PARTS LIST
- A- ON/OFF Switch
- B- Battery Compartment (bottom of unit)
- C- Thread Spindle
- D- Take-up Lever
- E- Thread Spool
- F- Presser Foot
- G- Presser Foot Lever
- H- Thread Gap
- I- Bobbin Compartment
- J- Bobbin Holder
- K- Hand Wheel
- L- Speed Control
- M- Foot Pedal Jack
- N- Tension Adjusting Screw
- O- Needle Clamp Screw
- P- Needle Clamp
- Q- Adjusting Screw
- R- Needle
- S- Bobbin
- T- Bobbin Winder Spool
- U- Bobbin Spindle
- V- Bobbin Holder
- W- LED Light
- X- ON/OFF Light
- Y- Thread Cutter
- Z- Power Adapter DC Jack
ACCESSORIES LIST
- (1) Foot Pedal controller
- (1) Power Adapter DC
- (1) Needle
- (1) Needle Threader
- (1) Large Extension Table
- (4) Metal Bobbins
- (1) 60” Tape Measure
Detailed Specifications
The Sew-mighty Mini Sewing Machine 2270 comes with several key features, including:
- 10 built-in stitch patterns
- Adjustable stitch length and width
- Forward and reverse stitching capabilities
- Built-in handle for easy transportation
- Free arm for sewing cuffs and sleeves
- Top-loading bobbin
- LED light for better visibility
- Lightweight design (less than 5 lbs.)
- 2-speed control for safety and skill development
- Accessory package including 4 sewing patterns, 2 bobbins, and a needle assortment
BEFORE SEWING
- Check if the needle thread and bobbin thread are available. The machine must be threaded correctly (Both needle thread and bobbin thread, refer to Pages 6-7 "Threading the Machine"). Incorrect threading will cause skipped stitches (cannot sew), thread breaking, and irregular stitches.
- Check if the needle is threaded from left to right (the right side is the Hand-wheel) refer to Pages 6-7 "Threading the Machine."
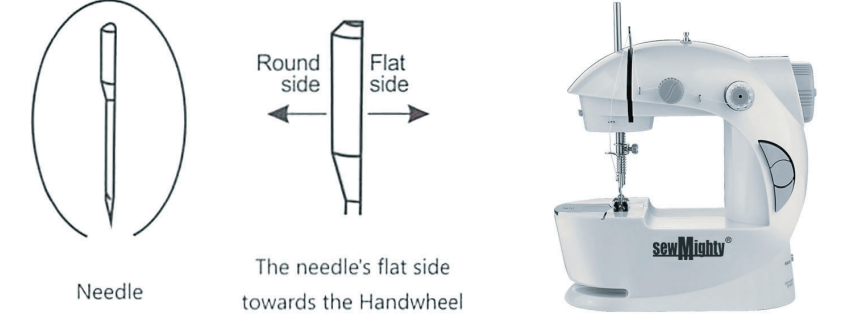
- Check if the needle is inserted in the correct position (its flat side towards the machine, refer to Page 9 "Needle Replacement").
- Check if the machine power is "OFF" (Automatic Sewing Button). If not, turn the power switch OFF. IMPORTANT.
- Insert the Power Adapter into the machine socket on the back of the machine.
IMPORTANT Note: AC Power Adapter and batteries CANNOT be used at the same time. - Insert the Power Adapter plug into the wall outlet.
- Insert the Foot Pedal into the jack on the back of the machine, if you need it.
Note: Foot Pedal and On/Off Button (automatic) cannot be used at the same time.
START TO SEW
- Raise up the presser foot by pulling its lever, and raise the needle to its highest position by turning the Hand Wheel towards you.
- Pull at least 10 cm (4 inches) of needle thread from the needle. Put the needle thread and bobbin thread under and behind the presser foot.
- Insert the fabric under the presser foot.
- Lay down the presser foot.
- Select sewing mode: Foot Pedal, or On/Off Button (automatic). Select the speed (slow or fast) according to your need.
IMPORTANT: Foot Pedal and On/Off Button cannot be used at the same time. - Sew some stitches on the fabric manually by turning the Hand-wheel towards you to stabilize the stitches.
IMPORTANT! - Turn it on by Auto-sewing button or Foot Pedal to sew.
Note: It is suggested that you try some sewing on a test fabric to adjust the thread's tension accordingly. (Page 5 "Adjust Thread Tension") - Switch off the machine immediately when encountering thread breaking or jamming.
FINISH SEWING
- After you finish sewing, raise the Presser Foot, and raise the needle to its highest position by turning the Hand-wheel.
- Pull the fabric gently. DO NOT pull it by force; otherwise, it will warp or break the needle. You can turn the Hand-wheel up and down during pulling the fabric. If the threads are too tight, pull some needle thread from the Take-up Lever.
- Cut the threads by using the Cutter on the machine or scissors.
- Remember to unplug the machine from the electrical outlet when you do not need to use it again.
THREADING THE MACHINE
Set the Needle Thread (Upper Thread)
Please strictly follow the right order to thread the needle thread as illustrated.
Start from the Upper Bobbin (the bobbin must be placed clockwise). The thread must go through:
- Eyelet
- Tension Screw (The thread must be placed between the clamps, NOT in the spring)
- Eyelet
- Hole of the Takeup Lever
- Eyelet
- Needle Bar
- Needle IMPORTANT: thread the needle from left to right. You can use the Needle Threader (included in accessories) to thread the needle.
Draw up the Bottom Bobbin Thread
Before drawing up the bottom bobbin thread, pull out at least 10 cm (4 inches) of needle thread from the needle.
- Slide outward the bottom bobbin cover plate, and place the bobbin in the bobbin holder.
IMPORTANT: the bobbin should be positioned clockwise. (Pic. 1) - Pull about 7 cm (3 inches) of thread from the bobbin and lay it on the slot.
- Lay down the Presser Foot, and hold the needle thread lightly with your left hand.
- Turn the Hand-wheel slowly towards you one complete round. Draw up the bobbin thread by pulling up the needle thread with your left hand as illustrated. (Pic.2)
- You can either grab the bobbin thread with your hand or hook it with scissors. Seal the bottom bobbin with its cover plate. (You can also seal it after the bobbin is positioned).
Raise up the presser foot, put the needle thread and bobbin thread under and behind the presser foot. (pic.3)
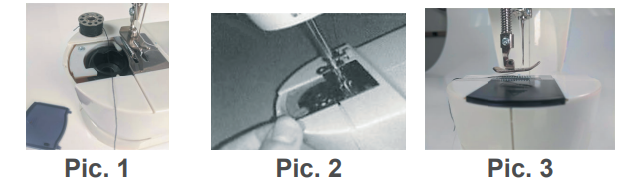
IMPORTANT: Remember to lay down the presser foot again and sew some stitches on the fabric manually by turning the Hand-wheel towards you before turning on the machine to sew.
Description
The Sew-mighty Mini Sewing Machine 2270 is a highly suitable option for youngsters who are 6 years old and older. This machine is designed with safety as a top priority and includes a distinctive 2-speed control, guaranteeing that your child can acquire new skills and develop alongside the machine. The Sew-mighty 2270 is a tiny, lightweight, and effortlessly storable device, making it an ideal choice for confined areas. Equipped with a repertoire of 10 pre-installed stitch patterns and the ability to modify stitch lengths and widths, this sewing machine empowers your youngster to unleash their creativity and cultivate their sewing abilities.
TENSION ADJUSTMENT
Thread Tension: The thread tension should be adjusted according to sewing materials, and layers of fabric. To tighten, turn the Tension Screw clockwise; and loosen the tension by turning counter-clockwise.
As shown in Fig. A, it is the normal stitches, which the top thread and Bottom thread are neat and uniform. The tension is just right!

As shown in Fig. B, if the bottom threading looks like a straight line, which indicates the top thread is too loose. Please turn the Tension Screw clockwise to increase pressure (until it is neither too tight nor too loose).

As shown in Fig. C, when the top thread looks like a straight line, it indicates the thread is too tight. Please slowly turn the Tension Screw counter-clockwise to reduce the pressure until the stitch is back to normal.

Note: If the fabric is too thin/thick/slippery/hard, it will cause: skipped stitches, thread breaking, puckering, or forming loops, and tension adjustment cannot help that. You should change the fabric. Please kindly note that this is just a small domestic sewing machine. Applicable fabrics: Jean, Cotton fabric, Felt, Polypropylene cloth, thin Leather, etc.
NEEDLE REPLACEMENT
Caution: Make sure to turn off the machine and plug out the adapter before replacing the needle.
- Raise the needle to its highest position by turning the hand-wheel and lay down the presser foot.
- Loosen the needle clamp screw by turning it counterclockwise, and remove the needle from the clamp.
- Insert a new needle into the needle clamp with its flat side towards the hand-wheel, which is very important.
When inserting the needle into the needle clamp, push it up against the top, then tighten the needle clamp screw firmly. DONE!
WINDING THE BOBBIN
Note: Remove the fabric and the thread from the Take-up lever before winding the bobbin.
- Pull out the thread spindle (on the top of the machine), then put the spool on it.
- Press the winding pole of the Hand-wheel and turn it counter-clockwise. The pole will automatically pop up.
- Insert the empty bobbin in the winding pole.
- Pull a thread from the spool and wind it on the empty bobbin for 4-5 circles, then turn on the machine to begin the automatic winding. Guide the winding with side-to-side movement to feed the bobbin evenly.
- After winding, you can restore the winding pole.
CREATIVE TIPS & IDEAS
- Recycle clothing by tailoring it to fit growing children. It doesn't have to look like ill-fitting hand-me-downs anymore! Also, add an appliqué or decorative ribbon to give it a new look.
- Make your own shower curtains, window curtains, and bath sink skirts out of on-sale sheets. It's a lot of fabric for little money. And you can find prints that are absolutely perfect for a designer bathroom. Also, use sheets for great custom bedroom ensembles. Sew a cover for a comforter (new or recycled) out of oversized sheets to create a new look. Then make easy pillow shams to match. Sheets are always on sale, and naturally have the most up-to-date designer looks for the bedroom. Get an extra set of sheets for the bed, and you have an ensemble that would cost hundreds of dollars.
- Make your own tablecloths and napkins. It's easy and inexpensive, and you can make them to fit all the occasions of the year. Get creative. Christmas, Valentine's Day, Easter, St. Patrick's Day, Fourth of July, Halloween, Thanksgiving, you can have inexpensive table settings for them all. Even birthdays and anniversaries. Most fabric stores carry a wide range of printed fabrics with all these themes. Just cut and sew hems around the edges. It's hostess magic in minutes!
- Get on the mailing list of your local fabric shop. You'll get advance notice on all the fabric sales so you can get the best selection and the lowest prices.
- Check tag sales for drapes or curtains. You can alter drapes worth hundreds of dollars that can be purchased for pocket change.
- Watch for pattern sales. Look through pattern books for ideas on easy-to-make projects that impress and delight.
Most of all...Have Fun!
Some of the Great Ways to Save Money and Avoid Costly Repairs or Replacements:
- Fix rips in children's clothing
- Let down hems on skirts, dresses, and pants for growing kids
- Take in clothing after weight loss
- Let out clothing after weight gain
- Raise and lower dress hems to keep up with fashion
- Mend torn bed sheets
- Alter curtains to fit your windows
Some of the Things You Can Make with your SewMighty to Get Decorator Looks for a Fraction of the Cost:
- Throw pillows
- Slip covers
- Duvet covers
- Bedspreads
- Pillow Shams
- Curtains
- Table linens
Quick and Easy Gifts from your SewMighty:
- Blankets and quilts
- Lively fabric liners for inexpensive store-bought baskets
- Tea cozy
- Car blankets and comfort pillows
- Tote bags in fun or beautiful fabrics
- Men's ties with fabric in his favorite colors and themes
- Doll clothes and layettes
- Teddy bears and stuffed toy
Setup Guide
To set up the Sew-mighty Mini Sewing Machine 2270, follow these steps:
- Place the machine on a stable, flat surface.
- Insert the power cord into a nearby outlet and plug in the machine.
- Load the top-loading bobbin with thread and place it in the bobbin case.
- Thread the needle with a suitable thread and guide it through the tension discs and needle thread guide.
- Choose your desired stitch pattern, stitch length, and stitch width using the control dials on the machine.
- Place the fabric under the presser foot and lower it using the handwheel or foot control.
- Begin sewing, using the reverse stitch button to secure your stitches as needed.
SewMighty Mini Sewing Machine
Sewing for all your personal needs has never been easier. Mending or creating masterpieces for yourself and as memorable gifts isn't wishful thinking anymore. You can do it all with the easy-to-use, lightweight SewMighty. Now you can make repairs to clothing, curtains, bedding -- virtually all the fabric items in your home. Don't throw it away! You can mend it 1-2-3! Save a lot of cash and have a lot of fun doing it. It is so satisfying when you can say, "I did it myself."
SAFETY & PRECAUTIONS
IMPORTANT: THE POWER ADAPTER & BATTERIES CANNOT BE USED AT THE SAME TIME. THERE CANNOT BE ANY BATTERIES IN THE SewMighty IF USING THE POWER ADAPTER. THIS WILL DAMAGE THE SewMighty.
REMOVE ALL BATTERIES WHEN USING POWER ADAPTER
- Remove batteries when the machine is not in use for long periods. This saves battery life and protects the machine. Keep extra batteries on hand so projects will not be interrupted when batteries need to be replaced.
- The SewMighty® is an electrical appliance when used with a power adapter. Do not submerge the unit or any other parts in water. Do not operate the sewing machine with wet hands, without shoes, or while standing in water or on a wet surface when using the Power Adapter.
- Never open the main motor case of the machine. The mechanism has been factory adjusted.
- ALWAYS disconnect or remove the power supply, including batteries, when changing needles or threading the SewMighty.
- Never use with a damaged power cord or plug.
- Keep the power cord away from heated surfaces.
- Do not close the door on the cord or pull it around sharp edges; this could cause the cord to become punctured or damaged and could result in injury.
- Do not unplug by pulling or tugging on the cord. Grasp the plug with dry hands to remove the plug from the outlet.
- Always check the threading of the lock-stitch before beginning to sew a seam. Improper threading or placement of the bobbin in the case will result in damage to the SewMighty®.
- Do not pull on the fabric as you sew. Gently guide only. Pulling could break the needle and result in damage to the SewMighty.
- The SewMighty® is not a toy. Use of the SewMighty® with children MUST be supervised by an adult.
- Do not change needles or thread the SewMighty® while the unit is on. DO NOT touch needles before you turn off the power.
- Do not sew clothing while it is on your body.
- Use only the power adapter recommended (Sold Separately) by the manufacturer. Any other adapter may cause injury or damage to the machine.
- Never leave the sewing machine unattended while plugged in. Turn the switch off and unplug the cord when not in use.
TROUBLESHOOTING
| Fault | Possible Reasons | Solutions |
|---|---|---|
| No power (Slow) | The battery is installed to the wrong side | Install the battery correctly (when the machine is slow) |
| No power in the batteries | Replace the batteries | |
| Mixed use of old and new batteries | Replace the batteries | |
| External transformer power is not enough or the output voltage is not enough | Replace the transformer | |
| Skipping of Stitches | Improperly installed needle, or the needle is not installed to the end of the needle pole hole | Replace the needle |
| Needle is bent or deformed | Replace the needle | |
| Presser foot is loose | Tighten the nuts of the presser foot | |
| No Bobbin Thread | Bobbin thread runs out | Replace the bobbin thread clip and install it again |
| The upper thread is threaded in the wrong order | Thread the needle in the right direction | |
| Make sure that the upper thread is threaded from the front to the back | ||
| Breaking of thread | Thread is stuck in the bobbin thread clip | Thread the upper and bobbin thread again |
| There is burr in the pinhole | Replace the needle | |
| The needle is crooked and not installed correctly | Install the needle again | |
| There is burr on the plate, spring or the thread bar | Sand them with sandpaper to make them smooth | |
| Poor Performance of Threads | The upper thread clip is stuck | Pull up the cover of the upper thread clip to make it turn freely |
| The upper thread is too tight or too loose | Adjust the tension screw to make the bobbin thread even | |
| Needle is bending or deformed | Replace the needle | |
| The threading location is wrong | Recheck and thread again | |
| Needle collide with Sewing Plate | The presser foot or the needle is loose | Replace the needle and tighten the presser foot |
| Pull the fabric when sewing | Replace the needle and thread again | |
| The needle does not penetrate through the fabric when start operation | Replace the needle, thread again and turn the hand wheel | |
| Adjust the stitch selection button when the needle does not leave the cloth | Start the machine after the cloth is placed in the right position |
Sew-mighty Pros & Cons
- Pros
- Easy to use
- Affordable price
- Lightweight and portable
- Safety-focused design
- Adjustable stitch settings
- Cons
- Limited stitch patterns compared to more advanced machines
- May not be suitable for older or more experienced sewists
Customer Reviews
Customers have praised the Sew-mighty Mini Sewing Machine 2270 for its ease of use, affordability, and safety features. Common complaints include limited stitch patterns and occasional issues with thread tension. Overall, parents have found this machine to be an excellent way to introduce their children to the world of sewing.
Faqs
Which fabrics are compatible with the Sew-mighty Mini Sewing Machine 2270?
Is a foot pedal included with the Sew-mighty Mini Sewing Machine 2270?
Are novices able to use the Sew-mighty Mini Sewing?
Which stitches are available with the Sew-mighty Machine?
Is it possible to quilt with the Sew-mighty Mini?
On the Sew-mighty Mini Sewing Machine 2270, how do I thread it?
Is there an integrated light in the Sew-mighty Mini Sewing Machine?
Which power settings are available for the Sew-mighty Mini Sewing Machine?
How should the Sew-mighty Mini Sewing Machine 2270 be maintained?
Which attachments are included of the Sew-mighty Mini Sewing Machine 2270 package?
Leave a Comment