How to Clean: Shark Lift-Away VC NV361 Instructions
Content
Introduction of Shark Lift-Away VC NV361
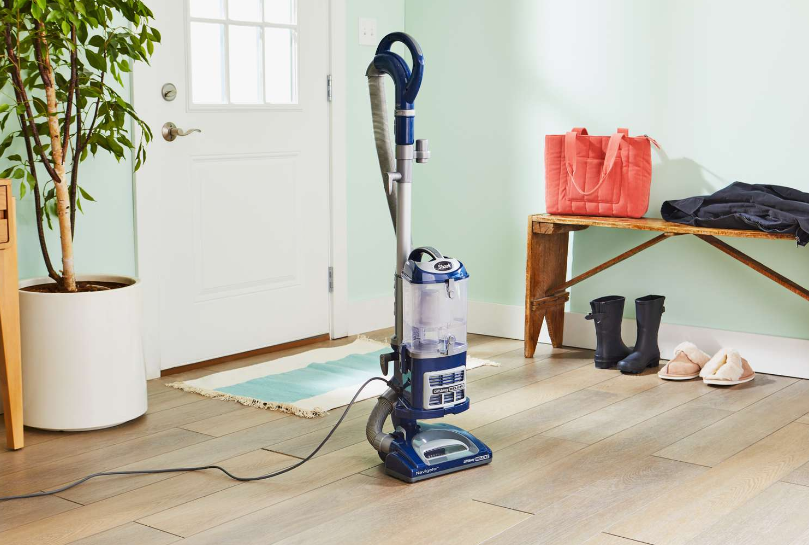
The Shark Lift-Away VC NV361 is a powerful and versatile upright vacuum cleaner that is perfect for cleaning all types of floors. With its advanced swivel steering and lift-away technology, this vacuum cleaner makes it easy to clean hard-to-reach areas and above-floor surfaces. The NV361 is available for an estimated price of $250 and was launched in 2019.
Detailed Specifications
The Shark Lift-Away VC NV361 features a 1250 watt motor that provides powerful suction for deep cleaning. It has a dust cup capacity of 0.9 quarts and comes with a detachable hose and wand for extended reach. The vacuum cleaner also has advanced swivel steering for easy maneuverability and lift-away technology for portable cleaning. The NV361 also includes a crevice tool, dusting brush, and pet power brush for versatile cleaning.
Getting to know Shark Lift-Away VC NV361
Use this instruction manual to learn about your new vacuum’s great features. From assembly to use to maintenance, you will find it all in here. There are a variety of accessories that are compatible with this vacuum series. The top flap of your box shows the select accessories that are included with your model.

A. Handle with Stretch Hose
B. Accessory Holder
C. Extension Wand
D. Portable Lift-Away Pod
E. Motorized Floor Nozzle
F. Dusting Brush
G. Crevice Tool
H. Air-Driven Pet Brush
I. Appliance Wand
Instructions
UPRIGHT MODE
Upright vacuuming floors and carpets.
LIFT-AWAY MODE
Take the Lift-Away Pod with you around the house to clean hard-to-reach places.


Your new Shark Navigator Lift-Away Deluxe vacuum cleaner can easily be configured into different cleaning modes to meet all your needs: upright vacuum and portable Lift-Away Pod, both with powerful suction.
USING YOUR VACUUM IN UPRIGHT MODE
WARNING: The ON/OFF switch is located on the top of the Lift-Away® Pod. Always ensure the power is set to the OFF (O) position before plugging in or unplugging.
WARNING: To reduce the risk of electric shock, unplug the unit before assembling, adding or removing attachments, or converting modes.
WHAT DOES THE BRUSHROLL INDICATOR LIGHT MEAN?
Solid Green
The brushroll is on and working as it should.Solid Red
There is a jam in the brushroll area. Turn your vacuum off and remove the blockage.Flashing Red
The motorized floor nozzleis overheating. Turn your vacuum off and wait for it to cool down. Next time you are vacuuming that surface, try opening the Suction Control.No Light
The brushroll is off because the vacuum is in Hard Floor mode.
Shark Lift-Away VC NV361 Description
The Shark Lift-Away VC NV361 is a reliable and efficient vacuum cleaner that is designed to make cleaning easier and more convenient. Its powerful suction and advanced features make it a great choice for cleaning all types of floors, including carpets, hardwood, and tile. The lift-away technology allows you to easily convert the vacuum into a portable canister vacuum for cleaning stairs, upholstery, and above-floor surfaces. The swivel steering makes it easy to navigate around furniture and other obstacles. With its versatile attachments and crevice tool, the NV361 can handle all of your cleaning needs.
Assembly
Place the floor nozzle on a level surface. Align the opening on the Lift- Away pod with the tube on the floor nozzle, then lower pod until it clicks into place. When attaching the motorized floor nozzle, ensure that the latching mechanism is fully locked in place to ensure electrical connection has been made.
Attach the end of the extension wand to the tube on the back of the Lift-Away pod until it clicks into place.
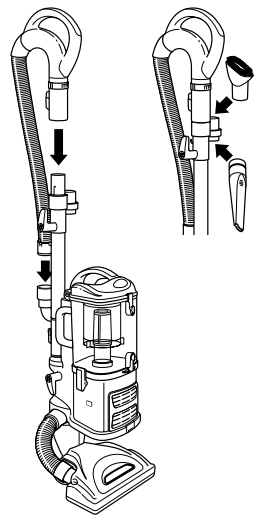
Slide the accessory holder (positioned opposite the upper cord wrap) over the extension wand. Align the tab with the groove and push down.
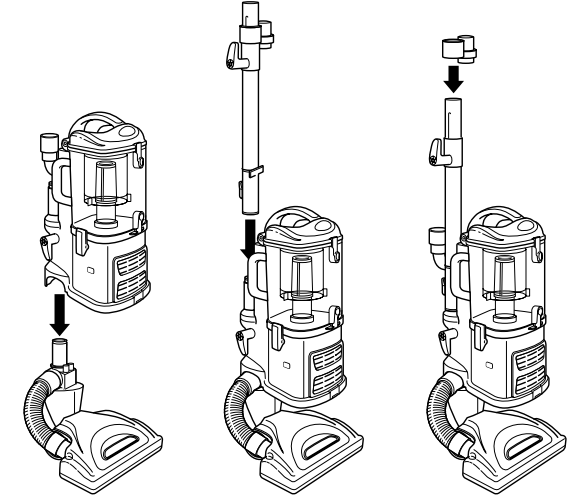
Push the handle onto the top of the extension wand until you hear it click into place. Insert the end of the stretch hose into the connector on the back of the Lift-Away pod.
Store the dusting brush and the crevice tool on the mounts on the accessory holder.
II Brushroll ON (Carpets & Area Rugs)
I Suction Only (Bare Floors)
O OFF

USAGE

Quickly release the power cord by rotating the upper cord hook located on the back of the wand.
Press the ON/OFF switch to the Suction Only (I) position to vacuum bare floors or to the (II) position to engage the motorized brushroll for vacuuming carpets and rugs.
Gently press the floor nozzle down with your foot while you grasp the handle and tilt it back towards you.
NOTE: The brushroll will not spin unless the nozzle is flat against the floor and the handle is tilted back.When you are finished vacuuming, turn the vacuum off
USING YOUR VACUUM IN LIFT-AWAY MODE
NOTE: You can carry your vacuum cleaner in both modes by the carry handle located on top of the dust cup.
SUCTION RELEASE COLLAR
Due to the huge suction power of this vacuum, it may become necessary at times to adjust the suction release collar on the handle. If the vacuum seems difficult to push or pull, if it is lifting up area rugs or when cleaning delicate above-floor surfaces such as drapes, reduce the suction by rotating the collar counterclockwise to open the valve. Rotate the collar clockwise to close the valve when you need high suction and for vacuuming floors and when using the Air-Driven Pet Brush.

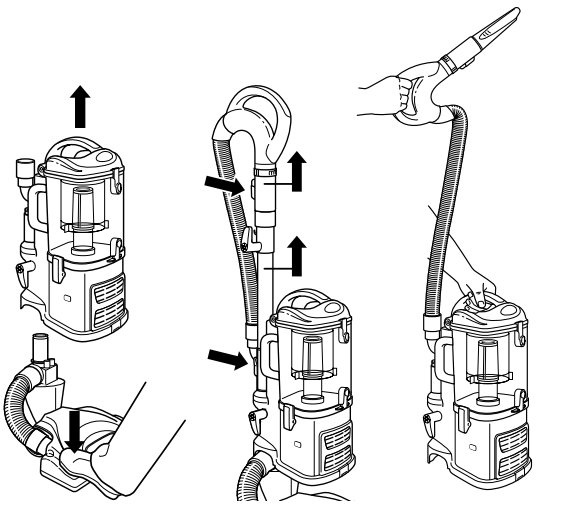
Separate the portable Lift-Away pod from the floor nozzle by pressing the red release button on the side of the pod. Gently hold the nozzle to the floor with your foot and pull the pod up.
Press the handle release button and pull the handle up, or press the extension wand release button and pull the extension wand up.
Attach desired accessory onto the end of either the extension wand or the handle.
Press the On/Off switch to the “I” position for abovefloor cleaning. Hold the handle in one hand while you carry the portable LiftAway around the house with the other hand.
ABOVE-FLOOR CLEANING

CLEAN ABOVE THE FLOOR IN UPRIGHT VAC OR PORTABLE LIFTAWAY MODE
Press the handle release button and pull the handle up, or press the extension wand release button and pull the extension wand up.
Attach desired accessory onto the end of either the extension wand or the handle.
Press the On/Off switch to the “I” position for above-floor leaning.
NOTE: Ensure vacuum is in upright position.
DO NOT use position “II” when cleaning above the floor in the upright vac mode as this will engage the brushroll. The brushroll may damage your floor if run for a prolonged period of time in one area.
Shark Lift-Away VC NV361 Setup Guide
To set up the Shark Lift-Away VC NV361, follow these steps:
- Remove the vacuum from the box and remove any packing materials.
- Attach the handle to the vacuum using the quick-release latch.
- Attach the hose to the handle and the vacuum using the quick-release latches.
- Attach the wand to the hose and the handle using the quick-release latches.
- Plug in the vacuum and select the appropriate floor setting.
- Begin cleaning by guiding the vacuum along the floor or upholstery.
Storage & Maintenance
WARNING: To reduce the risk of shock and unintended operation, turn off power and unplug unit before servicing.
NOTE: DO NOT use soap when cleaning the filters.
Hand wash filters only with water to prevent damage from cleaning chemicals.
Allow ALL filters to air-dry completely before replacing them in the vacuum to prevent liquid from being drawn into electric parts. DO NOT use a hair dryer or other heating methods to dry.
RECOMMENDED CLEANING SCHEDULE
Dust Cup
Empty after each time you vacuum.
Pre-Motor Filter Kit XFF350
(Foam & Felt) Clean every 3 months.
Post-Motor Filter XHF350
(HEPA) Clean every 2 years.

Convert your vacuum back to upright vac mode.
Rotate the upper cord hook to its upright position and coil the power cord loosely around the upper and lower cord hooks.
Clip the plug onto the cord to secure.Store the dusting brush and the crevice tool on the mounts on the accessory holder.
Store your vacuum cleaner safely in a cool, dry area where it will not be a hazard, will not get damaged, and will not cause damage to anyone or anything.


EMPTYING THE DUST CUP
The dust cup needs to be emptied each time you vacuum and periodically during cleaning, when the dust cup appears full.
Undo the latches on the sides of the dust cup by lifting them up and outwards to remove the dust cup from the motor base.
Hold the dust cup over a trash receptacle and press the bottom-door release button. Tap gently to empty contents. Press the door shut again until it clicks.
If needed, turn the dust cup upside down over the trash receptacle and press the top-door release button. Tap gently to remove contents.
Use a dry cloth or paper towel to remove debris stuck to the screen filter inside the dust cup. Press the door shut again until it clicks.Replace the dust cup on top of the motor base. Hook the two latches onto the tabs on the sides of the dust cup and push down to lock.

CLEANING THE PRE-MOTOR FILTERS
Remove the dust cup.
Pull the 2 filters out from the top of the motor base.
Rinse the filters thoroughly in lukewarm water until the water runs clear.
Squeeze out excess water and let air-dry for at least 24 hours before replacing.
Place the felt filter in first, then the foam filter.
Replace the dust cup.
NOTE: DO NOT put the filter in the washing machine or dishwasher.
NOTE: The material in the filter will discolor over time. This is normal, and will not affect the performance of the filter.
WARNING: To reduce the risk of shock and unintended operation, turn off power and unplug unit before servicing.
NOTE: DO NOT use soap when cleaning the filters. Hand wash filters only with water to prevent damage from cleaning chemicals. Allow ALL filters to air-dry completely before replacing them in the vacuum to prevent liquid from being drawn into electric parts. DO NOT use a hair dryer or other heating methods to dry.
WARNING: To reduce the risk of shock and unintended operation, turn off power and unplug unit before servicing.
CLEANING THE POST-MOTOR HEPA FILTER

- Remove the filter cover from the front of the vacuum by pulling up on the tab and pulling the cover away from the vacuum. Take out the HEPA filter by pulling it straight out.
- Turn the filter over so that the dirty side is on the bottom and vigorously tap it clean against a garbage can to remove any dust.
- Hold the filter under the tap with the dirty side facing down. Rinse with lukewarm water until the water runs clear. Allow filter to air-dry for 24 hours.
- Once the HEPA filter is dry, replace it back into the vacuum.
- Replace the cover by inserting the two tabs into the holes at the top and then swinging the cover down until it clicks into place.
CLEANING THE AIR-DRIVEN PET BRUSH
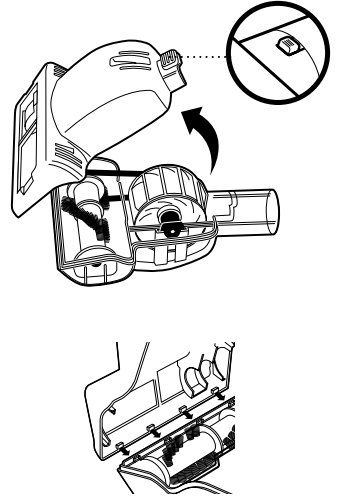
- Slide the locking latch forward and gently tilt brush housing upward to remove.
- Carefully remove any blockage or debris and use scissors to cut away any buildup of hair or string around the rotating bristle brush.
- To reassemble, insert the tabs on the front edge of the bottom cover into the matching holes in the top half and tilt it back down until it clicks into place.
CLEANING THE MOTORIZED FLOOR NOZZLE
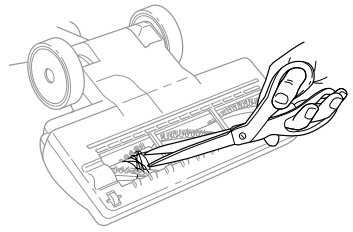
When your motorized floor nozzle needs cleaning or locks onto an object, it automatically shuts down to prevent damage to your lifetime belt. The indicator light will illuminate red, warning you to turn off the vacuum and clear blockage immediately. The light will reset itself once blockage has been cleared and power has been cycled on/off, or vacuum has been locked in the upright position.
- Detach the motorized floor nozzle from the portable Lift-Away pod.
- Inspect the opening underneath and the brushroll. If a buildup of debris is present, remove it. Use scissors to carefully cut away anything wound around the brushroll.
TIP: Make sure you are working in a well-lit area and use a flashlight to help search for blockages.


CHECKING FOR BLOCKAGES
Blockages may cause your vacuum to overheat and shut down. To prevent this from happening, check potential blockage areas after heavy use, or if you detect a loss of suction or poor cleaning performance.
Detach the stretch hose from the back of the portable LiftAway® pod by squeezing the tabs together and pulling up.
Check the hose and pod openings for blockages.Remove the dust cup and extension wand and separate the portable Lift-Away pod from the motorized floor nozzle.
Check all openings for any blockages.Detach the hose on the motorized floor nozzle at the top by squeezing the tabs together and pulling out, and at the bottom by pulling out the connector. Check all openings for any blockages
Troubleshooting of Shark Lift-Away VC NV361
WARNING: To reduce the risk of shock and unintended operation, turn off power and unplug unit before servicing. Vacuum is not picking up debris. No suction or light suction. (Refer to Maintenance section for more information).
Check filters to see if they need cleaning. Follow instructions for rinsing and drying the filters before reinserting in the vacuum.
Dust cup may be full; empty dust cup.
Check hose, hose connections, wand, nozzles, and accessories for blockages; clear blockages if required.
Remove any string, carpet fibers, or hair that may be wrapped around the brushroll.
Rotate the suction release collar on the handle clockwise to increase suction power.
Vacuum lifts area rugs
Turn off unit to disengage the brushroll. Move switch to position “l” (bare floors) for suction-only cleaning, and turn unit back on.
Suction is powerful. Take care when vacuuming area rugs or rugs with delicately sewn edges.
Rotate the suction release collar on the handle counterclockwise to decrease suction power.
Brushroll does not spin
If Brushroll Indicator Light on the motorized floor nozzle turns red, the brushroll has stopped spinning. Immediately turn off and unplug vacuum, disconnect the nozzle, and remove blockage before reconnecting and turning vacuum back on.
With the power on, recline the handle, which will automatically turn on the brushroll.
Make sure the On/Off switch is set to position “II”, Brushroll ON. Vacuum turns off on its own or indicator light flashes red.
This vacuum is equipped with a motor-protective thermostat. If your vacuum overheats, the thermostat will automatically turn the suction motor off.
Perform the following steps to restart the thermostat:
Turn vacuum off and unplug it.
Empty dust cup and clean filters (see Maintenance section).
Check for blockages in hose, accessories, and inlet openings.
Allow unit to cool for a minimum of 45 minutes.
Plug in vacuum and turn it on.
If hose is not fully connected to the pod, it can cause a poor electrical connection and the hose can come loose, turning the vacuum off.
Turn vacuum off and unplug it.
Empty dust cup and clean filters.
Check for blockages in hose, accessories, and inlet openings.
Remove cord from cord hook so hose latch can be seen and engaged.
Ensure that hose, wand, and handle are all clicked securely into place at all connection points:
Where hose meets back of pod (may require additional force; pull on hose to ensure latch is fully engaged)
Where wand plugs into floor nozzle
Where handle plugs into wand
Plug in vacuum and turn it on.
IMPORTANT SAFETY INSTRUCTIONS
FOR HOUSEHOLD USE ONLY. PLEASE READ CAREFULLY BEFORE USE
WARNING: To reduce the risk of injury, fire, electric shock, and property damage resulting from improper use of the appliance, carefully observe the following instructions. This unit contains electrical connections and moving parts that potentially present risk to the user.
THE MOTORIZED FLOOR NOZZLE, WAND, AND HANDLE CONTAIN ELECTRICAL CONNECTIONS:
These are not serviceable parts.
DO NOT use to vacuum any liquids.
DO NOT immerse in water.
If handle/wand is damaged, discontinue use.
Important
Inspect power cord or plug for any damage before use. DO NOT use vacuum cleaner with a damaged cord or plug. Turn off all controls before plugging or unplugging the vacuum cleaner. Store your vacuum cleaner with the power cord secured around the two cord hooks.
DO NOT use outdoors or on wet surfaces.
Use only on dry surfaces.Unplug from electrical outlet when not in use and before servicing.
If vacuum cleaner is not working as it should, has been dropped, damaged, left outdoors, or immersed in water, return it to SharkNinja Operating LLC for examination, repair, or adjustment.
The hose contains electrical wires. DO NOT use when damaged, cut, or
punctured.DO NOT pull or carry vacuum cleaner by the cord or use the cord as a handle.
DO NOT unplug by pulling on cord. Grasp the plug, not the cord.
DO NOT handle plug or vacuum cleaner with wet hands.
DO NOT run the vacuum cleaner over the power cord, close a door on the cord, or pull cord around sharp corners.
The use of an extension cord is NOT recommended.
DO NOT leave vacuum cleaner unattended when plugged in.
Keep cord away from heated surfaces.
Always turn off the vacuum cleaner before connecting or disconnecting motorized nozzle.
GENERAL USE
Use only as described in this manual.
Keep your work area well lit.
Keep the vacuum cleaner moving over the carpet surface at all times to avoid damaging the carpet fibers.
DO NOT place vacuum cleaner on unstable surfaces such as chairs or tables.
DO NOT put any objects into openings.
DO NOT use with any opening blocked; keep free of dust, lint, hair, and anything that may reduce airflow.DO NOT allow young children to operate the appliance or use as a toy. Close supervision is necessary when any appliance is used near children.
DO NOT use without dust cup and/or filters in place.
DUST CUP/FILTERS/ACCESSORIES
Before turning on the vacuum:
Make sure that all filters are thoroughly dry after routine cleaning.
Make sure that dust cup and all filters are in place after routine maintenance.
Make sure accessories are free of blockages.
Only use Shark-brand filters and accessories. Using other brands will void warranty.
HOSE ATTACHMENTS
DO NOT use if airflow is restricted; if the air paths or the motorized floor nozzle become blocked, turn the vacuum cleaner off and unplug from electrical outlet. Remove all obstructions before you turn on the unit again.
Keep the end of the hose and accessory openings away from face and body.
Keep cleaning tools and hose suction openings away from hair, face, fingers, uncovered feet, or loose clothing.
Only use manufacturer’s recommended attachments.
GENERAL CLEANING
DO NOT vacuum up large objects.
DO NOT vacuum up hard or sharp objects that could damage the vacuum cleaner such as glass, nails, screws, or coins.
DO NOT vacuum up drywall dust, fireplace ash, or embers. DO NOT use as an attachment to power tools for dust collection.
DO NOT vacuum up smoking or burning objects such as hot coals, cigarette butts, or matches.
DO NOT vacuum up flammable or combustible materials (e.g., lighter fluid, gasoline, or kerosene) or use vacuum in areas where they may be present.
DO NOT vacuum up toxic solutions (e.g., chlorine bleach, ammonia, or drain cleaner).
DO NOT use in an enclosed space where vapors are present from paint, paint thinner, moth-proofing substances, flammable dust, or other explosive or toxic materials.
DO NOT vacuum up any liquids.
DO NOT immerse vacuum cleaner in water or other liquids.
Use extra care when cleaning on stairs.
POLARIZED PLUG
To reduce the risk of electric shock, this vacuum cleaner has a polarized plug (one blade is wider than the other). As a safety feature, this plug will fit into a polarized outlet only one way. If the plug does not fit fully into the outlet, reverse the plug. If it still does not fit, contact a qualified electrician. DO NOT force into outlet or try to modify to fit.
Shark Lift-Away VC NV361 Warranty
The 5-Year Limited Warranty applies to purchases made from authorized retailers of SharkNinja Operating LLC. Warranty coverage applies to the original owner and to the original product only and is not transferable.
SharkNinja warrants that the unit shall be free from defects in material and workmanship for a period of 5 years from the date of purchase when it is used under normal household conditions and maintained according to the requirements outlined in this instruction manual, subject to the following conditions and exclusions.
Pros & Cons
Pros
- Powerful suction for deep cleaning
- Advanced swivel steering for easy maneuverability
- Lift-away technology for portable cleaning
- Versatile attachments and crevice tool
- Large dust cup capacity
Cons
- May be too heavy for some users
- Can be loud on high setting
- The cord is not retractable
- The filter may need to be replaced frequently
Customer Reviews about Shark Lift-Away VC NV361
Customers love the Shark Lift-Away VC NV361 for its powerful suction and easy maneuverability. Many customers also appreciate the lift-away technology for cleaning stairs and above-floor surfaces. However, some customers have reported that the vacuum is heavy and difficult to move around, and that the filter needs to be replaced frequently. The most common complaints are the noise level, and the non-retractable cord which can be a hassle to wrap up after use.
Faqs
How often should I clean the filters in my Shark Lift-Away VC NV361?
Can I wash the HEPA filter of my Shark Lift-Away VC NV361?
Is it safe to use the Shark Lift-Away VC NV361 on all floor types?
Does the Shark Lift-Away VC NV361 have a headlight?
How do I maintain the battery life of my Shark Lift-Away VC NV361 cordless vacuum?
How can I prevent my Shark Lift-Away VC NV361 from emitting bad odors?
How long is the power cord of the Shark Lift-Away VC NV361?
What's the best way to clean the roller brush of my Shark Lift-Away VC NV361?
How do I attach and use the accessories that come with my Shark Lift-Away VC NV361?
What is the warranty on the Shark Lift-Away VC NV361?
Leave a Comment
