How to Assemble: Shark Pro Steam Pocket S3973 Owner Guide
Content
Introduction of Shark Pro Steam Pocket S3973
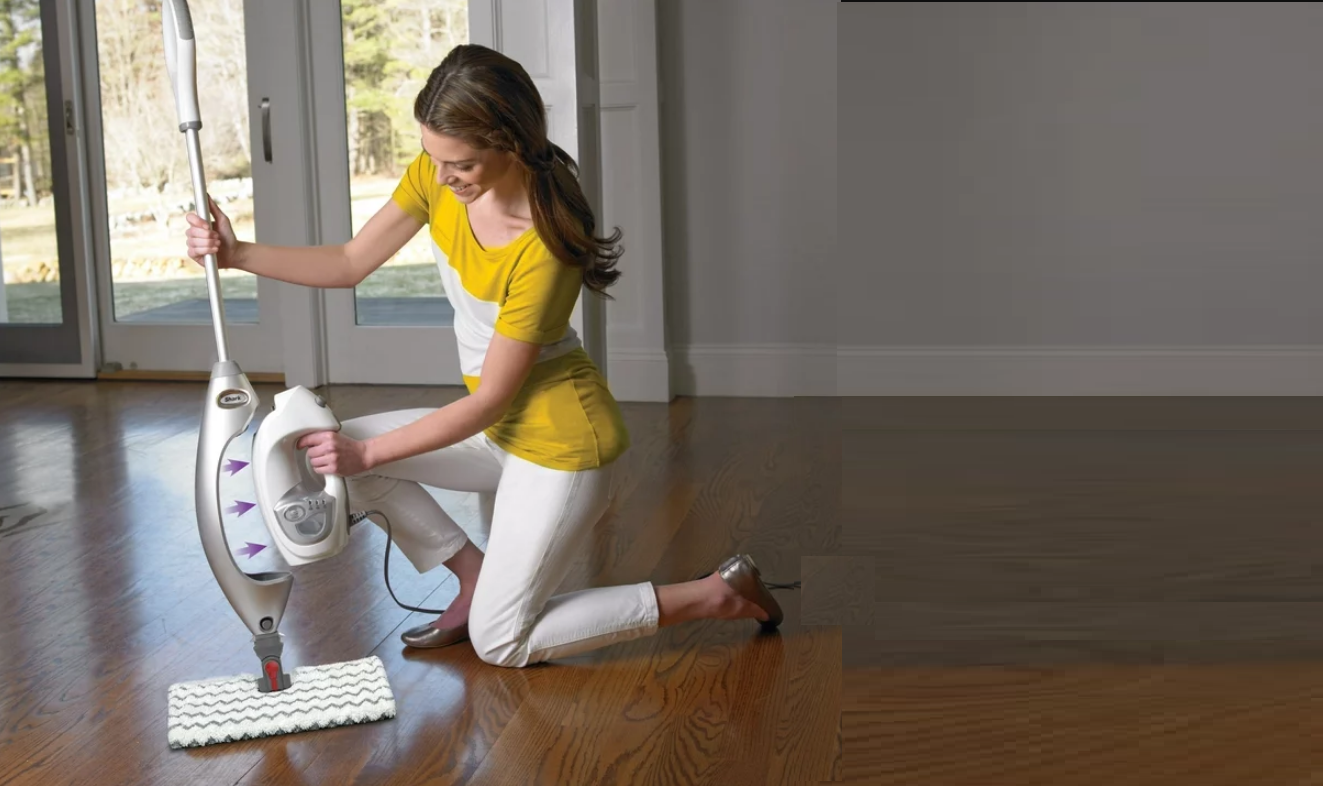
The Shark Pro Steam Pocket is a powerful and versatile steam mop designed to make your cleaning tasks easier and more efficient. With an estimated price range of $150 to $200 and a launch date set for early 2023, this innovative product is perfect for those who want to maintain a spotless and hygienic home.
Detailed Specifications
The Pro Steam Pocket S3973 boasts an array of impressive features, including:
- Swivel steering for easy maneuverability
- Powerful 1200-watt motor for efficient steam production
- Large 300 ml water tank for extended cleaning sessions
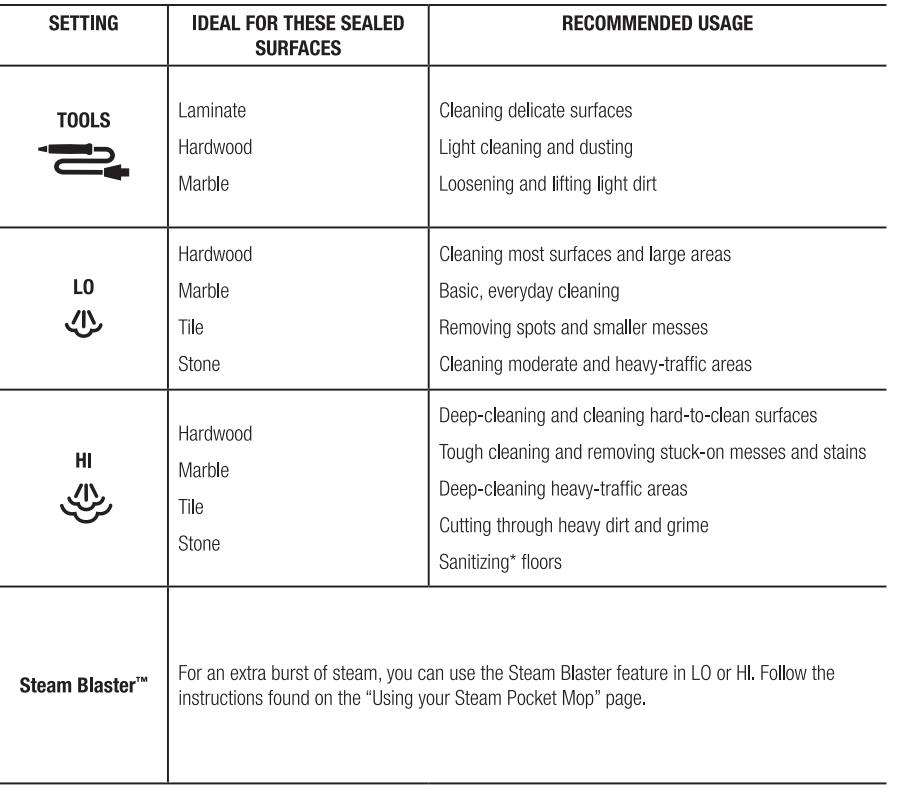
- Multiple steam settings for various floor types
- Integrated washable microfiber pads for streak-free cleaning
- Lightweight design for effortless handling
- Cord length of 22 feet for added convenience
Description of Shark Pro Steam Pocket
The Shark Pro Steam Pocket is a game-changer in the world of steam mops. Its sleek and ergonomic design, coupled with its powerful motor and swivel steering, make it a breeze to use on all types of floors. The large water tank ensures that you can clean for extended periods without interruptions, while the multiple steam settings allow you to customize your cleaning experience based on the surface you're working with. The washable microfiber pads are not only reusable but also leave your floors streak-free and sparkling clean.
Features of Shark Pro Steam Pocket
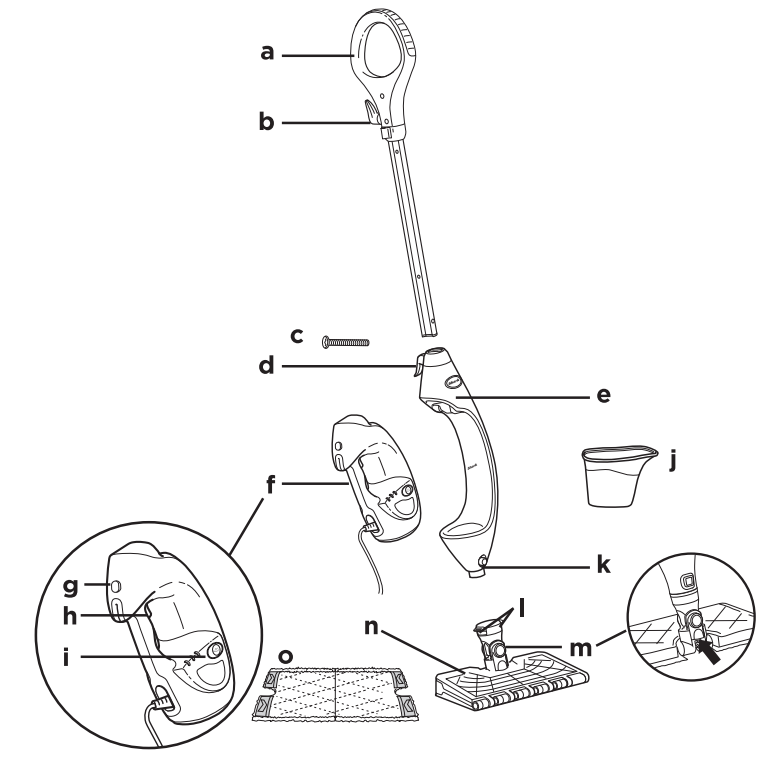
- Steam Mop Handle
- Upper Cord Wrap
- (1) 6 mm x 54 mm Large Screw
- Lower Cord Wrap
- Steam Mop Body
- Removable Handheld Steamer
- Release Button for Handheld Steamer
- Steam Trigger
- Steam Control Panel
- Filling Flask
- Mop Head Release Button
- Dirt Grip™ Pad Release Buttons
- Steam Blaster'" Nozzle
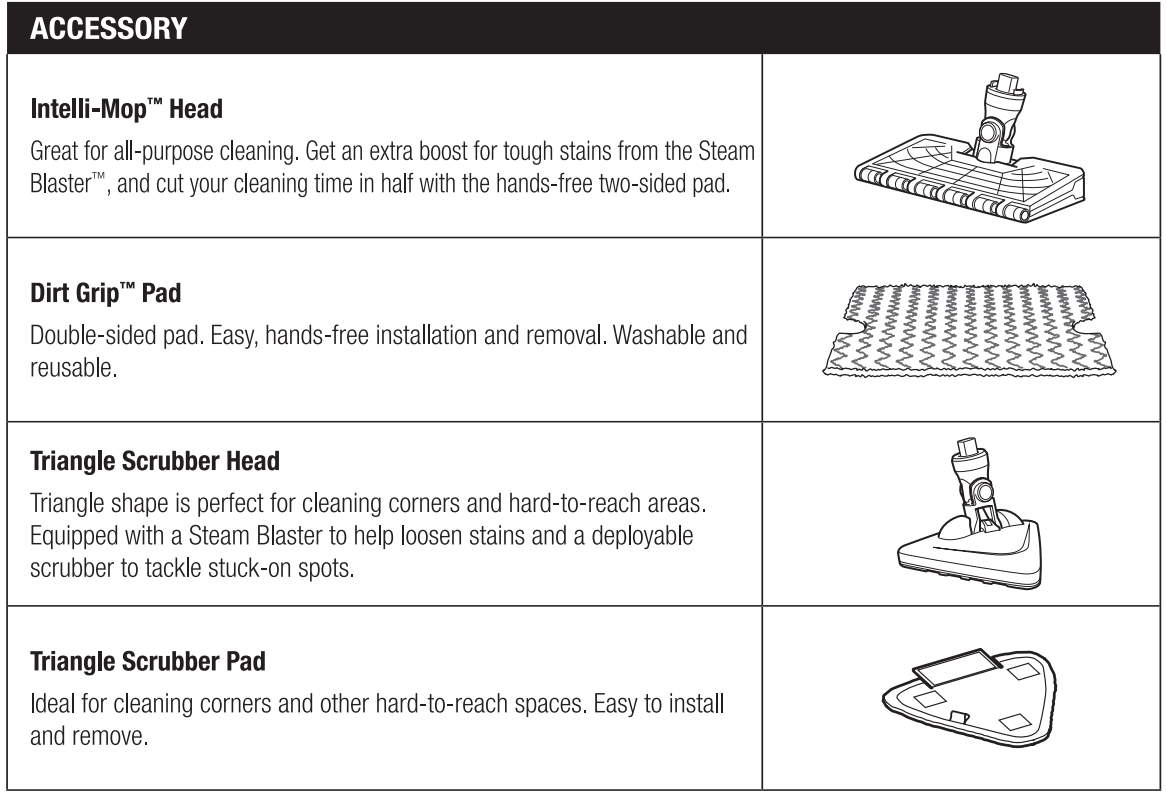
- IntelliJ-Mop'" Head
- Dirt Grip Pad
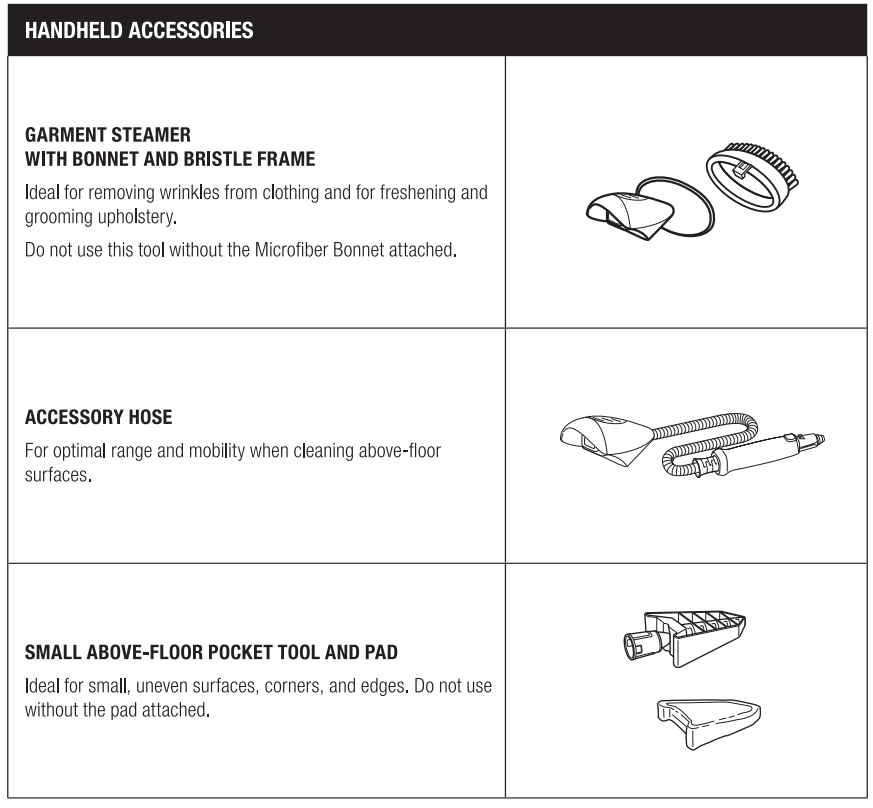
HANDHELD ACCESSORIES
Assembling Your Steam Pocket Mop

WARNING: Always make sure the Steam Mop is UNPLUGGED when not in use. Never fill the Steam Mop or attach the mop head when the Steam Mop is plugged into an electrical outlet. Unplug from the electrical outlet and allow to cool before you fill the mop, or attach or remove the head. To prolong the life of your Steam Mop, we recommend using distilled water. Make sure you add only water to the tank. Chemicals or cleaning solutions (including vinegar) may damage the Steam Mop and could be unsafe for you and your family.
STEAM MOP ASSEMBLY
- Screw the mop handle into the Steam Mop body (screwdriver not included) (fig. 1).
- Slide the lntelli-Mop™ Head post into the Steam Mop body. Push until you hear it click securely into place. (fig. 1) To detach the lntelli-Mop Head, press the release button on the front of the unit above the head connection (fig. 1) and slide off.
- To attach the Dirt Grip™ pad, spread the pad on the floor with the pocket side up. Lift the mop and center the lntelli-Mop Head above the pad, then press down on the release buttons on the neck of the steam mop head (fig. 2a). Both sides of the lntelli-Mop Head will drop open (fig. 2b). Slip the lately-Mop Head's four corner tabs into the four corner pockets of the pad (fig. 3 and fig. 4). Gently press one side of the lntelli-Mop Head to the floor until that side clicks into place (fig. 5). Repeat on the other side (fig. 6).
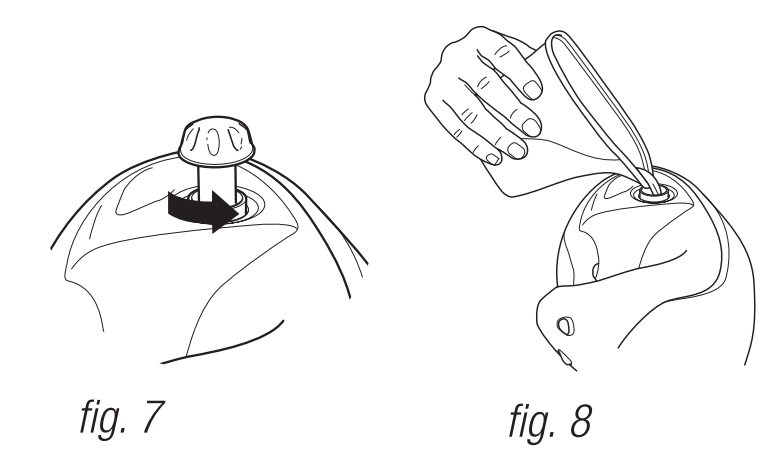
- Open the water tank cap (fig. 7), fill the tank with water, then replace and tighten the cap. Use the filling flask and pour water into the tank (fig. BJ. Do not overfill. Replace the cap on the water tank.
Using Your Steam Pocket Mop
IMPORTANT: Make sure you do not use the Sharf<C Lift-Awayt> Pro Steam Pocket® Mop without attaching a Dirt Grip pad and adding water to the water tank first. When you are using the Steam Mop for the first time, it might take longer than the normal 30 seconds to start steaming.
IMPORTANT: Do not use on unsealed wood or unglazed ceramic floors. On surfaces that have been treated with wax and on some no-wax floors, the sheen may be removed by the heat and steam action. Test an isolated area of the surface to be cleaned before proceeding. Check the use and care instructions from the floor manufacturer.
NOTE: To prolong the life of your Steam Mop, we recommend using distilled water.
NOTE: Sweep or vacuum your floors prior to cleaning with your Steam Mop.
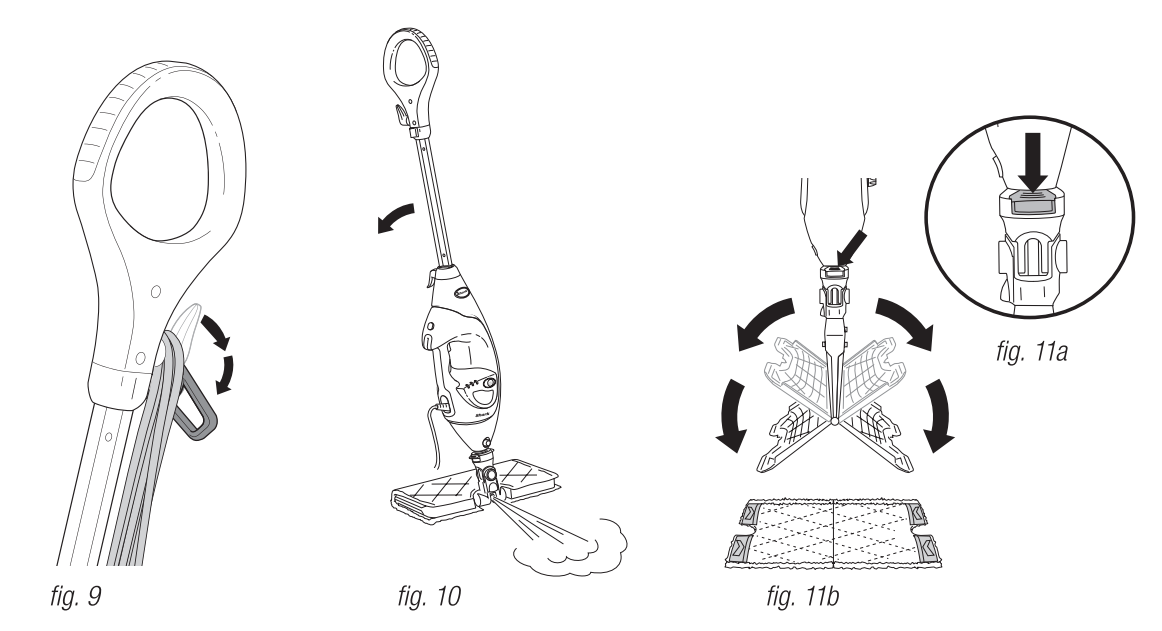
- Twist the upper cord holder to unwrap the power cord completely {fig. 9). Plug into an electrical outlet.
- When it's first plugged in, the unit will be in Standby mode. The LO and HI lights below the Steam Control Button will blink to indicate Standby mode.
- To select the steam mode, press the Steam Control Button once for LO, twice for HI and 3 times for Standby.
- Clean your floors with a forward and backward motion.
- When you need an extra burst of steam to clean a stuck-on stain, you can use the Steam Blaster™ feature. Flip the head over so that it is behind the mop body, then tilt the mop handle down. This will cause the the Steam Blaster (fig. 10) to emit a concentrated blast of steam onto the stain.
- CAUTION: While in Steam Blaster mode, do not leave stationary for more than one minute.
- CAUTION: Do not scrub any one area for an extended period of time.
- To stop the Steam Blaster spray, simply raise the handle. You can then flip the mop head back into its original position and continue cleaning.
- When you are done mopping, press the Steam Control Button until you return to Standby mode.
- To remove the Dirt Grip pad, simply lift the mop straight up by the handle until the lntelli-Mop™ Head is hanging straight down. Press down on the pad release buttons on the neck of the mop head {fig 11a), and both sides of the head will drop open, releasing the pad (fig 11b).
- Once the Dirt Grip pad has been released, close the lntelli-Mop Head. To close, gently press one side of the lntelli-Mop Head to the floor until that side clicks into place. Repeat on the other side.
- When the water tank is empty, the Steam Mop will stop producing steam. You can refill the water tank at any time as long as the Steam Mop is unplugged. Follow the water tank filling instructions on page 7.
NOTE: Please wait 2 to 3 minutes for the Steam Mop to cool off before switching the mop head. Never leave the Steam Mop with a damp or wet Dirt Grip pad on any floor for an extended period of time.
Intelligent Steam Control
The Shark Lift-Away Pro Steam Pocket® Mop has 3 unique Intelligent Steam Control settings so you can use the right amount of steam for the cleaning task at hand. See below for tips on when to use each setting.
TO SANITIZE WITH THE STEAM MOP USING THE INTELLI-MOP'" HEAD AND THE DIRT GRIP'" PAD
- Attach a clean Dirt Grip pad to the mop head.
- Plug in the unit and press the Steam Control Button to select the HI Setting.
- Wait 30 seconds for the unit to begin producing steam.
- Start mopping on an appropriately sealed hard floor surface with a forward and backward motion. After three minutes, your unit is ready to be used to sanitize.
- Using a forward and backward motion, move the unit over the area you seek to sanitize. Repeat at least 15 times.
Sanitization studies were conducted under controlled test conditions. Household conditions and results may vary. With the lntelli-Mop head only in HI mode. Not in above-floor mode or when using Steam Blaster.
Above-Floor Cleaning
For a full list of what is included with your Steam Mop, please refer to box's top panel.
The Shark Lift-Awaye Pro Steam Pocket Mop is designed to clean surfaces that can withstand high heat and moisture. Do not use on unsealed wood surfaces (especially antique wood furniture), unglazed ceramic tile, painted surfaces, or surfaces that have been treated with wax, oils, varnishes, or shellac. The sheen may be removed by the heat, steam, and friction of the cleaning accessories. It is always recommended to test an isolated area of the surface to be cleaned before proceeding. We also recommend you check the use and care instructions from the surface manufacturer. When cleaning finished wood surfaces, use broad, continuous strokes. To prevent surface damage, avoid focusing steam or allowing the cleaning accessories to remain stationary in any one spot.
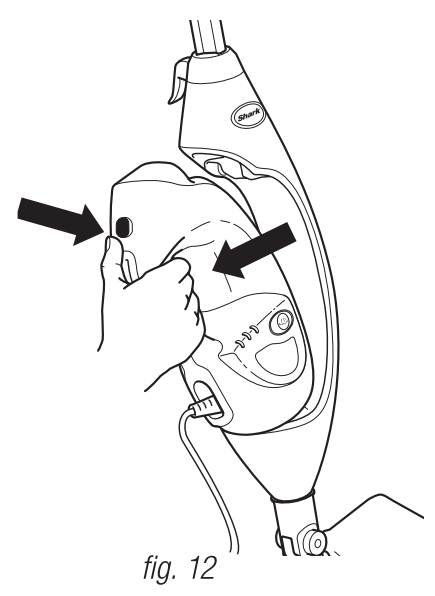
- Remove the Handheld Steamer by pressing on the release button and pulling away from the cradle. Be careful to NOT press the steam trigger as you remove the handheld steamer. (fig. 12)
- The Handheld Steamer is automatically set to TOOLS mode. Squeeze the steam trigger to activate steam. You may select other steam modes depending on the accessory and the use.
- With all attachments, control Steam better by using 3- to 5-second bursts of the trigger. This will allow you to steam longer and with more control.
Using the Garment Steamer
For a full list of what is included with your Steam Mop, please refer to box's top panel
CAUTION
- Make sure the Handheld Steamer is unplugged or in Standby mode while attaching or removing the accessory. Avoid touching the accessory, as it will be very hot after steaming.
- To avoid scalding injuries, always unplug and allow the Steam Mop to cool before removing or changing accessories or pads.
How to Attach/Detach
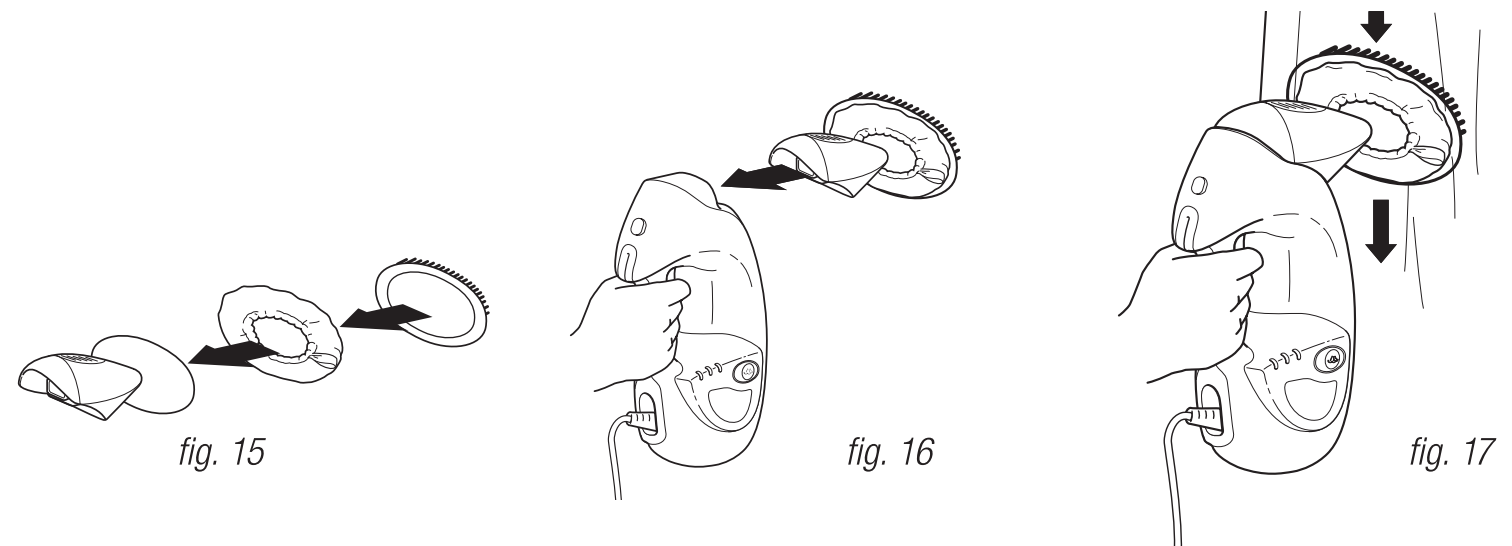
- Use the lavender loop on the side of the bonnet to slide over the nozzle opening of the Garment Steamer. (fig. 15)
- Snap the bristle frame over the bonnet with the bristles placed at the top of the Garment Steamer bonnet.
- Attach the assembled Garment Steamer to the Handheld Steamer by snapping it into the main nozzle. (fig. 16)
- To remove, wait 2 to 3 minutes for the tool to cool, hold the release button and pull the tool away from the unit.
Usage
- The Garment Steamer is ideal for removing wrinkles from clothing and for freshening and grooming upholstery.
- The bonnet and frame with bristles provides controlled steaming for fabrics and upholstery.
Cleaning Tips
- Pressing the steam trigger in 3-to-5-second bursts, move slowly up and down over your garments or upholstery. (fig. 17)
- Always determine color fastness of any fabric, especially with reds or blues:
- Take a clean, moist, warm towel and gently rub a small area on the fabric that is as out of sight and out of the way as possible.
- If color bleeds onto the towel, you may need to have the piece professionally cleaned.
Using the Accessory Hose and the Small Above-Floor Pocket Tool
How to Attach/Detach
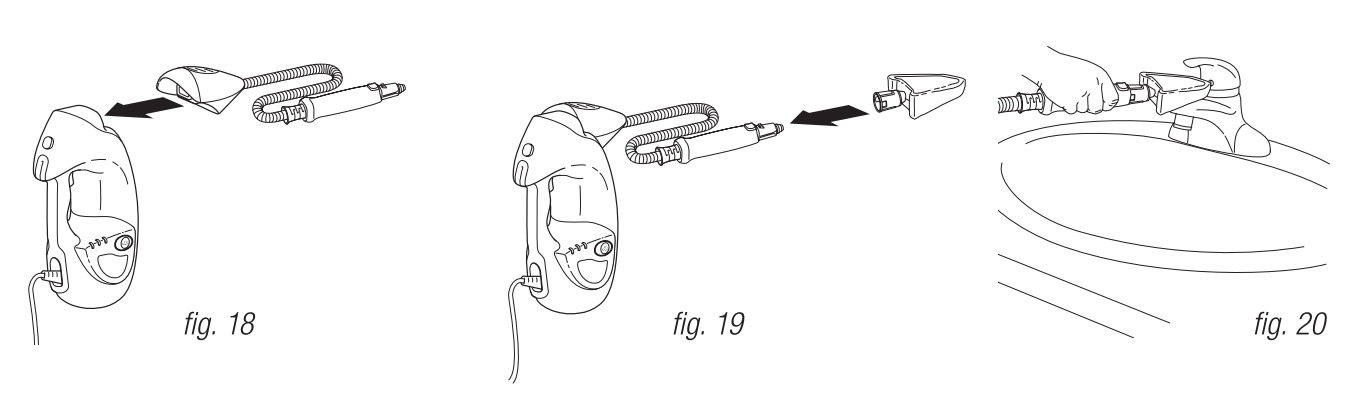
- First attach the Accessory Hose to the Handheld Steamer by snapping the Accessory Hose into the main nozzle.(fig. 18)
- Slide the pad over the Small Above-Floor Pocket Tool so it fits snugly. Cinch the elastic band and slide the locking toggle to securely tighten the pad over the tool.
- Connect the Small Above-Floor Pocket Tool to the steam nozzle at the end of the accessory hose. Slide the base of the tool over the tip of the nozzle until the tool clicks securely into place. (fig. 19)
- Do not use the Small Above-Floor Pocket Tool without the pad attached.
- To remove, wait 2 to 3 minutes for the tool to cool, hold the release button and pull the tool away from the unit.
Usage
The Small Above-Floor Pocket Tool is ideal for small, uneven surfaces. The pointed tip is great for edges and corners. (fig. 20)
Cleaning Tips
Additional attachments are available for your accessory hose. Please visit sharkaccessories.com for more information.
Caring for Your Steam Mop
AFTER USE AND STORAGE
- Press the Steam Control Button until it starts to blink, indicating that you are in Standby mode. Unplug the cord from the outlet and place the Steam Mop into the upright position. Let it cool.
- To remove the Dirt Grip'" pad, lift the Steam Mop straight up by the handle until the lntelli-Mop'" Head is hanging straight down. Press the pad release buttons on the neck of the mop head, and both sides of the lntelli-Mop Head will drop open, releasing the pad. Once the pad has been released, close the lntelli-Mop Head.
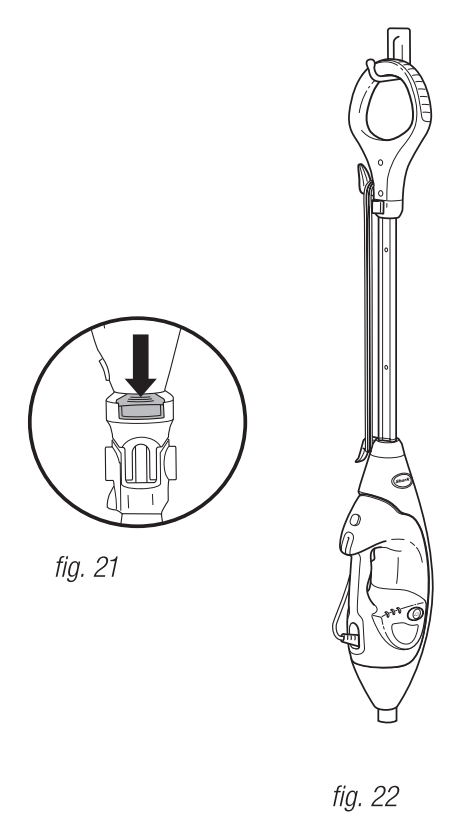
- If the lntelli-Mop Head is not attached to the mop, the pad can still be removed. Press down on the release button on the lntelli-Mop Head post to release the pad (fig.21).
- Empty the water tank before storing. To empty the tank, hold the Steam Mop beside a sink. Open the water tank lid, then lean the unit over the sink. Let the water drain out, then close the lid.
- To store the Steam Mop, wait until after it has cooled and the steam has been released. Then remove the lntelli-Mop Head and hang the mop by its handle on a large hook (not included) (fig. 22).
DIRT GRIP'M PAD CARE INSTRUCTIONS
- Care
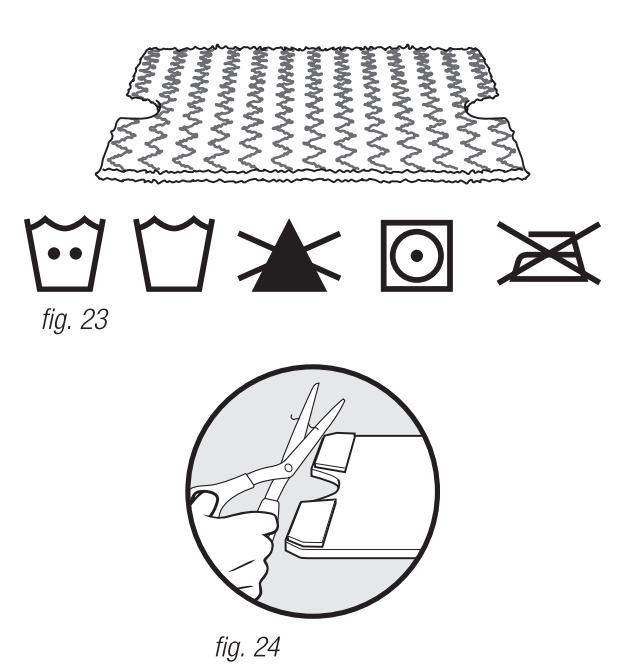
Machine-wash the Dirt Grip pads separately with warm water using liquid detergent.
NEVER USE BLEACH, POWDERED DETERGENT, OR FABRIC SOFTENERS as they may damage or leave a coating on the Dirt Grip pads that will reduce their cleaning performance and absorbency. Dirt Grip pads should be line-dried or tumble-dried on a low setting, as this will extend the life of the microfiber fabric (fig. 23). Loose fibers can indicate wearing of the microfiber fabric. Do not pull the loose fibers, as this can cause the weave to come undone. Simply trim the loose fibers with scissors (fig. 24). - Replacement Dirt Grip pads
For best cleaning results, we recommend replacing your Dirt Grip pads every 3 to 4 months following normal use. As with any fabric, dirt particles, grease, friction, and repeated washing can cause the fibers to break down, and you may notice an increase in the effort needed to push or pull the mop. You can purchase replacement Dirt Grip pads and other accessories by visiting sharkaccessories.com or calling 1-800-798-7398. - STEAM NOZZLE CARE
If you believe the main steam nozzle or the Steam Blaster'" nozzle is clogged, please contact Customer Service at 1-800-798-7398 or [email protected]
Ordering Additional Accessories
Troubleshooting
| PROBLEM | POSSIBLE REASONS & SOLUTIONS |
|---|---|
| The Steam Mop isn’t producing any steam. | The Steam Mop should be securely plugged into an electrical outlet. Check your fuse or circuit breaker or try a different outlet. Make sure the water tank is full, the unit is plugged in, and the light around the Steam Control Button is solid. If the lights below the Steam Control Button are not illuminated, try a different electrical outlet. If the lights below the Steam Control Button are solid, wait 30 seconds for the unit to warm up. If the lights below the Steam Control Button are solid, wait 30 seconds for the unit to warm up. If after following the above steps the Steam Mop still does not produce any steam, contact Customer Service. |
| The Steam Mop is producing intermittent steam. | This is normal—for more consistent steam select the HI setting. Also, make sure the water tank is full. |
| I can’t select a Steam Setting. | Make sure the Steam Mop is plugged in and the lights below the Steam Control Button are solid. If your Steam Mop is producing steam but the lights below the Steam Control Button are not lit, call customer service. |
| I am getting streaky/cloudy floors. | The Dirt Grip™ pad might be dirty. If it is, flip it over to the clean side or change it entirely. If you washed the Dirt Grip pad with powdered detergent, then it could be damaged and require replacement. This could also be an indication of soap or grease residue that has accumulated on the floor. As the Steam Mop uses only a small amount of water, it may not be enough to rinse off the accumulation of residue that the steam is bringing to the surface. We suggest rinsing the floor with nothing but water, letting it dry, and then steam mopping again with a clean Dirt Grip pad. One or more rinses will generally remove the residue. A more stubborn case may require you to rinse the floor with a mix of one part vinegar and two parts water* (but DO NOT put vinegar or any other cleaner into the Steam Mop's water tank). *Please consult your flooring manufacturer’s care and maintenance instructions before applying any cleaning products or solutions including vinegar. |
WARRANTY of Shark Pro Steam Pocket S3973
SharkNinja Operating LLC warrants this product to be free from defects in material and workmanship for a period of one (1) year from the date of the original purchase, when utilized for normal household use, subject to the following conditions, exclusions, and exceptions.
Pros & Cons of S3973
Pros
- Efficient and powerful steam production
- Swivel steering for easy handling
- Versatile steam settings for various floor types
- Large water tank for extended cleaning sessions
- Eco-friendly and chemical-free cleaning solution
Cons
- May not be suitable for deep carpet cleaning
- Requires time to heat up before use
- May leave floors slightly damp after cleaning
Customer Reviews about Shark Pro Steam Pocket S3973
Customers rave about the Shark Pro Steam Pocket 's ease of use, efficient steam production, and versatile steam settings. However, some have noted that it may not be ideal for deep carpet cleaning and that it leaves floors slightly damp after use.
Faqs
Is it possible to add cleaning agents to the water tank of the Shark S3973?
With my Shark Steam Pocket Mop S3973, what surfaces can I clean?
Why is there no steam coming from my Shark S3973?
How should my Shark S3973 mop head be cleaned and maintained?
Water drips from my Shark S3973 onto the ground. How should I proceed?
If I have carpets, is it possible to use the Shark S3973?
In the Shark S3973, how long does it take for it to reach the desired temperature?
What steps should I take if I notice that my Shark S3973 has a foul odour?
The steam that comes out of my Shark S3973 is sporadic. What causes that to take place?
Is there a warranty on the Shark Steam Pocket Mop S3973?
Leave a Comment