
How to Use: Singer Handheld Sewing Machine Owner Guide
Content
Singer Handheld Sewing Machine
Introduction
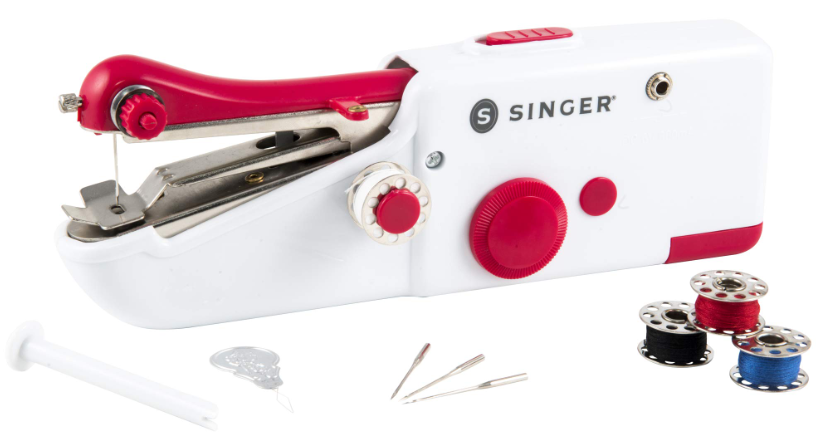
The singer Handheld Sewing Machine is a compact, cordless sewing device designed for quick mending and small sewing projects. Perfect for beginners and on-the-go users, this lightweight tool offers convenience and portability, allowing repairs on fabrics, clothing, curtains, and other textiles without needing a bulky traditional machine. Its handheld design enables sewing in awkward or tight spaces, making it ideal for emergency fixes, temporary basting, and delicate fabric work.
Key benefits include ease of use, battery-powered cordless operation for maximum mobility, and compatibility with a variety of fabric types up to 1.8 mm thick. Unlike full-sized machines, it is perfect for quick repairs rather than heavy sewing tasks. The device typically retails in the price range of approximately $20 to $35 USD,, depending on retailer and bundle options, making it an affordable addition to any household sewing kit. Authorized dealers and online stores offer wide availability, often including additional bobbins, needles, and threaders to ensure an immediate start.
Targeted towards hobbyists, crafters, and anyone needing fast fabric fixes without setting up a traditional sewing machine, the Singer Handheld Sewing Machine combines portability with user-friendly functionality, making it a must-have for casual sewing and mending tasks.
Technical Specifications and Features of the Singer Handheld Sewing Machine
- Power Source: 4 x AA batteries (not included), cordless operation for portability
- Sewing Function: Single-thread feed for basic stitching and quick repairs
- Fabric Compatibility: Suitable for most fabrics,, including silk, wool, cotton, curtains, and lightweight denim up to 1.8 mm thickness
- Weight & Dimensions: Compact and lightweight, designed for handheld use with ergonomic grip
- Threading System: Includes multiple thread guides and a thread cutter for convenience
- Modes: Handheld and desktop/tabletop use (some models,, like Stitch Quick Plus, include a mode selector switch)
- Accessories Included: Pre-threaded bobbins, extra needles, needle threader, and spindle in some packages
- Performance: Ideal for light sewing tasks such as hemming, patching, and small repairs; not recommended for heavy fabrics like thick leather or denim
- Comparison: Unlike traditional sewing machines, the handheld model offers unmatched portability but limited stitch types and power. Compared to other handheld models, Singer is noted for ease of use and reliability for beginners.
Parts Diagram
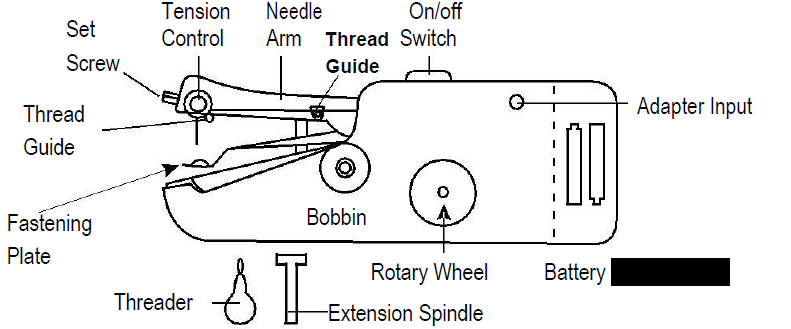
Notes: always use the rotary wheel to move the needle. Never press or pull directly on the needle arm to avoid damage to the internal mechanism..
IMPORTANT NOTES TO BE READ BEFORE FIRST USE:
- When operating the device for the first time, run for 10 seconds and then pause for 5 seconds. It can be used again regularly.
- Lift the fastening plate and pull out the test material. Cut the thread close to the test material.
Directions for Use:
- Make sure the device is in the Off position (See diagram #1. On/Off Switch should be slid backward, toward the rear of the device). Raise the needle arm to the highest position by turning the rotary wheel. Note: The rotary wheel can be turned in either direction (see
diagram #1). - Lift the fastening plate, making sure not to push down on the needle arm (the arm can still be moved manually even when the device is in the locked position). Place a cloth underneath the fastening plate (see diagram #2). Release the fastening plate.
Pull at least 2 inches of thread through the needle, from back to front, before starting to sew. If the needle needs to be threaded, please see the "How to Thread Stitch Sew Quick_'' section.
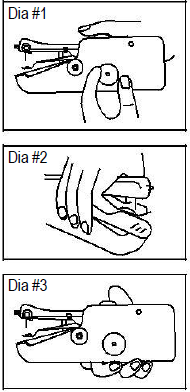
- Hold the Stitch Sew Quick_ with your right hand. Place your thumb on the On/Off Switch while your other fingers support the bottom of the device (see diagram #4)
- Turn the device on by sliding the On/Off Switch forward with your ththumbUse your left hand to hold the cloth and to control the direction and speed as you pull it through the device. Be careful not to pull the material through the device too quickly. When wider stitches are required, pull the cloth to the left a little faster while you continue sewing. Follow the centerline on the cloth fastening plate to ensure straight stitching (see diagram #5)..
To Finish Seam - When finished sewing, raise the needle arm to the highest position by turning the rotary wheel, then use the back of a seam ripper or scissors to pull the thread
out about 3 inches. Cut thread (see diagrams #5 & #6).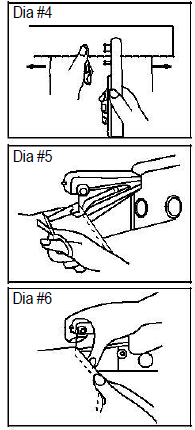
- Turn the rotary wheel, lowering the needle into the cloth, and continue to turn the rotary wheel until the needle arm is again at its highest position.
- Lift the fastening plate and take off the cloth to the left, MAKING SURE NOT TO PULL THE THREAD AS THE SEAM WILL UNRAVEL.
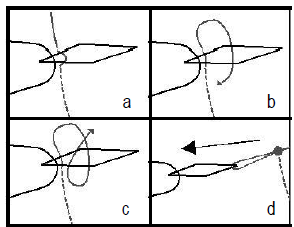
Tieing a Knot in Thread - Turn to the back side of the cloth and guide the reserved 3 inches of thread according to the following directions and corresponding drawings:
- Slide the threader under the last stitch.
- Pass about 1 inch of thread through the threader, from top to bottom.
- Pass the thread through the loop that has been created and pull tight to form a knot.
- Slowly pull the threader out from under the stitch.
Cut excess thread.
How to Thread Stitch Note:
The thread should flow from the top right of the bobbin or spool. Spring must be in place before installing the bobbin.
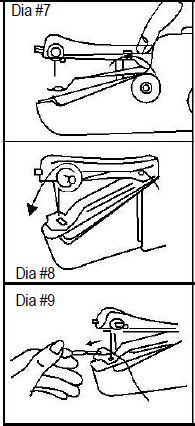
- Thread the device according to the diagrams # 7, 8,, and 9. 2.
- Pass the thread upward through the eyelet. (see diagram # 7).
- Pass the thread over the top of the tension control between the two silver discs. (See diagram #8).
- Pass the needle threader through the eye of the needle, from front to back. Pass the thread through the eye of the needle threader.
- Pull the needle threader with the inserted thread through the eye of the needle, from back to front (see diagram #9). Remove the needle threader.
Adjusting Thread Tension
- If stitching is too tight, turn the tension control slightly to the left.
- If stitching is too loose, turn the tension control slightly to the right.
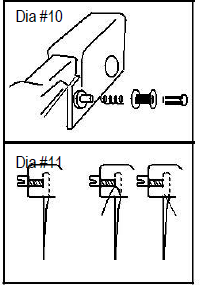
To install a Normal Thread Spool (see diagram #10)
- Loosen the bobbin nut and take off the bobbin.
- Slide the thread spool into the extension spindle.
- Connect the extenstheeobbin bbinnbbin shaft.
To Replace Needle
Loosen the set screw with a screwdriver and take off the old needle. Always use a standard sewing machine needle. The needle must be installed with the flat side of the needle shank facing the front of the Stitch Sew Quick_ (see diagram #11).
Bobbin Replacement
When purchasing replacement bobbins for this device, please note that it uses a class 15 metal bobbin.
To Replace Batteries (4AA not included)
Note: Make sure the device is in the Off position before battery replacement.

AC/DC Adapter (not included)
Adapter must be 6V 800mA. Adapter must use a plug with a 1/8"/3.5 mm diameter. Plugging an adapter into a portable that has different ratings could damage the portable & adapter. Be sure to set the adapter's tip polarity to conform to the diagram shown
below the sewing device's DC input jack.
CAUTION: Needle is sharp. Use care when working with a needle to avoid injury. Keep away from children. When not in use, the device should always be kept in the Off position.
This device is not intended for use by persons (including children) with reduced physical, sensory,, or mental capabilities, or a lack of experience and knowledge, unless they have been given supervision or instruction concerning use of the device by a person responsible for their safety. Children should be supervised to ensure that they do not play with the device.
Troubleshooting Common Issues with Your Singer Handheld Sewing Machine
- Machine Not Sewing Properly: Check battery installation , ensuring all 4 AA batteries are fresh and inserted correctly. Replace if the power is low.
- Thread Breaking or Tangling: Re-thread the machine carefully , following the thread guides. Ensure the thread tension dial is set correctly (not too tight or loose).
- Needle Jamming or Not Moving: Verify the needle is inserted securely and not bent. Lubricate moving parts if necessary and remove any fabric debris.
- Bobbin Issues: Replace the correct bobbin size; ensure the bobbin is properly seated under the bobbin cover.
- Device Shuts Off Unexpectedly: Confirm battery contacts are clean and batteries are fully charged. Avoid mixing battery types.
- Preventive Measures: Use the device on recommended fabric thickness only, avoid forcing through heavy materials, and store in a dry place.
- Warranty & Support: Singer typically offers a limited warranty on handheld machines. For assistance, contact Singer customer service via their official website or authorized dealers.
Pros & Cons of siSinger and heldheld Sewing Machine
- Pros:
- Highly portable and cordless, allowing sewing anywhere without a power outlet dependency
- Easy for beginners to operate with minimal setup
- Effective for small repairs, hemming, and quick fixes on various light fabrics
- Affordable price point suitable for casual users
- Includes useful accessories like extra bobbins and needles in many packages
- Cons:
- Not suitable for heavy or thick fabrics such as leather or denim
- It can be difficult to control precisely, leading to uneven stitches
- Limited stitch options compared to traditional sewing machines
- Battery operation may limit continuous use time
- Some users report fragility and delicate mechanical parts
Customer Reviews and Feedback on the Singer Handheld Sewing Machine
Users appreciate theSingerr Handheld Sewing Machine for its convenience and portability, commonly praising its ability to perform quick mends without setup hassle. Many highlight how it easily fixes curtains, hems, and light fabric tears, making it a practical tool for home use. Average ratings hover around 3 to 3.5 stars out of 5 on major retail platforms, reflecting mixed but generally positive user experience.
Common complaints include difficulty maintaining consistent stitch quality and limited effectiveness on thicker materials. Several reviewers recommend it for light sewing tasks only and warn about its fragile build, advising careful handling. Some users find the threading process a bit tricky at first,, but manageable with practice. Despite these issues, most testify that it is a valuable, cost-effective option for emergency sewing needs and travel kits.
Overall, the handheld machine is recommended for those seeking portability and ease for small sewing repairs rather than heavy-duty projects.
Faqs
How do I set up singer Handheld Sewing Machine for the first time?
What should I do if singer Handheld Sewing Machine is skipping stitches?
Can I use singer Handheld Sewing Machine for all types of fabric?
How do I adjust thread tension on the singer Handheld Sewing Machine?
What are the key features that make singer Handheld Sewing Machine different?
How often should I maintain singer Handheld Sewing Machine?
Can I use singer Handheld Sewing Machine with thicker fabrics or multiple layers?
What should I do if singer Handheld Sewing Machine is not stitching at all?
More singer manuals
Leave a Comment