Singer Sewing Machine 4832 Instruction Manual
Content
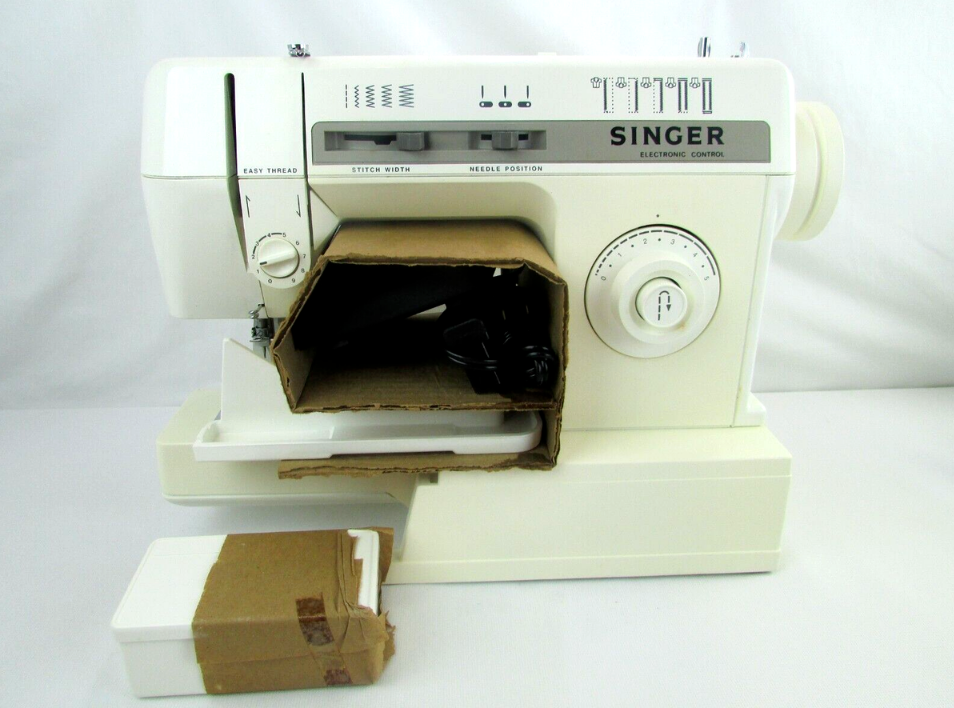
Introduction of Singer Sewing Machine 4832
The sewing Machine is a versatile and user-friendly machine designed for both beginners and experienced sewers. Featuring 32 built-in stitches, including essential, decorative, and stretch options, it allows for creative expression in various sewing projects. The machine comes equipped with an automatic needle threader and a top drop-in bobbin system, simplifying the setup process. Its lightweight design makes it easy to transport, while the durable construction ensures long-lasting performance. Priced at approximately $199.99, the Singer 4832 offers excellent value for those looking to enhance their sewing skills.
Getting to know your machine
Principal parts
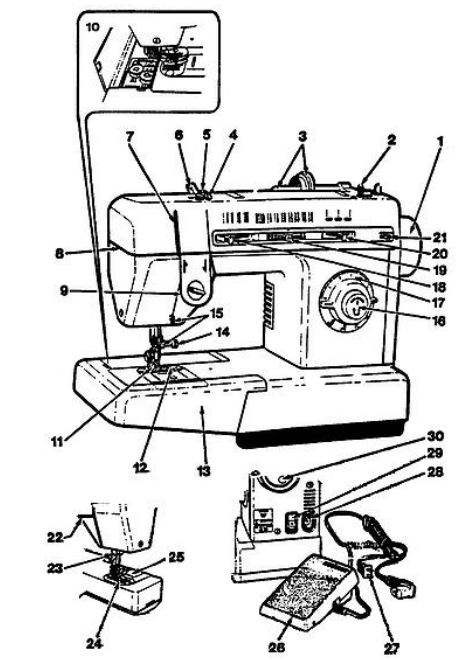
- Hand wheel
- Bobbin winder
- Horizontal spool pin and holder
- Thread guide
- Bobbin winder tension disc
- Snap-in thread guide
- Take up lever
- Face plate
- Needle thread tension dial
- Accessory storage
- Snap on presser foot
- Needle plate
- Removable extension table
- One-way needle clamp
- Thread guides
- Push button reverse
- Stitch length dial/four-step buttonhole
- Stitch width lever
- Pattern selector dial
- Needle position selector
- Stitch balance control
- Presser foot lifter
- Thread cutter
- Feed system
- Slide plate
- Foot control
- Electrical lead
- Machine plug
- Power and light switch
- Bobbin winding Indent
Accessories
The following accessories furnished with your sewing machine are designed to simplify your sewing projects and increase the versatility of your machine.
The letter in a circle adjacent to the Illustrated part is reproduced on the part itself to help you select the correct attachment for the type of work you are doing.

- Blindstitch hem presser foot is used to position the hem for blindstitch hemming.
- Special purpose presser foot (J) is used for decorative and zig-zag sewing.
- General purpose needle plate (A) and presser foot (B) are on your machine when delivered. Use together for alternating between straight and zigzag stitching.
- Buttonhole presser foot (1) is used with the General Purpose Needle Plate to make four-step buttonholes.
- Zipper foot (E) is used for inserting zipper and stitching corded seams.
- Friction free spool holder is used to hold various size spools and allows thread to unwind smoothly. The spool does not turn.
- Small thread spool hold (Q) for use with small diameter spools of thread.
- Needle pack includes an assortment for sewing various types of fabrics.
- Feed cover (F) is used to prevent the feed from moving the fabric when darning or free motion embroidery.
- Transparent bobbins for easy viewing of thread supply.
Specifications
The Singer 4832 boasts several key features that make it a standout in its category. Here are some of the most notable specifications:
- 32 Built-in Stitches: Includes basic, stretch, decorative, and buttonhole stitches.
- Free Arm: Allows for easy sewing of cuffs and sleeves.
- Adjustable Stitch Length and Width: Customize your stitches to suit your project needs.
- Reverse Stitch Button: Secure your stitches with a simple press of a button.
- Automatic Needle Threader: Saves time and reduces eye strain.
- Top Drop-In Bobbin: Easy bobbin loading and removal.
Description
The Singer 4832 sewing machine is designed with user-friendliness in mind. Its compact design and lightweight construction make it easy to transport and store. The machine comes with a variety of accessories, including additional bobbins, needles, and a seam ripper, ensuring you have everything you need to start sewing right away.
The intuitive control panel allows you to quickly select stitches and adjust settings. The built-in carrying handle adds to the machine's portability, making it perfect for classes, workshops, or sewing retreats. With its robust build and smooth operation, the Singer 4832 is a reliable companion for any sewing enthusiast.
Connecting the machine
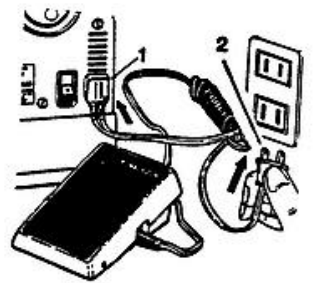
Push plug into the receptacle (1) at the right end of the machine. Then connect plug (2) to your socket outlet.
Running the machine
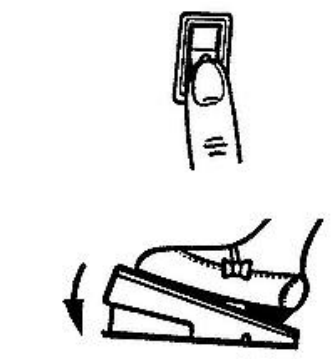
- To turn on machine and sewing light, press upper portion of power switch. To turn off machine and light, press lower portion "D" of power switch.
- To run the machine and control speed, press the foot control with your foot. The harder you press, the faster the machine will sew. To stop machine, remove foot from control.
Note: Do not operate machine without fabric under the presser foot as this may damage the feed and the presser foot.
Choosing and changing needles
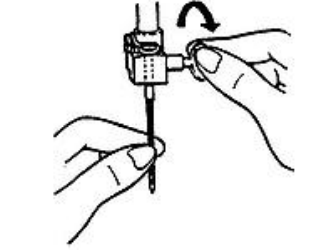
- Raise needle to its highest position.
- Loosen needle clamp screw and remove needle.
- With flat side of needle to the back, insert new needle up into clamp as far as it will go.
- Tighten needle clamp screw securely.
Changing the needle plate (A), (C)
,_(c)_singer_sewing_machine_4832.png)
- Raise needle and presses foot.
- Open slide plate.
- Lift up needle plate from right comer and slide out from under foot.
- To replace needle plate slide it under pin (1) and push it firmly to the left.
- Press down until it snaps into place Changing screw-on presser feet (H)
- Raise needle and presser foot.
- Loosen presser foot screw (1) and remove presser foot with shank (2), guiding it toward you and to the right.
- To replace presser foot with shank, hook shank around the presser bar and tighten presser foot screw with the use of a coin.
Attaching the feed cover (F)
The feed cover is used to keep the feed from moving the fabric when attaching a button, darning or sewing free motion embroidery.
_singer_sewing_machine_4832.png)
To attach it, follow the directions below:
- Raise needle and presser foot.
- Open slide plate.
- Slide feed cover on top of needle plate, pressing tabs (1) and (2) into holes.
- Close slide plate.
- To remove open slide plate and lift front edge of cover; pull it away.
Changing snap-on presser feet (B),(D),(J),(L)
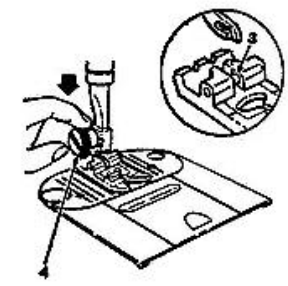
- Raise needle to its highest position by turning hand wheel toward you.
- Raise presser foot using presser foot lifter at back of machine.
- Push to of presser foot (1) up, until it snaps off the shank (2).
- Remove foot from machine.
- Place new foot under centre of shank.
- Lower presser foot lifter, fitting shank over presser foot pin (3).
- Don't turn screw. Instead, push presser foot screw (4) down, firmly until foot snaps into place.
Setup Guide
To get started with your Singer 4832 sewing machine, follow these steps:
- Unpack and inspect the machine for any damage or missing parts.
- Thread the machine using the automatic needle threader.
- Insert the bobbin into the bobbin case and place it in the machine.
- Select your desired stitch using the stitch selector dial.
- Adjust the stitch length and width as needed.
- Begin sewing by gently pressing the foot pedal or using the start/stop button.
IMPORTANT SAFETY INSTRUCTIONS
When using this machine basic safety precautions should always be followed including the following:
Read all instructions before using this machine.
DANGER
To reduce the risk of electric shock
- The machine should never be left unattended when plugged in. Always unplug the machine from the electric outlet immediately after using and before cleaning.
- Always unplug before relamping. Replace bulb with the same type rated 15 watts
- Be sure to replace the face plate which covers the light bulb before operating the machine.
WARNING
To reduce the risk of burns. tire, electric shock or injury to persons:
- Be sure that the electrical voltage of the socket outlet (wall receptacle is the same as the rated voltage of the motor).
- Use this machine only for its intended use as described In this Operator's Guide
- Use only attachments recommended by the manufacturer as contained In the Operator's Guide
- To disconnect, turn all controls to the off ("0") position, then remove plug from outlet
- Disconnect the power-line plug from the socket outlet or switch the machine off when making any adjustments in the needle area, such as threading needle changing needle, changing throat plate or changing presser foot, etc
- Always unplug the machine from the electrical outlet when removing covers lubricating, or when making any other user servicing adjustments mentioned in the Operator's Guide.
Troubleshooting
If you encounter any issues with your Singer 4832, here are some common problems and their solutions:
- Thread Jam: Turn off the machine, remove any excess thread, and rethread the machine carefully.
- Broken Needle: Replace the needle with a new one, ensuring it is properly seated and aligned.
- Inconsistent Stitches: Check that the thread tension is correct and that the bobbin is properly seated.
Always refer to the user manual for detailed instructions and follow all safety precautions to avoid injury or damage to the machine.
Singer 4832 Pros & Cons
Pros
- Easy to use with an intuitive control panel.
- Versatile with 32 built-in stitches.
- Compact and lightweight design.
- Includes a variety of accessories.
- Affordable price point.
Cons
- Some users find the automatic needle threader finicky.
- No built-in walking foot or other specialized feet included.
- Not suitable for heavy-duty or commercial use.
Customer Reviews
Customers have generally praised the Singer 4832 for its ease of use and versatility. Many appreciate the variety of stitches available and the machine's reliability. However, some users have noted that the automatic needle threader can be tricky to use and that additional feet may need to be purchased separately.
Common complaints include occasional thread jams and the need for more detailed instructions in the user manual.
Faqs
What types of projects is the Singer suitable for?
How do I thread the Singer 4832?
What is the purpose of the free arm on the Singer 4832?
Can I adjust the stitch length and width on the Singer 4832?
How do I fix a thread jam on the Singer 4832?
Is the Singer 4832 heavy-duty enough for commercial use?
What accessories come with the Singer 4832?
Can I purchase additional feet for the Singer 4832?
How do I maintain my Singer 4832 to ensure it lasts long?
What is the warranty period for the Singer 4832?
Leave a Comment
