Singing Machine Studio Bluetooth Karaoke SDL2093 User Guide
Content
Introduction
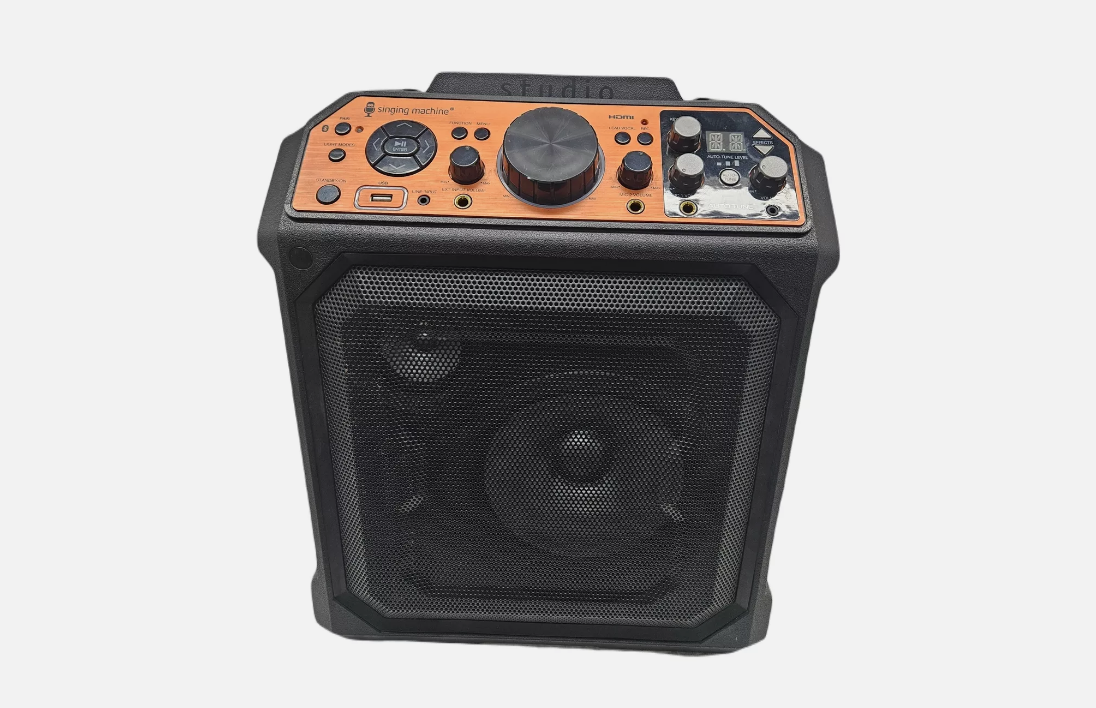
The Singing Machine Studio Bluetooth Karaoke SDL2093 is an innovative karaoke system designed for both casual and professional use. Featuring official Auto-Tune software, it enhances vocal performances with professionally engineered effects, making every singer sound their best. The system includes an 8” woofer and a 3” tweeter, delivering dynamic sound quality. With a rechargeable battery providing over 25 hours of playtime, it's perfect for parties or events where mobility is key.The cost of the Singing Machine SDL2093 is approximately $49.99, offering a versatile entertainment solution for music lovers.
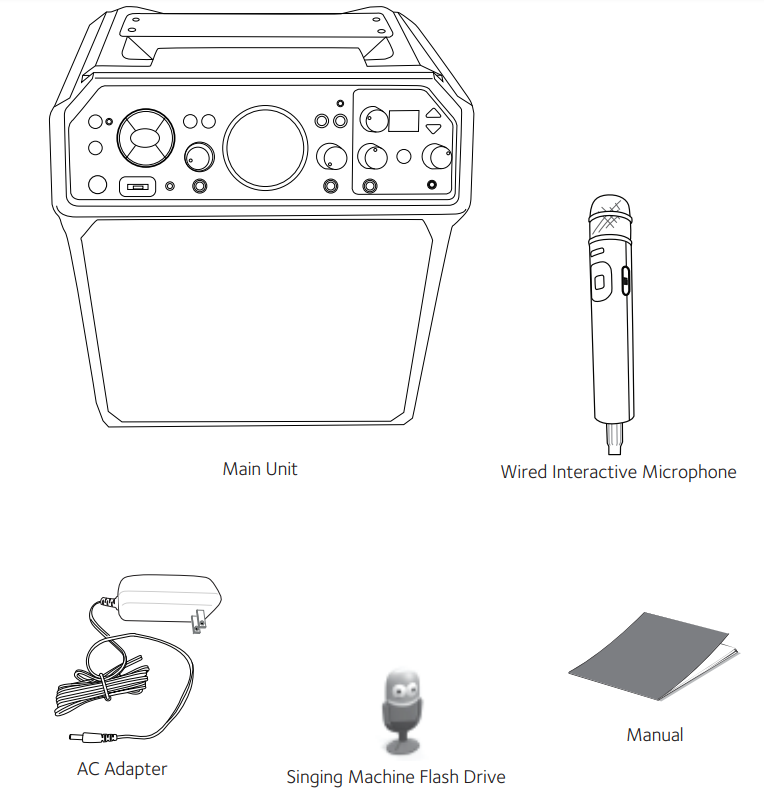
Singing Machine Studio Bluetooth Karaoke SDL2093 Included
Please make sure the following items are included.
Location of Controls
Front
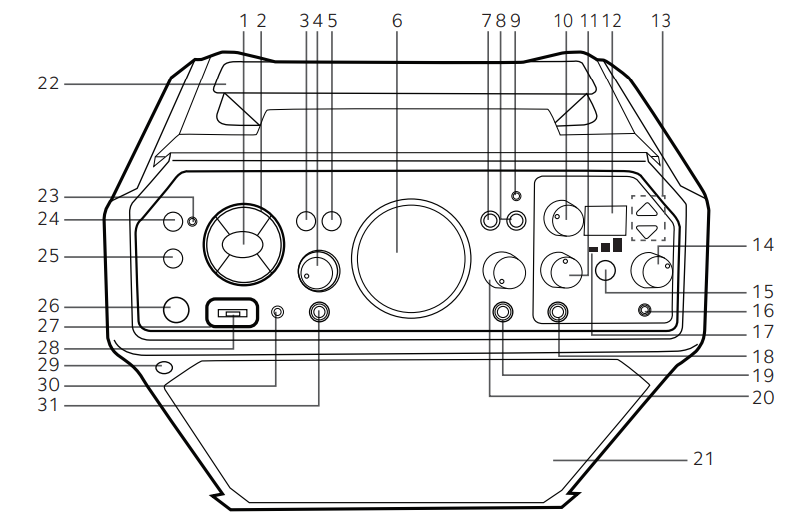
- ENTER/ Button
- Navigation Buttons (Up 5, Right , Down , Left Button)
- FUNCTION Button
- EXT INPUT VOLUME Control
- MENU Button
- MASTER VOLUME Control
- LEAD VOCAL Button
- RECORD Button
- RECORD Indicator
- KEY SELECT/FX LEVEL Control
- MIC 1 VOLUME Control
- Display
- EFFECTS Up/Down Buttons
- HEADPHONES VOLUME Control
- AUTO-TUNE Control
- Headphones Jack
- Auto-Tune Level
- MIC 1 Jack
- MIC 2 Jack
- MIC 2 VOLUME Control
- Speaker
- Handle/Cradle
- Pair Indicator
- PAIR Button
- LIGHT MODES Button
- STANDBY/ON Button
- Function Indicator
- USB Port
- Remote Sensor
- LINE INPUT Jack
- EXT INPUT Jack
Rear/Top
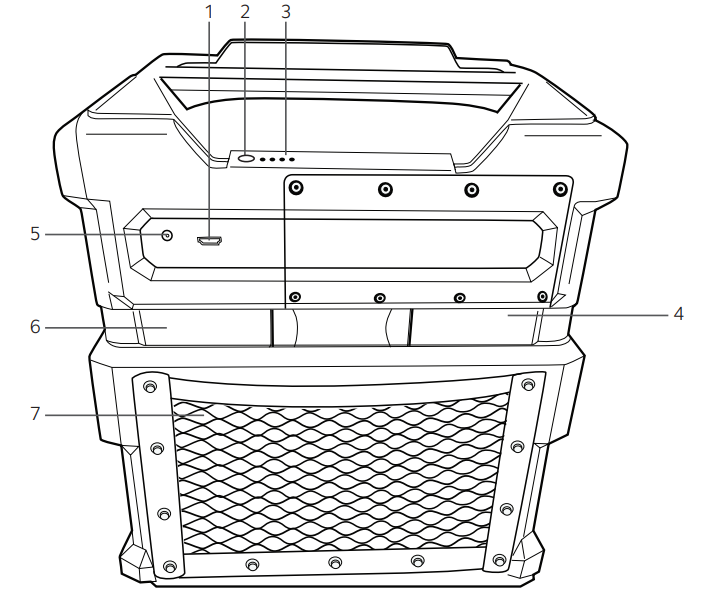
- HDMI Jack
- Battery Level Button
- Battery Level Indicators
- Mic Holder (Slides out)
- DC IN Jack
- Mic Holder (Slides out)
- Accessory Storage
Singing Machine Studio Bluetooth Karaoke SDL2093 Mic
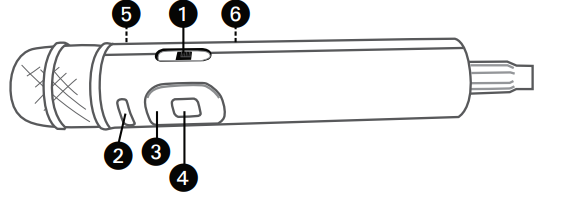
- Mic ON/OFF Switch
- MENU Button
- Navigation Buttons
- ENTER/ Button
- Remote Transmitter (Rear)
- Battery Compartment (Rear)
Playback Display
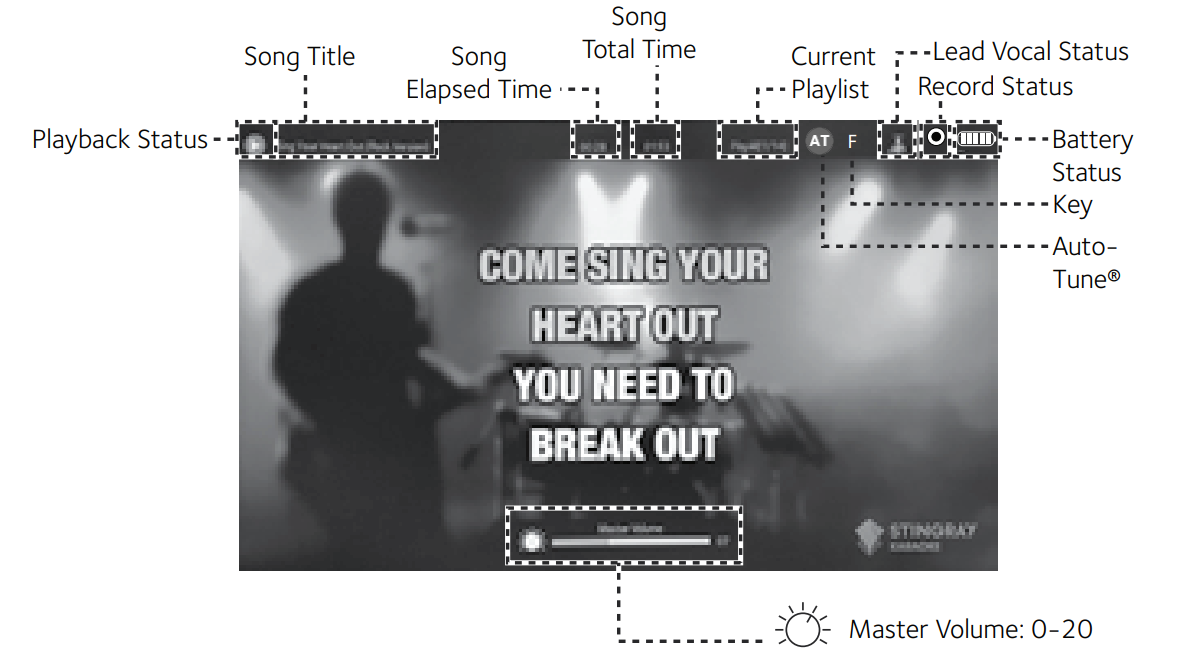
Specifications
AUDIO
- Output Power..................................................................................................................50 Watts (RMS)
- Output Impedance.........................................................................................................................4 Ohms
BLUETOOTH
- Bluetooth Version......................................................................................................................V2.1+EDR
- Working Distance............................................Up to 30 feet/10 meters measured in open space
USB
- Format..................................................................................................................................................FAT32
- Maximum Compatibility...................................................................................................................32GB
RECORDED FILE
- MP3 Encoding...............................................................................................................................128kbps
- JACK
- Microphone........................................................................................... 6.3 mm Microphone Jacks (2)
GENERAL
- Power............................................................................................................. AC 100-240V, 50-60 Hz
- Dimensions - Main Unit.........................................................................................xxx inches (xxx cm)
- Weight - Main Unit.............................................................................................................xxxlbs xxx Kg
- Microphone.........................-74 dB 600 Ohms impedance with 6.3 mm Dynamic Microphone
Description
The Singing Machine Studio Bluetooth Karaoke SDL2093 boasts a modern and sleek design that fits well into any home decor. The 7-inch color LCD display provides clear visuals of lyrics and song information, making it easy for users to follow along. The system includes one wireless microphone for convenient performance without the constraints of cables. The SDL2093 supports a wide range of media formats and can connect to various devices via Bluetooth, USB, or SD cards. The dual 8-inch speakers along with the subwoofer ensure a rich and immersive audio experience. Additional features like echo control and auto voice control enhance the overall performance quality.
Connection of Singing Machine Studio Bluetooth Karaoke SDL2093
Connecting the Microphone(s)
Microphones:
Connect a microphone into MIC 1 Jack u as well as MIC 2 Jack v (when desired).
_singing_machine_studio_bluetooth_karaoke_sdl2093.png)
Note:
Do not drop or tap the Mic as damage to the Mic or speakers may occur. Do not twirl the microphone by the cord as it will cause damage to the encased wiring.
Connecting the Unit to a TV
- To output the video, lyrics and audio to your TV, perform the following steps:
Plug the HDMI cable (not included) into the HDMI Jack on the back of the unit. Plug the other end of the HDMI cable into the HDMI input on your TV.
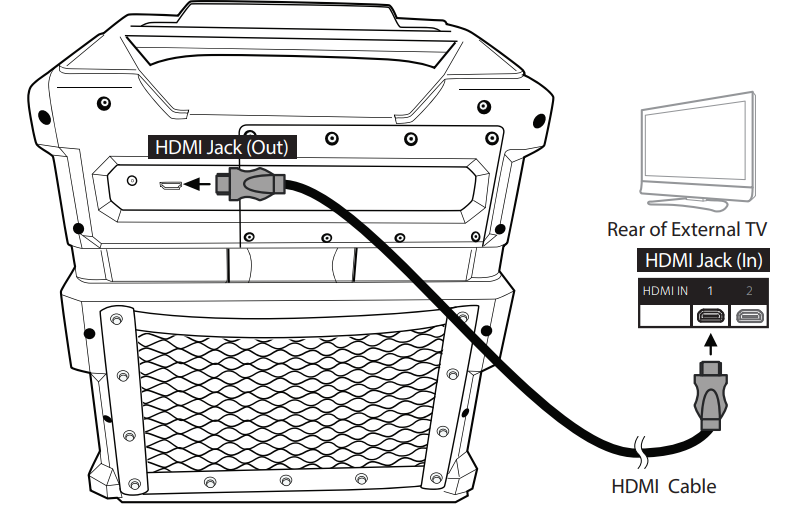
Notes:
- This unit can be used with or without a TV, but it is highly recommended to use a TV in order to utilize all the features.
- Also, refer to the TV’s or external unit’s User Guide.
Connecting to AC Power
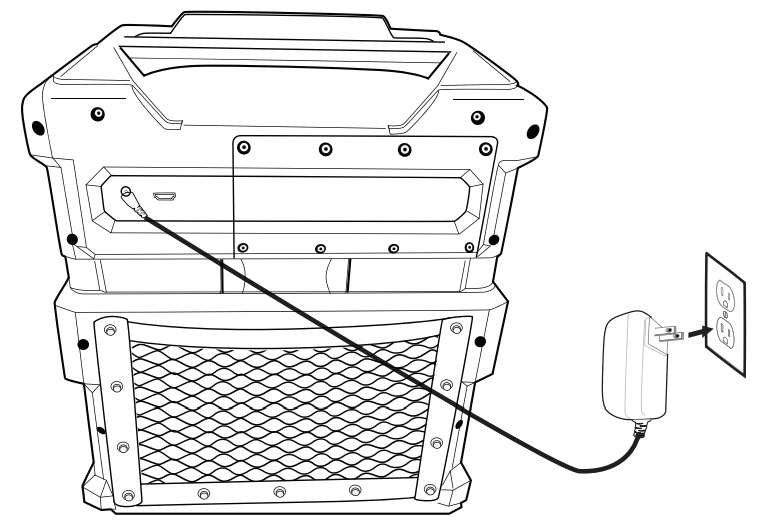
Insert the small end of the AC adapter into the DC IN Jack on the rear of the unit. Insert the other end (with the 2 blades) into a conveniently located AC outlet having 120V AC, 60Hz.
Note: Make all connections before connecting to AC power.
Connecting Headphones
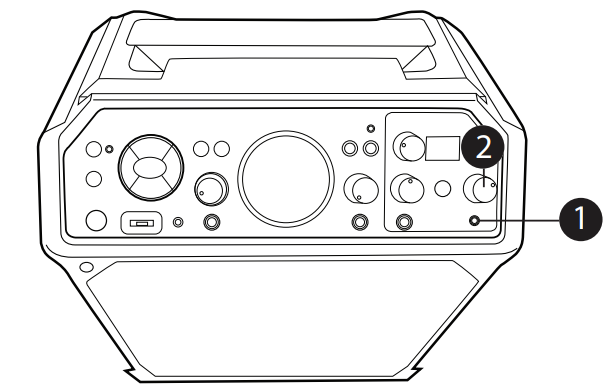
For private listening or to monitor singing, use headphones (not included). Insert headphones into the Headphones jack u. The headphones have a dedicated Volume control so rotate the HEADPHONE VOLUME control v as desired.
The Headphones jack can also be used as an audio out to connect to another audio system using a 3.5mm Auxiliary Audio cable (not included).
Changing the Interactive Microphone’s Battery
When performance suffers, change the batteries as follows:

- Unscrew the Battery Compartment screw and remove the door.
- Replace battery with CR2032 button cell battery.
- Replace Battery Compartment and screw.
BATTERY PRECAUTIONS
Follow these precautions when using batteries in this device:
- Warning: Danger of explosion if battery is incorrectly replaced. Replace only with the same or equivalent type.
- Use only the size and type of batteries specified.
- Be sure to follow the correct polarity when installing the batteries as indicated in the battery compartment. A reversed battery may cause damage to the device.
- If the device is not to be used for a long period of time, remove the batteries to prevent damage or injury from possible battery leakage.
- Do not try to recharge a battery not intended to be recharged; it can overheat and rupture. (Follow battery manufacturer’s directions.)
- Remove batteries promptly if consumed.
Rechargeable Battery
This unit comes with a built-in rechargeable battery pack that will allow the unit to be used without being connected to AC power. The Battery indicator (top of the unit) will show the battery charge remaining, indicated by the amount of bars. The rechargeable battery pack is not user-replaceable.
We recommend to charge the unit once a month so as to keep the battery in the best condition. When the battery icon turns red and flashing, recharge the unit by following below:
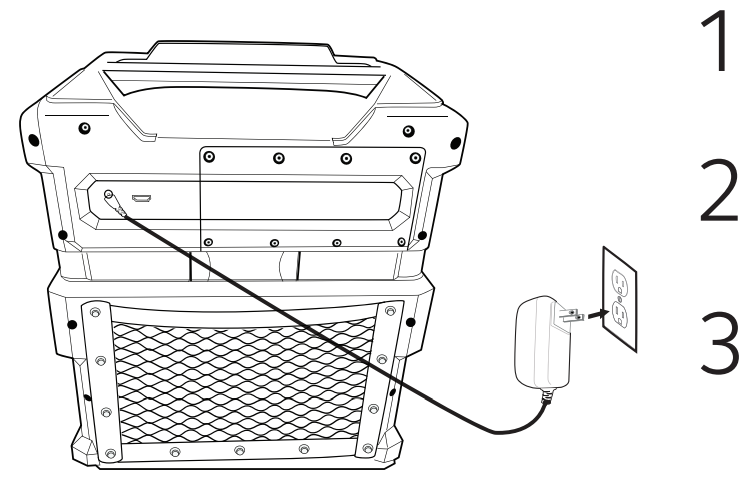
- Insert the AC power cord into a conveniently located AC outlet having 120V AC, 60Hz .
- Allow the unit to charge for approximately twelve hours for a full charge.
- Disconnect the AC cord and the fully charged unit is now ready for use. Battery life can last up to 25 hours depending on playback operations.
Attention: The sound volume will adjust automatically when the battery is not full.
Singing Machine USB Flash Drive
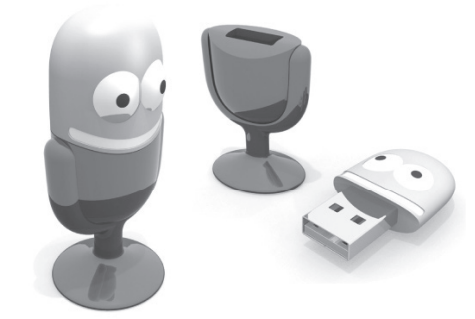
Included with the system is an 8GB Singing Machine USB Flash Drive which is used for storing Karaoke songs as well as recordings from this unit.
There are two songs included on the Singing Machine USB Flash Drive but you can access the Karaoke Store for many more songs. See Welcome Kit for more information.
Inserting the USB Flash Drive
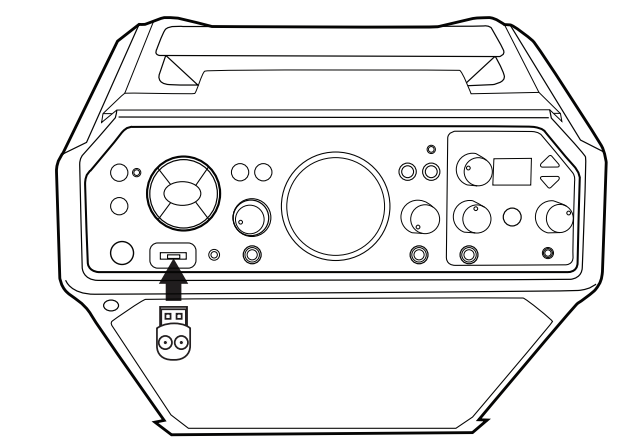
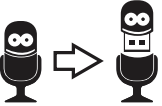
- Before you insert the Singing Machine USB Flash Drive, make sure to remove it from its stand which will reveal the USB plug.
Insert it into the USB slot on the unit with the face towards the top of the unit.
Setup Guide
Setting up the Singing Machine Studio Bluetooth Karaoke SDL2093 is straightforward:
- Unboxing: Carefully unpack all components including the main unit, microphone, power cord, and any other accessories.
- Power On: Plug in the power cord and turn on the device.
- Pairing: To connect via Bluetooth, go to your device's settings, select the SDL2093 from available devices, and confirm pairing.
- Microphone Setup: Insert batteries into the wireless microphone and it will automatically pair with the karaoke machine.
- Configuring: Use the control panel to adjust settings such as volume, echo, and song selection.
Important Safety Information
- Read these Instructions.
- Keep these Instructions.
- Heed all Warnings.
- Follow all Instructions.
- Do not use this apparatus near water.
- Clean only with a dry cloth.
- Do not block any of the ventilation openings. Install in accordance with the Manufacturer’s instructions.
- Do not install near any heat sources such as radiators, heat registers, stoves, or other apparatus (including amplifiers) that produce heat.
- Do not defeat the safety purpose of the polarized or grounding-type plug. A polarized plug has two blades with one wider than the other. A grounding type plug has two blades and a third grounding prong. The wide blade or the third prong are provided for your safety. When the provided plug does not fit into your outlet, consult an electrician for replacement of the obsolete outlet.
- Protect the power cord from being walked on or pinched particularly at plugs, convenience receptacles, and the point where they exit from the apparatus.
- Only use attachments/accessories specified by the manufacturer.
- Use only with a cart, stand, tripod, bracket, or table specified by the manufacturer, or sold with the apparatus. When a cart is used, use caution when moving the cart/ apparatus combination to avoid injury from tip-over.
- Unplug this apparatus during lightning storms or when unused for long periods of time.
- Refer all servicing to qualified service personnel. Servicing is required when the apparatus has been damaged in any way, such as power-supply cord or plug is damaged, liquid has been spilled or objects have fallen into the apparatus, the apparatus has been exposed to rain or moisture, does not operate normally, or has been dropped.
- WARNING: To reduce the risk of fire or electric shock, do not expose this apparatus to rain or moisture. Do not place objects filled with water, such as a vase, on the apparatus.
- The AC mains plug is used as the power disconnect device and it should remain readily accessible and operable during intended use. In order to completely disconnect the apparatus from power, the mains plug should be completely removed from the AC outlet socket.
- CAUTION: To reduce the risk of fire or explosion, do not expose batteries to excessive heat such as sunshine, fire or other heat sources.
Troubleshooting Guide
Should this unit exhibit a problem, check the following before seeking service:
No Power
- Power is not on; press the STANDBY/ON button to turn power ON.
- Make sure the unit is connected to AC power
- Confirm the AC adapter is connected securely to the back of the unit.
- Connect the unit to a different outlet.
No Sound – General
- Master Volume is set to minimum; raise volume.
- Correct Function was not selected; select using the Navigation buttons or by pressing the FUNCTION button.
No Sound – If connected to a TV
- Volume on the TV is muted or too low.
- Correct source (usually HDMI) was not selected on the TV’s menu.
Lyrics do not appear on the TV screen (if connected)
- If connected to a TV, HDMI plug is not connected properly; see page 6.
- If connected to a TV, select the correct source on the TV (usually HDMI).
- The file/track being played is not a track recorded with lyrics. These are the only files that allow you to view the lyrics on the TV screen.
No sound from the microphone
- Make sure the microphone is firmly connected to the MIC 1 or MIC 2 Jack.
- Make sure the Mic’s ON/OFF switch on the Mic is set to the ON position.
- Make sure the microphone volume is not on the lowest setting.
- MASTER VOLUME control is set to minimum; raise volume.
File(s) on USB are not playing
- The file is corrupted; replace the file.
- The file is not in a format this unit will play.
- The connected USB device is not supported by the product.
The Bluetooth device cannot be paired or connected with the unit
- Ensure any other Bluetooth devices are turned off to avoid accidental pairing.
- You have not activated the Bluetooth function of your device; see page 24 or refer to the Bluetooth device user’s manual.
- The system is not in pairing mode; press the PAIR button to restart pairing.
The Music is not available on the unit after successfully connecting the Bluetooth
- Ensure your Bluetooth device can support the A2DP Bluetooth profile.
- The volume on the external Bluetooth device is set to low or muted; raise as desired.
Instructions & Warnings
- Always read the user manual before first use.
- Avoid placing heavy objects on top of the unit.
- Keep children away from electrical components.
Singing Machine Studio Bluetooth Karaoke SDL2093 Pros & Cons
Pros
- High-Quality Sound: Dual 8-inch speakers with subwoofer deliver excellent audio.
- User-Friendly Interface: Easy-to-use controls and clear display make operation simple.
- Versatile Connectivity Options: Supports Bluetooth, USB, and SD cards.
- Wireless Microphone: Convenient performance without cables.
- Affordable Price: Offers great value for its price range.
Cons
- Limited Microphone Range: Wireless microphone signal may drop at longer distances.
- No Additional Microphones Included: Only one wireless microphone is provided.
- Bulkier Design: May require more space compared to other models.
Customer Reviews
Customers praise the SDL2093 for its ease of use, robust sound quality, and versatile connectivity options. However, some users have noted issues with the wireless microphone's range and the lack of additional microphones included in the package.
Most Common Complaints
- Limited range of wireless microphone
- Only one microphone included
- Bulkier design compared to other models
Faqs
What is included in the Singing Machine Studio package?
How do I connect my smartphone to the Bluetooth via Bluetooth?
Can I use multiple microphones with the Singing Machine Studio?
Does the Singing Machine Studio Bluetooth Karaoke SDL2093 support SD cards?
What are some common issues with the wireless microphone?
Can I record my performances with the Bluetooth Karaoke?
How do I update the firmware of my Singing Machine Studio Bluetooth Karaoke SDL2093?
What is the warranty period for this product?
Leave a Comment
