Sony FM Stereo Receiver STR-DE997 User Guide
Content
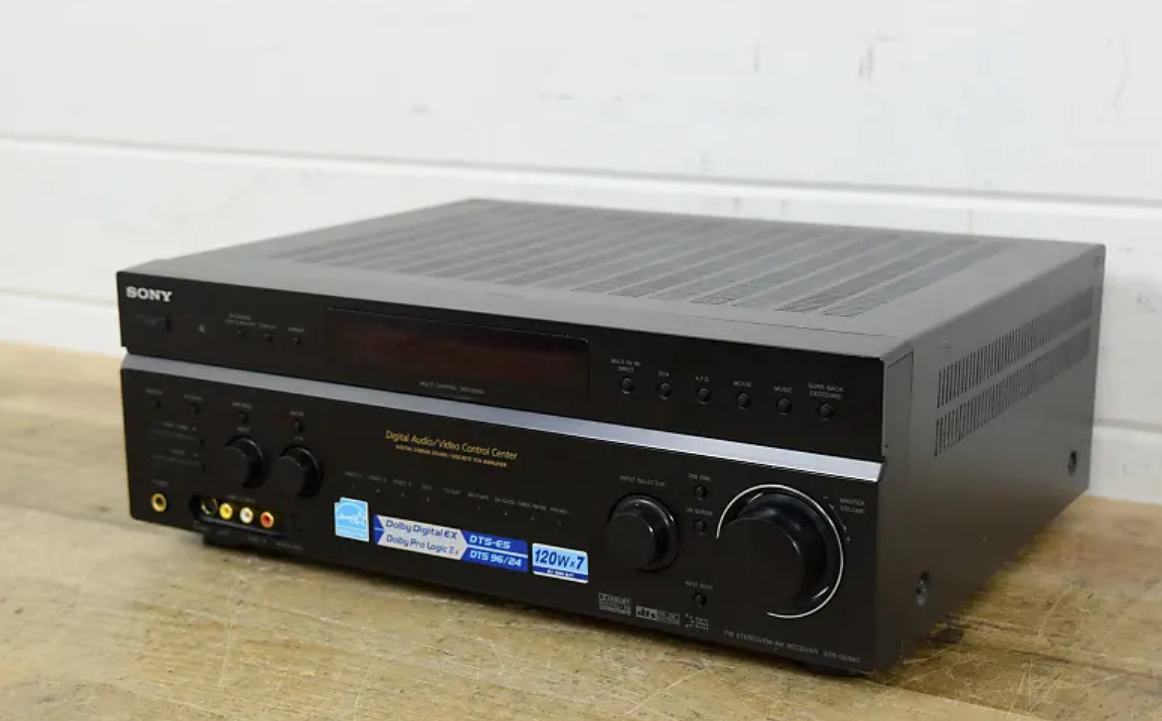
Sony FM Stereo Receiver STR-DE997 Introduction
The Sony FM Stereo Receiver STR-DE997 is a high-performance audio component designed to enhance your home entertainment experience. With its multi-channel surround sound capabilities, this receiver supports a range of audio formats, delivering rich and immersive sound quality. It features multiple inputs for connecting various devices, including CD players and gaming consoles, and offers easy tuning for FM and AM radio stations. Priced at approximately $299.99, it represents an excellent investment for audiophiles seeking superior sound.
Specifications
AUDIO POWER SPECIFICATIONS
POWER OUTPUT AND TOTAL HARMONIC DISTORTION: (Models of area code U only)
With 8 ohm loads, both channels driven, from 20 – 20,000 Hz; rated 110 watts per channel minimum RMS power, with no more than 0.09% total harmonic distortion from 250 milliwatts to rated output.
Amplifier Section
Power output
Models of area code U, CA
- Rated Power Output at Stereo Mode
(8 ohms 20 Hz – 20 kHz, THD 0.09%)
- 110 W + 110 W1)
Reference Power Output1)
(8 ohms 20 Hz – 20 kHz, THD 0.09%)
- FRONT2): 110 W/ch
- CENTER2): 110 W
- SURR2): 110 W/ch
- SURR BACK2): 110 W/ch or 110 W
(8 ohms 1 kHz, THD 0.7%)
- FRONT2): 120 W/ch
- CENTER2): 120 W
- SURR2): 120 W/ch
- SURR BACK2): 120 W/ch or 120 W
Measured under the following conditions:
Area code Power requirements U, CA: 120 V AC, 60 Hz
Depending on the sound field settings and the source, there may be no sound output.
Frequency Response
- PHONO RIAA equalization curve: ±0.5 dB
- MULTI CH IN (1, 2), SA-CD/CD, TV/SAT, MD/TAPE, DVD, VIDEO 1, 2, 3: 10 Hz – 70 kHz, +0.5/–2 dB (with sound field and equalizer bypassed)
Inputs (Analog)
- PHONO Sensitivity: 8 mV
- Impedance: 50 kiloohms
- S/N3): 86 dB (A, 8 mV4))
- MULTI CH IN (1, 2), SA-CD/CD, TV/SAT, MD/TAPE, DVD, VIDEO 1, 2, 3
- Sensitivity: 500 mV
- Impedance: 50 kiloohms
- S/N3): 96 dB (A, 500 mV4))
INPUT SHORT (with sound field and equalizer bypassed).
Weighted network, input level.
Inputs (Digital)
- DVD, SA-CD/CD (Coaxial)
Impedance: 75 ohms
S/N: 100 dB (A, 20 kHz LPF) - TV/SAT, SA-CD/CD, MD/TAPE, VIDEO 3 (Optical)
S/N: 100 dB (A, 20 kHz LPF)
Outputs (Analog)
- MD/TAPE (OUT), VIDEO 1, 2 (AUDIO OUT)
Voltage: 500 mV
Impedance: 10 kiloohms - SUB WOOFER
Voltage: 2 V
Impedance: 1 kiloohms
FM Tuner Section
- Tuning range: 87.5 - 108.0 MHz
- Antenna: FM wire antenna
- Antenna terminals: 75 ohms, unbalanced
- Intermediate frequency: 10.7 MHz
- Sensitivity:
Mono: 18.3 dBf, 2.2 μV/75 ohms
Stereo: 38.3 dBf, 22.5 μV/75 ohms - Usable sensitivity: 11.2 dBf, 1 μV/75 ohms
- S/N:
Mono: 76 dB
Stereo: 70 dB - Harmonic distortion at 1 kHz:
Mono: 0.3%
Stereo: 0.5% - Separation: 45 dB at 1 kHz
- Frequency response: 30 Hz – 15 kHz, +0.5/–2 dB
- Selectivity: 60 dB at 400 kHz
AM Tuner Section
- Tuning range
Models of area code U, CA
With 10-kHz tuning scale: 530 – 1,710 kHz5)
With 9-kHz tuning scale: 531 – 1,710 kHz5) - Antenna: Loop antenna
- Intermediate frequency: 450 kHz
- Usable sensitivity: 50 dB/m (at 1,000 kHz or 999 kHz)
- S/N: 54 dB (at 50 mV/m)
- Harmonic distortion: 0.5% (50 mV/m, 400 Hz)
- Selectivity:
At 9 kHz: 35 dB
At 10 kHz: 40 dB
You can change the AM tuning scale to 9 kHz or 10 kHz. After tuning in any AM station, turn off the receiver. While holding down PRESET TUNING + or TUNING +, press ?/1. All preset stations will be erased when you change the tuning scale. To reset the scale to 10 kHz (or 9 kHz), repeat the procedure.
Video Section
Inputs/Outputs
- Video: 1 Vp-p, 75 ohms
- S-video:
Y: 1 Vp-p, 75 ohms
C: 0.286 Vp-p, 75 ohms - COMPONENT VIDEO:
Y:1 Vp-p, 75 ohms
PB/CB/B-Y: 0.7 Vp-p, 75 ohms
PR/CR/R-Y: 0.7 Vp-p, 75 ohms
General
- Power requirements
Area code U, CA: 120 V AC, 60 Hz - Power consumption
Area code U: 310 W
Area code CA: 420 VA - Power consumption (during standby mode): 0.3 W (when “POWER SAVE” in the CUSTOMIZE menu is set to “ON”) (page 40)
- AC outlets
Area code U, CA: 2 switched, 120 W/1A MAX - Dimensions (w/h/d) (Approx.): 430 × 157.5 × 371 mm (16 7/8 × 6 2/8 × 14 5/8 inches) including projecting parts and controls
- Mass (Approx.): 10.7 kg (23 lb 10 oz)
Supplied Accessories
- FM wire antenna (1)
- AM loop antenna (1)
- Remote commander RM-LG113 (1)
- R6 (size-AA) batteries (2)
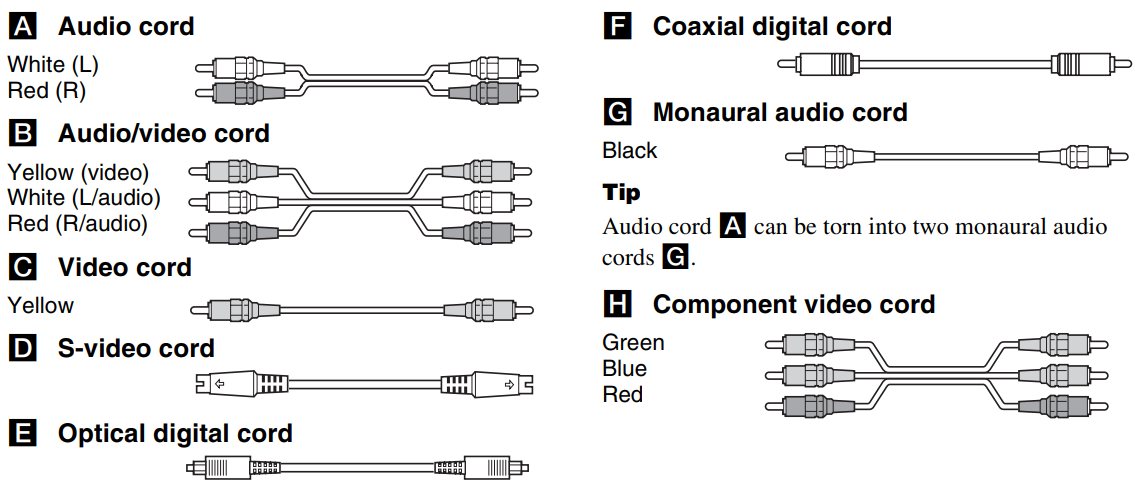
Required cords
The hookup diagrams on the subsequent pages assume the use of the following optional connection cords (A to H) (not supplied
Notes
- Turn off the power to all components before making any connections.
- Be sure to make connections firmly to avoid hum and noise.
- When connecting an audio/video cord, be sure to match the color-coded pins to the appropriate jacks on the components: yellow (video) to yellow; white (left, audio) to white; and red (right, audio) to red.
- When connecting optical digital cords, insert the cord plugs straight in until they click into place.
- Do not bend or tie optical digital cords.
Description
Because of its small size and elegant design, the Sony FM Stereo Receiver STR-DE997 is simple to incorporate into any type of home environment. Its front panel has a user-friendly interface with knobs and buttons for simple navigation. The receiver ensures a rich audio experience by supporting DTS and Dolby Digital 5.1 surround sound formats. Furthermore, customers can enjoy crystal-clear reception of their preferred radio stations thanks to the included FM stereo tuner.
This receiver's strong amplifier section makes it easy to drive a range of speakers and produce loud, clear music. Coaxial and optical digital inputs provide a smooth connection with contemporary gadgets like game consoles and Blu-ray players.
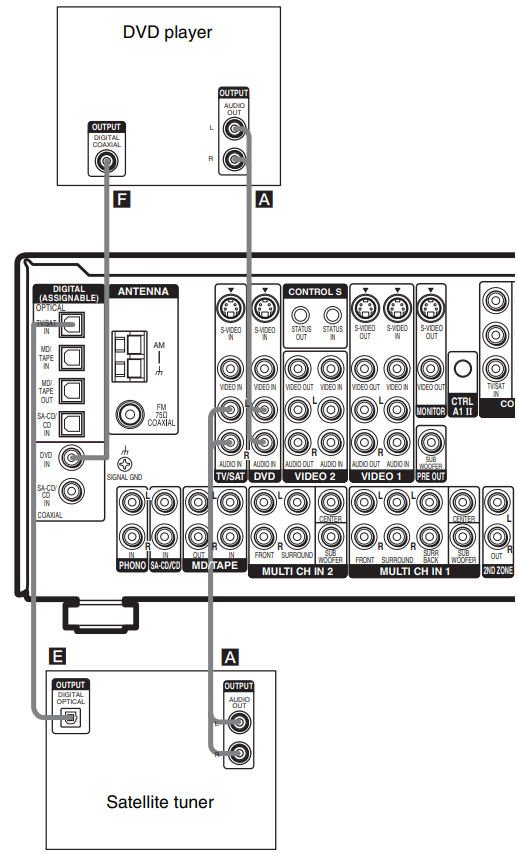
Connecting components with digital audio output jacks
Hooking up a DVD player, TV monitor or satellite tuner
Connect the audio jacks.
Note
You can also listen to the sound of your TV by connecting your TV’s audio output jacks to the TV/SAT AUDIO IN jacks on the receiver. In this case, do not connect the TV’s video output jack to the TV/SAT VIDEO IN jack on the receiver.Connect the video jacks.
The following illustration shows how to connect a TV or satellite tuner and a DVD player with COMPONENT VIDEO (Y, PB/CB/B-Y, PR/CR/R-Y) output jacks. Connecting a TV with component video input jacks allows you to enjoy higher quality video.
Tips
- When using the S-video jacks instead of the video jacks, your monitor must also be connected via an S-video jack. S- video signals are on a separate bus from the video signals and will not be output through the video jacks.
- On this receiver, standard video signals can be converted to component video or S-video signals and S-video signals can be converted to component video signals. These upconverted video signals can only be output from the MONITOR VIDEO OUT jack. However, you cannot convert the component video signals to standard video or S- video signals.
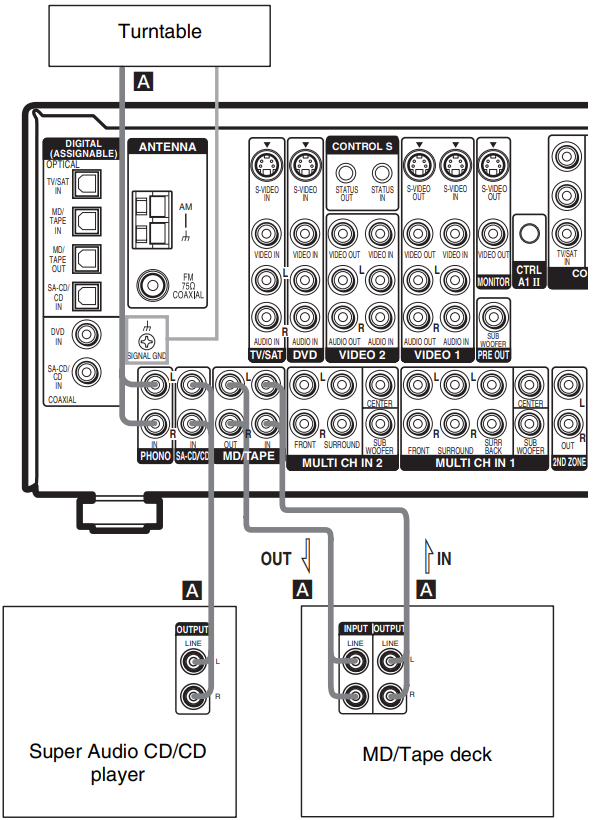
Hooking up an MD/Tape deck or a Super Audio CD/CD player

If you want to connect several digital components, but cannot find an unused input
Tip
All the digital audio jacks are compatible with 32 kHz, 44.1 kHz, 48 kHz and 96 kHz sampling frequencies.
Notes
- You cannot make digital recordings of digital multi channel surround signals.
- It is not possible to record analog signals to components connected to the MD/TAPE OUT, VIDEO 1 AUDIO OUT or VIDEO 2 AUDIO OUT jacks if you make only digital connections. Likewise, you cannot record digital signals if you make only analog connections. To record analog signals, make analog connections. To record digital signals, make digital connections.
- The sound is not output when you play a Super Audio CD on the Super Audio CD player connected to the SA-CD/CD OPTICAL IN or SA-CD/CD COAXIAL IN jack on this receiver. Connect to the analog input jacks (SA-CD/CD IN jacks). Refer to the operating instructions supplied with the Super Audio CD player.
Connecting components with multi channel output jacks
Connect the audio jacks.
If your DVD or Super Audio CD player is equipped with multi channel output jacks, you can connect it to this receiver’s MULTI CHANNEL INPUT jacks to enjoy the multi channel sound. Alternatively, the multi channel input jacks can be used to connect an external multi channel decoder

Tips
This connection also allows you to enjoy software with multi channel audio recorded in formats other than the Dolby Digital and DTS.
Make connections to either the MULTI CHANNEL INPUT 1 or MULTI CHANNEL INPUT 2 jacks according to the number of audio output jacks of the component.
Note
When you make connections to the MULTI CHANNEL INPUT jacks, you will need to adjust the level of the surround speakers and sub woofer using the controls on the connected component.
Connect the video jacks.
The following illustration shows how to connect a DVD player with COMPONENT VIDEO (Y,PB/CB/B-Y, PR/CR/R-Y) output jacks. Connecting a TV with component video input jacks allows you to enjoy higher quality video.

Tips
When using the S-video jacks instead of the video jacks, your monitor must also be connected via an S-video jack. S- video signals are on a separate bus from the video signals and will not be output through the video jacks.
On this receiver, standard video signals can be converted to component video or S-video signals and S-video signals can be converted to component video signals. These upconverted video signals can only be output from the MONITOR VIDEO OUT jack. However, you cannot convert the component video signals to standard video or S- video signals.
Connecting components with only analog audio jacks
Hooking up audio components
Note
If your turntable has a ground wire, connect it to the U SIGNAL GND terminal.
Hooking up video components
If you connect your TV to the MONITOR jacks, you can watch the video from the selected input. You can also display the SET UP, LEVEL, EQUALIZER and CUSTOMIZE menu settings and sound fields on your TV by pressing ON SCREEN. For details on the required cords (A–H).
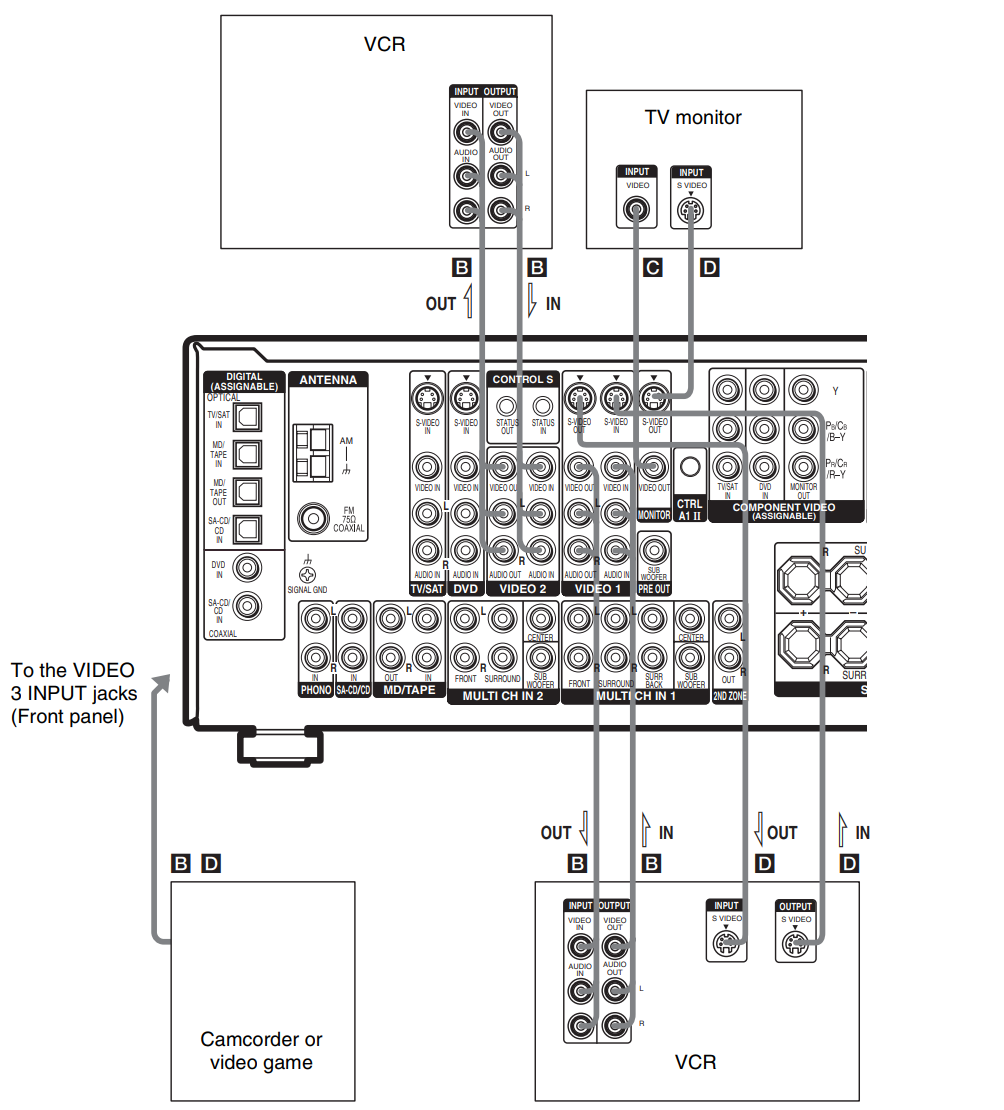
Setup Guide
To set up the Sony FM Stereo Receiver STR-DE997,
- To begin, attach your speakers to the corresponding terminals on the back panel.
- Check to see if the speakers and the receiver's output capabilities are compatible.
- Next, use RCA cables or digital inputs to connect your audio sources, such as a CD or DVD player.
- After turning on the receiver, choose the preferred input source with the remote control.
- To suit your tastes, change the equalization and volume settings. Press the "Tuner" button to tune FM, then save your preferred stations using the preset buttons.
Connecting the antennas
Connect the supplied AM loop antenna and FM wire antenna.
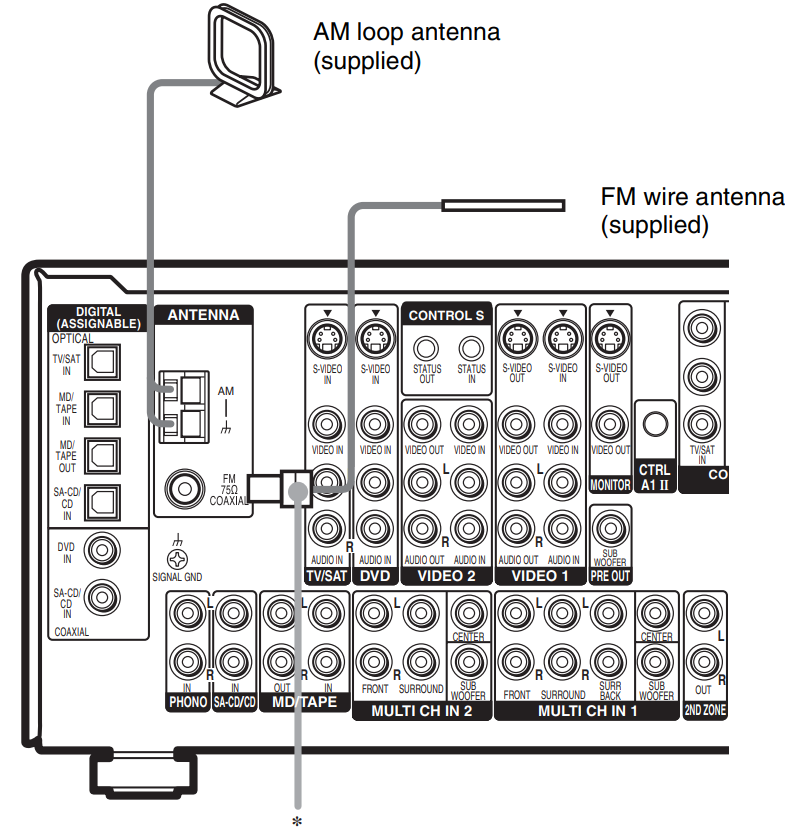
The shape of the connector varies depending on the area code.
Notes
- To prevent noise pickup, keep the AM loop antenna away from the receiver and other components.
- Be sure to fully extend the FM wire antenna.
- After connecting the FM wire antenna, keep it as horizontal as possible.
- Do not use the U SIGNAL GND terminal for grounding the receiver.
Troubleshooting
If you experience any of the following difficulties while using the receiver, use this troubleshooting guide to help you remedy the problem.
There is no sound or only a very low-level sound no matter which component is selected.
- Check that the speakers and components are connected securely.
- Check that both the receiver and all components are turned on.
- Check that you have selected the correct component on the receiver.
- Check that MASTER VOLUME –/+ is not set at “VOLUME MIN.”
- Check that the SPEAKERS (OFF/A/B/A+B) is not set to off (page 42).
- Check that the headphones are not connected.
- Press MUTING on the remote to cancel the muting function.
There is no sound from a specific component.
- Check that the component is connected correctly to the audio input jacks for that component.
- Check that the cord(s) used for the connection is (are) fully inserted into the jacks on both the receiver and the component.
- Check that you have selected the correct component on the receiver.
There is no sound from one of the front speakers.
- Connect a pair of headphones to the PHONES jack to verify that sound is output from the headphones. If only one channel is output from the headphones, the component may not be connected to the receiver correctly. Check that all the cords are fully inserted into the jacks on both the receiver and the component. If both channels are output from the headphones, the front speaker may not be connected to the receiver correctly. Check the connection of the front speaker which is not outputting any sound.
There is no sound from analog 2-channel sources.
- Check that the DIGITAL ASSIGN function is not used to assign the audio input of another input to the selected input (page 35).
- Check that the INPUT MODE is not set to “COAX FIXED” or “OPT FIXED” (page 36).
- Check that you have not selected MULTI CH IN function.
There is no sound from digital sources (from COAXIAL or OPTICAL input jack).
- Check that the DIGITAL ASSIGN function is not used to assign the audio input of another input to the selected input (page 35).
- Check that the INPUT MODE is not set to “ANALOG FIXED” (page 36). Check that the INPUT MODE is not set to “COAX FIXED” for the sources from the OPTICAL input jack, or set to “OPT FIXED” for the sources from the COAXIAL input jack.
- Check that you have not selected MULTI CH IN function.
The left and right sounds are unbalanced or reversed.
- Check that the speakers and components are connected correctly and securely.
- Adjust balance parameters in the LEVEL menu.
There is severe hum or noise.
- Check that the speakers and components are connected securely.
- Check that the connecting cords are away from a transformer or motor, and at least 10 feet away from a TV set or fluorescent light.
- Move your TV away from the audio components.
- Make sure you have grounded U SIGNAL GND terminal (only when a turntable is connected).
- The plugs and jacks are dirty. Wipe them with a cloth slightly moistened with alcohol.
There is no sound from the surround back speakers.
- Some discs have no Dolby Digital EX flag even though the packages have Dolby Digital EX logos. In this case, select “SB DEC ON” (page 34).
There is no sound or only a very low-level sound is heard from the center/surround/surround back speakers.
- Make sure the sound field function is on (press A.F.D., MOVIE, or MUSIC).
- Select a CINEMA STUDIO EX mode (page 31).
- Adjust the speaker level (page 21).
- Make sure the center/surround speakers size parameter are set to either “SMALL” or “LARGE” (pages 18 and 19).
- Make sure the surround back speakers selection parameter is set to either “DUAL” or “SINGLE.”
There is no sound from the subwoofer.
- Check that the subwoofer is connected correctly and securely.
- Make sure the subwoofer selection parameter is set to “YES” (page 18).
- There is no sound output from the SUBWOOFER depending on the sound field.
The surround effect cannot be obtained.
- Make sure the sound field function is on (press A.F.D., MOVIE, or MUSIC).
- Sound fields do not function for signals with a sampling frequency of more than 48 kHz.
Dolby Digital or DTS multi-channel sound is not reproduced.
- Check that the playing DVD, etc. is recorded in Dolby Digital or DTS format.
- When connecting the DVD player, etc. to the digital input jacks of this receiver, check the audio setting (settings for the audio output) of the connected component.
Recording cannot be done.
- Check that the components are connected correctly.
- Select the source component with INPUT SELECTOR.
- Make sure that INPUT MODE is set to “ANALOG FIXED” (page 36) before recording from a digital component connected to the analog MD/TAPE jacks.
- Make sure that INPUT MODE is set to “COAX FIXED” or “OPT FIXED” (page 36) before recording from a digital component connected to the DIGITAL OPTICAL MD/TAPE OUT jack.
The FM reception is poor.
- Use a 75-ohm coaxial cable (not supplied) to connect the receiver to an outdoor FM antenna. Ground it against lightning if connecting to an outdoor antenna. To prevent a gas explosion, do not connect the ground wire to a gas pipe.
Radio stations cannot be tuned in.
- Check that the antennas are connected securely.
- Adjust the antennas and connect an external antenna if necessary.
- The signal strength of the stations is too weak (when tuning in with automatic tuning). Use direct tuning.
- Make sure you set the tuning interval correctly (when tuning in AM stations with direct tuning).
- No stations have been preset or the preset stations have been cleared (when tuning by scanning preset stations). Preset the stations (page 25).
- Press DISPLAY repeatedly so that the frequency appears in the display.
There is no picture or an unclear picture appears on the TV screen or monitor.
- Select the appropriate input on the receiver.
- Set your TV to the appropriate input mode.
- Move your TV away from the audio components.
The DIGITAL OPTICAL MD/TAPE OUT jack flashes red.
- When “AUTO 2CH” is selected for INPUT MODE, the jack flashes red when no digital audio signal is input. This depends on the INPUT MODE function, and is not a malfunction.
Remote control
The remote does not function.
- Point the remote at the remote sensor on the receiver.
- Remove any obstacles in the path between the remote and the receiver.
- Replace all the batteries in the remote with new ones, if they are weak.
- Check if the command modes of the receiver and the remote are the same. If the command mode of the receiver and the remote is different, you cannot operate the receiver with the remote. To switch the command mode of the receiver, press ?/1 to turn off the power. Then, press ?/1 while pressing ENTER. Each time you press ?/1, the command mode switches between “C.MODE.AV2” and “C.MODE.AV1.” (The initial setting is “C.MODE.AV2.”)
- Make sure you select the correct input on the remote.
- To activate the buttons with orange printing, press ALT first before pressing the buttons.
- Before you use the V/v/B/b button for receiver operation, press MAIN MENU. To operate other components, press TOP MENU/GUIDE or AV MENU after pressing the input button.
Error messages
If there is a malfunction, the display shows a message. You can check the condition of the receiver by the message. Refer to the following table to solve the problem.
DECODE ERROR
Appears when the signal which the receiver cannot decode (e.g. DTS-CD) is input when “DEC. PRI.” in the CUSTOMIZE menu is set to “DEC. PRI. PCM.” Set to “DEC. PRI. AUTO.”
PROTECTOR
Irregular current is output from the speakers. The receiver will automatically turn off after a few seconds. Check the speaker connection and turn on the power again. If this problem persists, turn off the receiver and consult your nearest Sony dealer.
If you are unable to remedy the problem using the troubleshooting guide, clearing the receiver’s memory may help. However, all memorized settings will reset to factory defaults, and you will have to readjust all settings on the receiver.
Sony FM Stereo Receiver STR-DE997 Pros & Cons
Pros
- High-quality sound output: Delivers clear and powerful sound with good bass response.
- Multiple input options: Supports various audio sources, making it versatile.
- FM stereo tuner: Allows for enjoyable radio listening with preset options.
- Durable build: Robust construction ensures long-lasting performance.
Cons
- Outdated technology: Launched in the early 2000s, it may lack some modern features.
- No HDMI support: Limits connectivity options compared to newer models.
- Complex setup for beginners: Requires some technical knowledge for optimal configuration.
Customer Reviews
Customers praise the Sony FM Stereo Receiver STR-DE997 for its exceptional sound quality and reliability. Many users appreciate its ability to drive high-quality speakers and its ease of use once set up. However, some users have noted that it can be bulky and lacks some modern features like HDMI connectivity.
Faqs
What is the power output of the Sony FM?
Can I connect my DVD player to the Receiver STR-DE997?
How do I set up the FM tuner on the Sony FM Stereo Receiver STR-DE997?
Is the Sony FM Stereo Receiver compatible with Dolby Digital 5.1?
What are some common issues with the Sony FM Stereo Receiver?
How do I troubleshoot no sound from a particular input source?
Is the Sony FM Stereo Receiver STR-DE997 easy to set up for beginners?
What types of speakers can I connect to the FM STR-DE997?
How do I save FM presets on the Sony FM Stereo Receiver?
Leave a Comment
