Sony Home Audio System MHC-V41D User Manual | Operating Instructions
Content
Sony Home Audio System MHC-V41D Introduction
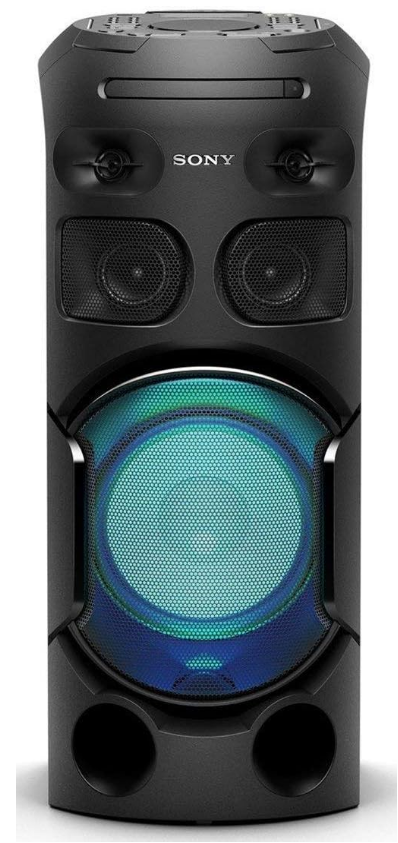
The Sony Home Audio System MHC-V41D is a powerful and versatile audio solution designed to elevate your entertainment experience. With its high-output speakers and enhanced bass, this system delivers rich, immersive sound, making it perfect for parties or home use. It features Bluetooth connectivity for seamless streaming, as well as USB and CD playback options. The built-in DJ effects and karaoke functions add a fun element to your gatherings. The Sony MHC-V41D is priced at approximately $299.99.
Guide to parts and controls
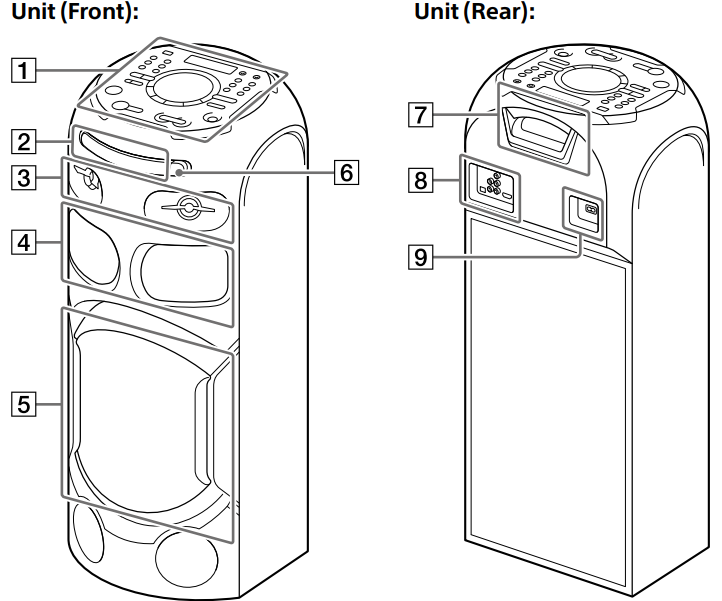
- Top panel
- Disc tray
- Tweeter × 2
- Midrange speaker × 2
- Subwoofer × 1 (The speaker light function equipped*)
- Remote control sensor

- Party light*
- Connector panel
- AC IN jack
Do not look directly at the light-emitting parts when the speaker light and party light are turned on.
You can lock the buttons except (power) on the unit to prevent them from being operated by mistake.
Detailed Specifications
The Sony Home Audio System MHC-V41D boasts several key features that make it a standout in its class:
- Power Output: 630W
- Number of Speakers: 3-way speaker system (Tweeters, Mid-range, and Subwoofers)
- Connectivity Options: Bluetooth, USB, HDMI, and more
- Additional Features: Karaoke Mode, Mic Input, LED Light Display
- Dimensions: Approximately 12.5 x 10.8 x 22.2 inches
- Weight: Around 24.3 pounds
Top panel
You can lock the buttons except ![]() (power) on the unit to prevent them from being operated by mistake
(power) on the unit to prevent them from being operated by mistake
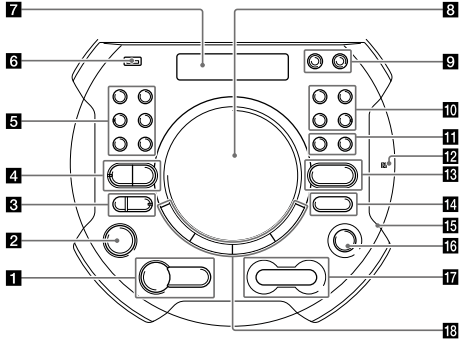
 (play) button
- Press to start playback.
- Hold down for more than 2 seconds to play the built-in sound demonstration.
 (stop) button
- Press to stop playback.
- Press twice to cancel resume playback.
- Press to stop transfer during music transfer.
- Press to stop the built-in sound demonstration.
 (power) button
- Press to turn on the system or set it to standby mode.
 (call) button
- Press to receive/end a call when using the hands-free call function with your Bluetooth-connected mobile phone.
- GESTURE ON/OFF indicator
- GESTURE ON/OFF button
- Press to activate/deactivate gesture control.
- Press to receive/end a call when using the hands-free call function with your Bluetooth-connected mobile phone.
- BLUETOOTH indicator
- BLUETOOTH button
- Press to select the BLUETOOTH function.
- PAIRING button
- Hold down to activate BLUETOOTH pairing during the BLUETOOTH function.
- FUNCTION button
- Press to select a function.
- BLUETOOTH button
- PARTY LIGHT button
- SOUND FIELD button
- MEGA BASS indicator
- Lights up when MEGA BASS sound effect is selected.
- MEGA BASS button
- FIESTA button
- PARTY CHAIN button
- W.PARTY CHAIN button
- Press to turn the Wireless Party Chain function on.
 (USB) (REC/PLAY) port
- Use to connect a USB device. This port can be used for both playback and music transfer.
- Display
- GESTURE CONTROL
- MIC1 jack
- Use to connect the microphone.
- MIC2/GUITAR jack
- Use to connect the microphone or guitar.
- Use to connect the microphone.
- VOICE CHANGER button
- MIC ECHO button
- VOCAL FADER button
- GUITAR indicator
- Lights up when the Guitar mode is turned on.
- GUITAR button
- MIC/GUITAR LEVEL +/– buttons
 (N-Mark)
 (folder) +/– button
- Press to select a folder on a data disc or a USB device.
- VOLUME +/– button
- Press to adjust the volume.
- Built-in microphone
 (open/close) button
- Press to open or close the disc tray.
 (go backward/go forward) button
- Press to select a track or file.
- TUNING +/– button
- PLAYBACK button
- DJ button
- SAMPLER button
- KARAOKE button
Remote control
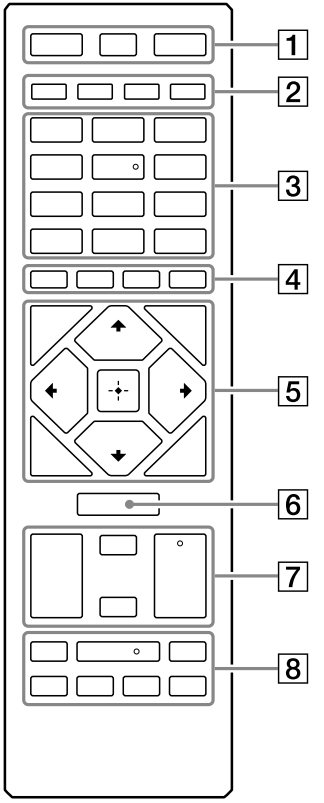
- DISPLAY button
- Press to change the information on the display.
 DISPLAY button: Press to view or hide the on-screen display.
- SLEEP button
 (power) button: Press to turn on the system, or set it to standby mode.
- PARTY LIGHT button
- LIGHT MODE button
- PLAY MODE button
- REPEAT/FM MODE button
- MEGA BASS button
- *Numeric (0 – 9) buttons, **
- Press to select a track, chapter, or file with its item number.
- Press to enter numbers or values.
- REC TO USB button: Press to transfer music to the USB device connected to the (USB) port.
- MEDIA MODE button: Press to select the media to be played back on a data disc or USB device.
- SUBTITLE button
- AUDIO button
- ANGLE button
- SCORE button
- VOICE CHANGER button
- MIC LEVEL +/– buttons
- VOCAL FADER button
- MIC ECHO button
- *Numeric (0 – 9) buttons, **
 (folder) +/– buttons: Press to select a folder on a data disc or a USB device.
- KEY CONTROL / buttons
- DVD TOP MENU button: Press to display the DVD title on the TV screen.
- DVD/TUNER MENU button
- RETURN button
- CLEAR button
- OPTIONS button: Press to enter or exit the options menu.
- SETUP button
 buttons: Press to select the menu items.
 Press to enter/confirm the settings.
- FUNCTION button: Press to select a function.
- SOUND FIELD +/– button
- SEARCH button
- SHIFT button: Hold down to activate the buttons printed in pink.
- (volume) +/– button: Press to adjust the volume.
 (fast reverse/fast forward) buttons
 (slow back/slow forward) buttons
- TUNING +/– buttons
 (play) button: Press to start playback.
 (go backward/go forward) buttons: Press to select a track or file.
- PRESET +/– buttons
 (pause) button: Press to pause playback. To resume playback, press
  .
. (stop) button
- Press to stop playback.
- When pressed twice, resume playback can be canceled.
- Press to stop transfer during music transfer.
- Press to stop the built-in sound demonstration.
*This button is printed in pink. To use this button, hold down SHIFT (7) button and press this button.
*The numeric button 5/AUDIO, ![]() + and
+ and ![]() buttons have a tactile dot. Use the tactile dot as a reference when operating the system.
buttons have a tactile dot. Use the tactile dot as a reference when operating the system.
Unpacking
- This unit (MHC-V41D) (1)
- Remote control (1)
- R03 (size AAA) batteries (2)
- FM lead antenna (1)
- AC power cord (mains lead) (1)
- AC plug adaptor* (1) (supplied only for certain areas)
- This plug adaptor is not for use in Chile, Paraguay, and Uruguay. Use this plug adaptor in the countries where it is necessary.
Note
When unpacking the carton, be sure that two people handle the unit. Dropping the unit may cause personal injury and/or property damage.
Playable discs or files on discs/USB device
Playable discs
- DVD VIDEO
- DVD-R/DVD-RW in DVD VIDEO format or video mode
- DVD+R/DVD+RW in DVD VIDEO format
- VIDEO CD (Ver. 1.0, 1.1, and 2.0 discs)
- Super VCD
- CD-R/CD-RW/CD-ROM in VIDEO CD format or super VCD format
- AUDIO CD
- CD-R/CD-RW in AUDIO CD format
Playable files on discs
- Music: MP3 files (.mp3) 1), 2)
- Video: MPEG4 files (.mp4/.m4v) 2), 3), Xvid files (.avi)
Playable files on USB device
- Music: MP3 files (.mp3) 1), 2), WMA files (.wma) 2), AAC files (.m4a/.mp4/.3gp) 2), WAV files (.wav) 2)
- Video: MPEG4 files (.mp4/.m4v) 2), 3), Xvid files (.avi)
Note
- The discs must be in the following format:
- CD-ROM/-R/-RW in DATA CD format that contains the MP3 1), 2), MPEG4 2), 3) and Xvid files, and conforms to ISO 9660 4) Level 1/Level 2 or Joliet (extended format).
- DVD-ROM/-R/-RW/+R/+RW in DATA DVD format that contains the MP3 1), 2), MPEG4 2), 3) and Xvid files, and conforms to UDF (Universal Disk Format).
- The system will attempt to play back any data with the extensions above, even if it is not in the supported format. Playing this data may generate a loud noise which could damage your speaker system.
- MP3 (MPEG 1 Audio Layer 3) is a standard format defined by ISO/MPEG for compressed audio data. MP3 files must be in MPEG 1 Audio Layer 3 format.
- Files with copyright protection (Digital Rights Management) cannot be played back by the system.
- MPEG4 files must be recorded in MP4 file format. Supported video codec and audio codec are as follows:
- Video codec: MPEG4 Simple Profile (AVC is not supported.)
- Audio codec: AAC-LC (HE-AAC is not supported.)
- A logical format of files and folders on CD-ROMs, defined by ISO (International Organization for Standardization).
Discs/files that cannot be played back
- You cannot play back the following discs:
- BDs (Blu-ray Discs)
- CD-ROMs recorded in PHOTO CD format
- Data part of CD-Extra or Mixed Mode CDs*
- CD Graphics disc
- Super Audio CDs
- DVD Audio
- DATA CD/DATA DVD that is created in Packet Write format
- DVD-RAM
- DATA CD/DATA DVD which has not been correctly finalized
- CPRM (Content Protection for Recordable Media) compatible DVD-R/-RW recorded in Copy-Once programs
- A disc that has a non-standard shape (e.g., heart, square, star)
- A disc that has adhesive tape, paper, or a sticker attached to it
- You cannot play back the following files:
- The video files which are larger than 720 (width) × 576 (height) pixels.
- The video files with a high width-to-length ratio.
- A WMA file in WMA DRM, WMA Lossless, or WMA PRO format.
- An AAC file in AAC DRM or AAC Lossless format.
- The AAC files which are encoded at 96 kHz.
- Files that are encrypted or protected by passwords.
- Files with DRM (Digital Rights Management) copyright protection.
- Some Xvid files that are longer than 2 hours.
- The MP3 PRO audio file can be played back as an MP3 file.
- The system may not play back an Xvid file when the file has been combined from two or more Xvid files.
*Mixed Mode CD: This format records data on the first track and audio (AUDIO CD data) on the second and subsequent tracks of a session.
Notes on CD-R/-RW and DVD-R/-RW/+R/+RW
- In some cases, a CD-R/-RW and DVD-R/-RW/+R/+RW cannot be played back on this system due to the recording quality or physical condition of the disc, or the characteristics of the recording device and authoring software. For more information, refer to the operating instructions of the recording device.
- Some playback functions may not work with some DVD+Rs/+RWs, even if they have been correctly finalized. In this case, view the disc by normal playback.
Notes on discs
- This product is designed to play back discs that conform to the Compact Disc (CD) standard.
- DualDisc and some music discs encoded with copyright protection technologies do not conform to the CD standard. Therefore, these discs may not be compatible with this product.
Note on a multisession disc
This system can play back continuous sessions on a disc when they are recorded in the same format as the first session. However, playback is not guaranteed.
Note on DVD VIDEO and VIDEO CD playback operations
Some playback operations for a DVD VIDEO or VIDEO CD may be intentionally restricted by software producers. Therefore, some playback features may not be available. Be sure to read the operating instructions of the DVD VIDEO or VIDEO CD.
Notes on playable files
- Playback may take a longer time to start when:
- a DATA CD/DATA DVD/USB device is recorded with a complicated tree structure.
- the audio files or video files in another folder have just been played back.
- The system can play back a DATA CD/DATA DVD or a USB device in the following conditions:
- up to a depth of 8 folders
- up to 300 folders
- up to 999 files in a disc
- up to 2,000 files in a USB device
- up to 650 files in a folder
- These numbers may vary depending on the file or folder configuration.
- Folders that have no audio files or video files are skipped.
- Files transferred by a device such as a computer may not be played back in the order in which they were transferred.
- The playback order may not be applicable depending on the software used for creating the audio file or video file.
- Compatibility with all encoding/writing software of the supported formats, recording devices, and recording media cannot be guaranteed.
Depending on the Xvid file, the picture may be unclear or the sound may skip.
Notes about USB devices
- This system is not guaranteed to operate with all USB devices.
- Although there are a variety of complex functions for USB devices, the playable contents of USB devices connected to the system are music and video contents only. For details, refer to the operating instructions of the USB device.
- When a USB device is inserted, the system reads all the files on the USB device. If there are many folders or files on the USB device, it may take a long time to finish reading the USB device.
- Do not connect the system and the USB device through a USB hub.
- With some connected USB devices, there may be a delay before an operation is performed by this system.
- The playback order for the system may differ from the playback order of the connected USB device.
- Before using a USB device, make sure that no virus-ridden files are on the USB device.
Region code
Your system has a region code and will only play back a DVD VIDEO labeled with an identical region code .
.
Websites for compatible devices
Check the websites below for the latest information about compatible USB and BLUETOOTH devices.
- For customers in Latin America: http://esupport.sony.com/LA
- For customers in Europe and Russia: http://www.sony.eu/support
- For customers in other countries/regions: http://www.sony-asia.com/support
Compatible iPhone/iPod models
The compatible iPhone/iPod models are as follows. Update your iPhone/iPod with the latest software before using with the system.
BLUETOOTH technology works with:
- iPhone 7 Plus
- iPhone 7
- iPhone SE
- iPhone 6s Plus
- iPhone 6s
- iPhone 6 Plus
- iPhone 6
- iPhone 5s
- iPhone 5c
- iPhone 5
- iPhone 4s
- iPod touch (6th generation)
- iPod touch (5th generation)
Description
The Sony MHC-V41D is engineered to provide a rich and balanced sound experience. The 3-way speaker system includes tweeters, mid-range speakers, and a built-in subwoofer to ensure that every frequency is well-represented. The system's sleek design features a modern aesthetic with an LED light display that enhances the ambiance of any room.
With its robust build and user-friendly interface, this system is easy to operate and maintain. It also includes a karaoke mode and mic input, making it perfect for entertaining guests or family members who love to sing.
Getting Started
Hooking up the system securely
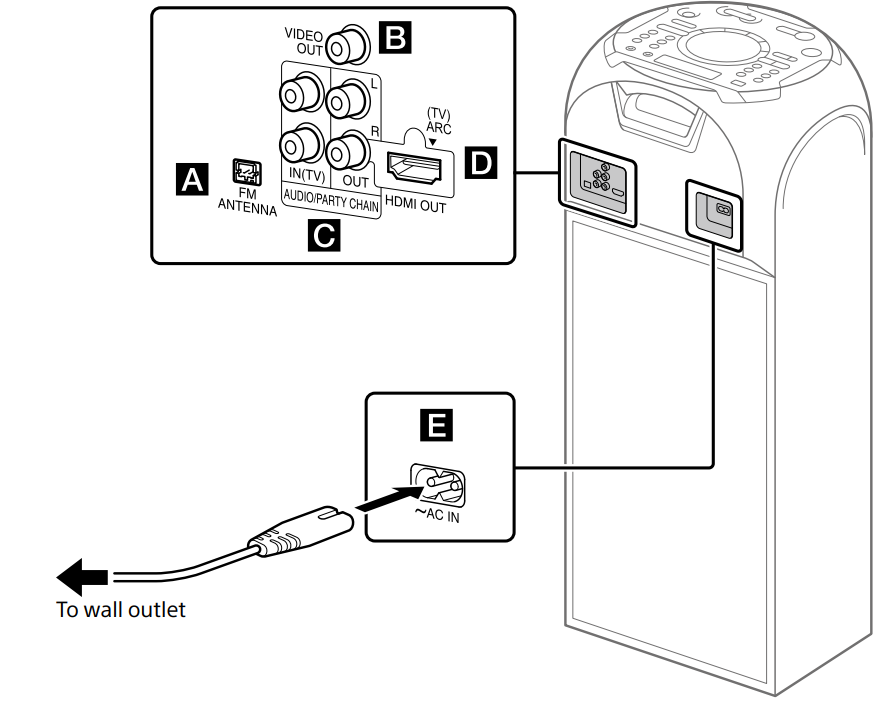
FM ANTENNA terminal
Find a location and an orientation that provide good reception when you set up the antennas. Keep the antenna away from the AC power cord (mains lead) and the USB cable to avoid picking up noise. Extend the FM lead antenna horizontally.

VIDEO OUT jack
Use a video cable (not supplied) to connect to the video input jack of a TV or projector.
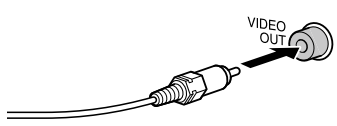
Note
Do not connect this system to the TV through the video deck.
Audio input and output jacks
Use an audio cable (not supplied) to make either connection as follows:
- AUDIO/PARTY CHAIN OUT L/R jacks
- Connect to the audio input jacks of optional equipment.
- Connect to another audio system to enjoy the Wired Party Chain function
- AUDIO/PARTY CHAIN IN (TV) L/R jacks
- Connect to the audio output jacks of a TV or an audio/video equipment. The sound is output through this system.
- Connect to another audio system to enjoy the Wired Party Chain function
HDMI OUT (TV) ARC jack
Use an HDMI cable (not supplied) to connect to the HDMI IN jack of a TV
AC IN jack
Connect the AC power cord (mains lead) (supplied) to the unit, then to the wall outlet. The demonstration starts automatically. If you press to turn on the system, the demonstration ends.
Deactivating the demonstration
To deactivate the demonstration while the system is turned off, press DISPLAY repeatedly to select the no display mode (Power Saving mode)
Inserting batteries
Insert the two supplied R03 (size AAA) batteries, matching the polarities shown below.
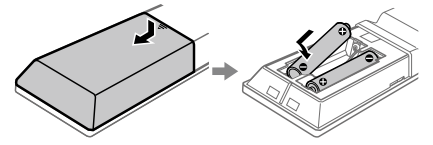
Note
- Do not mix an old battery with a new one or mix different types of batteries.
- If you do not use the remote control for a long period of time, remove the batteries to avoid damage from battery leakage and corrosion.
To operate the unit using the remote control
Point the remote control at the unit’s remote control sensor.
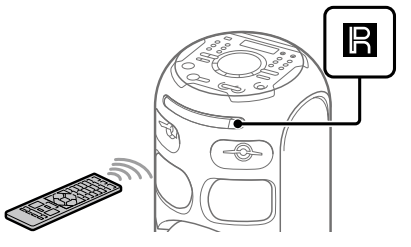
Connecting the TV
Before connecting cables, be sure to disconnect the AC power cord (mains lead).
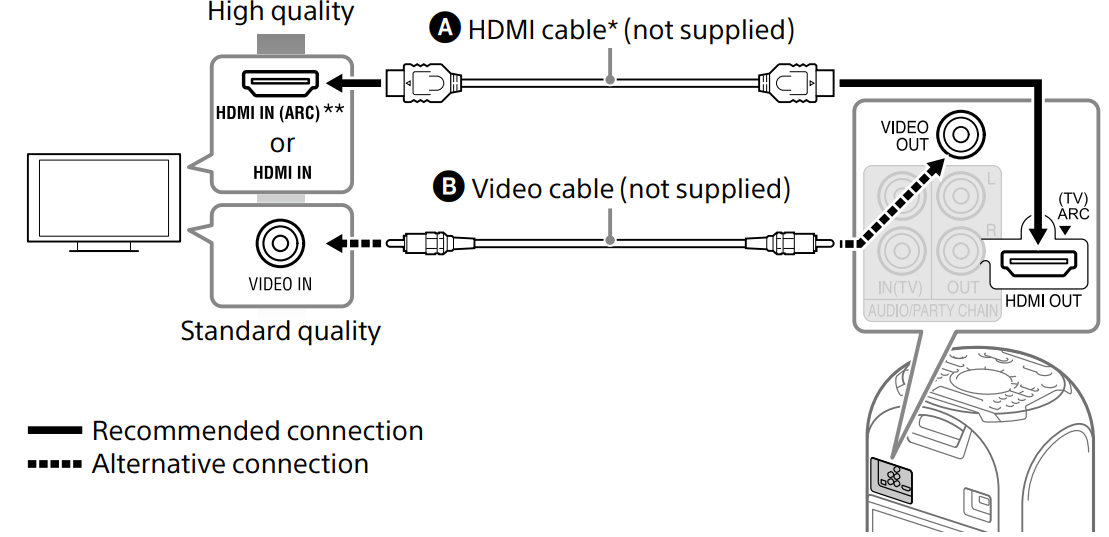
To watch video
Select the connection methods according to the jacks on your TV.
High Speed HDMI Cable with Ethernet
You can listen to TV sound via the system if you connect the system to the TV’s HDMI IN (ARC) jack. The Audio Return Channel (ARC) function enables the TV to output sound through the system with an HDMI connection, without performing an audio connection (connection c. To set the Audio Return Channel (ARC) function on this system, see [AUDIO RETURN CHANNEL]. To check the compatibility of your TV’s Audio Return Channel (ARC) function, refer to the operating instructions supplied with your TV.
To listen to TV sound via the system
If you do not connect the system to the TV’s HDMI IN (ARC) jack, make this connection.

To listen to TV sound, press FUNCTION repeatedly to select “TV.”
Hint
- You can also enjoy the sound of external equipment (DVD players, etc.) via the system by connecting to the AUDIO/PARTY CHAIN IN (TV) jack as connection c above. For details, refer to the operating instructions of your equipment.
- If the audio output level from the system is low when connecting the external equipment, try adjusting the audio output settings on the connected equipment. It may improve the audio output level. For details, refer to the operating instructions of your equipment.
If “CODE 01” and “SGNL ERR” appear on the display of the unit
When the audio input signals to the system are other than 2-channel Linear PCM signals, the messages “CODE 01” and “SGNL ERR” (indicate that the input audio signals are unsupported) appear on the display of the unit. In this case, select the proper audio output mode on the TV in order to output 2-channel Linear PCM audio signals. For details, refer to the operating instructions of your TV.
Changing the color system
(Except for Latin American, European, and Russian models)
Set the color system to PAL![]() or NTSC depending on the color system of your TV. Each time you perform the procedure below, the color system changes as follows: NTSC → PAL
or NTSC depending on the color system of your TV. Each time you perform the procedure below, the color system changes as follows: NTSC → PAL
Use the buttons on the unit to perform this operation:
- Press
 to turn on the system.
 - Press FUNCTION repeatedly to select “DVD/CD.”
- Hold down MEGA BASS and MIC ECHO for more than 3 seconds.
- “NTSC” or “PAL”
 appears on the display.
- “NTSC” or “PAL”
Performing the quick setup
Before using the system, you can make the minimum basic adjustments in the quick setup:
- Turn on your TV and select the input according to the connection.
Press
 to turn on the system.
- Press FUNCTION repeatedly to select “DVD/CD.”
- The guide message [Press ENTER to run QUICK SETUP.] appears at the bottom of the TV screen.
- Press without
 loading a disc.
[LANGUAGE SETUP] appears on the TV screen. Displayed items may vary depending on the country or region.
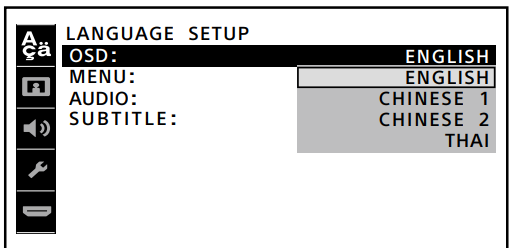
- Press
 repeatedly to select a language, then press
  .
.- [VIDEO SETUP] appears on the TV screen.
- Press
 repeatedly to select the setting that matches your TV type, then press
 .
.- After [QUICK SETUP is complete.] appears on the TV screen, the system is ready for playback.
To quit the quick setup
Hold down SHIFT and press SETUP.
Note
The guide message appears when you turn on the system for the first time or after performing [RESET]
Changing the display mode
Press DISPLAY repeatedly while the system is turned off. Each time you press the button, the display mode changes as follows:
- Demonstration
- The messages about the main features of this system scroll across the display, and the illumination turns on. To turn off the illumination, press PARTY LIGHT.
- No display (Power Saving mode)
- The display is turned off to conserve power.
Setup Guide
Setting up the Sony MHC-V41D is straightforward and user-friendly:
- Unbox the system and ensure all components are included.
- Place the main unit in a stable location and connect it to your power source.
- Connect your speakers and subwoofer to the main unit using the provided cables.
- Pair your device via Bluetooth or connect it using USB or HDMI for wired connectivity.
- Adjust settings such as volume, bass levels, and LED light display through the remote control or touch panel.
Other Operations
Using the Control for HDMI function
Connecting a TV compatible with the Control for HDMI function* by HDMI cable (High Speed HDMI Cable with Ethernet, not supplied) enables you to easily operate the device by a TV remote control.
The following functions can be used with the Control for HDMI function:
- System Power Off function
- System Audio Control function
- Audio Return Channel (ARC) function
- One-Touch Play function
- Remote Easy Control function
- Language Follow function
- Control for HDMI is a standard used by CEC (Consumer Electronics Control) for allowing HDMI (High-Definition Multimedia Interface) devices to control each other.
Note
These functions may work with devices other than those manufactured by Sony, but operation is not guaranteed.
Preparing to use the Control for HDMI function
- Hold down SHIFT and press SETUP, and then set [HDMI SETUP] – [CONTROL FOR HDMI] on the system to [ON]. The default setting is [ON].
- Enable the Control for HDMI function settings for the TV connected to the system.
Hint
If you enable the Control for HDMI (“BRAVIA” Sync) function when using a TV manufactured by Sony, the Control for HDMI function of the system is also enabled automatically. When settings are completed, “COMPLETE” appears on the display.
System Power Off function
- When you turn off the TV, the system will turn off automatically.
- Hold down SHIFT and press SETUP, and then set [HDMI SETUP] – [STANDBY LINKED TO TV] on the system to [ON] or [AUTO]. The default setting is [AUTO].
Note
The connected device may not turn off depending on the status of the device.
System Audio Control function
- If you turn on the system while you are watching the TV, the TV sound will be output from the speakers of the system. The volume of the system can be adjusted using the TV’s remote control.
- If the TV sound was output from the speakers of the system the previous time you watched the TV, the system will be turned on automatically when you turn on the TV again.
- Operations can also be made by the TV’s menu. For details, refer to the operating instructions of your TV.
Note
- The system’s volume level is displayed on the TV screen depending on the TV. It may differ from the volume level on the display.
- Depending on the settings of the TV, the System Audio Control function may not be available. For details, refer to the operating instructions of your TV.
Audio Return Channel (ARC) function
- If the system is connected to a TV’s HDMI IN jack compatible with the Audio Return Channel (ARC) function, you can listen to TV sound from the speakers of the system without connecting an audio cable (not supplied).
- On the system, hold down SHIFT and press SETUP, and then set [HDMI SETUP] – [AUDIO RETURN CHANNEL] to [ON]. The default setting is [ON].
Note
If the TV is not compatible with the Audio Return Channel (ARC) function, an audio cable (not supplied) needs to be connected.
One-Touch Play function
When you press ![]() in DVD/CD or USB function, the TV is turned on automatically. The TV’s input is switched to the HDMI input which the system is connected.
in DVD/CD or USB function, the TV is turned on automatically. The TV’s input is switched to the HDMI input which the system is connected.
Note
Depending on the TV, the beginning part of content being played may not play correctly.
Remote Easy Control function
You can select the system by the SYNC MENU button on the TV remote control and operate the system. This function can be used if the TV supports the link menu. For details, refer to the operating instructions of your TV.
Note
- In the TV’s link menu, the system is recognized by the TV as “Player.”
- Some operations may not be available with some TVs.
Language Follow function
When you change the language for the on-screen display of the TV, the system’s on-screen display language is also changed.
Enjoying wired playback using multiple systems (Wired Party Chain function)
You can connect multiple audio systems in a chain to create a more exciting party environment and produce higher sound output. One activated system in the chain serves as the “Party Host” and shares music. Other systems become “Party Guests” and play the same music as that being played by the “Party Host.”
Setting up a Wired Party Chain
Set up a Wired Party Chain by connecting all the systems using audio cords (not supplied). Before connecting the cords, be sure to turn off the systems and disconnect the AC power cords (mains leads).
If all the systems are equipped with the Wired Party Chain function
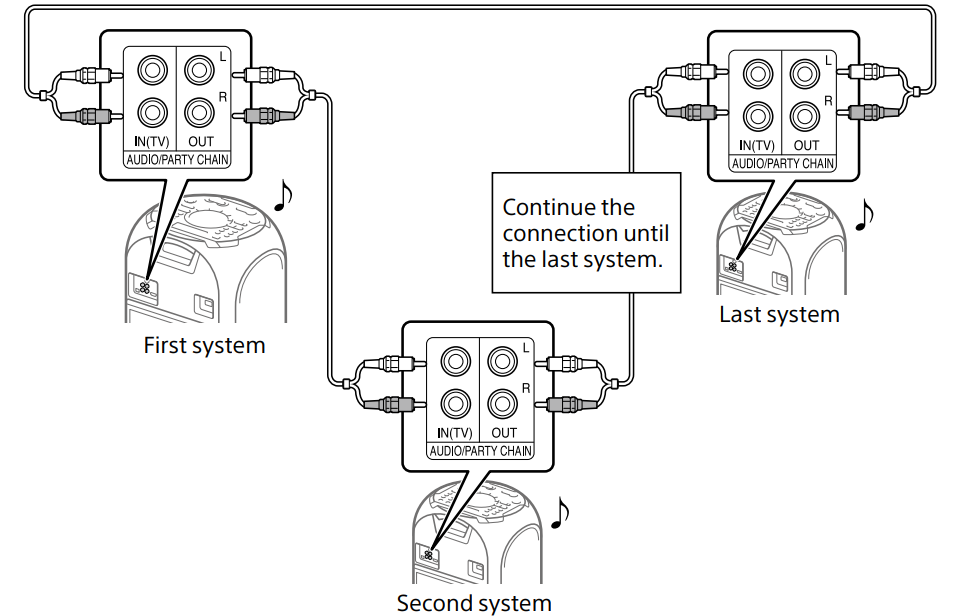
Example: When connecting with this system as the first system
- The last system must be connected to the first system. If the last system is not connected back to the first system, the Party Host cannot be changed.
- Any system can become a Party Host. You can change the Party Host to another system in the chain. For details, see “To select a new Party Host”
- Make sure that a function other than the AUDIO IN function is selected. When the AUDIO IN function is selected, this feature cannot be used.
If one of the systems is not equipped with the Wired Party Chain function
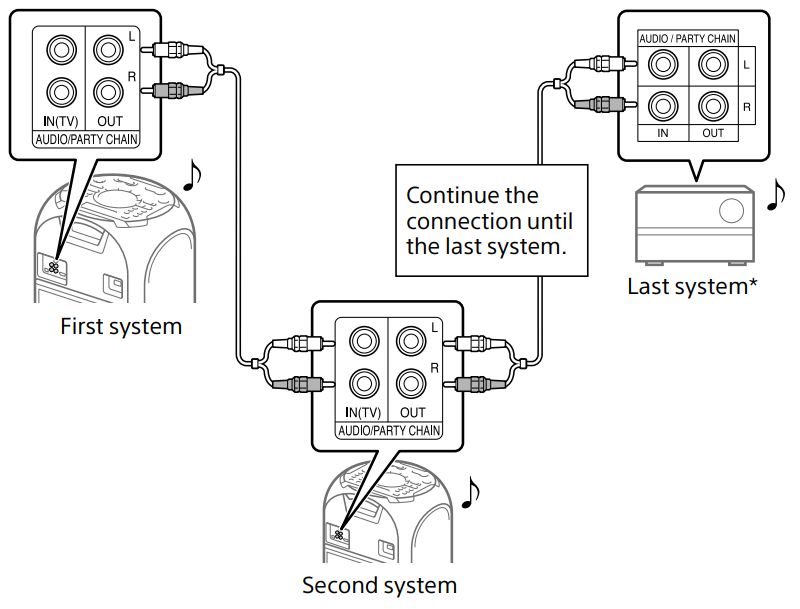
Example: When connecting with this system as the first system
- Connect the system that is not equipped with the Wired Party Chain function as the last system. Otherwise, the chain will stop at that system. Be sure to select the Audio In function on the last system.
- The last system is not connected to the first system.
- You must select the first system as the Party Host so that all the systems are playing the same music when the Wired Party Chain function is activated.
Troubleshooting
If you encounter any issues with your Sony MHC-V41D, here are some common problems and their solutions:
- No Sound Output: Check that all cables are securely connected and that the volume is not muted.
- Restart both your device and the audio system. Ensure Bluetooth is enabled on both devices.
Always refer to the user manual for detailed instructions and warnings to avoid any potential damage to the system.
Pros & Cons
Pros:
- High-Quality Sound: Powerful 630W output with clear and balanced sound reproduction.
- Versatile Connectivity Options: Supports Bluetooth, USB, HDMI, and more for seamless connectivity.
- Karaoke Mode: Perfect for entertaining with a built-in karaoke mode and mic input.
- Compact Design: Sleek and modern design that fits well in any living space.
Cons:
- Weight: The system is relatively heavy at around 24.3 pounds.
- No Wi-Fi Connectivity: Limited to Bluetooth and wired connections without Wi-Fi support.
- Some users may find the LED lights too bright or distracting.
Customer Reviews
Customer reviews highlight the system's excellent sound quality and ease of use. Many users praise its ability to fill large rooms with clear music and its robust build quality. However, some users mention that the system could benefit from Wi-Fi connectivity and find the LED lights somewhat distracting.
Common complaints include occasional Bluetooth connectivity issues and the weight of the system making it difficult to move around.
Faqs
How do I pair my device with the Sony MHC-V41D via Bluetooth?
Can I connect multiple devices to the Sony at once?
How do I turn off the LED light display on the Sony MHC-V41D?
What is the maximum power output of the Sony?
Does the Sony MHC-V41D come with a built-in subwoofer?
Can I use the Sony as a karaoke machine?
How do I reset the Sony to its factory settings?
Is there an app available for controlling the Sony?
What is the recommended usage environment for optimal performance of the Sony MHC-V41D?
How long does it take to charge if I'm using the battery option with the Sony MHC-V41D?
Leave a Comment
