Srne Solar RM-6 Remote Meter LCD Display Unit User Manual
Content
SRNE RM-6 Remote Meter LCD Display Unit
Introducing the RM-6 Remote Meter LCD Display Unit is the perfect tool to monitor and manage your solar power system. With a sleek design and user-friendly interface, this display unit provides real-time data on your solar energy production and consumption. The estimated price of the RM-6 is $199, and it is set to launch in the second quarter of 2023.
Technical Parameters
| Items | Parameter values |
|---|---|
| Model | RM-6 |
| Applicable models of controller | MC2420N10/MC2430N10/MC2440N10/MC2450N10/MC2430N10_LC100/etc. |
| Input voltage | 5V-12V |
| Standby power consumption | < 0.03W |
| Operating power consumption | < 0.04W |
| Fixed baud rate | 9600bps |
| Communication mode | TTL |
| Interface type | PH2.0 |
| Connection cable length | 1.5M |
| Operating temperature | -35℃ ~ +65℃ |
| IP rating | IP32 |
| Weight | 90g |
| Altitude | ≤ 3000M |
| Dimensions | 104.555.511.8mm |
Product Features
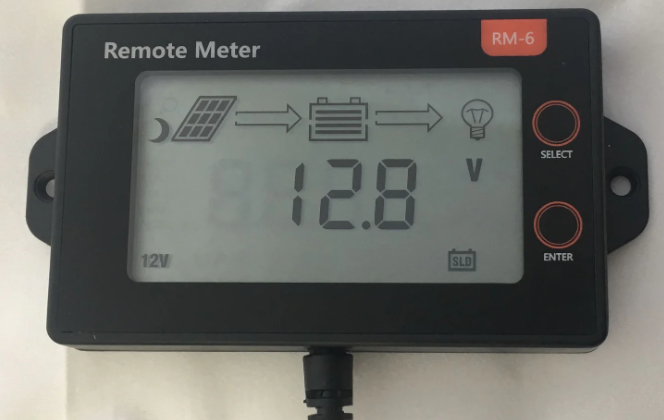
- LCD graphical main menu enables easy view of complete operating data of the system in real time.
- Simple double button design combines aesthetic appearance and easy operation.
- Directly powered by controller, external power supply is not needed.
- Industrial-grade design makes it fit for various outdoor environments, and provides safe service for a long time.
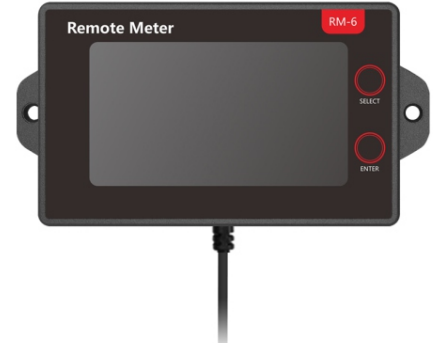
RM-6 Remote Meter LCD Display Unit Appearance
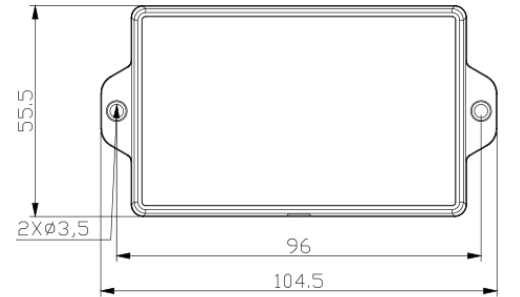
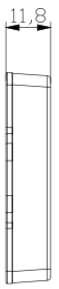
Installation Dimensions
Product dimensions: 104.555.511.8mm Installation dimensions: 96*φ3.5mm
Description
The RM-6 Remote Meter LCD Display Unit is a state-of-the-art monitoring solution for your solar power system. The display unit provides real-time data on your solar energy production and consumption, allowing you to optimize your energy usage and save money on your electric bill. With Wi-Fi and Bluetooth connectivity, you can easily connect the RM-6 to your smartphone or computer to access your solar data from anywhere. The weather-resistant and durable design ensures that the RM-6 can withstand the elements, making it ideal for outdoor use.
Button Operations
| Buttons | Functions |
|---|---|
| SELECT | Menu/parameter switching |
| ENTER | Parameters setting/adjusting |
LCD Menu
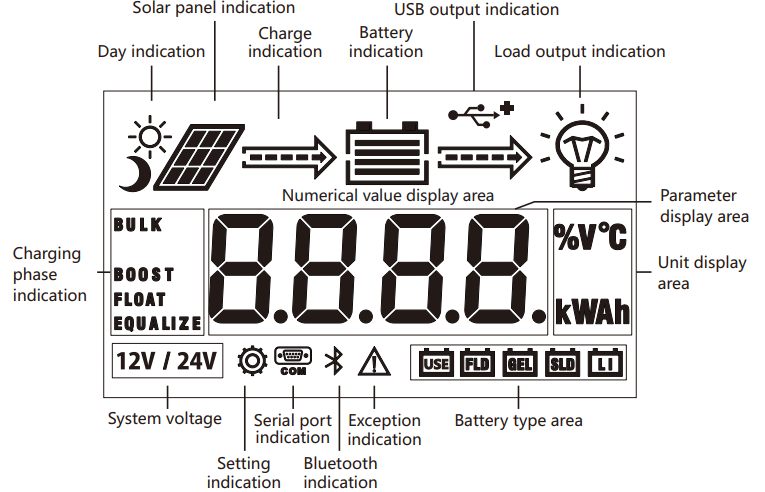
Menu Diagram
Menu Viewing Unloaded controller menu System Parameter Settings
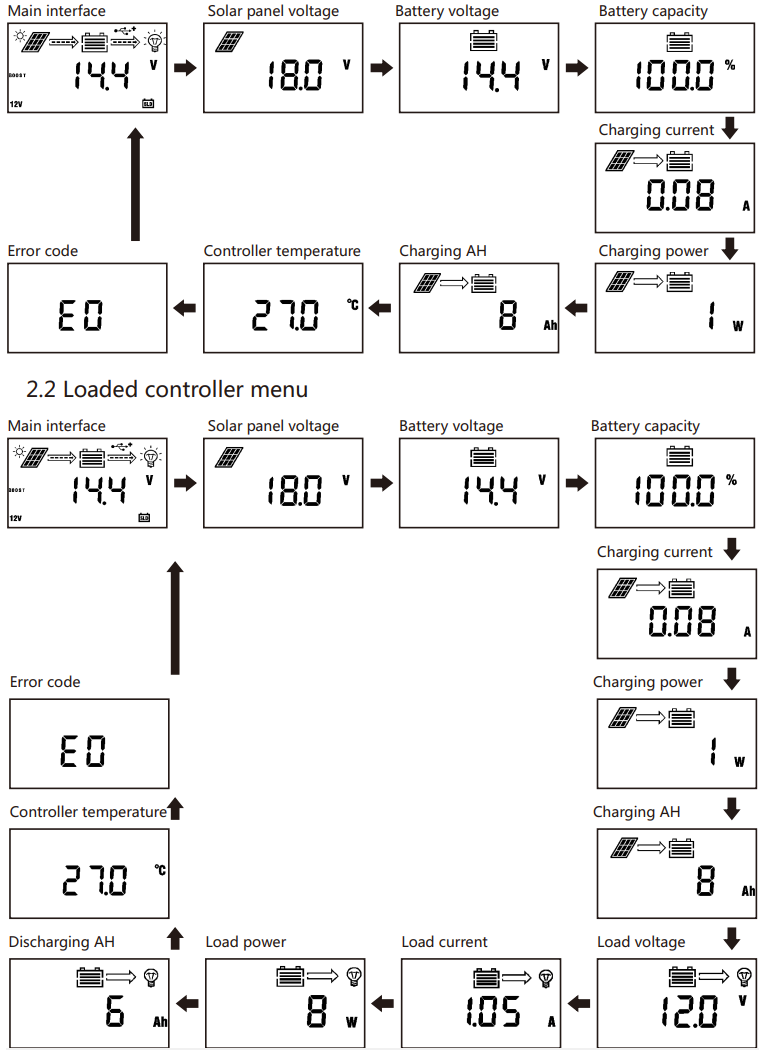
Methods
In any menu, press and hold “ENTER” to enter the “Parameter Settings” menu:
- Press the “ENTER” button to adjust parameter value;
- Press the “SELECT” button to switch between different setting items;
- Press and hold the “ENTER” button for 2 seconds to save what has been set and exit setting mode;
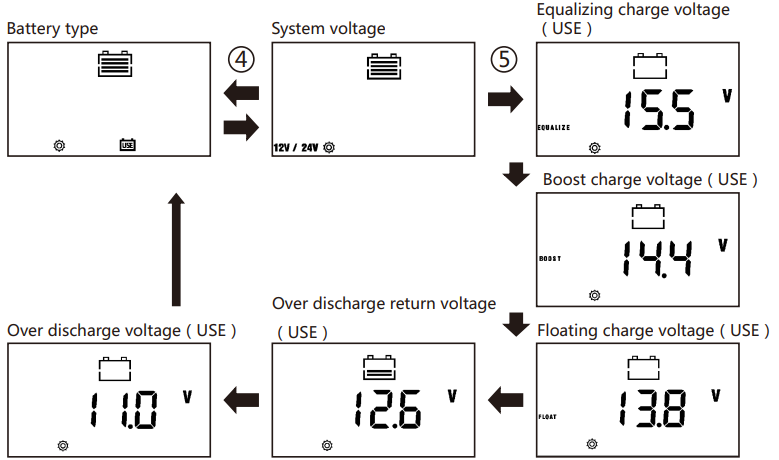
- Select the "FLD/GEL/SLD/LI" battery type and press the "SELECT" button to switch between "System voltage" and "Battery type";
- After selecting “USE” to customize the battery type, press “SELECT” button to switch between “system voltage”, “Equalizing charge voltage”, “Boost charge voltage”, “Floating charge voltage”, “Over-discharge return voltage” and “Over-discharge voltage” to change some common parameters.
Method of controlling load on/off (for controller with load)
Under any menu, press the “ENTER” button to control the load on/off.
Notes
- After changing "System Voltage", it is required to power up again to take effect!
- Care should be taken when the user defines parameters to their needs, and incorrect parameters may make the system fail to work properly!
User-defined USE Menu
No. | LCD Display | Setting items | Parameter range | Notes |
1 | USE | Battery type | Custom battery type | |
2 |
12V/24V |
System voltage |
12V/24V | "12V/24V" light up at the same time, indicating automatic I dentification |
3 | EQUALIZE | Equalizing charge voltage(USE) | 9.0~17.0V | |
4 | BOOST | Boost charge voltage(USE) | 9.0~17.0V | |
5 | FLOAT | Floating charge voltage(USE) | 9.0~17.0V | |
6 | 
| Low voltage disconnection recovery voltage(USE) | 9.0~17.0V | |
7 |  | Low voltage dis connection voltage(USE) | 9.0~17.0V |
Error Code Display
No. | Error codes displayed on LCD | Descriptions | Results of execution |
1 | EO | No exception | System normal |
2 | E1 | Battery over discharge | Disable load output |
3 | E2 | Battery over voltage | Do not charge |
4 |
E3 |
Battery under-voltage warning | If battery voltage is lowe rthan the under-voltage warning threshold, only give a reminder, and the system is normal |
5 | E4 | Load short circuit | The load is turned off and the maximum recovery is 5 times a day. |
6 | E5 | Load over-current | The load power is too large. So, reduce the load, and the output power will return to normal. |
7 |
E6 |
Controller internal over temperature | MPPT controller starts intelligent linear power charging; PWM controller turns off charging |
8 |
E7 |
Battery over temperature | Turn off charging and discharging, and automatically recover as the voltage is below a certain value |
9 | E8 | Solar panel input power too large | The MPPT controller charges at a rated current; PWM controller turns off charging |
10 |
E10 |
Solar panel over voltage | Solar panel over-voltage; turn off charging, and automatic recover as the voltage is lower than the set value. |
11 | E13 | Solar panel reverse polarity | Do not charge |
12 |
E15 |
Battery not connected or lithium battery feed | As long as the solar panel voltage meets the charging condition, the lithium battery will have a voltage pulse, while the lead- acid battery does not have a voltage output. |
13 | E16 | Battery over temperature | Do not charge and disable load output |
14 | E17 | Battery low temperature 1 | Disable load output |
15 | E18 | BMS overcharge protection | Do not charge |
16 | E19 | Battery low temperature 2 | Do not charge |
17 | E20 | Battery reverse polarity | Do not charge and disable load output |
18 | E21 | Output capacitor over-voltage | Do not charge |
Note: Not every controller has the above error code. For details, please refer to the corresponding controller manual.
Setup Guide
Setting up the RM-6 Remote Meter LCD Display Unit is a breeze. Simply follow these steps:
- Install the SRNE app on your smartphone or tablet.
- Connect the RM-6 to your solar power inverter using the provided cable.
- Turn on the RM-6 and follow the on-screen instructions to connect it to your Wi-Fi network.
- Open the SRNE app and follow the prompts to pair the RM-6 with your device.
Common Problems and Handling Methods
Phenomena | Handling methods |
LCD screen is not lit | Please check if the battery and solar pane lare properly connected. |
Solar panel has voltage, battery terminal has no voltage output, and the code E1 is displayed | If it is not lithium battery set in the system, when the battery is not connected, there is no voltage output at both ends of the battery, and this will return to normal as the battery is connected. |
Battery of 12Vor 24V normal voltage is connected, battery Icon on the LCD flashes slowly, and the code E1 is displayed. |
Check if it is set to the corresponding system voltage, or set to automatic identification and restart the controller After the system voltage is changed, it needs to be restarted to take effect. |
Battery icon indicator flashes quickly and the battery is not being charged. The code E2 is displayed. |
System overvoltage, check why battery voltage is too high |
Load indicator icon flashes | System over-voltage, load short circuit, overload and failure be turned on or load state switching |
E4 code is displayed |
|
No data on the screen | Poor communication, check the communication line |
Pros & Cons
Pros
- Real-time data on solar energy production and consumption
- Wi-Fi and Bluetooth connectivity
- Weather-resistant and durable design
- User-friendly interface
- Affordable price
Cons
- May not be compatible with all solar power inverters
- Limited customization options for display settings
Customer Reviews about RM-6 Remote Meter LCD Display Unit
"The SRNE Solar LCD Display Unit RM-6 is a game-changer for monitoring my solar power system. The real-time data is incredibly useful, and the Wi-Fi connectivity makes it easy to access my solar data from anywhere. Highly recommend!" - John D.
"I was looking for an affordable and reliable monitoring solution for my solar power system, and the SRNE Solar LCD Display Unit RM-6 fits the bill perfectly. The setup was straightforward, and the display unit is easy to use. I'm very happy with my purchase!" - Sarah K.
"The SRNE Solar LCD Display Unit RM-6 is a great tool for monitoring your solar power system. The display unit is weather-resistant and durable, and the real-time data is very useful. However, I wish there were more customization options for the display settings." - Michael P.
Faqs
What is the RMRM-6 Remote Meter LCD Display Unit ?
How is the RM-6 Remote Meter LCD Display Unit powered?
Which controllers are compatible with the RM-6 Remote Meter LCD Display Unit ?
What type of interface does the RM-6 Remote Meter LCD Display Unit use for communication?
How do I switch between different settings on the RM-6 Remote Meter LCD Display Unit ?
What is the warranty on the RM-6 Remote Meter LCD Display Unit ?
How do I navigate through the menus on the RM-6 Remote Meter LCD Display Unit ?
Is the RM-6 Remote Meter LCD Display Unit compatible with all solar power inverters?
Is the RM-6 Remote Meter LCD Display Unit weatherproof?
Can I use a stylus to operate the RM-6 Remote Meter LCD Display Unit touchscreen?
Leave a Comment