Stihl Backpack Battery AR-900 Instruction Manual
Content
Introduction
The STIHL Backpack Battery AR 900 is a powerful and efficient energy source designed for professional landscapers and gardeners. With a robust capacity of 25.6 Ah, this lithium-ion battery provides long-lasting power for various STIHL tools, ensuring uninterrupted operation throughout the day. Its ergonomic design offers comfort during extended use, while the backpack style allows for easy portability. Priced at approximately $1,199, the AR 900 is an excellent investment for those seeking reliable performance in outdoor tasks.
Main Parts
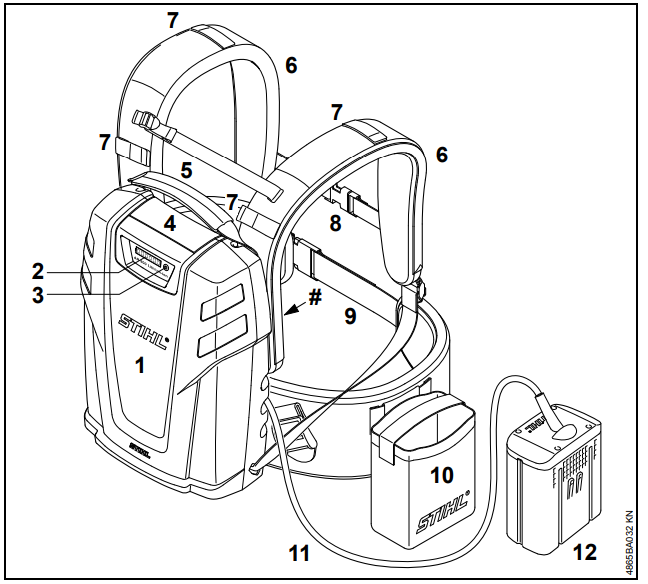
- Light Emitting Diodes (LEDs) on
- Battery
- Push Button
- Cover
- Carrying Handle
- Shoulder Straps
- Velcro Fasteners
- Chest Strap
- Hip/Waist Belt
- Pouch
- Cable
- Adapter
# Serial number
Definitions
- Battery
Supplies the motor of the power tool (used with this battery) with electrical power. - Light Emitting Diodes (LEDs) on Battery
Indicate the state of charge and operating condition of the battery. - Push Button
For activating light emitting diodes
(LEDs) on battery and for checking operation of acoustic signal. - Cover
Covers and protects the plug connection for the adapter. - Carrying Handle
For transporting the battery. - Shoulder Straps
Carry the battery comfortably on back and shoulders. - Velcro Fasteners
For fitting the cable by using the upper cable ducts. - Chest Strap
Ensures a more secure hold in the chest area. - Hip/Waist Belt
Carries the battery comfortably on hip / around the waist. - Pouch
Accommodates adapter during work. - Cable
Supplies electric current from the battery to the adapter. - Adapter
Supplies electric current to the power tool.
Stihl Backpack Battery AR-900 Specifications
- Type: Lithium-ion
 Number of cells and energy content according to cell manufacturer's specification.
 - Number of cells: 110
- Energy content: 891 Wh
- Capacity to IEC EN 61960: 23.7 Ah
The running time of the power tool is dependent on the energy content of the battery. - Weight: 15.7 lbs (7.1 kg)
Charge Times
- AL 300
- up to 80 % capacity: 190 min
- up to 100 % capacity: 250 min
- AL 500
- up to 80 % capacity: 100 min
- up to 100 % capacity: 130 min
Transporting batteries
STIHL batteries comply with the requirements set forth in UN-Manual ST/SG/AC.10/11/Rev.5/Part III, Subsection 38.3.
Commercial air, vessel and ground transportation of lithium ion cells and batteries is regulated. The battery is classified as a UN3091, Class 9, packaging group 2 product. Shipping it, either as a complete tool or the battery, requires compliance with all applicable shipping regulations. Check with the ground, vessel, air cargo or passenger airline to determine if transport is prohibited or subject to restrictions orexemptions prior to shipping or travel. Normally, no further conditions have to be fulfilled by the user to transport STIHL batteries by road to the power tool’s operating site. Check and comply with any special regulations that may apply to your situation.
USE OF THE BATTERY
Transporting the Battery
Disconnect the battery from the power tool – even when carrying it for short distances. This avoids the risk of accidental startup.
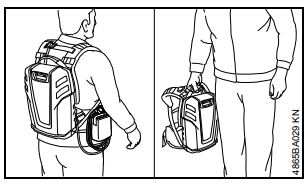
- Carry the battery by the handle or on your back.
In vehicles: Properly secure the battery to prevent turnover and damage.
WARNING
Special precautions must be taken when transporting a damaged or malfunctioning battery. To reduce the risk of accidents, always contact your STIHL servicing dealer before transporting such a battery.
Cleaning the Battery
- Always clean dust and dirt off the battery – do not use any grease solvents for this purpose.
- Clean plastic surfaces with a cloth. Do not use aggressive detergents. They may damage the plastic.
- Do not spray the battery with water.
- Do not use a pressure washer to clean your battery. The solid jet of water may damage parts of the battery and cause malfunctions.
Storing the Battery
- Disconnect the battery from the power tool or charger.
- When the battery is not in use, put it in a safe place it so that it does not endanger others. Secure it against unauthorized use.
- Store the battery out of the reach of children.
- Store indoors in a dry and safe location. Protect it from dirt and damage.
- To ensure maximum battery life: Store with a charge of about 30%.
- Do not store spare batteries unused – use in rotation.
Notes on Cable
- Check the adapter and its cable and plug for signs of damage. Never use a damaged adapter, cable or plug.
- Make sure the insulation of the cable and plug is in good condition.
- Straighten a twisted cable before use.
- Position the cable so that it cannot be reached or damaged by the cutting or working attachment of the power tool being used.
- Do not chafe, squash, jerk or damage the cable. Protect it from heat, oil and sharp edges.
- Do not use the cable for any other purpose, e.g. for carrying or hanging up the battery or power tool. Do not tug the cable.
- Position the cable so that it does not endanger others – risk of tripping or stumbling.
Notes on Operation
- Disconnect battery from the power tool:
- when carrying out tests and adjustments or cleaning
- before working on the power tool's cutting or working attachment
- before leaving the machine unattended
- when transporting
- storing the machine
- before performing repairs and maintenance work
- in the event of a malfunction or in an emergency
- This avoids the risk of accidental startup.
Before Starting Work
Check that the battery is in good condition – refer to appropriate chapters in the instruction manual.
- Check condition of housing parts.
- Check condition of straps.
- Make sure cable, plug and adapter are not damaged.
- Depress push button to activate the LED display – see chapter "Light Emitting Diodes (LED) on Battery".
- Acoustic signal should beep when push button is released.
Do not continue using the battery if parts of housing or straps are worn, cracked or broken – contact STIHL servicing dealer.
To reduce the risk of personal injury, use the battery only if it is in good working order.
- Do not use the battery if any of its components are damaged.
For emergencies: Practice quickly opening the fastener on the waist belt, loosening the shoulder straps and setting down the battery. To avoid damage, do not throw the battery to the ground when practicing.
Description
The Stihl Backpack Battery AR-900 is engineered to deliver consistent power and long runtime, making it an essential tool for professionals. Its ergonomic design ensures comfortable wear during extended use, while the advanced cooling system helps maintain optimal performance even under heavy loads. The battery features an LED indicator for easy monitoring of charge levels and includes multiple safety features like overcharge protection and thermal monitoring.
The AR-900 is built with durability in mind, using high-quality materials that withstand harsh working conditions. It is also designed to be user-friendly, with easy-to-use controls and quick-release mechanisms for tool changes.
During Operation
WARNING
The battery is equipped with a visual and acoustic signal. Your ability to hear the acoustic signal may be reduced when wearing hearing protection.
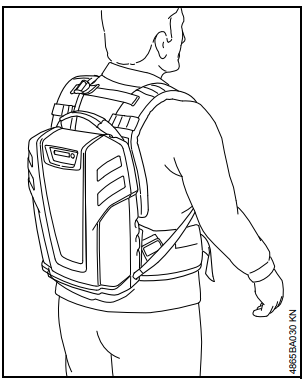
- The battery is carried as a backpack.The battery is designed to be operated by one person only. Do not allow other persons in the work area.
- Make sure you always have good balance and secure footing.
- Never work with the battery in trees, on roofs or on a ladder or other insecure support.
- Make sure the cable cannot become entangled or snag on objects – position and secure the cable carefully before starting work.
- If the battery is subjected to unusually high loads for which it was not designed (e.g. heavy impact or a fall), always check that it is in good condition before continuing work – see also "Before Starting Work". Do not continue operating the battery if it is damaged. In case of doubt, contact your STIHL servicing dealer.
After Finishing Work
Clean the battery – see "Cleaning the Battery".
Assembling the Battery
Connecting the Adapter
- Remove the cover (1) – press the tabs (arrows) inwards and push the cover upwards.
Insert the plug (2) in the socket (3) – line up the lugs on the plug with the slots in the socket.
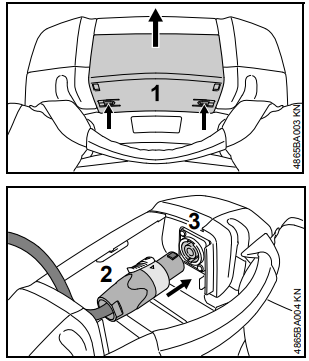
- Push the plug into the socket as far as stop, then turn it clockwise until the plug's latch (4) engages audibly.
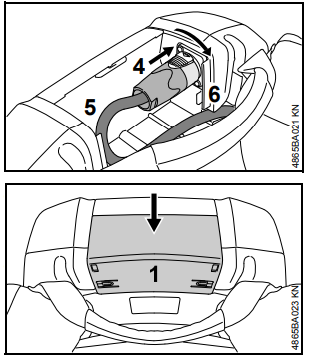
- Fit cable (5) in the cable duct (6) in the housing – see also "Positioning the Cable".
Push the cover (1) into place, making sure the cable is properly seated in the duct and not pinched.
Positioning the Cable
The cable can be fitted in different cable ducts.
- If the power tool being used with this battery is:
- next to or behind your body – fit the cable (1) in one of the lateral cable ducts (2) and push it into place
in front of your body – fit the cable (1) in one of the upper cable ducts (2) and push it into place
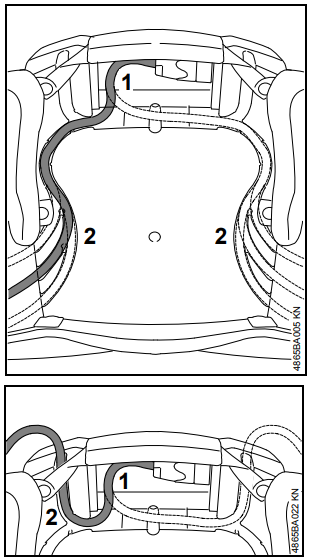
Always use the cable outlets at the side on which the power tool is held and controlled.
WARNING
To reduce the risk of accidents, never lay the cable diagonally – it may snag on objects.
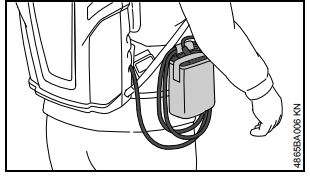
- If the cable is too long, attach it to the retainer on the bag.
Fitting the Harness
Adjusting the Harness Straps
- Pull the ends of the straps downward to tighten the harness.
Lift the tabs of the adjusters to loosen the straps.
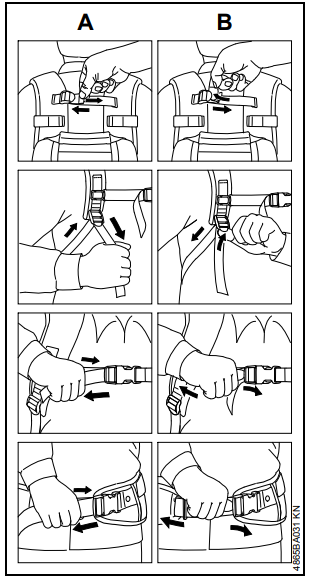
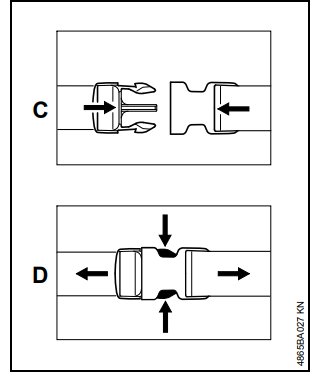
- Close and lock the quick-release fastener by pushing it together.
Squeeze the hooks to open the quick-release fastener.
Put on the shoulder strap
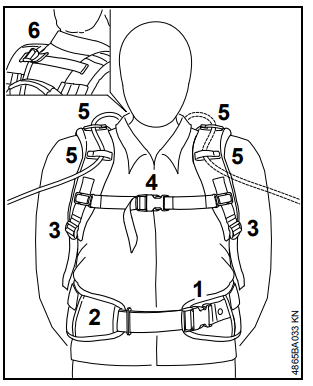
- Fasten and adjust the waist belt (1) so that it rests comfortably on your hips – thread the end of the belt through the loop (2) – do not let in hang down.
- Adjust the harness straps (3, 6) to the correct length.
- Adjust chest strap (4) to correct length and fasten it.
- If you use the upper cable ducts – see "Positioning the Cable" – thread the cable through the hook and eye fasteners (5).
The back padding must fit firmly and securely against your back.
Removing Harness
- Open the quick-release fasteners on the waist belt and chest strap.
- Loosen the harness straps by lifting the sliding adjusters and then take off the battery.
Throwing Off the Machine
WARNING
The battery must be quickly thrown off in the event of imminent danger. The waist belt and chest strap must be opened before throwing the battery to the ground.
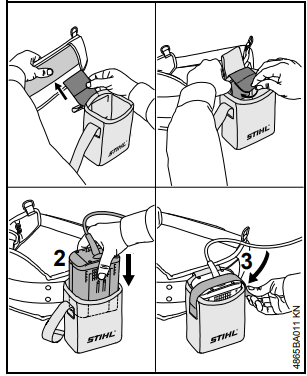
Pouch
Accommodates adapter during work breaks and after finishing work.
Secure the pouch (1) to the waist belt only in the positions shown.
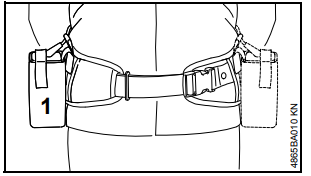
- Attach pouch to waist belt.
- Insert the adapter (2).
Close the hook and eye fastener (3)– the adapter is held in the pouch.
WARNING
Never transport metallic, pointed or sharp objects in the pouch. They may bridge the contacts in the adapter and cause a short circuit.
Acoustic Signal
The battery emits acoustic signals as well as optical signals – see "LEDs on Battery".
- Short beep
This signal is activated by pressing and releasing the button on the battery – see "Main Parts".
Meaning: Acoustic signal works as it should. - Four long beeps
One LED on battery flashes green.
Meaning: Battery's state of charge is low – recharge the battery. Rapid succession of short beeps 1)
Four LEDs on battery flash red.
Meaning: Malfunction in battery.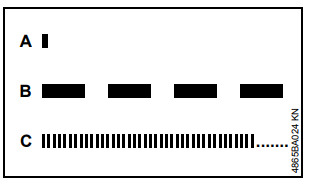
Signal stops automatically after a few seconds.
Charging the Battery
A factory-new battery is not fully charged.
Recommendation: Fully charge the battery before using it with your power tool for the first time.
- Connect the charger to the power supply – mains voltage andoperating voltage of the charger must be the same – see"Connecting Charger to Power Supply".
Operate the charger indoors only in dry locations at an ambient temperature between 41 °F (5 °C) and 104 °F (40 °C).
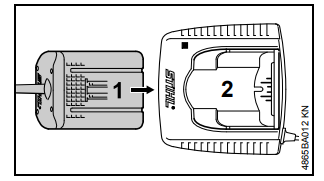
- Push the adapter (1) into the charger (2) until you feel noticeable resistance – then push it as far as stop.
The light emitting diode (3) on the charger comes on when the adapter is inserted – see "Light Emitting Diode (LED) on Charger".
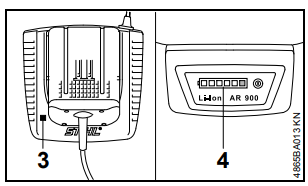
- Charging begins as soon as the light emitting diodes (4) on the battery light up green – see "Light Emitting Diodes (LEDs) on Battery".
- The charge time is dependent on a number of factors, including battery condition, ambient temperature, etc., and may therefore vary from the charge time in the "Specifications".
- The battery warms up during operation.
- If a warm battery is inserted in the charger, it may be necessary to cool it down before charging. The charging process begins only after the battery has cooled down. The time required for cooling may prolong the charge time.
AL 300, AL 500 charger
The charger is equipped with a fan.
End of Charge
The charger switches itself off automatically when the battery is fully charged:
- Light emitting diodes on the battery go off
- The light emitting diode on the charger goes off
- The charger's fan is switched off.
Remove the adapter from the charger.
LED on Charger
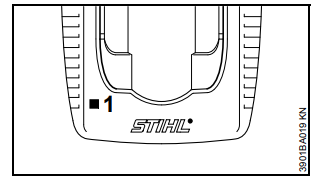
The LED (1) on the charger may glow continuously green or flash red.
Green continuous light ..... may indicate the following:
The battery
- – is being charged
- – is too hot and must cool down before charging
See also "LEDs on battery".
The green LED on the charger goes off as soon as the battery is fully charged.
A red flashing light ...... may indicate the following:
- – No electrical contact between battery and charger – remove and refit the adapter
- – Malfunction in battery – see also "LEDs on Battery".
- – Malfunction in charger – have charger checked by dealer – STIHL recommends an authorized STIHL servicing dealer.
Connecting Battery to Power Tool
A factory-new battery is not fully charged.
Recommendation: Fully charge the battery before using it for the first time.
- If necessary, remove the cover from the power tool's battery compartment before fitting the adapter, i.e. depress both locking levers to unlock and remove the cover.
Insert adapter
Insert the adapter (1) in the power tool – the adapter slides into the compartment – press it down carefully until it snaps into position – the adapter must be flush with the top of the housing.
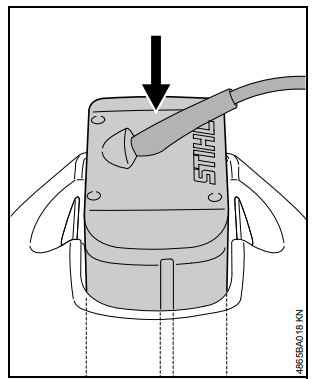
The battery and power tool are now connected together.
For further information on switching on and operating the power tool: see the instruction manual of the power tool being operated with this battery.
Disconnecting Battery from Power Tool
Switch off the power tool – see also instruction manual of the power tool being used.
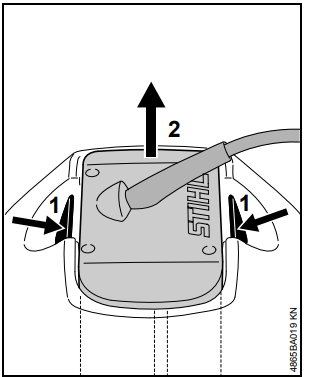
- Depress both locking levers (1) at the same time to unlock the adapter.
- Take the adapter (2) out of the power tool.
- The battery and power tool are now disconnected.
Setup Guide
To set up the Stihl Backpack Battery AR-900, follow these steps:
- Ensuring the battery is fully charged before first use.
- Adjusting the backpack straps to fit comfortably.
- Connecting the battery to your chosen Stihl tool using the provided connector.
- Turning on the tool and checking for proper function.
- Pairing with other Stihl tools if necessary, following the manufacturer's instructions.
Maintenance and Care
The following intervals applyto normal operating conditions only. If your dailywork- ing time is longer or operating conditions are difficult (very dusty work area, etc.), shorten the specified intervals accordingly. Always disconnect the battery from the power tool before performing any work on the battery. |
before starting work |
after finishing work or daily |
weekly |
monthly |
every 12 months |
if problem |
if damaged |
if required | |
Battery | Visual inspection | X | X | X | X | ||||
Clean | X | ||||||||
Light emitting diodes(LEDs) | Check operation – LED display must be activated when button is pressed | X | X | ||||||
Acoustic signal | Check operation – brief signalmust sound when button is released | X | X | ||||||
Adapter and cable | Visual inspection | X | X | X | |||||
Safety labels | Replace | X | |||||||
Troubleshooting
Always disconnect the battery from the power tool before performing any maintenance work. | ||
Condition | Cause | Remedy |
Power tool doesnot start afterswitch-on | No electrical contact between power tool and battery | Remove adapter, check contacts andrefit adapter |
Battery has lowcharge (1 LED on batteryflashes green and four long beeps sound) | Charge the battery | |
Battery too hot/ too cold (1 LED on battery glowsred) | Allow battery to cool down / at temperatures of about 60°F - 70°F (15°C - 20°C), allow battery to warm up slowly | |
Malfunction in battery (4 LEDs on battery flash red and a rapid succession of beeps soundfor several seconds) | Disconnect battery frompower tool, takeit off your back,observe battery and contact your STIHL servicing dealer immediately. If the battery emitsfumes, heats up, smells, makes noises or shows signs of deforma- tion, disconnect it from thepower tool, take it off your back,put it downand immediately move a safe distance away. Keep children and animals away from the work area. Keep battery away from combustible materials. | |
Power tool toohot (3 LEDs on battery glowred) | Allow power toolto cool down | |
Electromagnetic problem or malfunc- tion in machine (3 LEDs on battery flashred) | Take the adapterout of the power tool and refit it. Switchon the powertool – if the LEDs still flash,the power tool hasa malfunction and mustbe checked by a STIHLservicing dealer. | |
Moisture in powertool and/or battery | Allow power tool/ battery to dry | |
Power tool shutsdown during operation | Battery or machine's electronics too hot | Take the adapter out of the power tool; allow the battery and power tool to cool down |
Electrical or electromagnetic malfunction | Remove the adapterand refit it again | |
Malfunction in battery (4 LEDs on battery flash red and a rapid succession of beeps soundfor several seconds) | Disconnect battery frompower tool, takeit off your back,observe battery and contact your STIHL servicing dealer immediately. If the battery emitsfumes, heats up, smells, makes noises or shows signs of deforma- tion, disconnect it from thepower tool, take it off your back,put it downand immediately move a safe distance away. Keep children and animals away from the work area. Keep battery away from combustible materials. |
Running time is too short | Battery not fullycharged | Charge the battery |
Useful life of battery has been reached or exceeded | Have battery checked and replaced by STIHL servicing dealer | |
Rapid succession of beeps soundfor sev- eral seconds and 4 LEDs on battery flash red | Malfunction in battery | Disconnect battery frompower tool, takeit off your back,observe battery and contact your STIHL servicing dealer immediately. If the battery emitsfumes, heats up, smells, makes noises or shows signs of deforma- tion, disconnect it from thepower tool, take it off your back,put it downand immediately move a safe distance away. Keep children and animals away from the work area. Keep battery away from combustible materials. |
Four longbeeps sound and 1 LED on bat- tery flashes green | Battery has lowcharge | Charge the battery |
Adapter jamswhen being inserted in power tool / charger | Guides dirty | Carefully clean the guides |
Battery is not beingcharged even though LED on charger glows green | Battery too hot/ too cold (1 LED on battery glowsred) | Allow battery to cool down / at temperatures of about 60°F - 70°F (15°C - 20°C), allow battery to warm up slowly Operate chargeronly in closed,dry rooms at ambient temperatures of 40°F - 105°F (5°C - 40°C) |
LED on chargerflashes red | No electrical contact between charger and battery | Remove the adapterand refit it again |
Malfunction in battery (4 LEDs on battery flash red and a rapid succession of beeps soundfor several seconds) | Disconnect battery fromcharger, observe battery and contact your STIHL servicing dealer immediately. If the battery emitsfumes, heats up, smells, makes noises or shows signs of deforma- tion, disconnect it from the charger and immediately move a safe distance away. Keep children and animals away from the work area. Keep battery away from combus- tible materials. | |
Malfunction in charger | Have charger checked by STIHL servicing dealer. |
Stihl Backpack Battery AR-900 Pros & Cons
Pros
- Long Runtime: Provides extended working hours without needing frequent recharges.
- High Performance: Delivers consistent power even under heavy loads.
- Durability: Built with robust materials to withstand harsh working conditions.
- Comfortable Design: Ergonomic backpack design for comfortable wear during extended use.
Cons
- Cost: Higher price point compared to other batteries in the market.
- Weight: Heavier than some other battery options, which may be a concern for some users.
- Charging Time: While faster than some competitors, charging time can still be significant.
Customer Reviews
Customers have praised the Stihl Backpack Battery AR-900 for its reliability and extended runtime. Many professionals appreciate its ability to power through long workdays without needing multiple recharges. However, some users have noted the higher cost and weight as drawbacks.
Common complaints
Occasional overheating issues if not properly maintained and the need for frequent software updates to ensure optimal performance.
Faqs
What is the capacity of the Stihl Backpack Battery?
How long does it take to fully charge the Backpack?
Is the Stihl Battery compatible with all Stihl tools?
Can I use any charger with my Stihl?
How do I set up my Backpack for first use?
Is the Stihl Battery suitable for heavy-duty applications?
What safety features does the Stihl Backpack Battery AR-900 have?
Leave a Comment
