Synology DiskStation Router DS923 Owners Manual
Content
Introduction
Synology Router Manager (SRM) is a dedicated web-based operating system for your Synology Router, designed to help you manage and protect your network.
SRM's main features and functionalities include:
- Connectivity management: Easy-to-use and powerful connectivity management tools ensure the smooth operation for your network. Effortlessly configure the Internet, VLAN, dual WAN, and other settings.
- Smart Wi-Fi & mesh network: Smart Connect with band steering technology intelligently points your device to the better of the 2.4 GHz and 5 GHz bands, ensuring the best signal and speed. You can efficiently manage multiple Wi-Fi networks from a single web portal.
- Monitoring of network traffic: SRM provides detailed information about each application's and device's traffic, allowing administrators to easily discover potential threats or compromised devices using device control and network discovery tools.
- VLAN configuration: Use advanced VLAN features to improve network security and flexibility; you can create a network specifically for wired or wireless devices. Isolate devices from other network segments or isolate devices between two networks (e.g., primary network and IoT network).
- Multiple SSIDs: Pair Wi-Fi names (SSIDs) with VLANs, set multiple SSIDs (up to 15 for models that support tri-band frequencies), and customize schedules and MAC filters for each SSID.
- Add-on packages: Easily expand network management functionalities with VPN Plus Server, Safe Access, Threat Prevention, and others according to your needs.
- Mobile application DS router: Do the initial installation of a Synology Router, configure its Internet connection, manage multiple SSIDs, manage device connectivity with Safe Access, remind users of relevant activity that require their attention, and see all contents within a glance in the all-new overview page.
Synology DiskStation Router DS923 Specifications
| Brand | Synology |
| Color | Black |
| Product Dimensions | 6.54"D x 7.83"W x 8.78"H |
| Size | DS923+ |
| Compatible Devices | iPhone, Laptop, Desktop, Server, Android |
Description
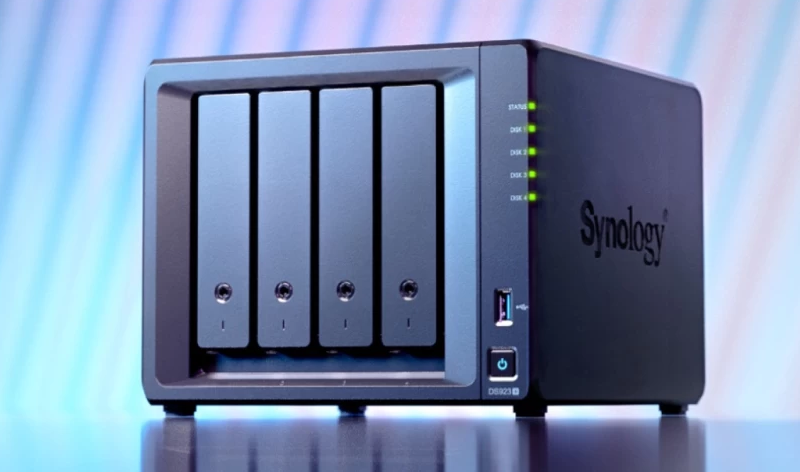
The Synology DiskStation Router DS923 is a versatile and scalable router that offers fast and reliable connectivity for small to medium-sized businesses and homes. It features a powerful processor, ample RAM, and multiple drive bays that allow for easy storage expansion. The router also supports Wi-Fi 6 technology, ensuring fast and stable wireless connectivity. With its intuitive user interface, the DS923 is easy to set up and manage, making it an ideal choice for users who want a hassle-free networking experience.
Set up Wi-Fi connections
This chapter introduces how to set up and manage Wi-Fi networks, define MAC filters, and configure WPS options in Wi-Fi Connect.
Manage the primary Wi-Fi network
By default, a Wi-Fi name (SSID) will be created for you as part of the primary local network. The following additional options are available to configure at Wi-Fi Connect > Wi-Fi Settings > Wi-Fi Network > Primary Network (System default), then selecting Edit:
- Enable Smart Connect: Smart Connect is a combination of 2.4 GHz and 5 GHz bands. This feature automatically steers connected devices toward the band which gives them the strongest speed and signal.
- Configure security settings: Settings such as the password and security level can be configured here.
- Apply MAC filter: Control whether specific MAC addresses (or devices) have access to the wireless network.
- Configure a schedule: Set days and times that your Wi-Fi network turns off automatically.
Activate the guest Wi-Fi network
A guest Wi-Fi network is typically a time-limited network created by businesses for visitors/non-regular users. To prevent unauthorized access to the host network, guests can only connect to the guest network and not the host one. By default, a deactivated guest Wi-Fi network will be created for you. The guest Wi-Fi network can be activated at Wi-Fi Connect > Wi-Fi Settings > Wi-Fi Network > Guest Network (System default).
In addition to the options available in the primary Wi-Fi network, the following additional options are available for configuration:
- Configure guest portal: Customize a web page where you can display a welcome message with various types of information which the user must interact with before being granted access to the network.
- Configure client isolation: This is a security feature that prevents wireless clients from communicating with one another.
- Configure a schedule: Set days and times that your Wi-Fi network turns off automatically. You can also specify a period after which the guest network will be disabled.
Create custom Wi-Fi networks
You can quickly create a custom Wi-Fi network by clicking Create at Wi-Fi Connect > Wi-Fi Settings > Wi-Fi Network. You can join an existing local network, or a local network with the same name will be created.
The following additional options are available for configuration:
- Enable Smart Connect: Smart Connect is a combination of 2.4 GHz and 5 GHz bands. This feature automatically steers connected devices towards the band that gives them the strongest speed and signal.
- Configure security settings: Settings such as the password and security level can be configured here.
- Apply a MAC filter: Control whether specific MAC addresses (or devices) have access to the wireless network.
- Configure a schedule: Set days and times that your Wi-Fi network turns off automatically.
Notes
- At Wi-Fi Connect > Wi-Fi Settings > Radio, you can edit the radio settings that apply to all your Wi-Fi networks as well as configure wireless uplink.
- Further settings such as VLAN tagging and network isolation can be configured in the Network Center.
- You can also create custom Wi-Fi networks using the mobile app DS router.
Configure MAC filtering
- MAC address filtering allows you to block traffic from known machines or devices or only allow known devices to connect. The MAC address of a computer or device is used by your Synology Router to identify it and to block or allow access.
- By default, the system block list will be created for you using MAC addresses containing devices blocked automatically by broadcast storm prevention. It will prevent devices from sending a large number of broadcast packets in a short time (and consequently affect the normal operation of other devices). This list applies to all Wi-Fi names (SSIDs) and takes precedence over all custom MAC filters.
- To edit devices on the system block list or to enable broadcast storm prevention, go to Wi-Fi Connect > Wi-Fi Settings > MAC Filter > System Block List.
- Additional filters can also be created, generally for organizational or administrative purposes. For example, in complex networks with multiple gateways and Wi-Fi points, you can use MAC filters to limit user access to specific networks.
- To create custom MAC filters, go to Wi-Fi Connect > Wi-Fi Settings > MAC Filter and click Create.
For more information about configuring MAC filtering, please refer to this article.
Connect to Wi-Fi via WPS
WPS (Wi-Fi Protected Setup) is a wireless security standard that allows you to easily connect devices to a wireless network. To enable WPS, go to Wi-Fi Connect > Wi-Fi Settings > WPS and tick Enable WPS.
There are two WPS methods in which users can connect to a wireless network hosted by your Synology Router:
- Push button: Press the WPS button located on your Synology Router or click the WPS button at WPS > By push button.
- PIN code: Enter an AP PIN code on the client device or enter the client PIN code.
Notes: Adding additional Wi-Fi points using WPS is not supported.
Build a mesh Wi-Fi network
Add Wi-Fi points
This section shows how to add Wi-Fi points to deploy a mesh Wi-Fi system. For more detailed instructions, please refer to this article.
- On your primary router, go to Wi-Fi Connect > Wi-Fi Point.
- Click Add.
- Follow the on-screen instructions to place your additional Wi-Fi points, power them on, and wait until their LED indicators start blinking.
- The wizard will start scanning available Wi-Fi points. When the scan is complete, name the Wi-Fi points and click Next. The Wi-Fi points will be added to your mesh Wi-Fi system in a few minutes.
Notes:
- For a specific model's LED behavior, please refer to its hardware installation guide.
- Wi-Fi points might fail to connect to the primary router if the primary router is reset to default. To rebuild your mesh Wi-Fi system, reset all Wi-Fi points and follow the instructions provided by the Mesh Wi-Fi System Setup Wizard.
Manage Wi-Fi points
At Wi-Fi Connect > Wi-Fi Point, you can add new Wi-Fi points, manage existing Wi-Fi points, and view the current status of your Wi-Fi system by topology. All your devices and their connection types are listed on this page — a solid line means the Wi-Fi point is connected by an Ethernet cable, and a dotted line means it is connected via Wi-Fi.
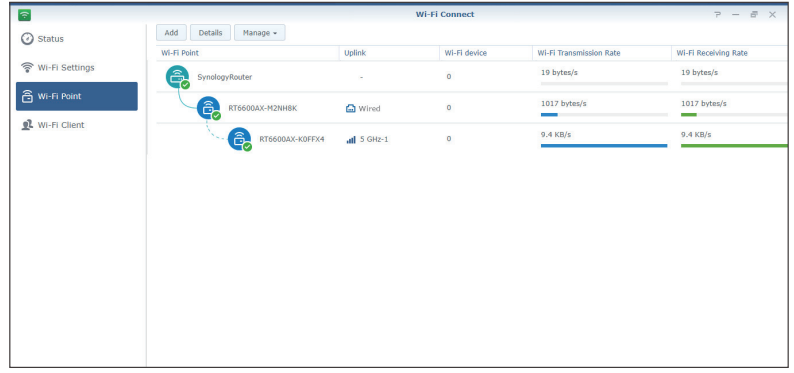
- Details: Name your Wi-Fi points for easy recognition. You can find the general information, network status, and the connected list from the pop-up window.
- Manage: Change the status of all Wi-Fi points.
- Turn off LED: Turn off the LED indicator of the selected Wi-Fi point.
- Blink to find: Use the blinking LED indicator of the selected Wi-Fi point to assist you in finding its location.
- Restart now: Restart the selected Wi-Fi point immediately.
- Delete & Reset: Remove the selected Wi-Fi point from the mesh Wi-Fi system, and reset to factory default.
Manage client devices
Monitor device status
Go to Network Center > Status to monitor the wired/wireless network status of Synology Router and its network, CPU, and memory usage in real-time. You can also monitor the devices connected to your Synology Router and their specific network usage.
Apply traffic control
Traffic control manages the upload and download of Internet traffic running on your Synology Router networks. An overview of current traffic control rules and QoS (Quality of Service) settings applied to devices can be seen at Network Center > Traffic Control > General.
Manage bandwidth
You can quickly apply traffic control rules to connected devices at Network Center > Traffic Control > General (refer to this article for more information).
Configure the following:
- Ban: Blocks the transmission between a device and your Synology Router. Banned devices will still be able to access other devices within the same local area network while access to the Internet or the SRM is paused until you sign in to SRM using another device and cancel the ban.
- High/low priority: Defines which devices should be given higher or lower priority when sending or receiving data between local networks and the Internet. You can at most designate three devices with higher priority and three with lower priority.
- Guaranteed Bandwidth: Defines the outgoing traffic guaranteed to be served to a device or application when the whole system bandwidth is sufficient.
- Maximum Bandwidth: Defines the maximum outgoing traffic a device or application can utilize when the whole system bandwidth is sufficient, and there is System Remaining Bandwidth.
At Network Center > Traffic Control > Advanced, you can apply more defined traffic control rules to additional devices based on their MAC addresses, as well as set the bandwidth allowed for applications running on each device (refer to this article for more information).
Traffic control formula:
- We suggest calculating System Output Bandwidth first. Then, make sure the sum of Guaranteed Bandwidth for every device and application is not greater than System Output Bandwidth, or the setting may not work properly.
- Total Guaranteed Bandwidth of all devices and applications + System Remaining Bandwidth ≤ System Output Bandwidth
- Guaranteed Bandwidth for each device or application ≤ Maximum Bandwidth for each device or application
Monitor network usage
You can monitor the network usage history by device and by application. To access the usage log, go to Network Center > Traffic Control > Monitor. You can identify the source of usage anomalies, such as malicious software/websites, or identify users that misuse network resources.
At Network Center > Traffic Control > Report, you can create a report task to generate a reader-friendly traffic report. This report will give you an overview of your Synology Router's network traffic statistics over a certain period of time. You can also set up schedules and email notifications for traffic reports.
Apply Wake on LAN
- With Wake on LAN (WOL), you can remotely wake up wired devices from shutdown.
- The devices joined to the WOL service can be woken up via the MAC addresses or the connection list.
- If you have a Synology NAS (e.g., DiskStation or RackStation) joined to a Synology Router's local network, you can simply wake it up with its QuickConnect ID, without using its MAC address or the connection list.
- To use the WOL-related service, go to Network Tools > Wake on LAN (refer to this article more detailed instructions).
Manage Internet connections
Select an Internet connection type
At Network Center > Internet > Connection > Primary Interface, you can choose how to connect your Synology Router to the Internet:
- Auto: Choose this option if you rely on an ISP (Internet Service Provider) modem for automatic IP assignment.
- PPPoE: Choose this option if you have obtained PPPoE credentials from the ISP.
- Manual: Choose this option if you have obtained an available IP address for use.
- DS-Lite: Choose this option if you have obtained a DS-Lite service request from the ISP.
You can enable a secondary interface to operate in failover or load-balancing mode. Go to Network Center > Internet > Connection > Secondary Interface (LAN 1) to enable this interface.
Configure ISP, VPN client, and IPv6 settings
You can manage ISP settings, VPN client settings, and IPv6 settings of your Synology Router.
Configure ISP settings
Some ISPs require additional configurations for successful registration. These settings allow you to configure MAC cloning and extra DHCP options (12/60/61) to suit the needs of these ISPs.
To configure, go to Network Center > Internet > Connection > Primary Interface > ISP settings.
Configure VPN settings
A VPN (Virtual Private Network) helps you securely access resources to another private network from the Internet. SRM currently supports the following protocols: L2TP/IPSec, OpenVPN, and PPTP.
To use your Synology Router as a VPN client, go to Network Center > Internet > Connection Primary Interface > VPN Settings to modify the settings.
Further reading: Frequently asked questions regarding using Synology Router as a VPN client
Configure IPv6 settings
To set up IPv6 on your Synology Router, please go to Network Center > Internet > Connection > Primary Interface > IPv6 Setup. The supported IPv6 types include Auto, Manual, 6in4, 6to4, 6rd, DHCPv6-PD, IPv6 relay (pass-through), and FLET's IPv6.
Set up Smart WAN
At Network Center > Internet > Smart WAN, you can configure network access plans for two defined outward-facing internet interfaces (e.g., PPPoE, WAN, VPN, and mobile networks). You can choose either mode to determine their roles in network connectivity:
- Failover: When one of the interfaces is down, the other will be responsible for all the network connectivity to ensure stable connection at all times.
Load Balancing + Failover: When both interfaces are well-functioning, this mode allows you to distribute network traffic to the interfaces for optimal network traffic flow; when one of the interfaces is down, the other will be responsible for all the network connectivity to ensure stable connection at all times.
Apart from failover and load balancing, you can also configure the following additional options for Smart WAN: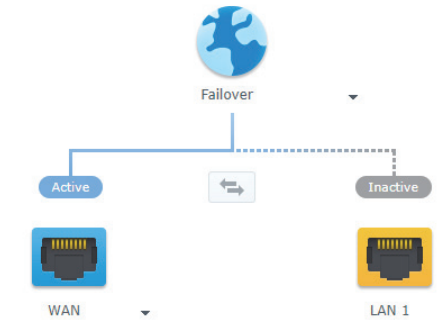
- Interface priority: This mode allows you to determine the priority order of WAN interfaces. The interface of the highest priority will act as the default interface. If its gateway fails, it will connect to the gateway of the next interface.
- Policy routing: This mode specifies WAN interfaces to forward outbound traffic based on customized criteria. If a network packet matches a policy routing rule, it will be routed to the network interface specified in the same rule.
- Interface checks: Test the connectivity of network interfaces by pinging external IP addresses. By default, your Synology Router periodically checks if its external IP address can be pinged.
Set up QuickConnect & DDNS
You can enable the services for QuickConnect or DDNS for easy connection to your Synology Router at Network Center > Internet > QuickConnect & DDNS.
Quick Connect
QuickConnect is a connection technology developed by Synology that helps you effortlessly access your Synology Router from everywhere, using only your QuickConnect ID. A Synology Account is required to set up QuickConnect.
DDNS
DDNS (Dynamic Domain Name Service) matches the hostname and the IP address of your Synology Router for quick access. If you don't have a DDNS hostname, you can register one from Synology or another DDNS provider. Enter the registered hostname in the web browser to find your Synology Router with its DDNS hostname (e.g., morgan.synology.me).
Set up DMZ
A DMZ (also known as a "demilitarized zone") is a section of a network that is directly connected to the Internet or other untrusted networks. All external access will be directed to the DMZ host device. The DMZ host can connect to the Internet directly and is not restricted by firewall restrictions or protection.
At times it may be useful to configure servers as the DMZ host. Some examples include:
- Open a random port for certain applications.
- Host a home-based webserver.
- Use the DMZ host for gaming consoles.
To set up DMZ, go to Network Center > Port Forwarding > DMZ.
NOTE: To connect to a host in the DMZ from an external network, you need the host's external IP address retrieved by your Synology Router.
Enable port forwarding
Port forwarding redirects data flow between different ports and has the following advantages:
- Improves performance for applications that might otherwise rely on a relay service.
- Protects the ports used by services/client devices from direct exposure to cyber threats.
- Offers open ports to resolve port conflicts between multiple services/client devices.
To set up port forwarding rules, go to Network Center > Port Forwarding > Port Forwarding.
Enable port triggering
Port triggering requires the configuration of one static port (the trigger port) and one dynamic port (the incoming port) for data transmission used by a service/device in the local network. Once the data come out to an external host through the trigger port, the incoming port is then triggered and opened to receive data from the host. If no data come out, the incoming port turns off, shutting down a possible opening for malicious attacks.
To set up port triggering rules, go to Network Center > Port Forwarding > Port Triggering.
Troubleshooting
- If you encounter any issues with the Synology DiskStation Router DS923, you can refer to the troubleshooting guide provided by Synology.
- Common issues include connectivity problems, slow network speeds, and difficulty accessing the router's settings.
- To resolve these issues, you may need to reset the router, update the firmware, or adjust the network settings.
- It's also important to follow the instructions provided in the user manual to avoid any potential issues.
Pros & Cons
Pros:
- Powerful processor and ample RAM for fast and reliable performance
- Multiple drive bays for easy storage expansion
- Intuitive user interface for easy setup and management
- Wi-Fi 6 technology for fast and stable wireless connectivity
Cons:
- Higher price point compared to other routers in its class
- May be overkill for small households with limited networking needs
Customer Reviews
Customers who have used the Synology DiskStation Router DS923 have praised its fast and reliable performance, easy setup and management, and ample storage options. However, some have pointed out that the router may be overkill for small households with limited networking needs. Overall, the DS923 has received positive reviews from customers, with an average rating of 4.5 stars out of 5.
Faqs
Which are the Synology DiskStation Router DS923 salient characteristics?
How much storage does the Synology have?
Which RAID levels is the Synology compatible with?
Is it possible to broadcast 4K video on the Synology DiskStation Router DS923?
How is the Synology configured?
Are third-party apps compatible with the Synology DiskStation Router?
Leave a Comment