Thames and Kosmos Candy Claw Machine User Manual
Content
Introduction
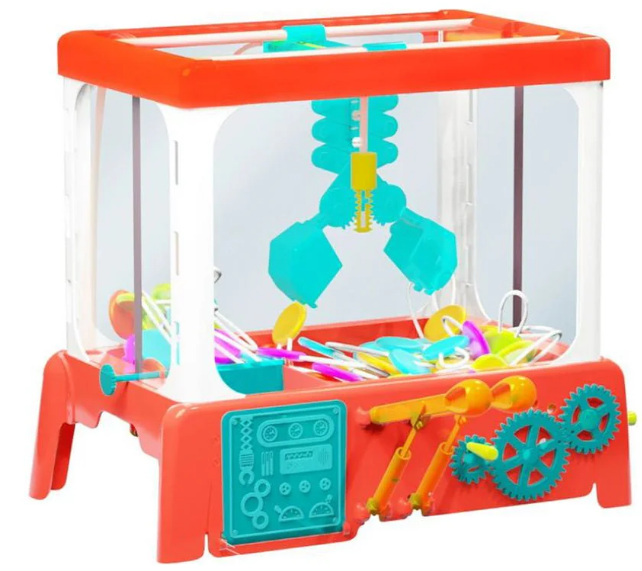
You have probably seen a claw machine game at a movie theater, video arcade, shopping mall, bowling alley, or other entertainment venue in your area. They go by many names including claw cranes, toy cranes, and skill cranes. They usually consist of a large, clear box filled with prizes like toys and stuffed animals. Inside the box is a claw that moves in three dimensions: forward and backward, left and right, and up and down. The player operates the claw with either push buttons or a joystick controller on the outside of the machine. The player pays a fee to try their luck at moving the claw to the correct position and grabbing a prize. Then the claw returns to its starting position and drops the prize into a chute where the player can get it.
With this kit, you can build a mechanical claw machine. Your machine requires no electricity or electronics — just simple machines and the power of your hand.
Priced at approximately $49.99, it offers a delightful blend of education and entertainment.
Overview
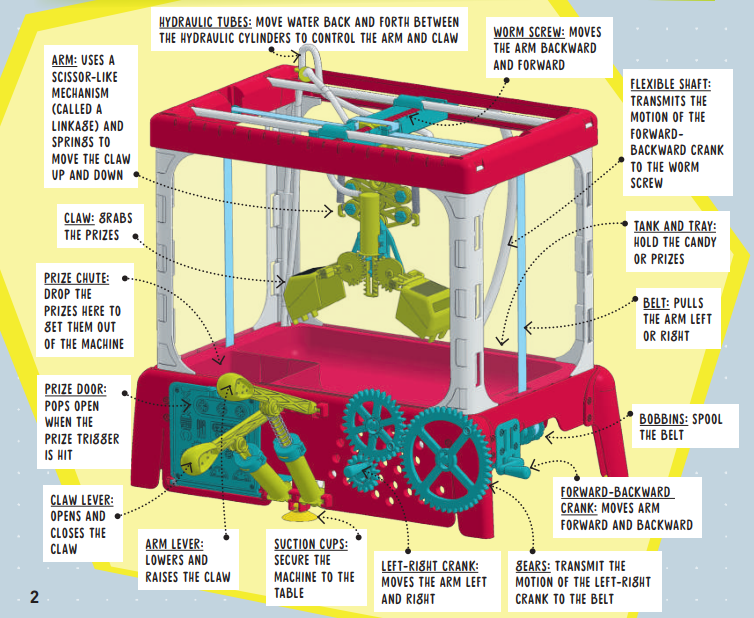
Here is an overview of the different parts of the Candy Claw Machine:
KIT CONTENTS
What’s inside your experiment kit:
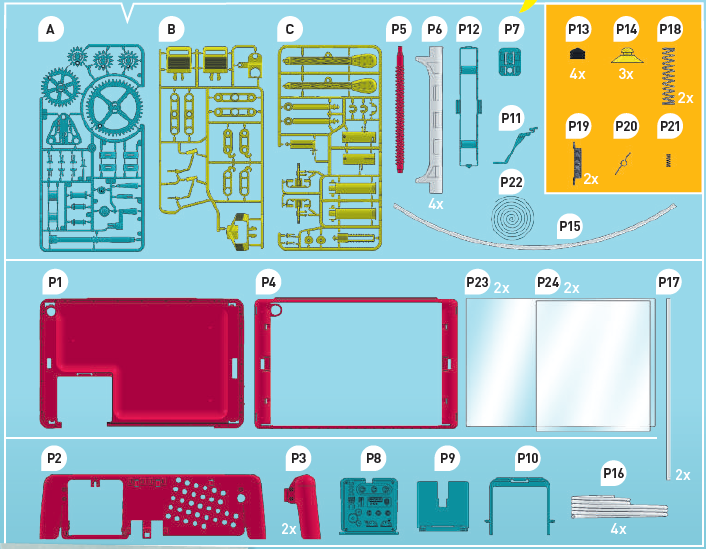
Checklist:
Specifications
The Thames and Kosmos Candy Claw Machine features a sturdy construction with a colorful design that appeals to both kids and adults. Here are some key specifications:
- Dimensions: Approximately 10 inches tall and 8 inches wide
- Material: Durable plastic
- Includes: Claw mechanism, base unit, candies, and instructions
- Battery Operated: Requires 3 AA batteries (not included)
- Ages: Recommended for children aged 6 and above
- Weight: Approximately 2 pounds
| Part Description | Quantity |
|---|---|
| A Plastic frame A (Parts A1 – A17) | 1 |
| B Plastic frame B (Parts B1 – B9) | 1 |
| C Plastic frame C (Parts C1 – C13) | 1 |
| P1 Base tray | 1 |
| P2 Base front panel | 1 |
| P3 Back leg | 2 |
| P4 Top frame | 1 |
| P5 Worm screw | 1 |
| P6 Column (2 left and 2 right) | 4 |
| P7 Mounting panel for crank | 1 |
| P8 Prize door | 1 |
| P9 Prize ejector tray | 1 |
| P10 Prize chute frame | 1 |
| P11 Prize trigger | 1 |
| P12 Worm screw housing | 1 |
| P13 Piston seal | 4 |
| P14 Suction cup | 3 |
| P15 Flexible drive shaft, 480 mm | 1 |
| P16 Flexible tubing (3x 450 mm, and 1x 240mm) | 4 |
| P17 Rail | 2 |
| P18 Large piston spring | 2 |
| P19 Arm scissor spring | 2 |
| P20 Prize door spring | 1 |
| P21 Prize trigger spring | 1 |
| P22 Belt | 1 |
| P23 Large clear plastic panel | 2 |
| P24 Small clear plastic panel | 2 |
| P25 Die-cut sheet with 3 prize boxes | 1 |
| P26 Sticker sheet | 1 |
| P27 Lollipops* | 6 |
WARNING
- Not suitable for children under 3 years.
- Choking hazard — small parts may be swallowed or inhaled.
- Strangulation hazard — long tubes and belts may become wrapped around the neck.
- Keep the packaging and instructions as they contain important information.
- Refer to the packaging for the nutritional information and the ingredients list for the lollipops.
You will also need:
Scissors, diagonal cutter, nail file, basin of water, oil (baby oil or cooking oil)
Dear parents and adults,
Children as young as six years of age can enjoy experimenting with the built Candy Claw Machine, but most children under eight will need a lot of help building it. Regardless of their age, please support your child with advice and a helping hand, especially during tricky assembly steps. Before beginning, read the instructions together and discuss the safety instructions.
To prevent damage to the work surface on which your child is building, provide them with a mat or other surface protection.
When cutting the plastic parts out of the frames with the diagonal cutter or scissors, special care must be taken, not just because of the sharp edges on the tools, but also because the plastic parts can yield sharp edges or burrs. These can be removed with the help of the diagonal cutter or a nail file. Supervise your child when they are using the sharp tools until you trust that they can handle the tools independently.
We hope you and your child have a lot of fun building and playing with the Candy Claw Machine!

Description
The Thames and Kosmos Candy Claw Machine is designed to mimic the classic arcade experience where you use a claw to pick up small prizes. The machine has a clear plastic container that holds the candies, and a mechanical claw that you operate using a lever. The challenge lies in aligning the claw perfectly to grab the candy without dropping it.
The kit includes a variety of colorful candies to fill the machine, making it an instantly appealing toy. The design is user-friendly, allowing children to easily understand how to play without needing complex instructions.
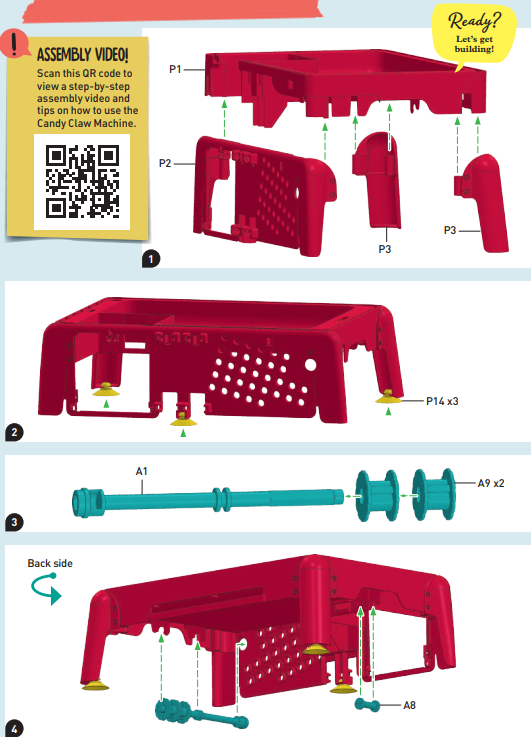
CANDY CLAW MACHINE ASSEMBLY
2. If the suction cups get stuck to your work surface during assembly, you can remove them from the model until the end
7. Make sure the straight arm of the spring (P20) is in the notch in P8.
Note: See the back cover of this manual for an alternate setup of the prize door.
8. Snap the peg inward.
Peel any thin protective films off the panels.
Note: There are two shapes of the column pieces (P6). Match their bottoms to the slots in the base.
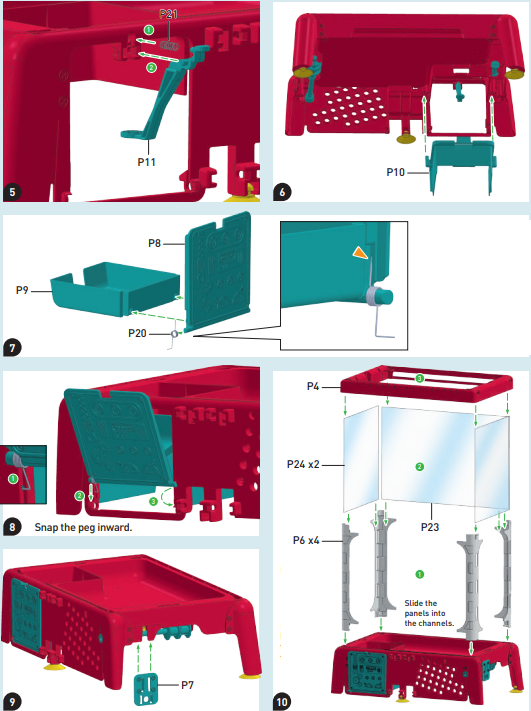
11. Pay very close attention to the proper orientation of each piece.
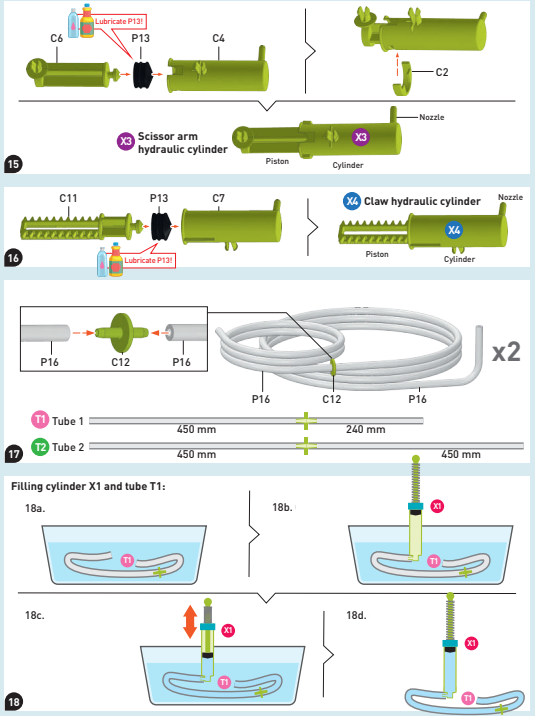
12. IMPORTANT! In steps 13–16, you will be assembling the four hydraulic cylinders. You must lubricate each piston seal (P13) with oil. Use baby oil, vegetable oil, or another cooking oil from your home. Coat the sides of P13 with the lubricant.
This makes the machine work more smoothly and quietly, requiring less force to move the hydraulic levers. You can reapply oil whenever the hydraulics get too sticky or noisy.
13. Make sure the spring (P18) is completely outside the cap (A12 + A13).

16. Tube assembly: There are three 450-mm tubes and one 240-mm tube. Connect them as shown here.
18. Filling cylinder X1 and tube T1:
- 18a. Submerge tube T1 in a basin of water.
- 18b. Connect the long end of tube T1 to the nozzle of cylinder X1 underwater.
- 18c. Move the piston in and out repeatedly to fill cylinder X1 and tube T1 with as much water and as little air as possible.
- 18d. Remove the assembly from the water. Set it aside. The water will remain in T1 the tube.
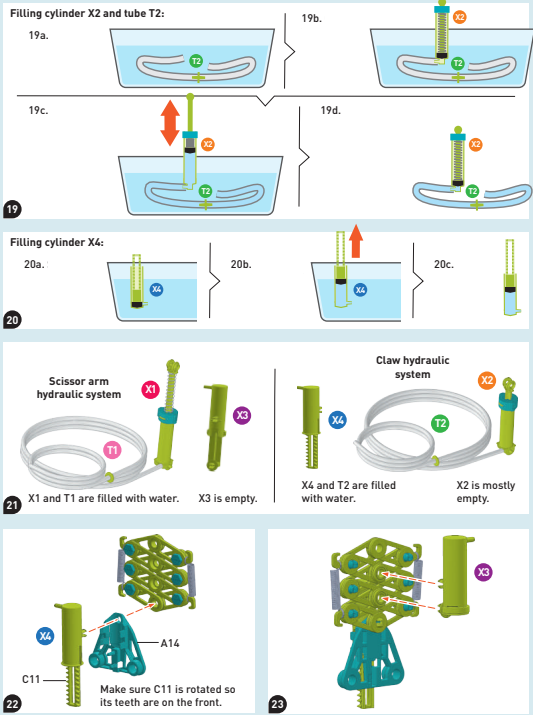
19. Filling cylinder X2 and tube T2:
- 19a. Submerge tube T2 in the basin of water.
- 19b. Connect tube T2 to the nozzle of cylinder X2 underwater.
- 19c. Move the piston in and out repeatedly to fill cylinder X2 and tube T2 with as much water and as little air as possible.
- 19d. Remove the assembly from the water. Let the spring draw the piston back into the cylinder. Set it aside. The water will remain in the tube.
Filling cylinder X4:
- 20a. Submerge cylinder X4 in the basin of water.
- 20b. Pull the piston up to fill the piston with water.
- 20c. Set X4 aside. The water will remain in the cylinder.
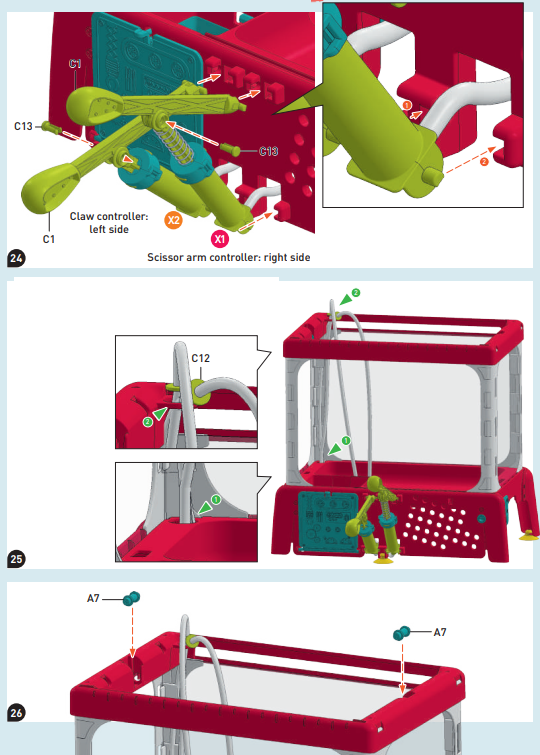
24. For each cylinder, snap the left peg into the base first. Then snap in the right peg. Guide the tubes back, under the base.
25. Guide the tubes up through the holes in the base (1) and top (2) of the machine.
Once the first tube is already passing through the holes, it is harder to pass the second tube connector (C12) through the holes. You just have to wiggle it and push it through. It will fit.
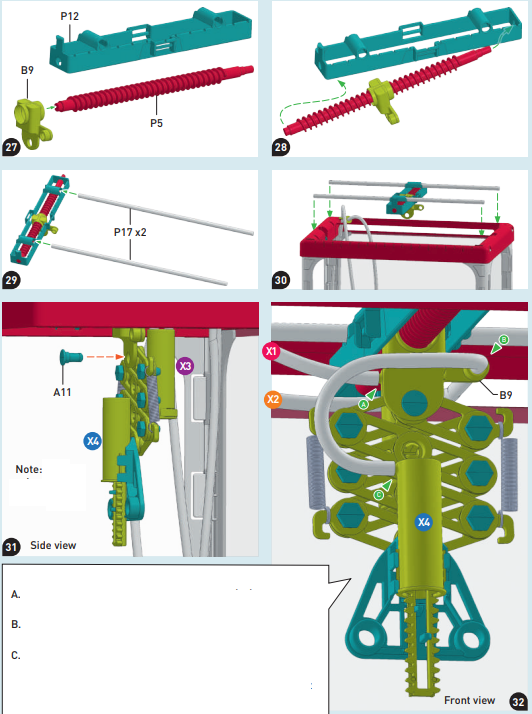
31. Side view
Connect the tubes to the cylinders as shown.
- The tube (T1) from the scissor arm controller (X1) connects to the upper cylinder — the scissor arm cylinder (X3).
- Guide the tube (T2) from the claw controller (X2) through the hole in B9 as shown.
- Then, the tube (T2) from the claw controller (X2) connects to the lower cylinder —the claw cylinder (X4).
Now test the movement of the claw and scissor arm! If they don’t work, give them a little push with your hand. If they still don’t work, watch the assembly video and refill the hydraulic systems.
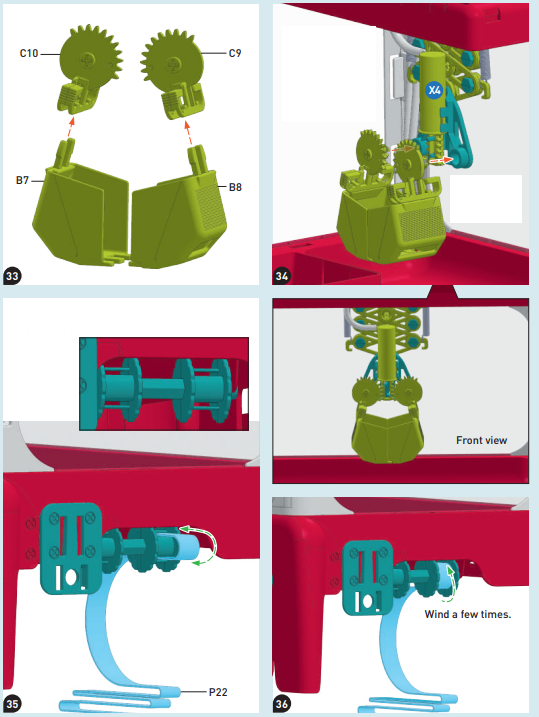
34. Hold the claw lever up, so the piston with the teeth on it in X4 is retracted up, and you can attach the gears as shown.
Align the gears exactly as shown.
35. Wind the belt around the right spool in the base of the machine.
It can be challenging to thread the belt. Refer to the assembly video (QR code on page 3) to see how it is done.
37. Guide the belt under the machine, through the slot, up the far side, over the roller, through the worm screw housing, over the roller, back down the near side, and through the slot.
38.
- Wind up the belt until taut.
- Slide the spool to the right to lock.
Note: Make sure that you have wound the belt around the two spools in opposite directions, so that when one spool unwinds, the other winds up.
40. Slide A6 into the slot.
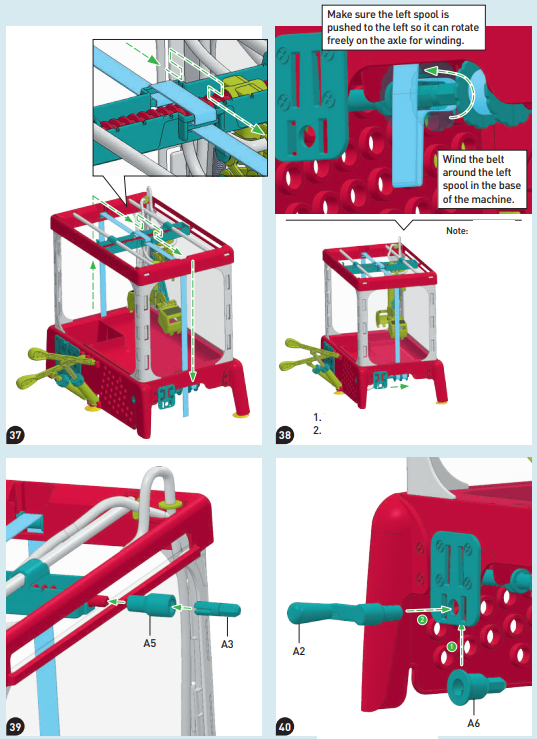
41. Connect the ends of the flexible shaft (P15) to A5 and A6.
42. Line up the prongs on the gear with the tabs inside the hole in A1.
43. Wipe up any water that has spilled out of the hydraulic system.
Done!

HOW TO USE THE CANDY CLAW MACHINE

- Fold up the small prize boxes and put them, along with the lollipops and any other prizes of your own, into the tray. Stick the number stickers onto your prizes to indicate different point values for each prize.
- Decide which prize you want to try to grab. Turn the left-right crank to move the claw arm left or right toward the prize.
- Turn the forward-backward crank to move the claw arm directly above the prize.
- Push the arm lever down to drop the claw onto the prize.
- Holding the arm lever down, close the claw by pulling up on the claw lever. Make sure you grabbed the prize with the claw. Release the arm lever to raise the arm.
- Holding the claw lever up, move the claw to the prize chute with the left-right and forward and backward cranks. Once the prize is over the target, release the claw lever.
- When the prize drops, it should hit the bullseye of the prize trigger. This will cause the prize door to pop open and the prize to pop out!
Can you master the Candy Claw Machine and get a prize EVERY time?!?
EXPERIMENTS
- Change the claws
- Lift up the front plastic panel. Press the tabs on C9 and C10 toward each other to release the current claw piece.
- Snap the new claw pieces into C9 and C10. Experiment to see which claws work best for picking up a variety of different objects!
- More direct control
- Remove the flexible shaft and the small shaft A3.
Connect the crank A2 directly to the connector A5. Observe the differences in how the worm screw operates with this configuration.
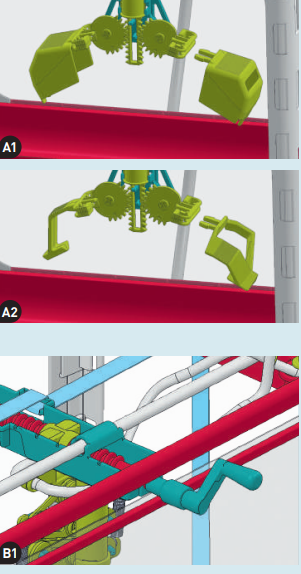
- Gears, gears, gears
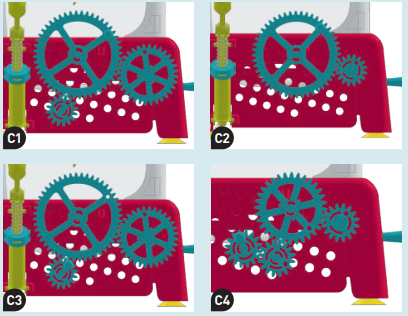
- 1–4. Try all of the different gear train combinations below, and invent your own!
5. Which one moves the arm the fastest? Which one is the easiest to turn? Note which direction each gear turns in each setup.
NOTE
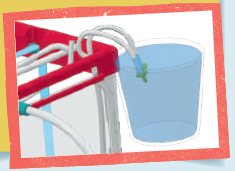
When you need to refill the hydraulic system with more water, you don’t have to take the tubes entirely out of the machine. Just disconnect the tubes at the tube connector, put the ends of the tubes in a cup of water, and pull on the hydraulic pistons to draw more water into the tubes.
HOW HYDRAULICS WORK
In the claw machine, you saw how you could use the piston of one hydraulic cylinder to move another cylinder’s piston, and thereby transfer force, when the two of them are connected by a tube and the system is filled with water. This is partly due to the fact that water cannot be compressed. It is also because the pressure applied to a liquid like water is transmitted through it with equal strength in all directions, because the molecules of a liquid can be easily moved.
The metal springs inside the cylinders apply forces to the pistons to keep them either pushed in or out. This sets the default state of the claw as open and the arm as raised. The transfer of force through cylinders and pistons is called hydraulics (Greek for “water tube”). Hydraulic technology is used in industrial machines and many technical applications. Hydraulics allow the transmission of forces from once place to another through a flexible tube and also the conversion of small forces into larger forces.
Special hydraulic oils are often used as a medium instead of water because they can be put under higher pressures. Hydraulic systems can be found in excavators, elevators, numerous construction vehicles, and in the braking systems in cars.
Handy-Dandy End Effectors
The device at the end of a robotic arm is called the end effector. You can think of it like a human hand, but the variety of different end effectors and their capabilities goes far beyond what a human hand can do on its own. In this kit, there are three interchangeable end effectors: scoop, three-point gripper, and two-point gripper. They are all good at picking up different objects. End effectors are designed to interact with and manipulate objects in their environments to perform specialized tasks.
What can end effectors do?
There are two main categories of end ef factors: gripper s and tools.
Here are examples of each:
Grippers
- Mechanical (fingers)
- Suction, vacuum
- Magnetic
- Adhesive
Tools
- Welding torch
- Spray painting
- Measuring, sensing
- Drilling, cutting
Degrees of Freedom
Unlike a human arm, a robotic arm has a lot more freedom to move through space in different ways. The term “degrees of freedom” is used to describe the movement of a robotic arm through space. The position and orientation of an object in space is described by three coordinates in the x, y, and z directions, and three directions of rotation around those axes.
The area defined by all of the positions in space that the end of the robotic arm can reach is known as the workspace. If the object that the robotic arm needs to pick up is not in the workspace, the robot cannot pick it up! The workspace depends on the degrees of freedom, limitations of the joints, lengths of the linkages, and the angles at which the object must be picked up.

GEARS AND GEAR RATIOS
Gears are actually just wheels with teeth on them. The teeth allow the wheels to mesh together and turn each other. In other words, they allow forces to be transmitted from one wheel to another. The mechanical advantage of a gear is evident when a large gear meshes with a small gear. One full turn of the large gear will produce, say, three full turns of the small gear. Because of this, the smaller gear always turns faster than the larger.
On the other hand, the larger gear turns with greater force than the smaller one. So, in this way, gears can be used to make slow turning motion into rapid turning motion, or to covert small forces into large forces. Multiple gears meshing with each other are called gear trains, or transmissions.
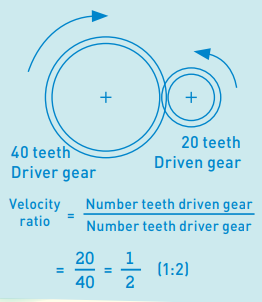
Your claw machine has a gear train controlling the left-right motion of the arm. The gear connected to the crank (or any input force) is called the driver gear. The gear that is turned by the driver gear is called the driven gear. Gears of different sizes are used to increase or decrease the speed or the force of rotary motion, called torque. The relationship between the number of teeth on meshing gears is called the gear ratio. The gear ratio indicates the change in speed or torque from one gear to the other.
LEVERS
The levers connected to the tops of the hydraulic cylinders help you transfer the force from your hand to move the pistons inside the cylinders. Levers are rigid bars that pivot on a point called the fulcrum. A weight (or load) at one point on the bar can be moved by applying a force (the effort) to another point on the bar. If the distance from the fulcrum to the effort (the effort arm) is greater than the distance from the fulcrum to the load (the load arm), then a smaller force can move a larger load. This is how the lever makes work easier.
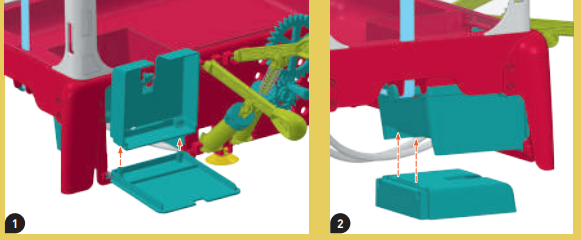
TIP: You might find that some prizes you want to use in the claw machine are too big and get stuck when they should be ejected from the prize chute. In this case, you can easily remove the ejector tray from the prize door and install it in a fixed position at the bottom of the prize chute. In this setup, the prize door simply pops open and you can reach in to get your prize.
Setup Guide
To set up the Thames and Kosmos Candy Claw Machine, follow these steps:
- Assemble the base unit according to the instructions provided.
- Insert the batteries into the battery compartment.
- Fill the plastic container with the provided candies.
- Place the claw mechanism on top of the base unit and ensure it is securely attached.
- Test the machine by operating the lever to see if it is working correctly.
Troubleshooting
If you encounter any issues with your Thames and Kosmos Candy Claw Machine, here are some common problems and solutions:
- Claw not picking up candies: Check if the batteries are properly inserted and if there is enough clearance for the claw to move freely.
- Candies falling out: Ensure that the plastic container is securely closed and that the candies are not overfilling it.
- Lever stuck: Gently clean the lever and surrounding area to remove any dust or debris that might be causing it to stick.
Instructions Warnings: Always supervise children when they are using the machine, and ensure that they do not put their fingers into the claw mechanism.
Pros & Cons
Pros
- Fun and interactive way to enjoy candies
- Easy to assemble and operate
- Durable construction
- Perfect for parties or family gatherings
- Develops fine motor skills and hand-eye coordination
Cons
- Batteries not included
- Some users find it difficult to pick up smaller candies
- May require occasional cleaning to maintain performance
- Not suitable for very young children due to small parts
Customer Reviews
Customers have generally praised the Thames and Kosmos Candy Claw Machine for its entertainment value and ease of use. Here are some common praises and complaints:
- "This toy is so much fun My kids love trying to pick up the candies." - Happy Parent
- "The assembly was a bit tricky, but once it was set up, it worked perfectly." - Satisfied Customer
- "The only downside is that the candies can be hard to pick up sometimes, but that's part of the challenge!" - Fun Seeker
Some customers have noted that the machine can be a bit noisy and that the claw mechanism might need occasional adjustment.
Faqs
How do I assemble the Thames and Kosmos Candy Claw Machine?
What age group is the Thames and Kosmos Candy Claw Machine suitable for?
Can I use any type of candy in the machine?
Why is my claw not picking up candies?
Is the Thames and Kosmos Candy Claw Machine noisy?
Can I adjust the difficulty level of the game?
How do I clean the Thames and Kosmos Candy Claw Machine?
What if my child puts their fingers into the claw mechanism?
Is the Thames and Kosmos Candy Claw Machine durable?
Can I purchase replacement parts for the Thames and Kosmos Candy Claw Machine?
Leave a Comment
