Titan Attachments 2 Ton Gantry Crane 840043 User Guide
Content
Introduction
This product was carefully designed and manufactured to give you many years of dependable service. Only minor maintenance (such as cleaning and lubricating) is required to keep it in top working condition. Be sure to observe all maintenance procedures and safety precautions in this manual and on any safety decals located on the product and on any equipment that you use in conjunction with this product.
This manual is designed to help you do a better, safer job. Read this manual carefully and become familiar with its contents. SAVE THIS MANUAL FOR FUTURE REFERENCE! The Titan Attachments 2-Ton Gantry Crane is priced at approximately $349.99.
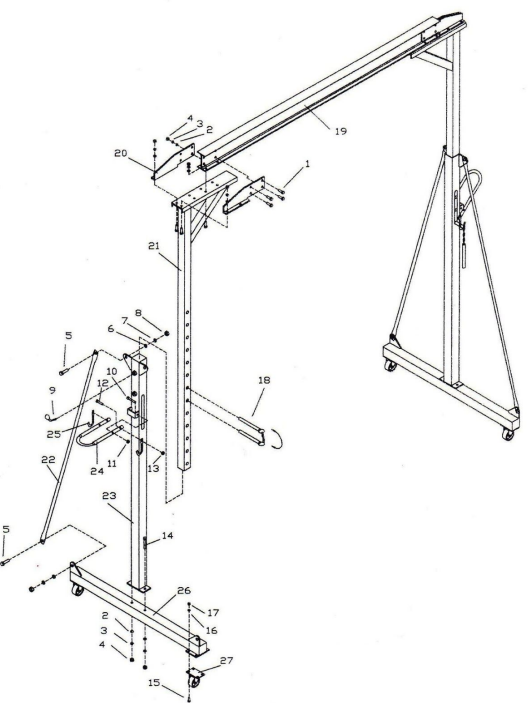
PARTS DIAGRAM
PARTS LISTS
0.5 Ton Parts List:
Part # | Description | Qty. | Part # | Description | Qty. |
| 1 | Bolt M12 x 35 | 24 | 15 | Bolt M8 x 16 | 16 |
| 2 | Ø12 Washer | 28 | 16 | Ø8 Spring Washer | 16 |
| 3 | Ø12 Spring Washer | 28 | 17 | M8 Nut | 16 |
| 4 | M12 Nut | 28 | 18 | Pin | 4 |
| 5 | Bolt M14 x 40 | 8 | 19 | Cross Beam | 1 |
| 6 | Ø14 Washer | 8 | 20 | Plate | 4 |
| 7 | Ø14 Spring Washer | 8 | 21 | Inner Vertical Post | 2 |
| 8 | M14 Nut | 8 | 22 | Support Tube | 4 |
| 9 | M12 Bolt | 4 | 23 | Outer Vertical Post | 2 |
10 | Bolt M10 x 70 | 4 | 24 | Handle | 2 |
11 | M10 Nut | 4 | 25 | Pin | 4 |
12 | Bolt M8 x 40 | 4 | 26 | Base Assembly | 2 |
13 | M8 Nut | 4 | 27 | Wheel | 4 |
14 | Bolt M12 x 90 | 4 |
1 Ton Parts List:
Part # | Description | Qty. | Part # | Description | Qty. |
| 1 | Bolt M12 x 35 | 24 | 15 | Bolt M10 x 30 | 16 |
| 2 | Ø12 Washer | 28 | 16 | Ø10 Spring Washer | 16 |
| 3 | Ø12 Spring Washer | 28 | 17 | M10 Nut | 16 |
| 4 | M12 Nut | 28 | 18 | Pin | 4 |
| 5 | Bolt M14 x 40 | 8 | 19 | Cross Beam | 1 |
| 6 | Ø14 Washer | 8 | 20 | Plate | 4 |
| 7 | Ø14 Spring Washer | 8 | 21 | Inner Vertical Post | 2 |
| 8 | M14 Nut | 8 | 22 | Support Tube | 4 |
| 9 | M12 Bolt | 4 | 23 | Outer Vertical Post | 2 |
10 | Bolt M10 x 60 | 4 | 24 | Handle | 2 |
11 | M10 Nut | 4 | 25 | Pin | 4 |
12 | Bolt M8 x 40 | 4 | 26 | Base Assembly | 2 |
13 | M8 Nut | 4 | 27 | Wheel | 4 |
14 | Bolt M12 x 100 | 4 |
2 Ton Parts List:
Part # | Description | Qty. | Part # | Description | Qty. |
| 1 | Bolt M12 x 35 | 24 | 15 | Bolt M10 x 30 | 16 |
| 2 | Ø12 Washer | 28 | 16 | Ø10 Spring Washer | 16 |
| 3 | Ø12 Spring Washer | 28 | 17 | M10 Nut | 16 |
| 4 | M12 Nut | 28 | 18 | Pin | 4 |
| 5 | Bolt M14 x 40 | 8 | 19 | Cross Beam | 1 |
| 6 | Ø14 Washer | 8 | 20 | Plate | 4 |
| 7 | Ø14 Spring Washer | 8 | 21 | Inner Vertical Post | 2 |
| 8 | M14 Nut | 8 | 22 | Support Tube | 4 |
| 9 | M12 Bolt | 4 | 23 | Outer Vertical Post | 2 |
10 | Bolt M10 x 60 | 4 | 24 | Handle | 2 |
11 | M10 Nut | 4 | 25 | Pin | 4 |
12 | Bolt M8 x 40 | 4 | 26 | Base Assembly | 2 |
13 | M8 Nut | 4 | 27 | Wheel | 4 |
14 | Bolt M12 x 150 | 4 |
UNPACKING
INSTRUCTIONS
When unpacking the tool:
- Carefully remove the tool and accessories from the box.
- Make sure that all items listed in the packing list are included.
- Inspect the tool carefully to make sure no breakage or damage occurred during shipping.
- Do not discard the packing material until you have carefully inspected and successfully operated the tool.
WARNINGS Safety, performance, and dependability have been given top priority in the design of this TITAN product making it easy to maintain and operate.
WARNING: Do not attempt to use this product until you thoroughly read and completely understand the operator’s manual. Pay close attention to the safety rules, including Dangers, Warnings, and Cautions. If you use your product properly and only as intended, you will enjoy years of safe, reliable service.
WARNING: The operation of any tool can result in foreign objects being thrown into your eyes, which can result in severe eye damage. Before beginning operation, always wear ANSI-approved safety goggles and heavy-duty work gloves.
WARNING: When using the tool basic safety precautions should always be followed to reduce the risk of personal injury and damage to equipment!
WARNING: The warnings, cautions, and instructions discussed in this instruction manual cannot cover all possible conditions and situations that may occur. It must be understood by the operator that common sense and caution are factors which cannot be built into this product, but must be supplied by the operator.
Detailed Specifications
- Lifting Capacity: 2 tons (4,000 lbs)
- I-Beam Dimensions: 8 inches x 2 inches
- Adjustable Height: 7.75 ft to 13.75 ft
- Adjustable Span: 10 ft to 16 ft
- Material: High-strength steel with powder-coated finish
- Certifications: Meets or exceeds ANSI/ASME standards
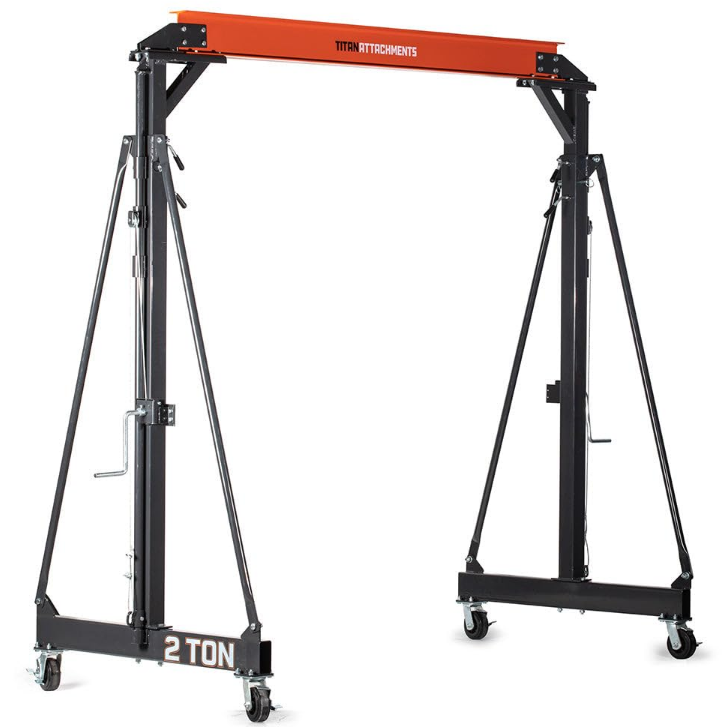
Description
The Titan Attachments 2 Ton Gantry Crane 840043 is constructed from high-strength steel to ensure durability and reliability. The powder-coated finish protects the crane from environmental elements, extending its service life. The adjustable height and span allow users to customize the crane to fit their specific needs, making it versatile for various applications.
The crane features an I-beam design with a smooth surface for easy trolley movement. It includes a winch and trolley kit for efficient lifting operations. The assembly process is relatively straightforward, and the crane comes with detailed instructions to ensure safe and proper setup.
ASSEMBLY INSTRUCTIONS
USE THE PARTS DIAGRAM AND TABLE AS YOUR GUIDE FOR THIS ASSEMBLY. ASSEMBLY WITH TWO OR MORE PEOPLE IS MUCH SAFER AND EASIER THAN ASSEMBLING THIS PRESS ALONE!
Do not fully tighten bolts until entire assembly is complete and all parts are fitting properly. This is the best way to ensure ideal fit.
- Attach two plates (#20) from two sides to the one end of Crossbeam (#19), secure by four bolts (#1), washers (#2), spring washers (#3), and nuts (#4). Repeat for another end.
- Attach each Inner Vertical Post Assembly to the Crossbeam (#19), secure by 8 bolts (#1), washers (#2), spring washers (#3), nuts (#4)
- Attach the four (4) Swivel Casters with brake (#27) to the Base Assembly (#26). Apply grease to the zerk in each caster.
- Attach each Outer Vertical Post Assembly (#24) to each Base Assembly (#26) making certain that the slot at two sides of the Outer Vertical Post Assembly are facing to the castors direction. From the top, insert two (2) Bolts (#14) through the base of the Outer Vertical Post Assembly, and into the Base Assembly (#26). Slip on Washer (#2), Spring Washer (#3) and secure by tightening on Nuts (#4).
- Attach two (2) Support Tubes (#22) to each Outer Vertical Post Assembly (#23). Insert the bolt (#5) through the top of the Support Tube, and through the eyelet. Slip on a Washer (#6), Spring Washer (#7) and secure with the Nut (#8). Attach the other end of support tube to the base assembly by bolts, washers, spring washers, and nuts. Repeat for all four (4) Support Tubes.
- Insert the Inner Vertical Post (#21) into the Outer Vertical Post (#23). Insert one (1) pin of the Pins with Chain (part #18) through the slot and the Inner Vertical Post hole so that it goes all the way through, left the other pin. Attach the Handle (#24) to the bracket on the side of Outer Vertical Post, insert the Bolt (#10) from the inside, slip on the Washer (#14), Spring Washer (#15) and secure with the Nut (#11). Make sure the two (2) hooks of the handle hold the two ends of the Pin (#18). Repeat for another post assembly.
- Tighten all the Bolts and Nuts securely and make certain that the entire Telescoping Gantry Crane Assembly is tight and secure.
- Test crane according to manual and ANSI/ASME B30.17 standards.
Titan Attachments 2 Ton Gantry Crane OPERATION
Never force the tool or attachment to do the work of a larger industrial tool. It is designed to do the job better and more safely at the rate for which it was intended.
- Move the Crane so that it is directly above the item to be lifted.
- Securely fasten the item to the Crane with the appropriate trolley or hoist.
- Raising and lowering the Crossbeam requires 2 people. There is a Handle (#27) on each of the Outer Vertical Post Assemblies. To raise the crossbeam, press the handle and the Inner Vertical Post will be up by one hole, insert the other Pin into this hole to hold the position. Pull out the original pin and make the handle to hook with the new positioned pin. Repeat it to reach the height you need. The Inner Vertical Post Assembly has thirteen (13) different stop positions.
MAINTENANCE
- The gantry crane should be maintained daily, monthly, and after overloading.
- The maintenance of the trolley and the hoist should be in accordance with relating manuals, ANSI/ASME B30.11 and B30.16.
- Only trained and qualified personnel should maintain the gantry crane.
- Clear a large enough area for maintenance, at least 1.5 times the Span (L) X 2.5 times the Height (H) of the gantry crane’s dimensions.
- Lower the load back to the ground if it is attached to the crane.
- All controllers shall be placed in the OFF position. Place warning signs and barriers around maintenance area.
- Disassemble the gantry crane, inspect all parts of the gantry crane and maintain as instructed in this manual.
- Replace all roller pins used for locking, all damaged, worn, and bent parts, and lost parts, such as warning labels.
- After maintenance work is completed and before restoring the crane to normal operation, all replaced parts and loose material should be removed. Reassemble the crane and conduct tests according to this manual and ANSI/ASME B30.17.
Setup Guide
To set up the Titan Attachments 2 Ton Gantry Crane, follow these steps:
- Unpack all components and ensure all parts are included.
- Assemble the legs and connect them to the I-beam using the provided bolts.
- Attach the winch and trolley kit to the I-beam according to the manufacturer's instructions.
- Adjust the height and span of the crane as needed for your specific application.
- Conduct a safety inspection before use to ensure all components are securely fastened and the crane is level.
GENERAL SAFETY RULES
- Work area conditions. Cluttered areas invite injuries.
- Additional work area conditions. Do not use machines or power tools in damp or wet locations. Do not expose to rain. Keep work area well lit.
- Keep children away. Children must never be allowed in the work area. Do not let them handle machines, tools or extension cords.
- Store idle equipment. When not in use tools must be stored in a dry location to inhibit rust. Always lock up tools and keep them out of the reach of children.
- Use the right tool for the job. Do not attempt to force a small tool or attachment to do the work of a larger industrial tool. There are certain applications for which this tool was designed. It will do the job better and safer at the rate for which it was intended. Do not modify this tool and do not use this tool for a purpose for which it was not intended.
- Dress properly. Do not wear loose clothing or jewelry as they can get caught in moving parts. Protective, electrically non-conductive clothing and non-skid footwear are recommended when working. Wear restrictive hair covering to contain long hair.
- Use eye protection. Always wear ANSI-approved impact safety glasses underneath a full face shield during use. Also wear heavy duty work gloves.
- Do not over reach. Keep proper footing and balance at all times. Do not reach over or across running machines.
- Maintain tools with care. Keep tools sharp and clean for better and safer performance. Follow instructions for lubricating and changing accessories. The handles must be kept clean, dry and free from oil and grease at all times.
- Remove adjusting keys and wrenches. Check that keys and adjusting wrenches are removed from the tool or machine work surface before starting work.
- Stay alert. Watch what you are doing. Use common sense. Do not operate any tool when you are tired.
- Check for damaged parts. Before using any tool, any parts that appear damaged should be carefully checked to determine that it will operate properly and perform its intended function. Any part that is damaged should be replaced.
- Replacement parts and accessories. When servicing use only identical replacement parts. Use of any other parts will void the warranty. Only use accessories intended for use with this tool. Approved accessories are available from our company.
- Do not operate tools if under the influence of alcohol or drugs. Read warning labels on prescriptions to determine if your judgment or reflexes are impaired while taking drugs.
Troubleshooting
Common issues with the Titan Attachments 2 Ton Gantry Crane may include:
- Uneven Load Distribution: Ensure the load is centered on the trolley to avoid tilting.
- Difficulty Adjusting Height/Span: Check for any obstructions or misaligned parts.
- Winch Malfunction: Inspect the winch cable for kinks or damage; lubricate moving parts if necessary.
Instructions and warnings: Always follow the manufacturer's instructions for assembly, operation, and maintenance. Wear appropriate safety gear when operating the crane, and ensure proper training before use.
Pros & Cons
Pros
- Durable Construction: High-strength steel with powder-coated finish for longevity.
- Adjustable Height/Span: Versatile for different work environments.
- Easy Assembly: Clear instructions provided for straightforward setup.
- Compliance with Standards: Meets or exceeds ANSI/ASME standards.
Cons
- Cost: Pricier compared to smaller capacity cranes.
- Space Requirements: Requires significant space for setup and operation.
- Maintenance Needs: Regular lubrication and inspections are necessary.
Customer Reviews
Customers have praised the Titan Attachments 2 Ton Gantry Crane for its robust build and ease of use. Many have noted its versatility in handling heavy loads efficiently. However, some users have mentioned that it requires a significant amount of space to operate effectively.
Common complaints include the cost and the need for regular maintenance to ensure optimal performance.
Faqs
What is the maximum lifting capacity of the Titan Attachments 2 Ton Gantry Crane?
Is the gantry crane adjustable?
What material is the gantry crane made of?
Does the gantry crane meet industry standards?
How do I assemble the gantry crane?
What safety precautions should I take when operating the gantry crane?
What are common issues with the Titan Attachments 2 Ton Gantry Crane?
Can I use this gantry crane for residential purposes?
How much space does the gantry crane require for setup?
What is included in the winch and trolley kit?
Leave a Comment