Tp-Link AC750 Wi-Fi Range Extender RE200 Installation User Guide
Content
Introduction
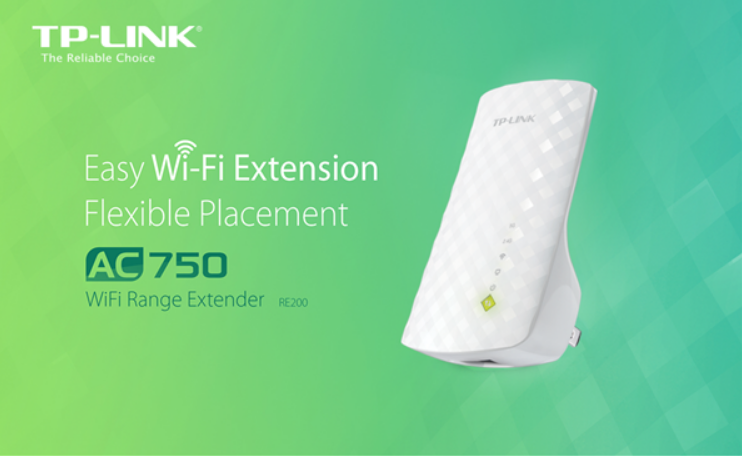
With the help of the small and effective TP-Link AC750 Wi-Fi Range Extender RE200, you can improve the coverage and get rid of dead zones in your current Wi-Fi network. With dual-band speeds of up to 750Mbps, this range extender is ideal for homes and workplaces and guarantees lag-free surfing, gaming, and streaming across all connected devices. Easy to set up and pluggable into any regular wall socket, the RE200 immediately boosts your wireless signal and is a great way to improve connectivity in those difficult-to-reach places. The TP-Link AC750 is an excellent addition to any network because to its stylish appearance and dependable performance.
Package Contents
The following items should be found in your package:
- RE200 AC750 Wi-Fi Range Extender
- Ethernet Cable
- Quick Installation Guide
Note: Make sure that the package contains the above items. If any of the listed items is damaged or missing, please contact your distributor.
Conventions
- The Range Extender, the Device or RE200 mentioned in this User guide stands for RE200 AC750 Wi-Fi Range Extender without any explanations.
- The parameters provided in the pictures are just references for setting up the product, which may differ from the actual situation. You can set the parameters according to your demand.
- The power plug may differ from the picture illustrated in this UG due to different regional power specifications. As follows we just take that of US version for example.
TP-Link AC750 Wi-Fi Range Extender RE200 Specifications
| General | |
| Standardsand Protocols | IEEE 802.3, 802.3u,802.11ac, 802.11n, 802.11band 802.11g, TCP/IP, DHCP |
| Safety & Emission | CE |
| Ports | One 10/100M Auto-Negotiation LAN RJ45 port |
| Wireless | |
| Frequency Band | 2.4~2.4835GHz |
Radio Data Rate | 11ac: up to 433Mbps(Automatic) 11n:up to 300Mbps(Automatic) 11g:54/48/36/24/18/12/9/6M(Automatic) 11b:11/5.5/2/1M(Automatic) |
| FrequencyExpansion | DSSS (Direct Sequence Spread Spectrum) |
| Modulation | DBPSK, DQPSK, CCK, OFDM, 16-QAM,64-QAM |
| Security | WEP, WPA-PSK, WPA2-PSK |
Sensitivity @PER | 270M: -68dBm@10% PER 108M: -68dBm@10% PER; 54M: -68dBm@10% PER 11M: -85dBm@8% PER; 6M: -88dBm@10% PER 1M: -90dBm@8% PER |
| Physical and Environment | |
| WorkingTemperature | 0℃~40℃ (32℉~104℉) |
| WorkingHumidity | 10%~ 90%RH, Non-condensing |
| StorageTemperature | -40℃~70℃(-40℉~158℉) |
| StorageHumidity | 5%~ 95%RH, Non-condensing |
Product Overview
The RE200 AC750 Wi-Fi Range Extender is dedicated to Small Office/Home Office (SOHO) wireless network solutions. It will enlarge your existing wireless network and mobility within your wireless network while also allowing you to connect a wired device to a wireless environment. Increased mobility and the absence of cabling will be beneficial for your network.
With using IEEE 802.11ac wireless technology, this device can transmit wireless data at the rate of up to 300Mbps (2.4GHz) + 433Mbps (5GHz). With multiple protection measures, including wireless LAN 64/128/152-bit WEP encryption, Wi-Fi protected Access (WPA2-PSK, WPA-PSK), the RE200 AC750 Wi-Fi Range Extender delivers complete data privacy. It is also compatible with all IEEE 802.11n, IEEE 802.11a, IEEE 802.11b and IEEE 802.11g products. It supports an easy wireless connection to the root Router/AP (equipped with WPS/QSS button) by pressing the WPS button on the front panel. It also supports an easy, web-based setup for installation and management. Even though you may not be familiar with the Range Extender, you can easily configure it with the help of this Guide. Before installing the Range Extender, please look through this Guide to get the full information of the RE200 AC750 Wi-Fi Range Extender.
Main Features
- Complies with IEEE 802.11ac
- Provides multiple encryption security Types including: 64/128/152-bit WEP and WPA-PSK/WPA2-PSK
- Supports Built-in DHCP server
- Supports Firmware Upgrade
- Supports Web-based Management
Appearance
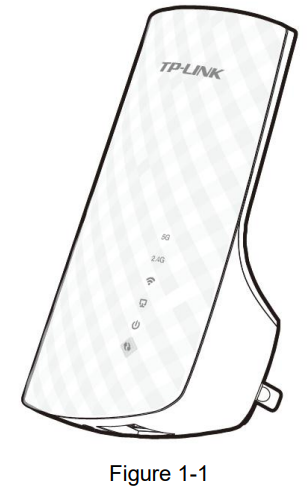
LED Explanation
Name | Status | Indication |
5G/2.4G | Green | The Range Extender is connected to your router and the signal is strong. |
Red | The Range Extender is connected to your router and the signal is weak. | |
Off | The Range Extender is not connected to your router. | |
| On | The wireless function is enabled. |
Off | The wireless function is disabled. | |
| On | A device is connected to the Ethernet Port. |
Blinking | The Ethernet portis transmitting or receiving data. | |
Off | The Ethernet port is not connected. | |
| On | The Range Extender is on. |
Off | The Range Extender is off. | |
| The RE LED blinks when the WPS connection is in process. After about 2 minutes, it will go from blinking to solid on, indicating the WPS connection is successful. | |
 (RANGE EXTENDER/WPS): If your Wireless router or AP supports WPS or QSS function, you can press the WPS or QSS button and then press the RANGE EXTENDER button to establish a secure connection between the Wireless router or AP and the Range Extender RE200.
- RESET: This button is used to restore the Range Extender’s factory default settings.
There are two ways to reset the Range Extender’s factory defaults:- Option One: With the Range Extender powered on, use a pin to press RESET button until all the LEDs turn on momentarily, then release the button and wait the Range Extender to reboot to its factory default settings.
- Option Two: Restore the default settings from “System Tools > Factory Defaults” of the Range Extender's Web-based Management page.
- ETHERNET: One 10/100Mbps RJ45 Ethernet port used to add wireless connectivity to an Ethernet-enabled device such as Internet TV, DVR, Gaming console and so on. Please note that this port is not allowed to be connected with router.
Description
The TP-Link AC750 Wi-Fi Range Extender RE200 is designed to eliminate dead zones and extend the coverage of your wireless network. With its dual-band technology, you can enjoy seamless streaming, gaming, and browsing on all your devices. The device is easy to set up and use, with a simple web interface and mobile app. Plus, the compact design allows for discreet placement anywhere in your home or office.
Hardware Installation
Before You Begin
Please read this User Guide carefully before installing and using the equipment. The operating distance range of your wireless connection can vary significantly depending on the physical position of the wireless devices. Factors that can weaken signals by getting in the way of your network’s radio waves are metal appliances or obstructions, and walls. Typical ranges vary based on the types of materials and background RF (radio frequency) noise in your home or office.
In order to optimize the performance of RE200, please follow the instructions below to achieve an ideal location (please make sure it is always within the wireless coverage of the wireless router).
Half-way Between - Generally, the ideal location for RE200 is half-way between the Wireless router and Wireless Client. If the wireless signal is not satisfactory, you may place RE200 somewhat nearer to the Wireless router.
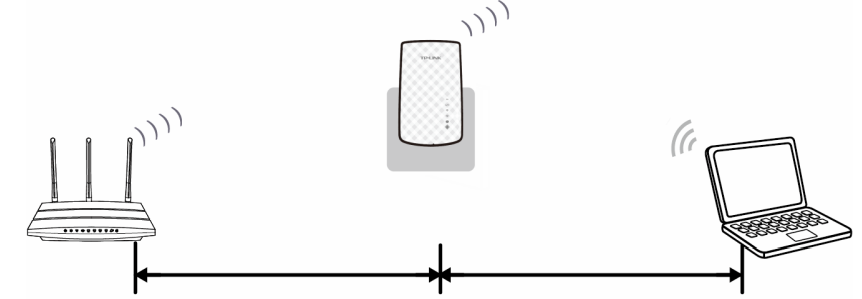
- No Obstacles and Spacious - Clear obstacles in the way between RE200 and Wireless router. It’s better to locate it in a spacious place, such as near the corridors.
- No Interference - Keep RE200 far away from wireless interference, which may come from electrical appliances that works in the same frequency band as RE200, such as Blue tooth devices, cordless phones, microwave ovens, etc.
Note: TP-LINK recommends that you connect to the Range Extender when your home network connection is poor, or when you want a larger wireless coverage to eliminate “dead zones”. As in compliance with the wireless transmission protocol, all the Range Extender devices are set to work in half-duplex instead of full-duplex mode. In other words, the Range Extender has to process one-way communication between your root Wireless Router or AP and the terminal clients; so the transmission time will be double-increased, while the speed will be decreased.
Basic Requirements
- Place your Range Extender in a well-ventilated place far from direct sunlight, any heater or heating vent.
- Leave at least 2 inches (5cm) space around the device for heat dissipation.
- Turn off your Range Extender and unplug the power adapter in a lighting storm to avoid damage.
- Use Web browser, such as Microsoft Internet Explorer 5.0 or above, Netscape Navigator 6.0 or above.
- Operating temperature of the Range Extender should be 0℃~40℃ (32℉~104℉).
- Operating humidity of the Range Extender should be 10%~90%RH (Non-condensing).
Connecting the Device
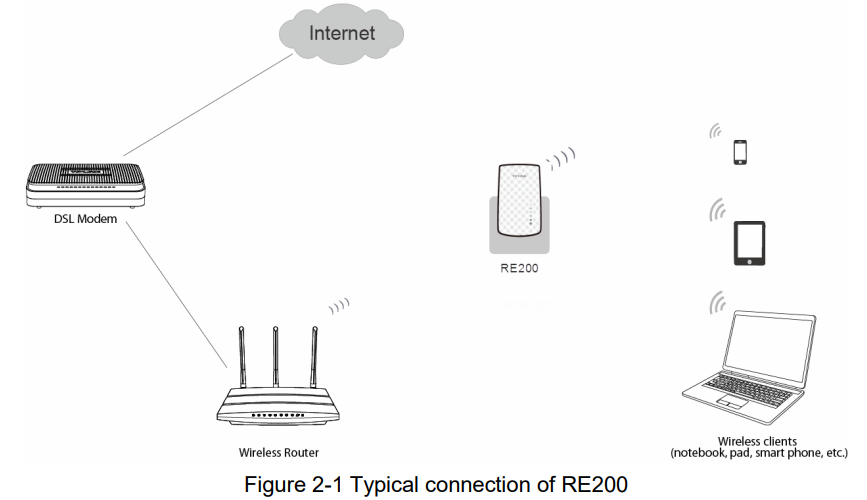
To establish a typical connection of the Range Extender, please take the following steps:
- Connect the Cable/DSL modem to a Wireless router with an Ethernet cable.
- Plug your RE200 directly to a standard electrical wall socket, which is near the Wireless router.
- Connect your Wireless Clients (such as notebook, pad, smart phone, etc.) to RE200 wirelessly. Or you can connect your PC to the sole LAN port of Range Extender via an Ethernet cable.
- Log in the web-based management page of RE200 and complete the configurations.
(Please refer to Chapter 3 Quick Installation Guide or Chapter 4 Configure the Device for the configurations, as you need.) Through the web page configuration you can successfully connect RE200 to the wireless router. - Adjust an ideal location for RE200. (Please refer to Section 2.1 Before You Begin for detailed information about ideal location.)
Quick Installation Guide
This chapter will guide you to configure your PC to communicate with the Range Extender and to configure and manage the RE200 AC750 Wi-Fi Range Extender easily with a Web-based utility.
With a Web-based utility, it is easy to configure and manage the RE200 AC750 Wi-Fi Range Extender. The Web-based utility can be used on any Windows, Macintosh or UNIX OS with a Web browser, such as Microsoft Internet Explorer, Mozilla Firefox or Apple Safari.
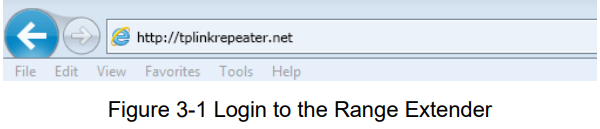
To access the configuration utility, open a web-browser and type in the domain name http://tplinkrepeater.net in the address field of the browser.
After a moment, a login window will appear as shown in Figure 3-2. Enter admin for the User Name and Password (both in lower case letters). Then click OK or press Enter.
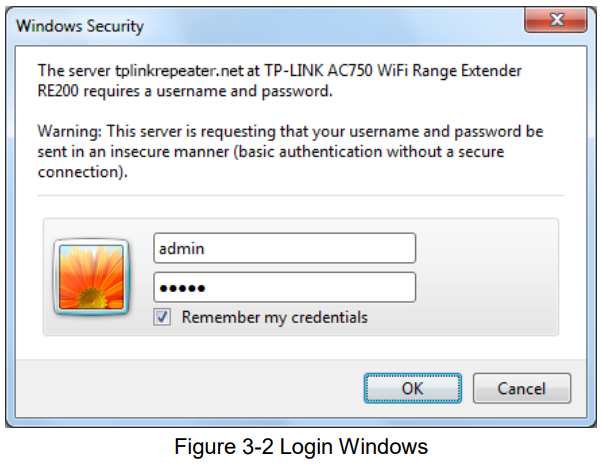
Note: If the above screen does not prompt, it means that your web-browser has been set to a proxy. Go to Tools menu>Internet Options>Connections>LAN Settings, in the screen that appears, cancel the Using Proxy checkbox, and click OK to finish it.After successful login, there will pop up the Quick Setup Start page. Click Next to get the quick setup started.
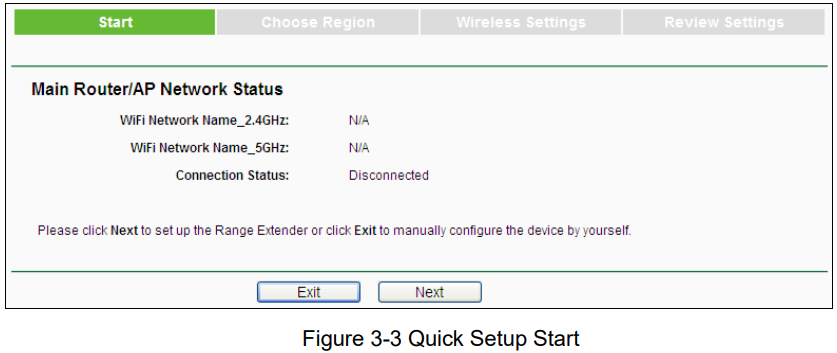
Note: If you want to go through the Quick Setup right away, you can click Exit and enter the main menu of the device.
Figure 3-4 will appear for you to choose the region. Then click Next to continue.
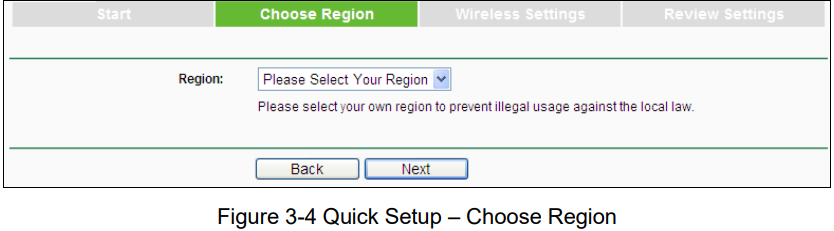
Note: Per FCC regulations, all Wi-Fi products marketed in the U.S. must be fixed to the U.S. region only.
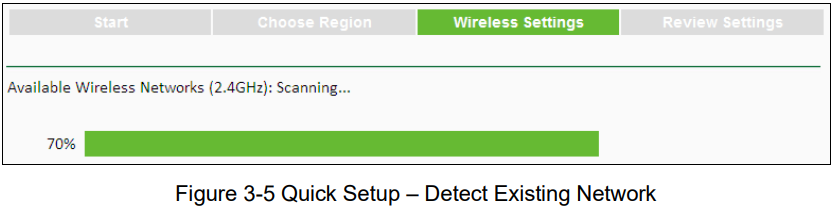
The device will detect the existing 2.4GHz network. Please wait for a while.
A list of available 2.4GHz wireless network will appear. Check the box before the SSID of your desired network, and then click Next.
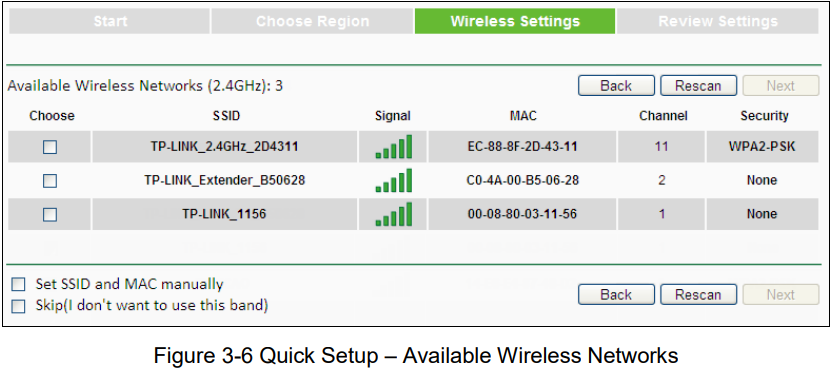
Note:
- If you could not find your wireless network name (SSID) in the list, you can click Rescan to redetect it or tick the checkbox before "Set SSID and MAC Manually" to manually configure the wireless settings.
- If you don’t want to use the 2.4GHz band, you can check the box of Skip at the bottom of the page.
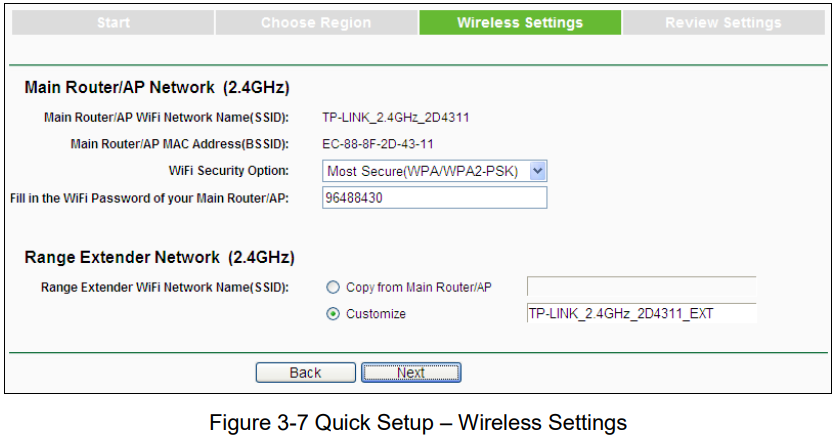
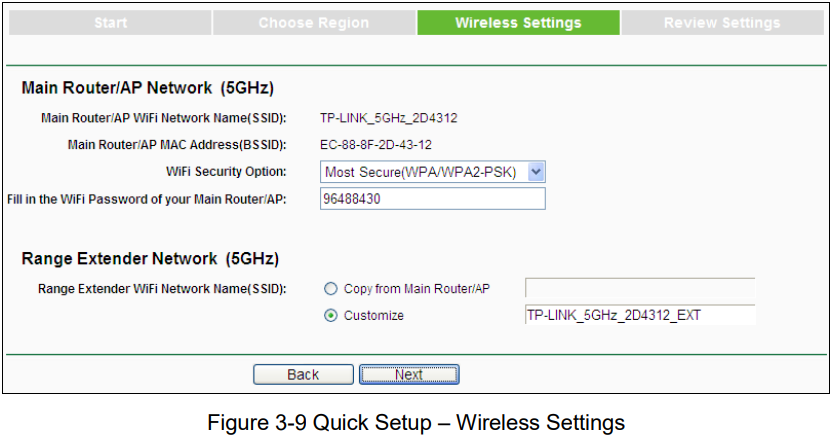
Wireless Settings page will appear as shown in Figure 3-7. Enter the WiFi Password of your main Router/AP, name your range extender WiFi network or keep it default, and then click Next to continue.
A list of available 5GHz wireless network will appear. Check the box before the SSID of your desired network, and then click Next.
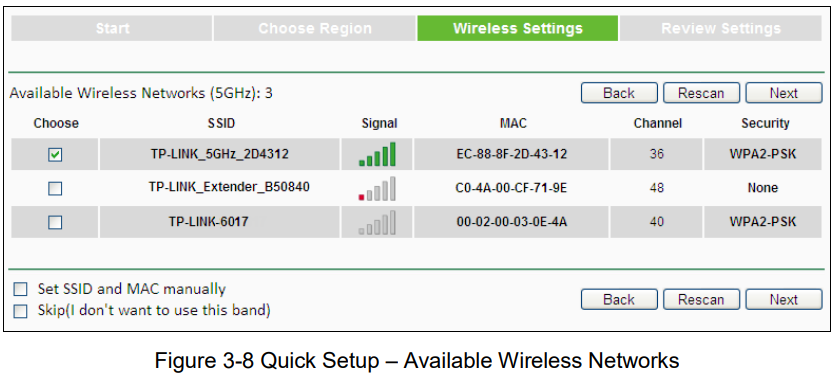
Note:
- If you could not find your wireless network name (SSID) in the list, you can click Rescan to redetect it or tick the checkbox before "Set SSID and MAC Manually" to manually configure the wireless settings.
- If you don’t want to use the 5GHz band, you can check the box of Skip at the bottom of the page.
The wireless Settings page will appear as shown in Figure 3-9. Enter the WiFi Password of your main Router/AP, name your range extender WiFi network or keep it default, and then click Next to continue.
Double-check your wireless setting and network setting, when Figure 3-10 appears. If verified, click Finish to complete the Quick Setup. If there is anything wrong, click Back to return to the previous pages and reconfigure it.
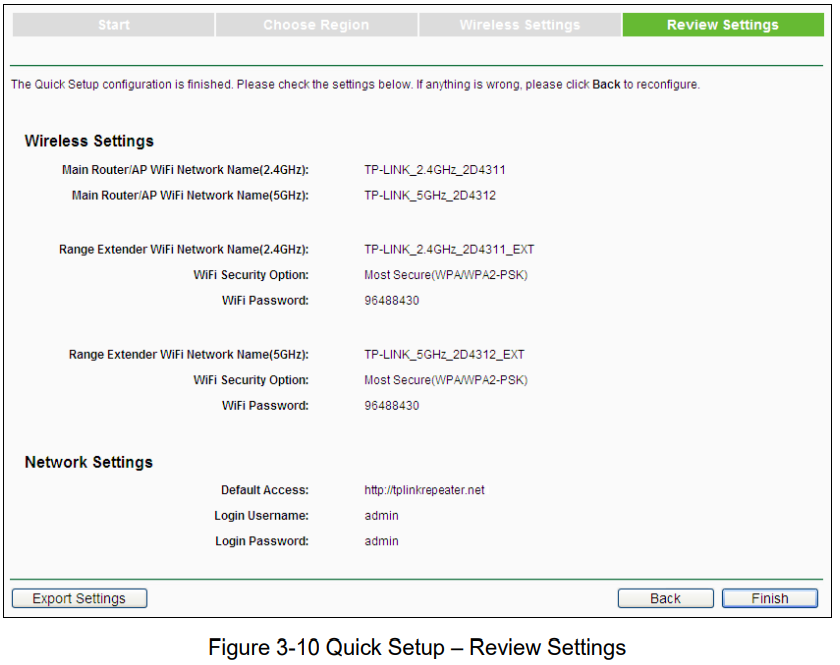
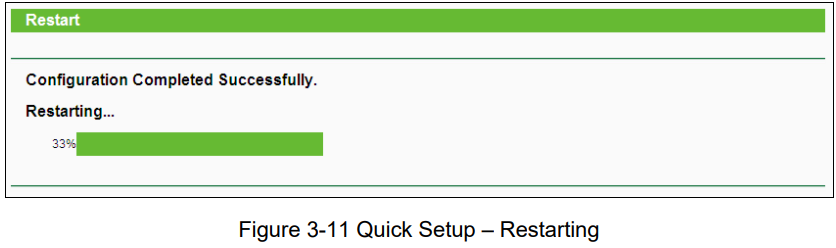
Note: It’s recommended to click the Export Settings button to save these settings as a txt file for your future reference.When the Range Extender is restarting (as shown in Figure 3-11), please wait for a while patiently until Figure 3-12 appears. Then you have successfully extended the root device’s wireless signal.

Setup Guide
Setting up the TP-Link RE200 is easy. Here are the steps:
- Plug in the RE200 near your router.
- Connect to the RE200's network using your computer or mobile device.
- Open a web browser and enter http://re.tl in the address bar.
- Follow the on-screen instructions to complete the setup process.
- Move the RE200 to a new location for extended coverage.
Factory Defaults
Item | Default Value |
Common Default Settings | |
Username | admin |
Password | admin |
IP Address | 192.168.0.254 |
Subnet Mask | 255.255.255.0 |
Domain | |
Wireless | |
SSID | TP-LINK_Extender_2.4GHz, TP-LINK_Extender_5GHz |
Wireless Security | Disabled |
Wireless MAC AddressFiltering | Disabled |
Troubleshooting of TP-Link AC750 Wi-Fi Range Extender RE200
How do I restore my Range Extender’s configuration to its factory default settings?
There are TWO methods available to restore the factory defaults.
Option 1:
With the Range Extender powered on, use a pin to press RESET button until all the LEDs turn on momentarily, then release the button and wait the Range Extender to reboot to its factory default settings.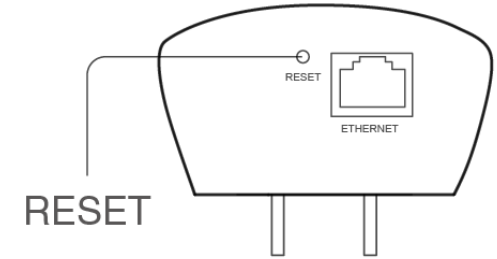
Option 2:
Get logged in to the web-based management page of RE200, then go to “System Tools -> Factory Defaults” and click “Restore”.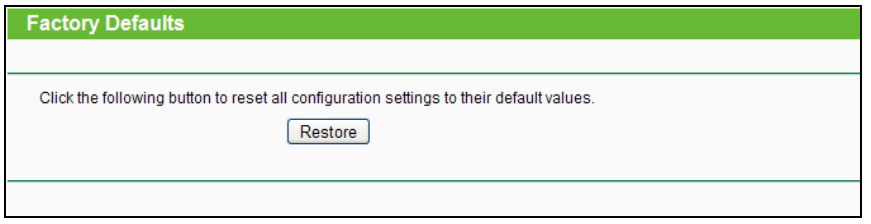
Note: Once the Range Extender is reset, the current configuration settings will be lost and you will need to reconfigure it.
What can I do if I forget my password?
- Restore the Range Extender’s configuration to its factory default settings. If you don’t know how to do that, please refer to previous T1;
- Use the default user name and password: admin, admin;
- Try to reconfigure your Range Extender by following the instructions of this UG.
What can I do if I cannot access the web-based configuration page?
- Check to verify all the connections (either wireless or wired ones) are proper. If yes, please proceed to the next step; otherwise, check the connections again.
- Try to obtain an IP address and gateway; if succeed, open your web-browser, enter the default domain http://tplinkrepeater.net in the address field and get logged in.
If you are unable to log in, please RESET the device, and then use the default IP address to get into the web-based configuration page, reconfigure the device. - Feel free to contact our technical support, if the problem still persists.
How can I know that my wireless signal has been repeated and boosted by RE200?
An easy way is to compare the signal strength of your target wireless network (symbolized by its SSID), with RE200 in operation vs. out of operation. Before comparison, you’d better make sure your computer can obtain an IP address from your target wireless network and thus access the Internet, either via RE200 or without.
Will the Range Extender work if I connect the ETHERNET port of it to the router via Ethernet cable?
Sorry, it won’t work. The Range Extender is designed to connect wirelessly to the router, while the ETHERNET port is designed to connect with a wired device, like Internet TV, Gaming console, DVR and so on.
Why does the wireless transmission rate speed down, while the wireless signal is stronger after repeated by RE200?
In compliance with the wireless transmission protocol, all the Range Extender devices are set to work in half-duplex instead of full-duplex mode. In other words, the Range Extender has to process one-way communication between your root Wireless Router or AP and the terminal clients; so the transmission time will be double-increased, while the speed will be decreased. TP-LINK recommends that you connect to the Range Extender when your home network connection is poor, or when you want a larger wireless coverage to eliminate “dead zones”.
Pros & Cons
Pros
- Cost-effective solution for extending wireless coverage.
- Easy to set up and use.
- Dual-band technology for seamless streaming and gaming.
- Smart signal indicator for easy placement.
Cons
- Limited range compared to higher-end extenders.
- No USB port for sharing files or printers.
Customer Reviews
Customers have generally praised the TP-Link RE200 for its ease of use, compact design, and affordable price. However, some have noted that the range could be better and that it may not work well with certain routers or networks.
Faqs
What is the maximum range of the TP-Link?
Can the TP-Link RE200 be used with any router?
How many devices can the TP-Link AC750 Wi-Fi Range support?
How do I update the firmware on the TP-Link AC750 Wi-Fi Range Extender RE200?
What is the warranty on the TP-Link?
Leave a Comment