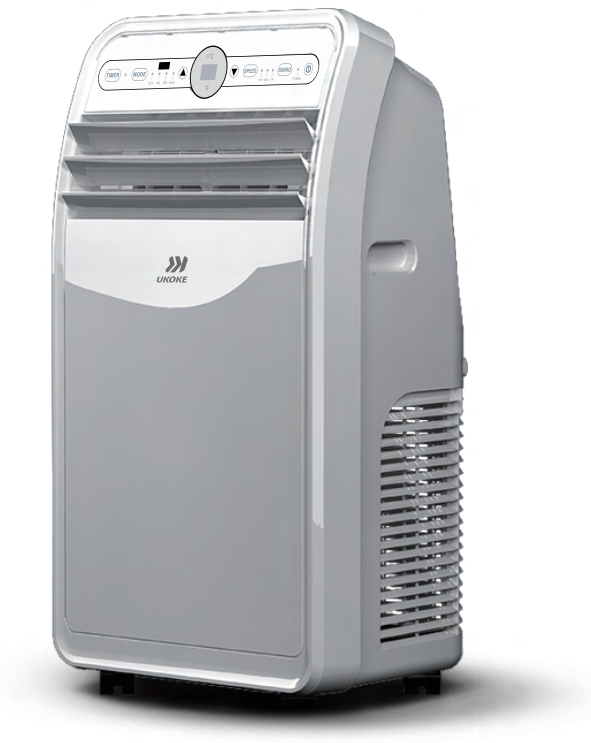
Ukoke Portable Air-Conditioner USPC01W User Manual
Content
Introduction
The UKOKE Portable Air-Conditioner USPC01W is a versatile cooling solution designed to efficiently cool spaces up to 400 square feet. Featuring a powerful 7,000 BTU cooling capacity, this unit also functions as a heater and dehumidifier, making it ideal for year-round use. With smart home compatibility, it can be controlled via Wi-Fi and works seamlessly with Alexa for added convenience. Priced at approximately $399.99, it combines functionality with modern technology for ultimate comfort.
SAFETY INFORMATION
DANGER
Immediate hazards which WILL result in severe personal injury or death
WARNING
Hazards or unsafe practices that COULD result in severe personal injury or death
CAUTION
Hazards or unsafe practices that COULD result in minor personal injury
IMPORTANT SAFETY INSTRUCTIONS
WARNING
When using electrical appliances, basic safety precautions should be followed, including the following
- Proper grounding must be ensured to reduce the risk of shock and fire.
DO NOT CUT OR REMOVE THE GROUNDING PRONG. - Do not operate air conditioner if power cord is frayed or otherwise damaged. Avoid using it if there are any cracks or abrasion damage along the length, plug connector or if the unit malfunctions or is damaged in any manner. Contact an authorized service technician for examination, repairs or adjustments.
- DO NOT USE AN ADAPTER OR AN EXTENSION CORD.
- Do not block airflow around the air conditioner. The exhaust hose should be free of any obstructions.
- Always unplug the air conditioner before servicing it or moving it.
- Do not install or use the air conditioner in any area where the atmosphere contains combustible gases or where the atmosphere is oily or sulphurous. Avoid any chemical coming in contact with your air conditioner.
- Do not place any object on the top of the unit.
- Never operate the air conditioner without filters in place.
- Do not use the air conditioner near a bathtub, shower or wash basin.
Your portable air conditioner is supplied with a Leakage-Current Detection and Interruption (LCDI) safety plug. This device provides protection to reduce the risk of fire due to arcing faults in the power supply cord. Before using your portable air conditioner, follow the instructions below to ensure that the LCDI plug is working properly:
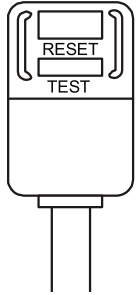
- Plug the power cord to a grounded outlet.
- Press the TEST button on the LCDI plug. This should trip the plug and cut the power to the air conditioner. If the plug does not trip and you are able to turn on the unit, please contact technical support.
DO NOT USE YOUR PORTABLE AIR CONDITIONER IF THE TEST FAILS.
- Press the RESET button to start using your air conditioner.
- Do not use the TEST and RESET buttons as an ON/OFF switch.
SAFETY GUIDELINES
To prevent injury to the user or other people and property damage, the following instructions must be followed. Incorrect operation due to ignoring of instructions may cause harm or damage.
ALWAYS DO THIS
- Your air conditioner should be used in such a way that it is protected from moisture. e.g.condensation, splashed water, etc. Do not place or store your air conditioner where it can fall or be pulled into water or any other liquid. Unplug immediately.
- Always transport your air conditioner in a vertical position and stand on a stable, level surface during use.
- Turn off the product when not in use.
- Always contact a qualified person to carry out repairs. If the supply cord is damaged it must be repaired by a quali tied technician.
- Keep an air path of at least 20 inches. all around the unit from walls, furniture and curtains.
- If the air conditioner is knocked over during use, turn off the unit and unplug from the power supply immediately.
NEVER DO THIS
- Do not operate your air condi- tioner in a wet room such as a bathroom or laundry room.
- Do not touch the unit with wet or damp hands or when barefoot.
- Do not press the buttons on the control panel with anything other than your fingers.
- Do not remove any fixed covers. Never use this appliance if it is not working properly, or if it has been dropped or damaged.
- Never use the plug to start and stop the unit.
- Always use the switch on the control panel to start or shut off the unit.
- Do not cover or obstruct the inlet or outlet grilles.
- Do not use hazardous chemi- cals to clean or come into contact with the unit. Do not use the unit in the presence of inflammable substances or vapour such as alcohol, inseoti cides, petrol,etc.
- Do not allow children to operate the unit unsupervised.
- Do not use this product for functions other than those described in this instruction manual.
ENERGY SAVE
- Use the unit in the recom-- mended room size.
- Locate the unit where furniture cannot obstruct the air flow.
- Keep blinds/curtains drawn.
- Keep the filters clean.
- Keep doors and windows closed to keep cool air in and warm air out.
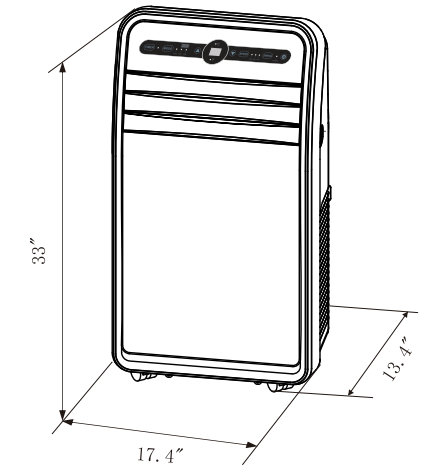
Machine Dimensions
SPECIFICATIONS
- Pack Dimensions (W x D x H): 19" x 17" x 35"
- Electric Requirement: 115V~60Hz
Weight: 73Ibs
Parts Description
Main Components
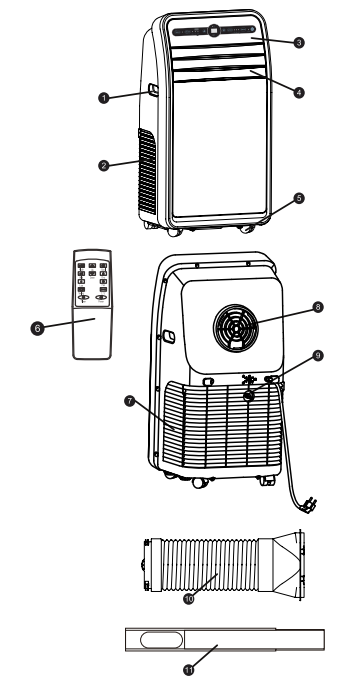
- Handle
- Side Grill
- Control Panel
- Air Outlet
- Wheels
- Remote Control
- Back Grill
- Exhaust Outlet
- Drainage cap, Drain Plug
- Exhaust Hose
- Window Bracket Kit
Description
USPC01W boasts a modern and sleek design with a weight of approximately 50 pounds, making it easy to move around. It features a user-friendly control panel with an LCD display and remote control for convenient operation. The unit comes with a washable filter and a drain hose for easy maintenance. Its noise level is relatively low, operating at around 45 dB, ensuring minimal disturbance.
The air conditioner also includes safety features such as overheating protection and an automatic shut-off function in case of an emergency. With its compact size and robust performance, the UKOKE USPC01W is an excellent addition to any home or office space.
UKOKE Portable Air-Conditioner USPC01W Usage
Placement
- Place the machine on flat floor near a window;
To ensure optimal efficiency, the machine should be about 20-inches away from the window.
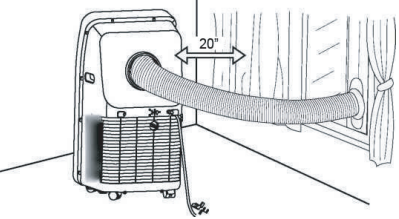
Keep the air conditioner upright to allow the refrigerant to stablize.
The space between the air conditioner and its surrounding objects should be about 20 inches.
Installation

SUGGESTED TOOLS FOR WINDOW KIT INSTALLATION
- Screwdrivers
- Tape measure or ruler
- Knife or scissors
- Saw (In the event that the window kit needs to be cutdown in size because the window is too narrow for direct installation)
Step 1:
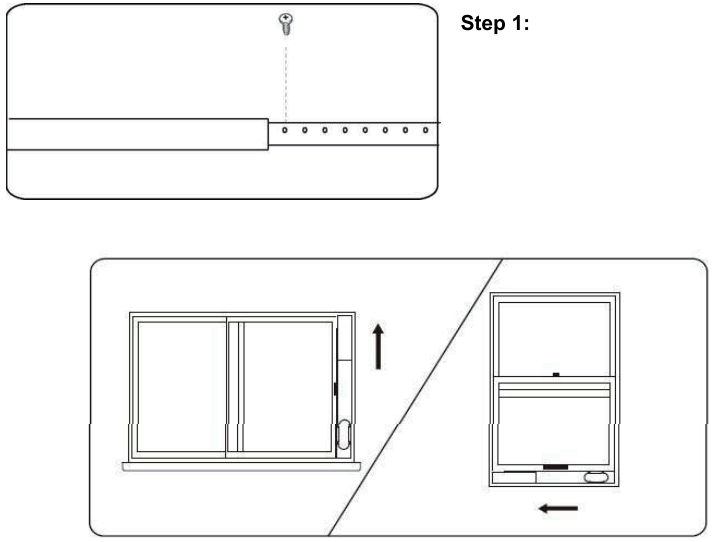
- Measure window size
- Adjust the length of the window sealingplate to fit the width or height of your window
- After the length is determined, insert screw to fix at your desired position
Step 2: EXHAUST HOSE INSTALLATION
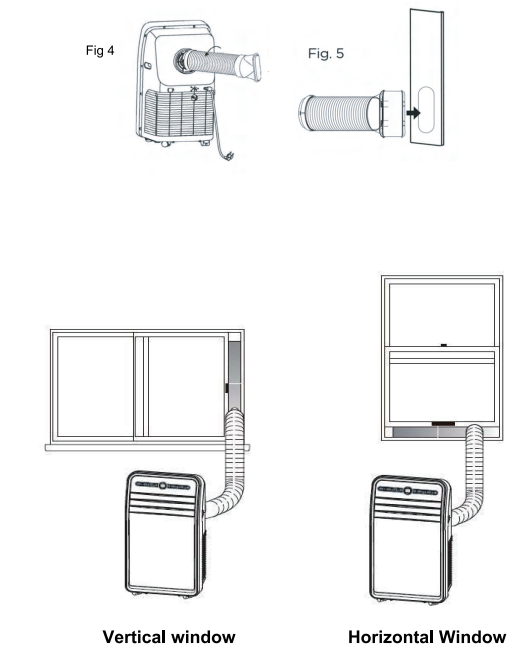
- Connect hose inlet to one end of air exhaust hose. Push hose inlet over the end of the hose, push in slightly and then start threading it on in a counter clockwise direction. (see Fig.1)
- Connect hose outlet to other end of air exhaust hose. Push hose outlet over the end of the hose, push in slightly and then start threading it on in a counter clockwise direction. (see Fig.2)
Align window brackeUair intake hose connector with hose outlet and push in until it locks into place. You will hear a clicking sound when it does. (see Fig.3)

- Place the hose inlet against the air outlet opening hook on the back of the portable air conditioner and firmly push and rotate counter clockwise to lock it into place. (see Fig.4)
After connecting the hose inlet to the unit, insert the window brackeUair intake hose connector into the opening of the window bracket. Align connector with the opening on the inside (side with the channels) of the window bracket and push in until it locks into place. You will hear a clicking sound when it does. (see Fig.5)
Incorrect installation
Do not bend the exhaust hose (shown here).
A bent hose will block exhaust air and cause the unit to malfunction or shut-off.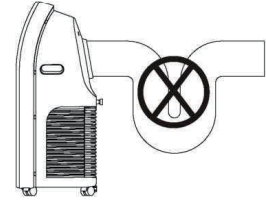
Warning: The length of the exhaust hose is specifically designed for this model. Do not replace or lengthen it as it could cause the unit to malfunction.
Note: The maximum length of the exhause hose is approximately 5-ft. Shorten its length as much as possible in use.
Remote Control
Before using the remote control, please install batteries correctly.
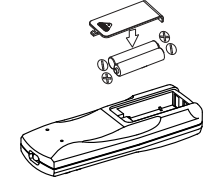
CAUTION:
- Use only AAA batteries.
- Remove the batteries if the remote control will not be used for one month or longer.
- Do not attempt to recharge batteries not designed to be recharged.
- All batteries should be replaced at the same time.
- Do not mix old and new batteries.
- Do not dispose of batteries in a fire as they may explode.
Remote Controller
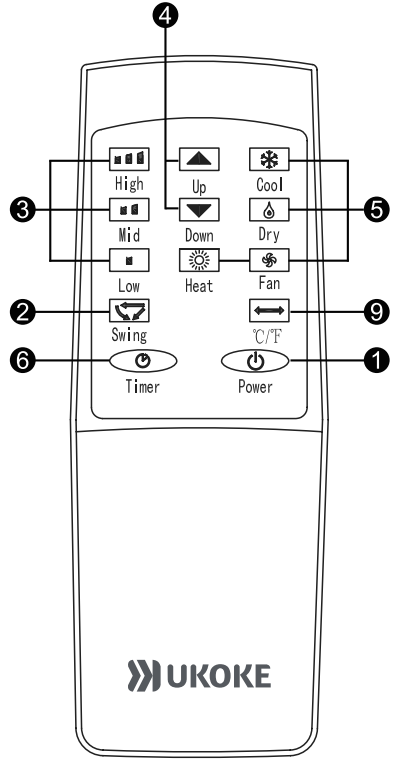
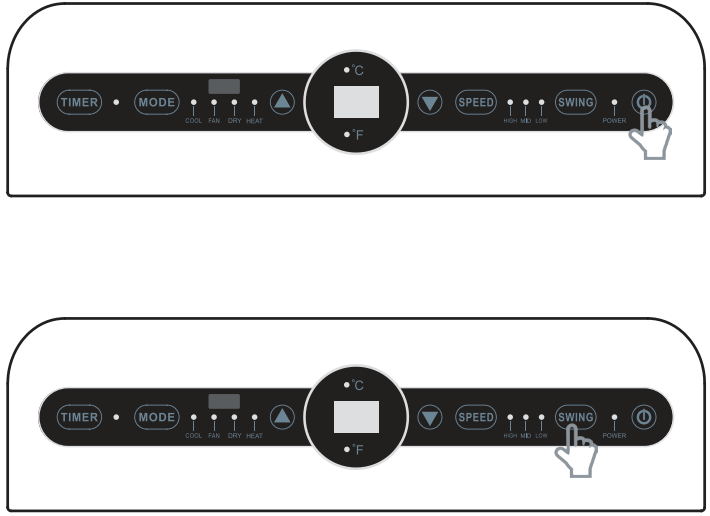
Control Panel

The display shows the temperature and time.
- Press
 on remote control to turn On/Off the device
 Press
 on remote control for rotation settings
- Press
 on remote control for 3-speed adjustment (High, Mid, Low)
 Press down
 Down on remote control to lower temperature
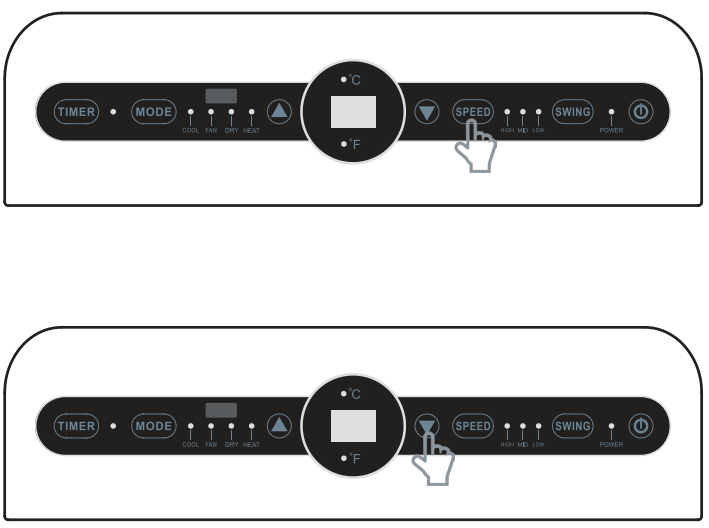
- Press up
 Up on remote control to increase temperature
 Press
 on remote control to change functions (Fan / Cooling / Heating / Dry)
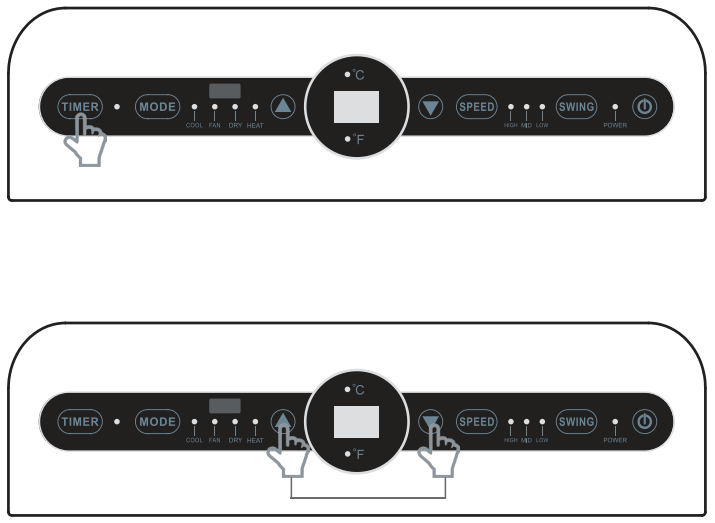
- Press
 on remote control for ON/OFF timer settings
(Then press Up/Down button to adjust and apply your settings) Press temperature
 (Up and Down buttons at the same time) 9 on remote control to change "F->C" or "C->F"
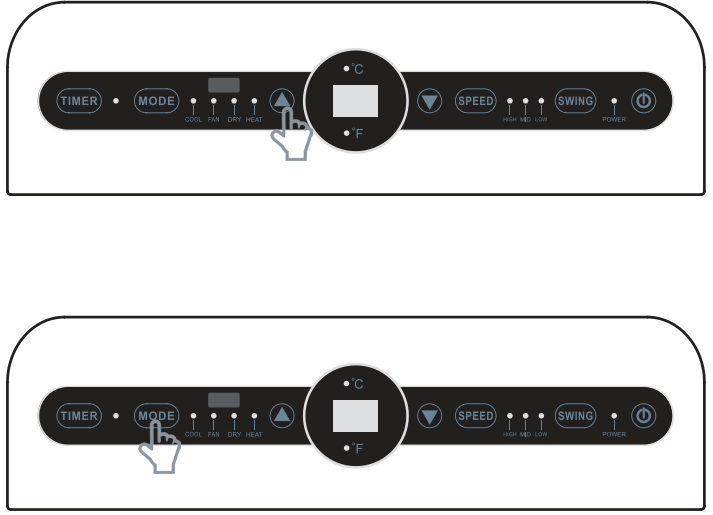
Operating the Control Panel
Use the Power button to turn the portable air conditioner on and off.
- Power: Auto-Restart: If power to the unit is interrupted, the air conditioner will restart itself in its last used mode/settings once power is restored. The compressor will restart after 3 minutes.
- Cooling mode: Cools and dehumidifies the air. If the ambient temperature drops below the temperature you selected, the compressor turns off and the unit functions with the fan only. When the temperature rises above the temperature you selected, the compressor turns on again. Whether your desired temperature can actually be reached depends on the ambient conditions. The room temperature remaining above the set temperature is normal.
To operate the unit in cooling mode:- 1) Press the Mode button until the Cool indicator lights up.
- 4) Select the fan speed by using the Fan button.
- 5) Set the thermostat by using the Up and Down buttons. The thermostat is adjustable between 62° F - 86° F in two degree increments.
- Heating mode: If the ambient temperature goes above the temperature you selected, the compressor turns off and the unit functions with the fan only. When the temperature drops below the temperature you selected, the compressor turns on again. Whether your desired temperature can actually be reached depends on the ambient conditions. The room temperature remaining above the set temperature is normal.
To operate the unit in heating mode:- 1) Press the Mode button until the Heat indicator light up.
- 4) Select the fan speed by using the Fan button.
- 5) Set the thermostat by using the Up and Down buttons. The thermostat is adjustable between 62° F - 86° F in two degree increments.
- Dry/ Dehumidifying mode: During the Dry mode, the unit will condense water out of the air and accumulate the water in the reservoir. In this mode, you will not be able to select a different fan speed or adjust the temperature. The fan motor operates at Low speed.
To operate the unit in Dry mode:- Remove the exhaust hose from the back of the unit. Otherwise, the dehumidification feature will be ineffective or FL (water full) error may occur.
- Press the Mode button until the Dry indicator light up.
Note: While in Dry mode, the ambient temperature in the room will probably rise by a few degrees.
You will not be able to change the thermostat temperature while in Dry Mode. Keep windows and doors closed for the best dehumidification performance.
- Fan Mode: Fan Mode is used to circulate the air in your room. No temperature setting is needed.
To operate the unit in Fan Only mode:- Press the Mode button until the Fan indicator light up.
- Press the Fan button to select the fan speed. You can choose between High, Medium and Low. The speed indicator light will up.
Note:- Fan mode requires that the exhaust hose be removed.
- The Fan feature is used to change the fan speed between High, Medium, and Low while in Cooling, heating and Fan modes only.
Timer Setting: The timer can be used to either turn the unit on or off after a number of elapsed hours. The timer is adjustable between 1-24 hours in one hour increments.
How to set the unit to automatically turn on:- Press the Timer button while the unit is powered off. The Timer indicator light will up.
- Use the Up and Down buttons to set the time (displayed in hours). The unit will count down the time remaining. After the selected time passes, the unit will automatically turn on.
How to set the unit to automatically turn off:
- Press the Timer button while the unit is powered on. Timer indicator light will up.
- Use the Up and Down buttons to set the time (displayed in hours). The unit will automatically count down and turn off after the selected time elapses.
Note: To cancel the timer, press the Power/ Timer button
- Swing mode: The Swing Button is used to adjust the louver swing to the desired angle.
Setup Guide
To set up the Air-Conditioner,
- Start by unpacking the unit and placing it on a flat, level surface. Connect the exhaust hose to the back of the air conditioner and ensure it is securely attached to the window kit provided.
- Install the window kit according to the instructions, making sure it fits snugly into your window frame.
- Plug in the power cord and turn on the unit using the control panel or remote control.
- Select your desired mode (cooling, dehumidifying, or fan) and adjust the temperature and fan speed as needed. The unit will begin to cool your space efficiently and quietly.
Cleaning and Maintenance Drainage Method
The product comes with an automatic water evaporation system, which improves the cooling efficiency while saving energy. If the machine's water container is full, the display screen will show "FL" accompanied by an audible alarm, and the compressor will stop working automatically. At this point, water needs to be discharged.
Discharging steps are as follows:
- Unplug the power cord and remove the exhaust hose assembly
- Disconnect the plug in the drainage cap to drain the water inside the machine (Fig 6)
Connect a drain hose to the drain port (You may need to purchase a drain hose separately) The portable air conditioner will now drain through the drain hose. Please note that this unit has nod rain pump; all water will drain with gravity only (Fig 7)
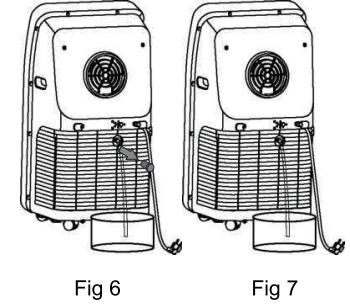
- Re-plug the drainage cap well
Maintenance
Note: To avoid electrical shock, turn off the conditioner and pull the plug out before conducting maintenance and repair.
Frame Cleaning
- Pull the plug before cleaning
- Wipe with a soft cloth. Do not use chemicals, such as benzene, alcohol, gasoline, etc. to avoid damaging the machine's surface
- Do not let water splash onto the machine
Cool effect reduces if there is dust build-up It is recommended to clean the filter screen once every two weeks.Cleaning frequency depends on your indoor air quality.Specific cleaning steps are as follows:
Remove the back grill and then filter screen in the direction shown in the picture below (Fig 8,9, 10)
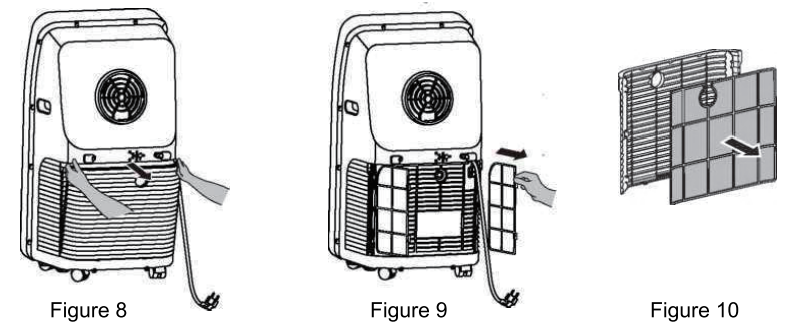
Clean the filter screen with a vacuum or in warm water
If the filter screen is not very dirty, use a vacuum cleaner to remove the dust Figure 11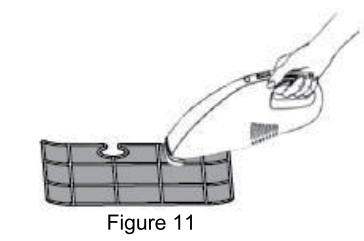
If the filter is very dirty, clean it with water or warm water Figure 12
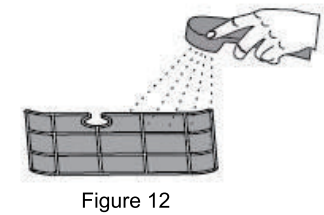
- Reinstall the clean filter screen
- Restart the machine
Note:
- Use warm water to clean the filter screen. Do not use harsh detergents (such as alcohol, petrol, benzene, etc).
- In order to avoid damaging the filter screen, keep it away from heat and put it in a dry place.
Seasonal Maintenance
If the machine will not be in use for up to 3 months, follow these guidelines to maintain your AC unit:
- Pull out the drainage cap to drain out the water(Fig.6)
- Keep the machine working for 2 hours in the air distribution mode until the inside becomes dry
- Turn off AC and disconnect the power
- Clean up the filter screen (please read the Fig. 8-12)
- Remove the window seal panel from the window and disconnect the exhaust hose from the seal panel, and storage all accessories
- Remove the batteries from the remote control
- Coating a plastic bag to keep the AC unit dry
- Avoid direct sunlight
To reinstate the idle machine, take note the following:
- Confirm whether the drainage cap and filter screen are correctly installed
- Check whether the power cord is intact. Do not use the machine if there is any breakage.
- Add batteries to the remote control.
- Follow installation instructions to reinstall other parts.
Mobile App Control
Using the mobile App remote the Portable Air Conditioner
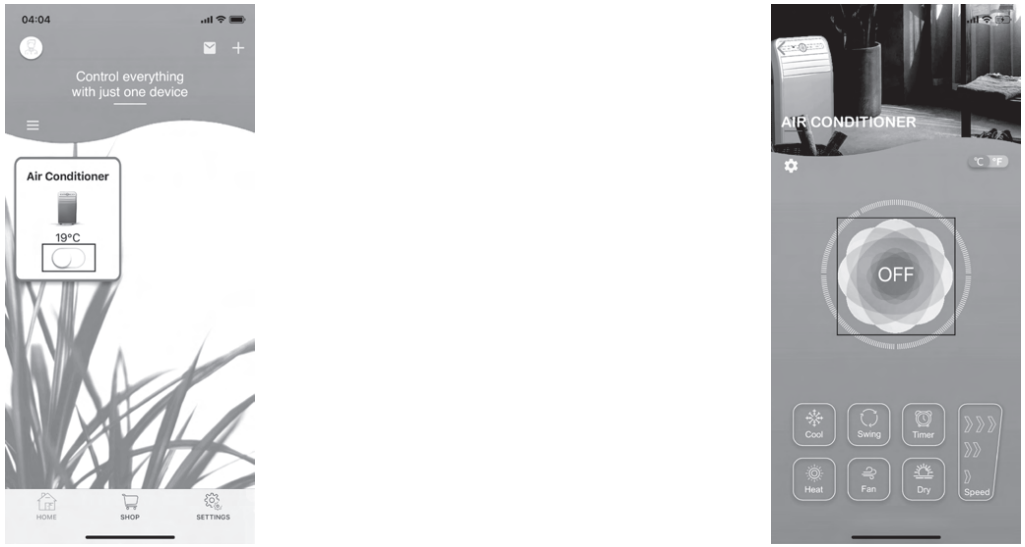
Power Button
Turning the Portable AC ON/OFF by clicking the switch button in the frame on the home page
Click the icon on the center of the page to toggle ON/OFF
Control Button
Click on the Air Conditioner icon to enter the control page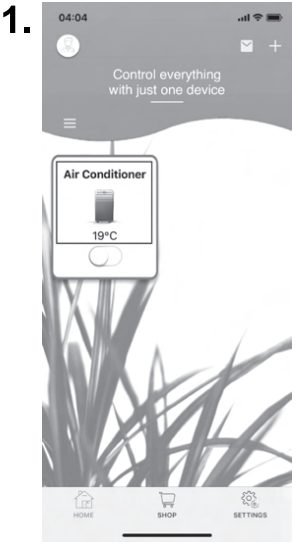
Mode switching
Heat Function
Press the Heat icon on the control panel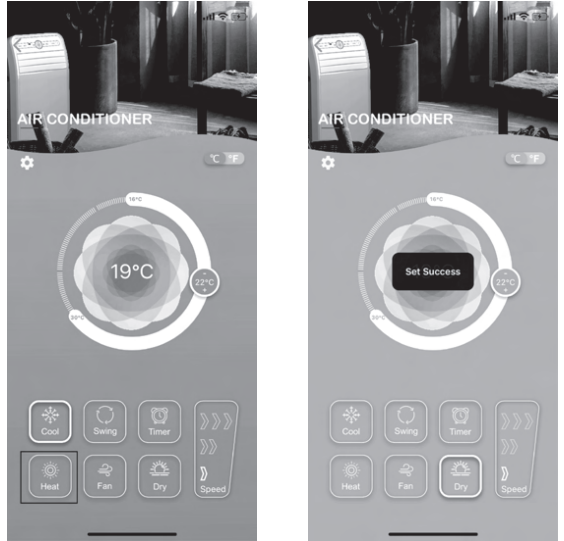
Fan Function
Select the Fan icon on the control panel (Temperature Setting will Disable)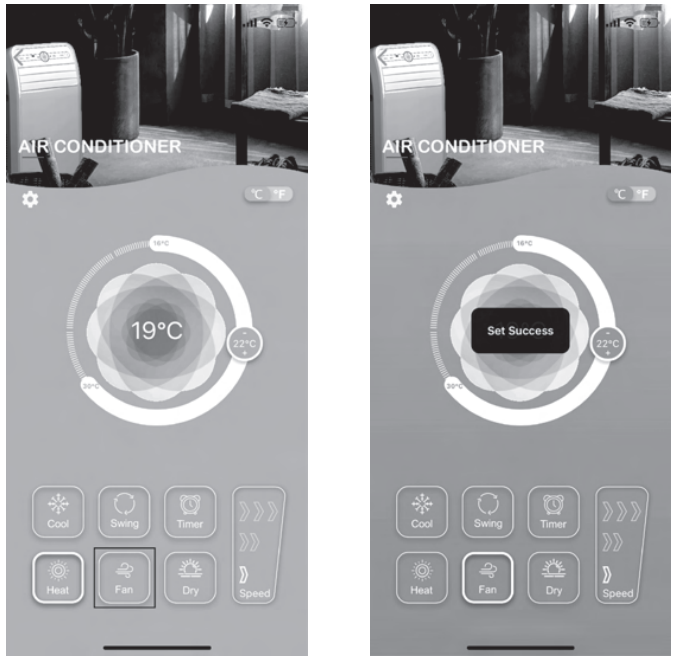
Cooler Function
Press the Cool icon on the control panel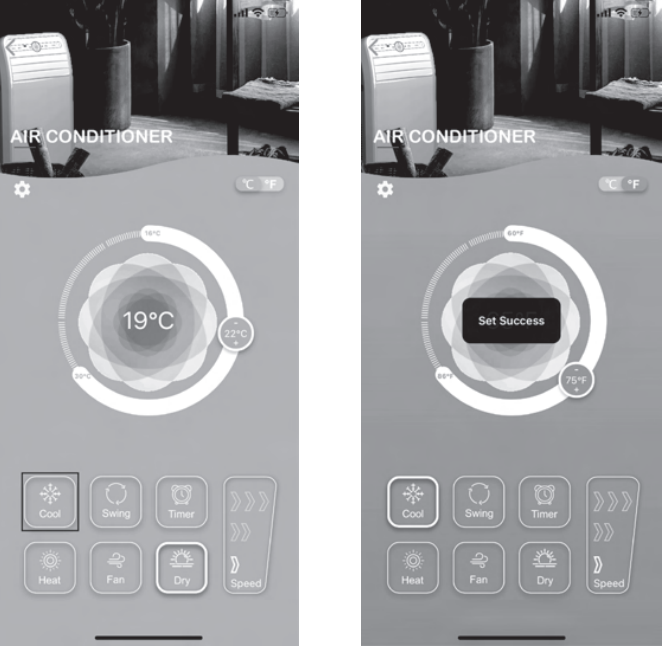
Dehumidify Function
Press the Dry icon on the control panel (Temperature Setting will disabled)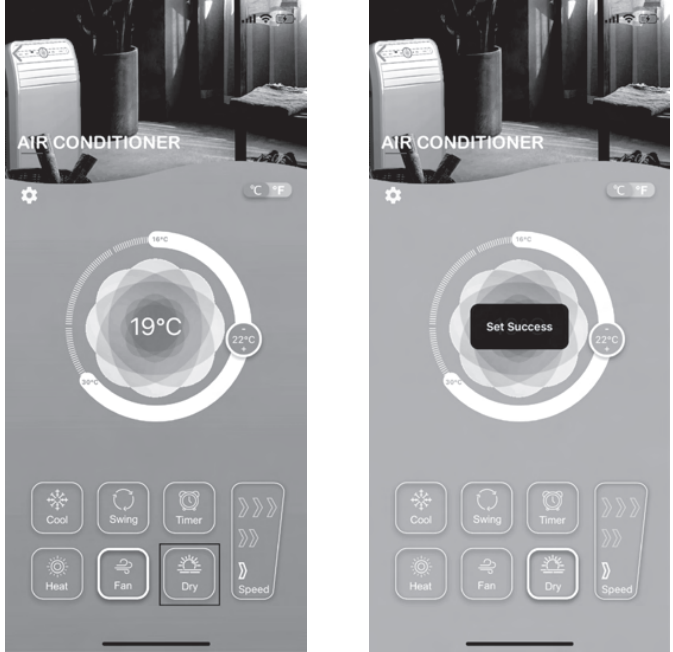
Temperature Settings
When the Air Conditioner is "ON" in cooler or heater mode, slide the temperature icon (on the left side of your screen) up and down to control the temperature.
(Note: Temperature control can only be used in Cooler or Heater mode)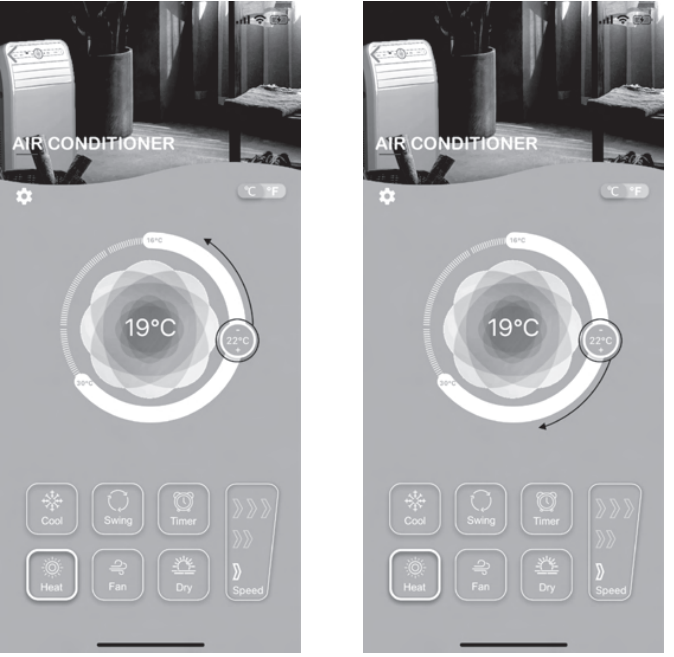
Rotation Settings
Once the portable AC is "ON", select the Swing icon in any mode to toggle device rotation
Put your ON and OFF times to set the Air Conditioning Device to turn On/Off in the specified times. (Select the Repeat toggle to maintain the timer schedule.)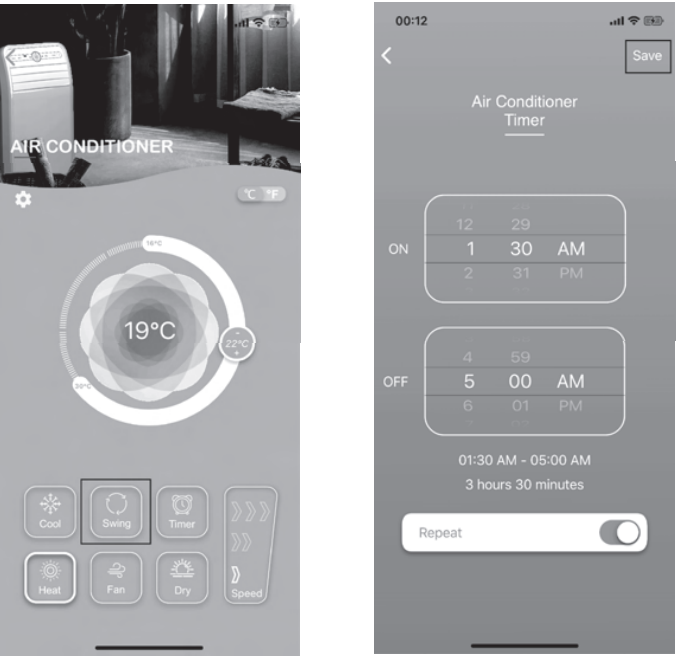
Air Conditioner Timer Setting
Press Timer on the control panel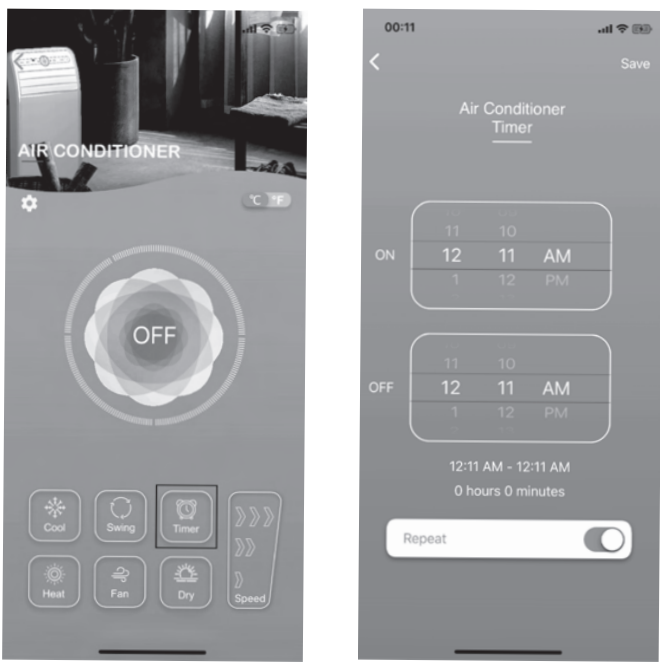
Speed Settings
Use to change the 3-Speed settings under mode of Cool/HeaUSwing.
(Note: Fan speed will be at minimum and unadjustable under Dehumidifier mode.)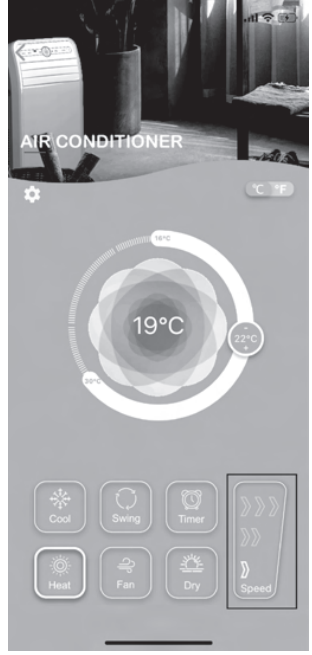
Temperature Display
Air Conditioner Mobile App can apply temperature display from C (Celsius) to F (Fahrenheit) by selecting the temperature icon on the upper middle right portion of the screen
Enter your phone number or email address registered with UKOKE, then press send to receive verification code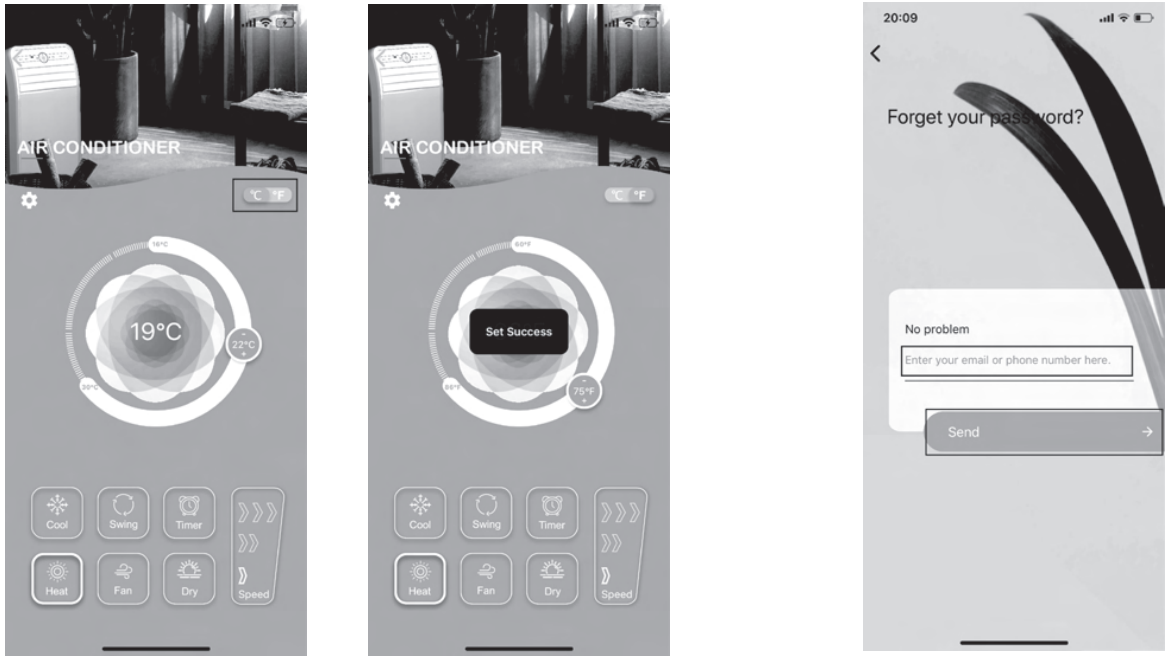
Device Settings
Forgot Password
Press Forgot Password
Enter the verification code, New Password, and Confirm Password before you save it. The code will reset in 59 seconds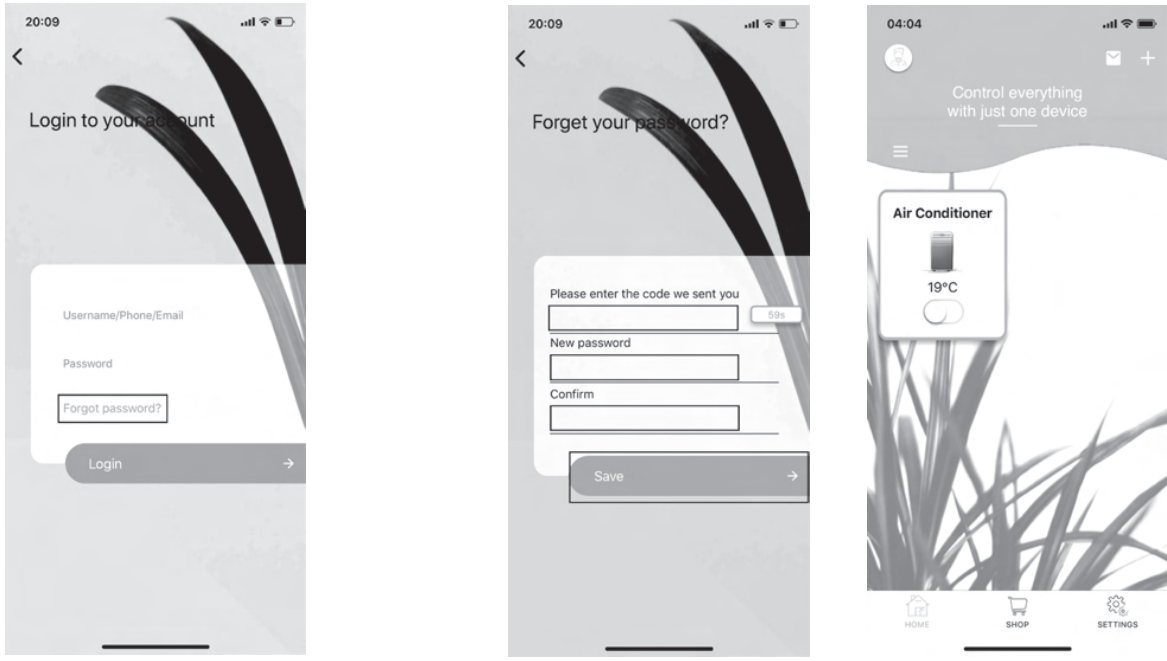
Rename UKOKE AC on a mobile device
Click Air Conditioner icon on the home page into the control panel
Press the name bar (default as Air Conditioner ) to rewrite to your own device name, ex. "AC" , and click Save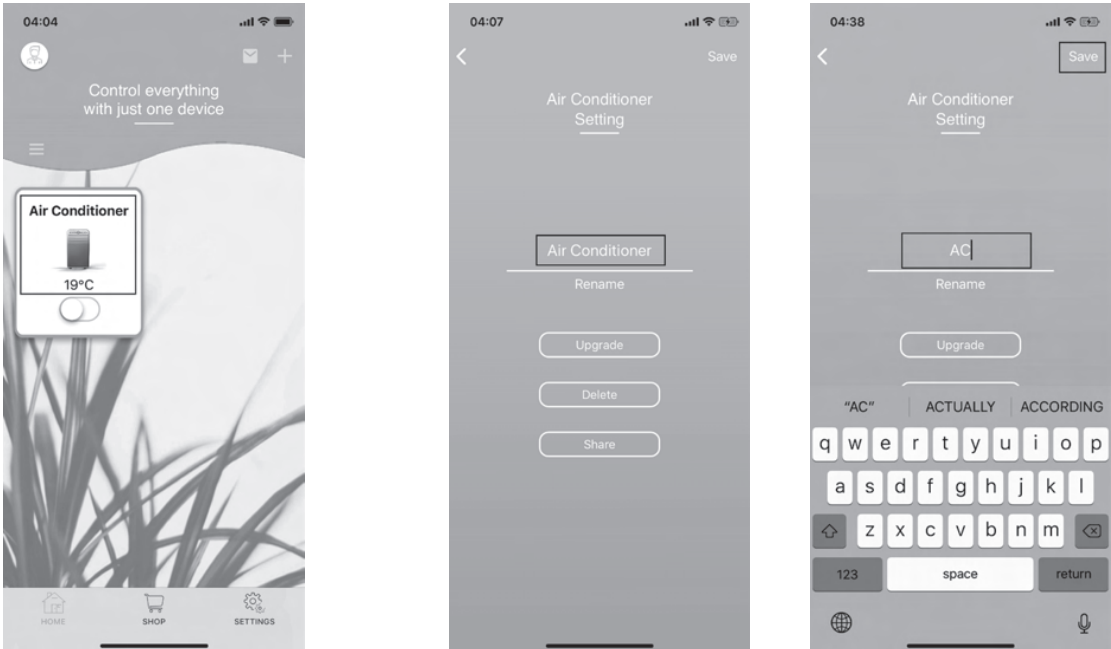
Select "Settings" Icon on upper middle left
The device name will show on your Home Page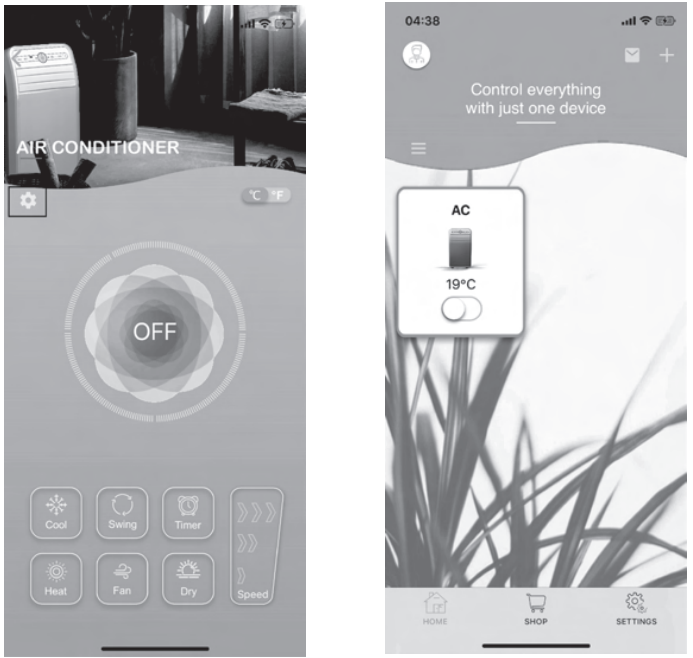
Software Update to latest version
Click Air Conditioner icon on home page into control panel
Keep AC unit plugged in; Press Upgrade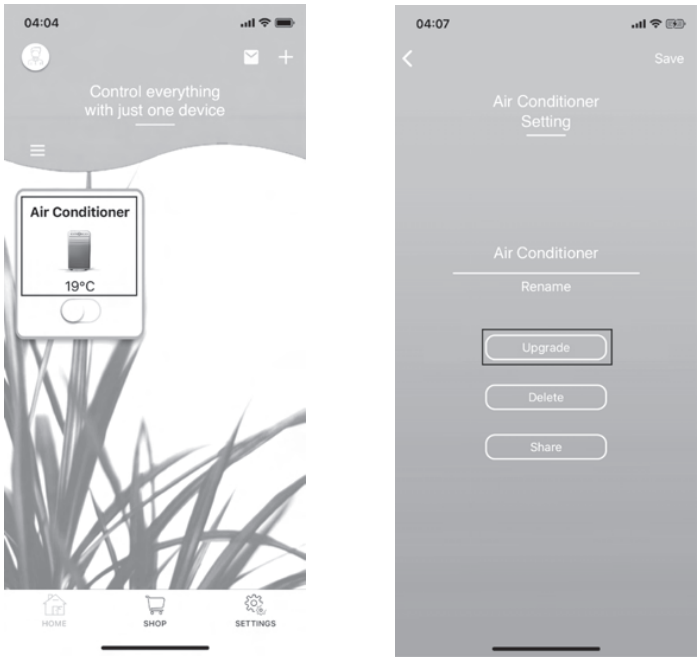
Click "Settings" Icon on upper middle left
In the update page, press Upgrade again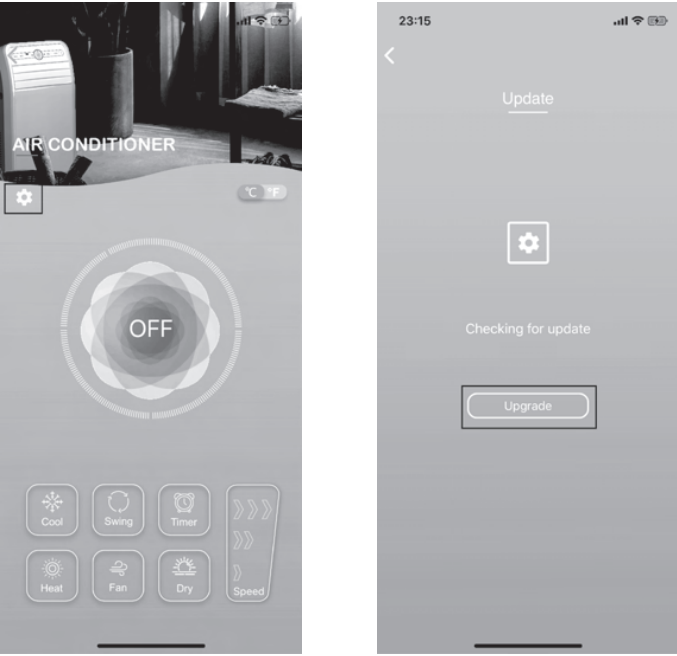
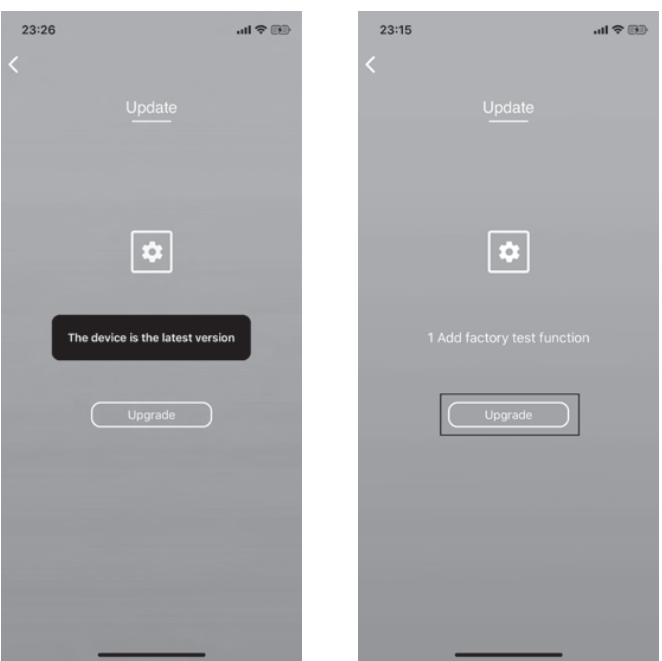
If the software is updated to the latest version, the mobile screen will pop-up "This device is the latest version"
To Delete Device from the App
Click Air Conditioner icon on home page into control panel
Be sure the mobile device upgrade is completed properly.
DO NOT access any other app when installing.
Press "Settings" Icon, into settings page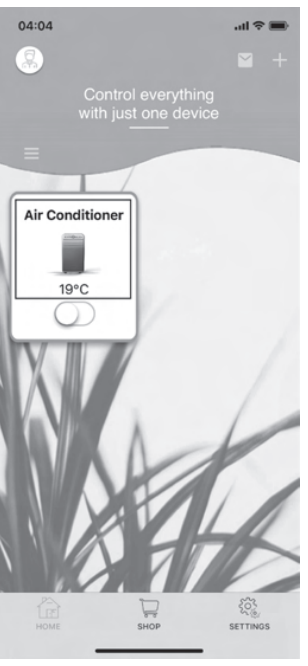
Press Delete to delete the connected device
Click "Settings" Icon Select Share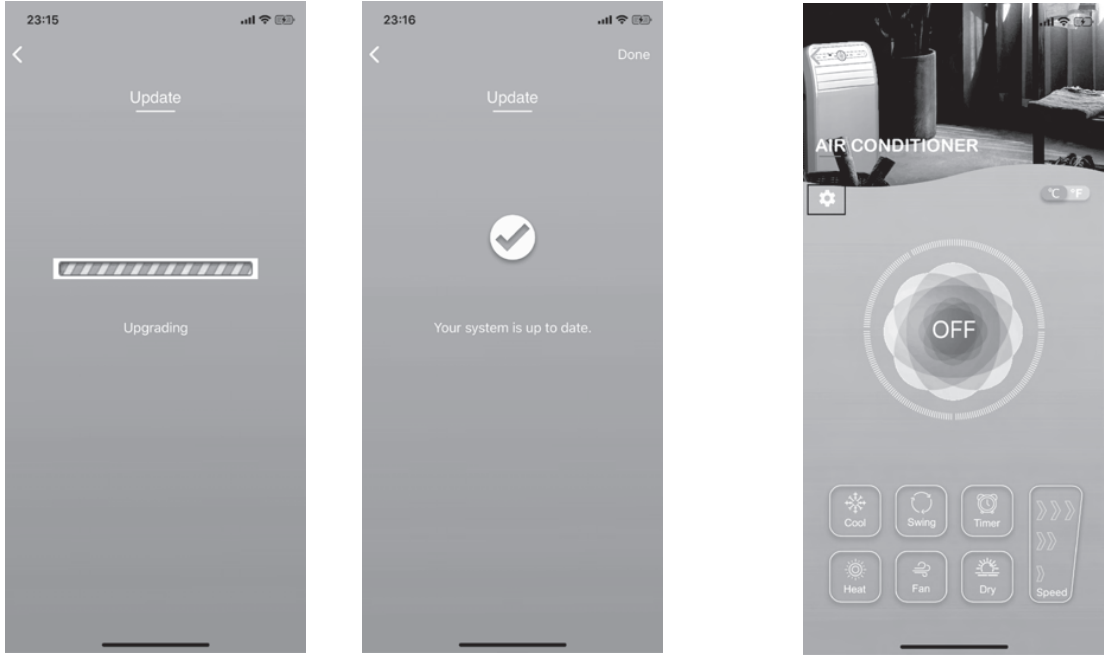
Share the Device
(Your family members can control the devices after shared)
Click Air Conditioner icon on home page into control panel
Type in a phone number or email address that you would like to share device to and click Send link to complete share.
TROUBLESHOOTING
BEFORE YOU CALL FOR SERVICE
IF THE AIR CONDITIONER FAILS TO OPERATE:
- Check to make sure that the air conditioner is plugged in securely. If it is not, remove the plug from the outlet, wait 10 seconds and plug it in again securely.
- Check for a blown circuit fuse or a tripped main circuit breaker. If these seem to be operating properly, test the outlet with another appliance.
IF NONE OF THE ABOVE SOLVES THE PROBLEM, CONTACT A QUALIFIED TECHNICIAN. DO NOT TRY TO ADJUST OR REPAIR THE AIR CONDITIONER YOURSELF.
Troubleshoot your problem by using the chart below. If the air conditioner still does not work properly, contact Ukoke Tech. customer service center or the nearest authorized service center. Customers must never troubleshoot internal components
Error Code | Self-Diagnosis |
 |
CoilTemperature sensor failure (Contact the customer service) |
 |
Indoor temperature sensor failure (Contact the customer service) |
 |
AC unit water tank full - Empty the internal water tank, following the instruction in the Cleaning and Maintenance section |
 |
Anti-freeze protection - When the coil temperature is below 32°F, the whole unit will stop. When the coil temperature rises to 46°F or more, the machine will restore to its original work state. |
ISSUE | POSSIBLE CAUSE | SOLUTION |
A. FT appears in the display window | A. Drain the water in the | |
Unit does not start when pressing ON/OFF button |
| bottom tray
|
Not cool enough |
|
|
Notwarm enough |
|
|
Noisy or vibration |
A. The surface is not level or not flat enough | A.Place the uniton a flat, level surface if possible |
Gurgling sound |
A. The sound comes from the flowing of the refrigerant inside the air-conditioner | A. It's normal |
Unit stops operating |
|
|
UKOKE Portable Air-Conditioner USPC01W Pros & Cons
Pros
- Compact Design: Easy to move and place in any room.
- Multi-Functional: Includes cooling, dehumidifying, and air purification modes.
- Energy-Efficient: Designed to save energy while providing effective cooling.
- User-Friendly Interface: Simple to operate with an LCD display and remote control.
- Low Noise Level: Operates at a quiet 45 dB, minimizing disturbance.
Cons
- Limited Coverage Area: Best suited for small to medium-sized rooms.
- Drainage Requirements: Needs regular emptying of the water tank when in dehumidifying mode.
- Window Kit Installation: Can be a bit tricky for some users to set up the window kit properly.
Customer Reviews
Customers have generally praised the Air-Conditioner USPC01W for its effective cooling performance and ease of use. Many reviewers appreciate its compact size and quiet operation, making it suitable for bedrooms and living rooms. However, some users have noted that the drainage system can be cumbersome and the window kit installation can be challenging.
Common complaints
Include the need for frequent emptying of the water tank when using the dehumidifier function and occasional issues with the exhaust hose fitting snugly into the window kit.
Warranty
Ukoke Tech. warrants to the original purchaser that the product will be free from defects in material, parts, and workmanship for the period designated for this product. The warranty commences the day the product is purchased and covers up to a period of
1 year (12 months) for labor/1 year (12 months) for parts (manufacturing defects only)/and a total of 5 years (60 months) for compressor parts only. Ukoke Tech. agrees that it will, at its option, replace the defective product with either a new or remanufactured unit equivalent to your original purchase during the warranty period.
Faqs
How do I install the window kit for the Air-Conditioner?
What is the coverage area of the UKOKE Portable Air-Conditioner USPC01W?
How often do I need to empty the water tank on the Air-Conditioner?
Is the UKOKE energy-efficient?
Can I use the Air-Conditioner in very hot climates?
How do I clean the filter on the UKOKE Portable Air-Conditioner USPC01W?
What safety features does the UKOKE have?
How loud is the UKOKE Air-Conditioner during operation?
What is included in the packaging of the Portable Air-Conditioner?
Leave a Comment
