Uppababy Mesa Infant Car Seat 1017-MSA-US User Manual
Content
Introduction
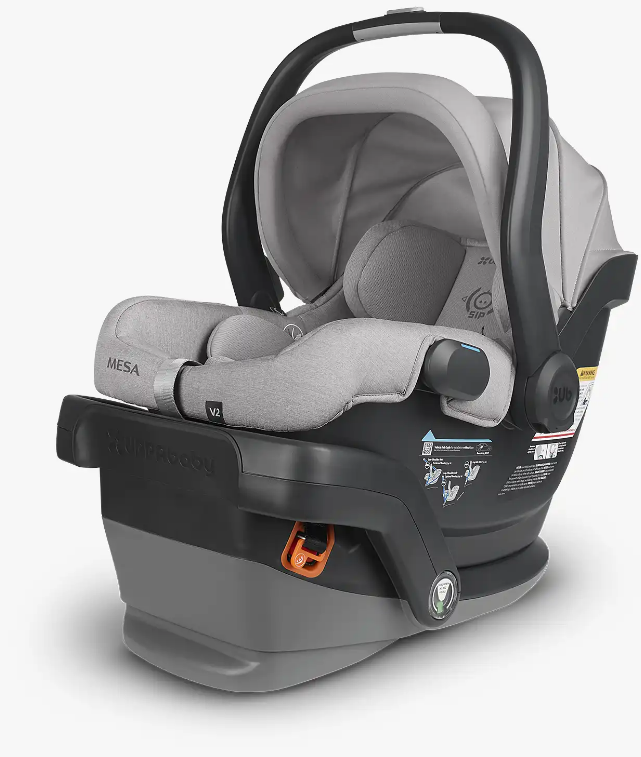
The UPPAbaby Mesa Infant Car Seat 1017-MSA-US is designed to provide safety and convenience for parents and their newborns. Featuring a unique SMARTSecure system, the car seat installs easily and provides visual indicators to ensure a secure fit. The adjustable headrest offers additional side impact protection, while the no-rethread harness allows for quick adjustments as your baby grows. The UPPAbaby Mesa is priced at approximately $329.99. Compatible with UPPAbaby strollers, the Mesa is a versatile choice for modern families.
Specifications
- Weight Range: 4-35 pounds
- Height Range: Up to 32 inches
- SmartSecure System: For easy and secure installation
- No-Rethread Harness: Allows for easy adjustments without rethreading the harness
- Self-Retracting LATCH Connectors: Simplify the installation process
- Side Impact Protection: Enhanced protection with EPP foam
- Machine Washable Fabric: Easy to clean and maintain
- UPF 50+ Canopy: Provides sun protection for your baby
USE RECOMMENDATIONS
Children should remain rear-facing for as long as possible.
UPPAbaby and the American Academy of Pediatrics advise parents to keep their toddlers in rear-facing car seats until age 2, or until they reach maximum height and weight for their seat. Do not use this child restraint beyond the expiration date or if the child outgrows either the weight or height requirements.
This child restraint is for use by children who meet BOTH requirements below:
- WEIGHT REQUIREMENTS: 4-35 lbs (1.8-15.9 kg)
Includes Infant Insert recommended for use with infants weighing 4-8 lbs (1.8-3.6 kg) HEIGHT REQUIREMENTS: 32 in (81.3 cm) or less
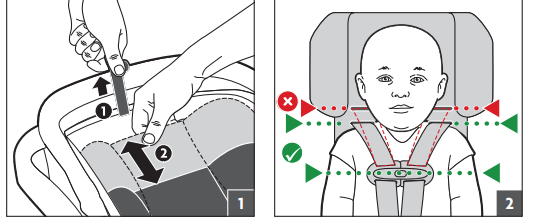
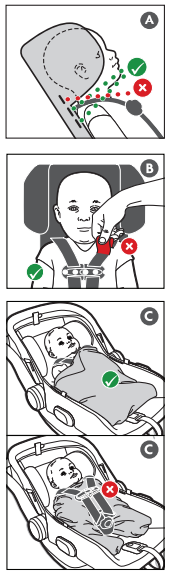
The top of the child’s head should not be less than 1 in from the top of the headrest when in its highest position.
Harness should be at the shoulders or slightly below.
Retainer clip must be at armpit level and harness straps should be snug .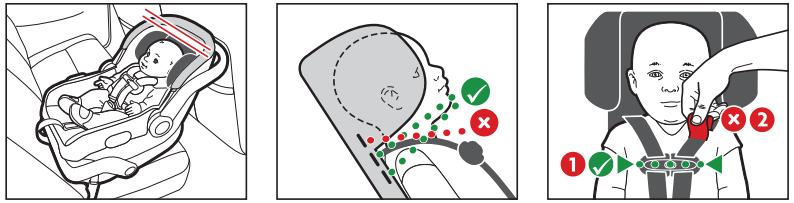
REAR-FACING SEAT FEATURES
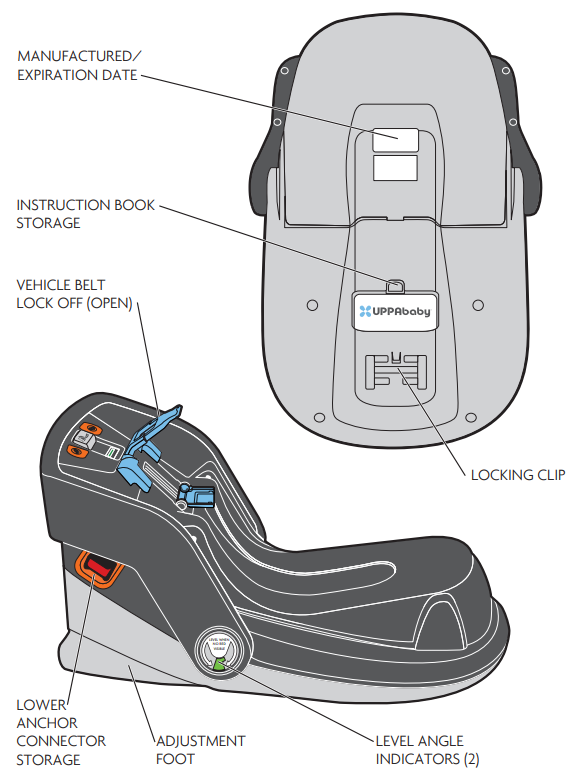
OVERVIEW OF BASE
Back View

Side View
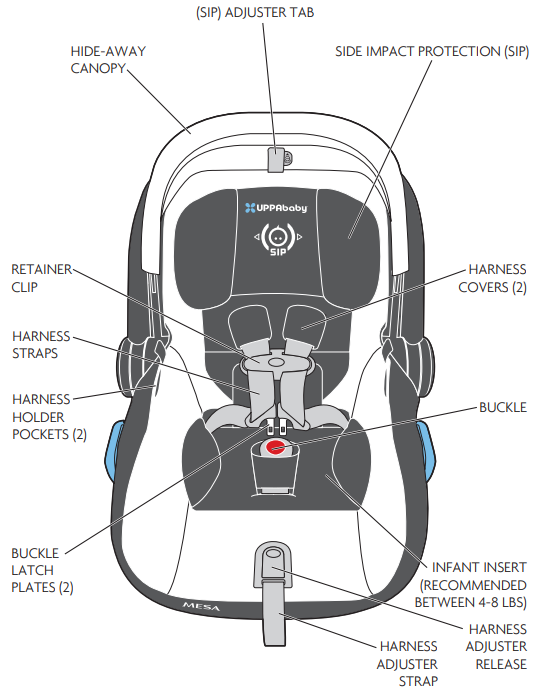
OVERVIEW OF CARRIER
Front View
Bottom View
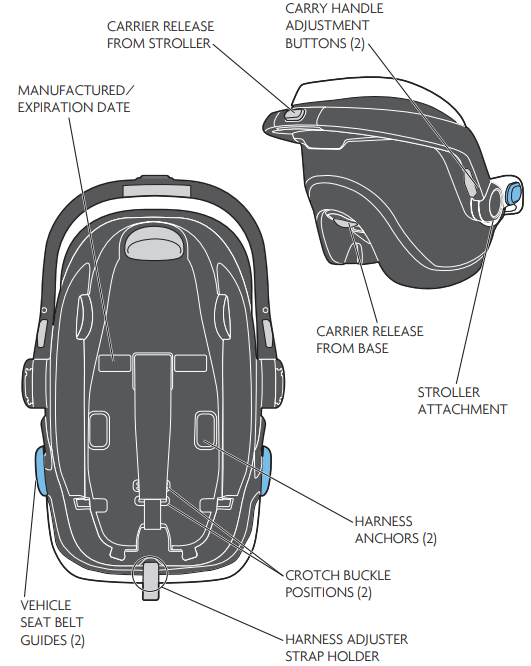
Description
The UPPAbaby is crafted with safety and convenience in mind. The SmartSecure system ensures that the car seat is installed correctly every time, eliminating the guesswork often associated with car seat installation. The no-rethread harness allows parents to adjust the height of the harness without having to rethread it, making it easier to accommodate your growing baby.
The car seat features enhanced side impact protection with EPP foam, providing additional safety in the event of a collision. The machine-washable fabric makes maintenance a breeze, and the UPF 50+ canopy offers protection from the sun. The Mesa Infant Car Seat is also designed to be compatible with UPPAbaby strollers, making it a versatile addition to your baby gear.
VEHICLE COMPATIBILITY
CHOOSING A VEHICLE SEATING LOCATION
PLEASE READ THE FOLLOWING INFORMATION BEFORE INSTALLING THIS CHILD RESTRAINT!
Always park on a level surface when installing a child restraint.
- The safest seating position is one that works best for your specific car seat, family and vehicle. When determining whether the MESA Rear-Facing Car Seat can be used with lower anchors in the rear center seating position, it is critical that you refer to your vehicle owner's instruction book. If the MESA does not install best in the rear center seating location, it is recommended to move to one of the outboard seating positions.
Before installing this child restraint you must determine the method of installation and the best vehicle seating position for that method. This child restraint can be installed either using LATCH or the Vehicle Seat Belt.
DETERMINING BEST INSTALLATION METHOD
At this point take out your VEHICLE OWNER'S INSTRUCTION BOOK. You will need this to look up different features in your vehicle that might affect the installation.
WARNING! NEVER place a rear-facing only child restraint in front of an active airbag.
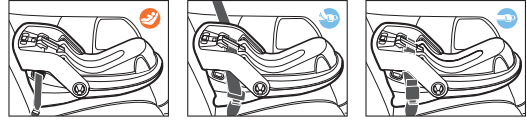
BASE INSTALLATION
- Lower Anchor Installation
- Lap/Shoulder Belt Installation
Lap Belt Only Installation
CARRIER INSTALLATION WITHOUT BASE
- Lap/Shoulder Belt Standard Routing Method
Lap Belt Only Routing Method
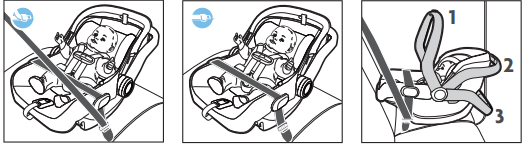
NOTE: The carry handle must be locked in any (3) positions when in use
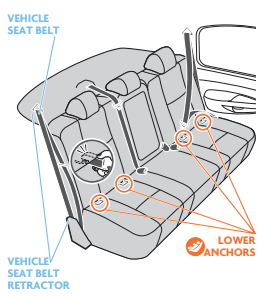
OVERVIEW OF LATCH
Most vehicles manufactured after September 1, 2002 are equipped with LATCH (Lower Anchors and Tethers for CHildren). Check your vehicle owner’s instruction book to determine lower anchor compatible seating positions.
NOTE: No tether is required with this rear-facing carrier. Only lower anchors are used.
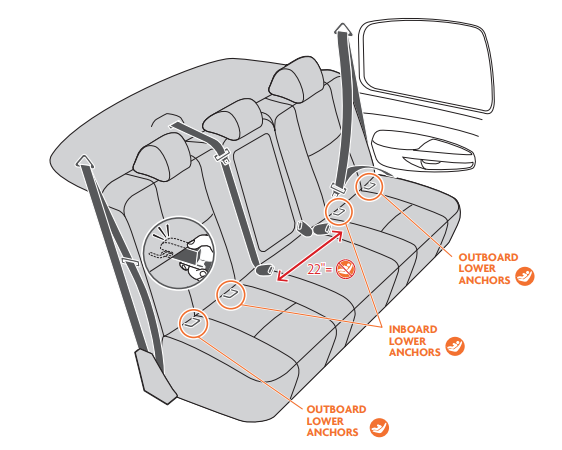
NOTE: In order to use the rear center seating position with lower anchor, the distance between the lower anchors may be up to 22 in and the seating position must be approved by the vehicle manufacturer. If spacing between the lower anchors is greater than 22 in or if the seating position is not approved by the vehicle manufacturer then use the vehicle seat belt for installation.
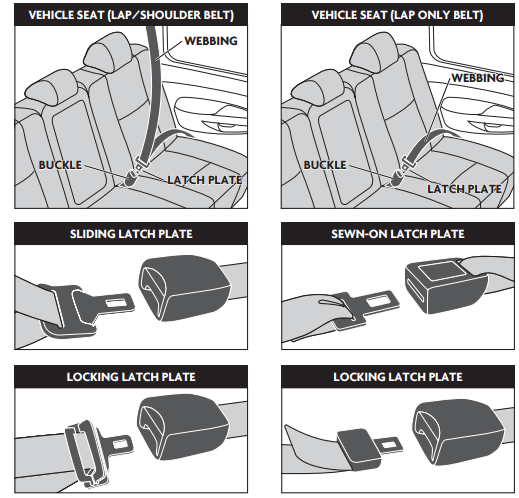
OVERVIEW OF VEHICLE SEAT BELT SYSTEMS
If you do not use lower anchor to properly secure the child restraint you must use the Vehicle Seat Belt System. Seat belt systems vary by make, model, and year of your vehicle. There are some vehicle belts that will NOT work with this child restraint or that require additional steps.
CHECK YOUR VEHICLE OWNER’S INSTRUCTION BOOK for information regarding your vehicle seat belt system(s). This child restraint is compatible with most vehicle seat belt systems.
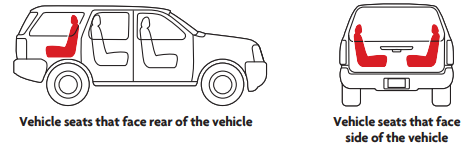
UNSAFE VEHICLE SEAT BELT SYSTEMS + SEATING
WARNING: DEATH OR SERIOUS INJURY CAN OCCUR
- CHECK YOUR VEHICLE INSTRUCTION BOOK for information regarding your vehicle seat belt system(s).
- Not all vehicle seat belts work with this child restraint.
DO NOT use this child restraint with the following seat belt systems:
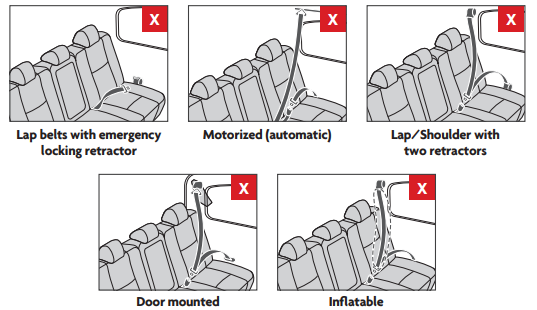
- DO NOT use this child restraint with the following vehicle seats:
GENERAL USE
HARNESS BUCKLE POSITIONING
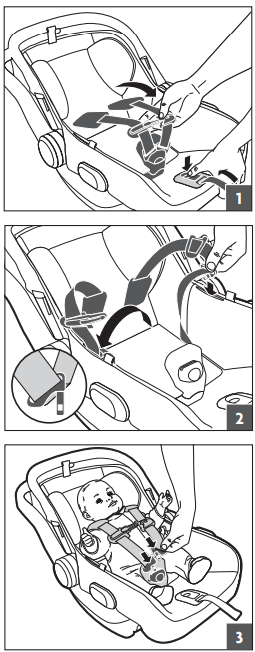
The crotch belt and buckle has two use positions. Always position the buckle and crotch strap in the slot closest to the child. If the child is on top of the buckle in the inner position, then adjust the buckle to the outer position.
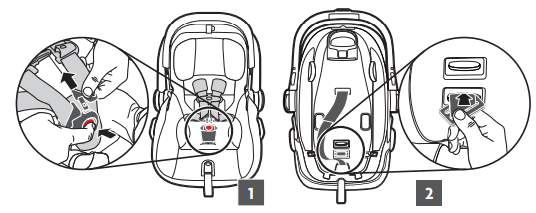
- STEP 1: Unbuckle the harness.
- STEP 2: Flip carrier over, insert the metal clip completely through the shell and seat pad.
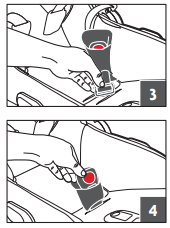
- STEP 3: Locate the appropriate buckle slot and insert from the top completely through the slot on the seat pad and shell.
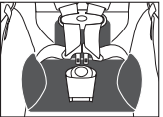
STEP 4: Check that buckle is securely attached by pulling up on buckle.
INFANT INSERT (4-8 LBS)
To ensure a better fit for smaller infants, we recommend using the infant insert (included) between 4 and 8 lbs. Remove infant insert when infant begins growing on top of the buckle making it difficult to buckle harness.
NOTE: Never use non-regulated products with this child restraint, unless approved by UPPAbaby.
SIP CARRIAGE + HARNESS POSITIONING
This child restraint has an adjustable head restraint and no-rethread harness system that is easy to adjust to properly secure the child.
- STEP 1: Adjust the head restraint by pulling on the adjuster tab1 sliding the head restraint up or down 2.
STEP 2: Position the head restraint so the harness rests at the child’s shoulders or slightly below.
SECURING YOUR CHILD
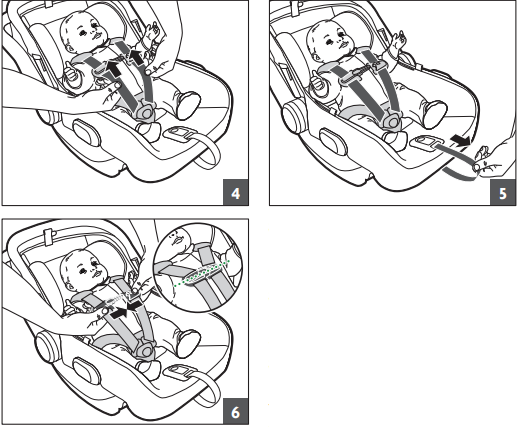
- STEP 1: Loosen the harness by pressing on the harness adjuster release button and pulling out the shoulder straps.
- STEP 2: Open the retainer clip, unbuckle the harness, and tuck the latch plates into the side pockets to hold harness open.
STEP 3: Place infant in child restraint making sure their body is making full contact with the seating surface. Place harness over child and insert buckle tongues into the buckle until a “click” is heard. Pull up on the buckle tongues to make sure they are locked.
WARNING!
- DO NOT place rolled towel or small blanket between crotch of infant and buckle or around head or SIP carriage.
- NEVER use non-regulated products with this child restraint, unless approved by UPPAbaby.
- STEP 4: Pull up on the harness to remove excess slack around the child’s legs.
- STEP 5: Pull the harness adjuster strap to snugly adjust the harness straps around your child.
STEP 6: Close retainer clip and position at armpit level. Make sure the shoulder pads don’t interfere with positioning the chest clip.
NOTE: For smaller babies, it is recommended to remove the harness pads for a more secure fit.
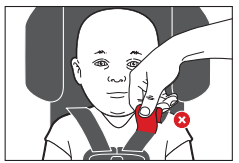
PINCH TEST
HARNESS SHOULD BE SNUG. Pinch harness webbing at child’s shoulders. If you can pinch web-bing, the harness is too loose and should be tightened.
ATTACHING CARRIER TO BASE
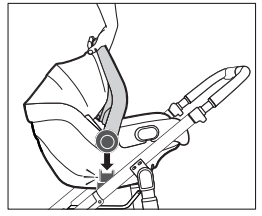
- STEP 1: Place carrier on base until a click is heard .
STEP 2: Check for a secure connection by pulling up on carry handle .
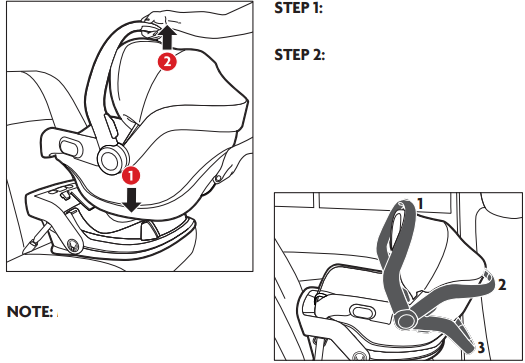
NOTE: Handle can be in any of the three (3) locked positions for use in the vehicle.
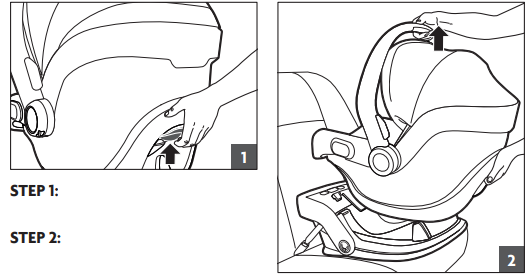
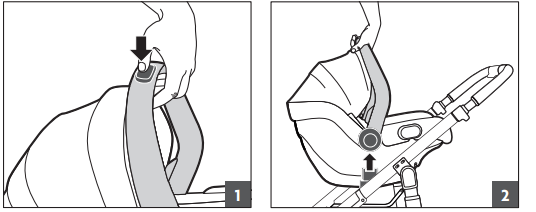
RELEASING CARRIER FROM BASE
- STEP 1: Pull and hold carrier release button on back of the carrier.
STEP 2: Lift carrier off base.
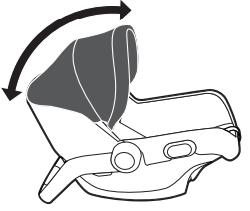
HIDE-AWAY CANOPY
Hide-away canopy easily adjusts to one of three (3) positions.
- TO EXTEND CANOPY: Slowly pull forward on main canopy frame until resting in desired position.
TO RETRACT/STOW CANOPY: Gently push downward on main canopy frame allowing the center support and canopy fabric to guide into the storage compartment in carrier.
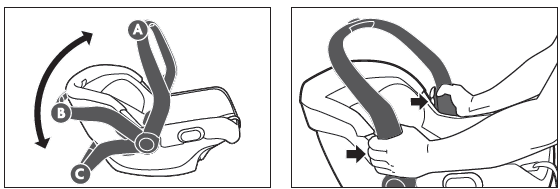
CARRY HANDLE
- The carry handle must be locked in any three (3) positions when in use: carry, store and stand.
To adjust the carry handle position, squeeze both handle adjustment buttons and rotate forward or backward.
WARNING!
NEVER hang toys and other objects from the carry handle when using in the vehicle. These products have not been tested by UPPAbaby and therefore are not approved for use with this child restraint.
IMPORTANT CHECKS
- This child restraint is for rear-facing use only.
- The seat must be tightly installed in a forward-facing vehicle seat.
- The harness should be at the shoulders or slightly below .
- Retainer clip must be at armpit level and harness straps should be snug .
- The top of child’s head should not be less than 1 in from the top of the headrest when in its highest position.
- The child must weigh between 4 and 35 pounds and be no taller than 32 in.
- The back seat is the safest place for children aged 12 and under.
- NEVER use non-regulated products with this child restraint, unless approved by UPPAbaby.
- NEVER place in front of an active airbag.
- Install using lower anchor or the vehicle seat belt, NOT BOTH.
- DO NOT secure an infant in the carrier with extra material, bulky clothing, or extra padding. Instead place a blanket over the harness after properly securing the child .
- Carry handle must be locked in any of the (3) handle positions.
- Adjust base to the appropriate angle by using the angle indicator on the sides of the base or the level to ground line on the carrier.
- Always check the tightness indicator is green after each use.
Always secure an unoccupied child restraint; in a crash an unsecured infant car seat may injure occupants in your vehicle.
Setup Guide
To set up the Infant Car Seat,
- Start by ensuring your vehicle has a compatible LATCH system or seatbelt. Use the self-retracting LATCH connectors to attach the car seat base to the vehicle's LATCH anchors.
- Tighten the connectors until they click into place. Alternatively, you can use the vehicle’s seatbelt to secure the car seat base.
- Place the infant car seat into the base, ensuring it clicks securely into position.
- Adjust the no-rethread harness to fit your baby comfortably, and make sure the chest clip is at armpit level.
- Finally, ensure that the car seat is installed at the correct angle using the built-in level indicator.
STROLLER COMPATIBILITY
FITTING CARRIER TO STROLLER FRAME
Prior to fitting MESA carrier to stroller frame, engage brake on stroller and remove toddler seat from frame.
- STEP 1: With carrier facing stroller handle, align carrier handle hubs with attachment posts on stroller.
- STEP 2: Let carrier slide onto attachment posts. An audible click indicates proper attachment.
STEP 3: Lift up on car seat handle to check attachment.
NOTE: Compatible with VISTA 2015+ and CRUZ strollers.
RELEASING CARRIER FROM STROLLER FRAME
- STEP 1: Engage and hold the stroller release button on the top of the carry handle.
STEP 2: Lift the carrier off stroller frame.
FITTING ADAPTERS TO VISTA 2014 AND EARLIER FRAME
Prior to fitting adapter to VISTA 2014 and earlier frame, engage brake on stroller and remove toddler seat or bassinet from frame.
NOTE: VISTA 2014 and earlier stroller models require adapters for use with the MESA.
- TO ATTACH: Place adapters (logo facing out) onto seat attachments and press until you hear a click.
TO REMOVE: Push down release button on backside of adapter and lift up from stroller frame.

NOTE: There are 2 adapters, one for the left and one for the right side of the stroller. The adapters are marked with “L” and “R” respectively. (The left adapter and left side of the stroller are determined by the driver’s left.
NOTE: Indicators should appear green as confirmation of secure installation. If the indicator symbol is red then the adapter is not secure. Remove the adapter and try fastening it again.
RELEASING CARRIER FROM VISTA 2014 AND EARLIER FRAME ADAPTERS
- STEP 1: Engage and hold the stroller release button on the top of the carry handle.
STEP 2: Lift the carrier off the adapters on stroller frame.

SIP PADDING REMOVAL
Following are fabric removal instructions for cleaning.
- STEP 1: Unbuckle retainer clip and harness.
- STEP 2: Pull forward on SIP padding releasing harness straps.
STEP 3: Pull SIP padding down from bottom and release.
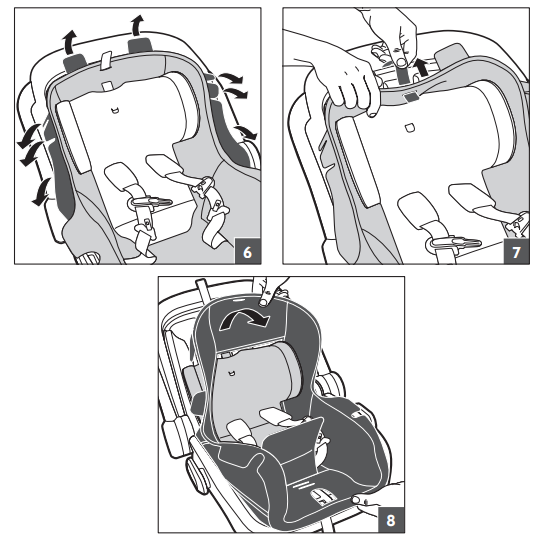
SEAT PADDING REMOVAL
- STEP 1: Remove buckle cover.
- STEP 2: Unhook harness adjuster strap from underside of carrier.
- STEP 3: Remove (4) plastic tabs from front sides of carrier.
- STEP 4: Loosen padding from front end of carrier and free padding from around harness adjuster release button housing.
- STEP 5: Raise SIP to highest position and pull back padding panel.
- STEP 6: Slide SIP to lowest position and release (8) plastic tabs from upper portion of carrier.
- STEP 7: Thread SIP adjuster tab through buttonhole in top of seat pad.
STEP 8: Pull seat padding up and forward to remove padding around SIP.
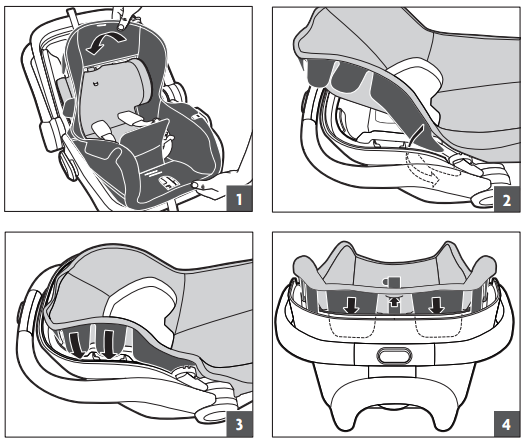
SEAT PADDING INSTALLATION
- STEP 1: With the SIP in the lowest position, lay seat pad over carrier, open Velcro flap and fit opening around SIP/headrest.
- STEP 2: Tuck lowest side tab behind seat foam and under post. Repeat on other side.
- STEP 3: Place second side tab into designated plastic slot and third side tab behind seat foam. Repeat on other side.
STEP 4: Tuck top 2 tabs into designated slots and pull headrest adjuster tab through buttonhole
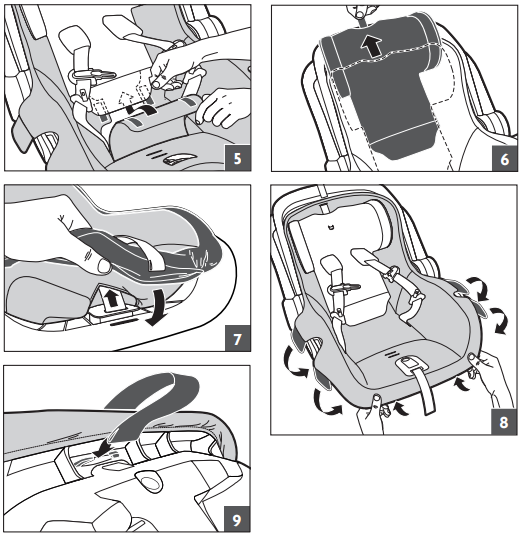
- STEP 5: Lift lower part of SIP and pull harness straps to each side of opening. Secure padding panel with Velcro.
- STEP 6: Raise SIP/headrest into highest position.
- STEP 7: Pull harness adjuster strap through opening in seat pad and install pad around adjuster release button housing.
STEP 8: Wrap padding around front lip and install 4 lower plastic tabs. STEP 9: Reconnect harness adjuster strap.
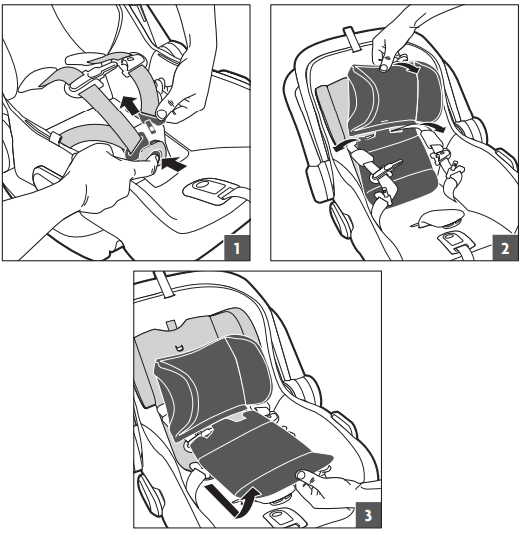
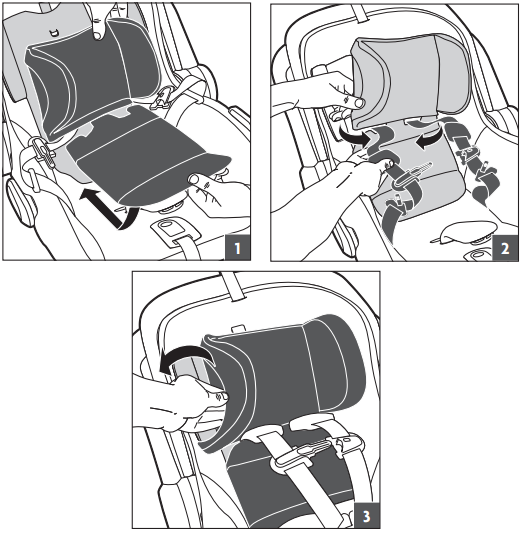
SIP PADDING INSTALLATION
- STEP 1: Insert lower part of SIP carriage into pocket on the back of SIP padding.
- STEP 2: Guide harness straps back into slots in SIP padding.
STEP 3: Secure SIP cover tightly around SIP ears.
CLEANING FABRICS
Fabrics include: seat pad, infant inserts, buckle pads and shoulder pad.
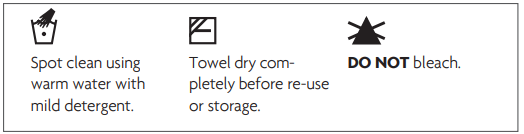
CLEANING HARNESS WEBBING + CANOPY
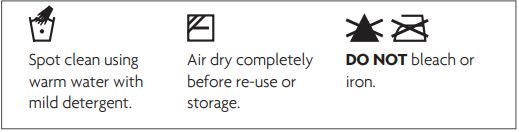
CLEANING PLASTIC
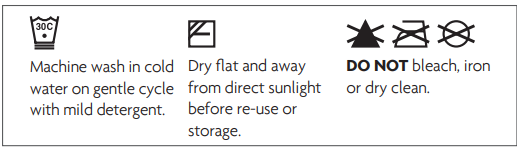
CLEANING BUCKLE AND LOWER ANCHOR CONNECTOR HARDWARE
NOTE: Buckle should fasten with a “click” if not, rinse under warm running water. DO NOT use detergents or lubricants.
UPPAbaby Mesa Infant Car Seat 1017-MSA-US Troubleshooting
If you encounter issues with the installation,
- Check that the LATCH connectors are securely attached and that the car seat base is level.
- Common problems include improper harness adjustment and incorrect angle of the car seat.
- Ensure that the harness straps are not twisted and that the chest clip is in the correct position.
For any warnings or instructions,
- Always refer to the user manual provided with the product.
- It is crucial to follow all safety guidelines to ensure your baby’s safety while in the car.
Warranty
Your UPPAbaby product is warranted to be free from any manufacturing defects for a period of 2 years from the date of purchase under normal use and in compliance with the operating instructions.
Register your product at: https://uppababy.com/register
Car Seat Pros & Cons
Pros:
- Ease of installation with SmartSecure system
- No-rethread harness for easy adjustments
- Enhanced side impact protection with EPP foam
- Machine-washable fabric for easy maintenance
- UPF 50+ canopy for sun protection
- Compatible with UPPAbaby strollers
Cons:
- Higher price point compared to other infant car seats
- Some users find the car seat base bulky
- Limited compatibility with non-UPPAbaby strollers
Customer Reviews
Customers generally praise the UPPAbaby Mesa Infant Car Seat for its ease of installation and superior safety features. Many appreciate the no-rethread harness and the self-retracting LATCH connectors, which simplify the setup process. However, some users note that the car seat is more expensive than other options on the market and that the base can be quite bulky.
Most Common Complaints
Some of the most common complaints include the higher price point and the bulkiness of the car seat base. Additionally, a few users have noted that it may not be as compatible with non-UPPAbaby strollers as they would like.
Faqs
How do I install the UPPAbaby Mesa Infant Car Seat using LATCH?
What is the weight range for the UPPAbaby Mesa Infant?
Can I use the UPPAbaby Mesa Infant Car Seat 1017-MSA-US with non-UPPAbaby strollers?
How do I adjust the harness on the Infant Car Seat?
Is the fabric of the UPPAbaby Mesa Infant Car Seat machine washable?
What safety features does the Seat have?
How do I ensure proper angle installation of the UPPAbaby?
Can I use this car seat in any vehicle?
What is the UPF 50+ canopy for?
How long does it take to install the Infant Car Seat?
Leave a Comment