Vivitar AquaShot Underwater Camera 26693 User Manual
Content
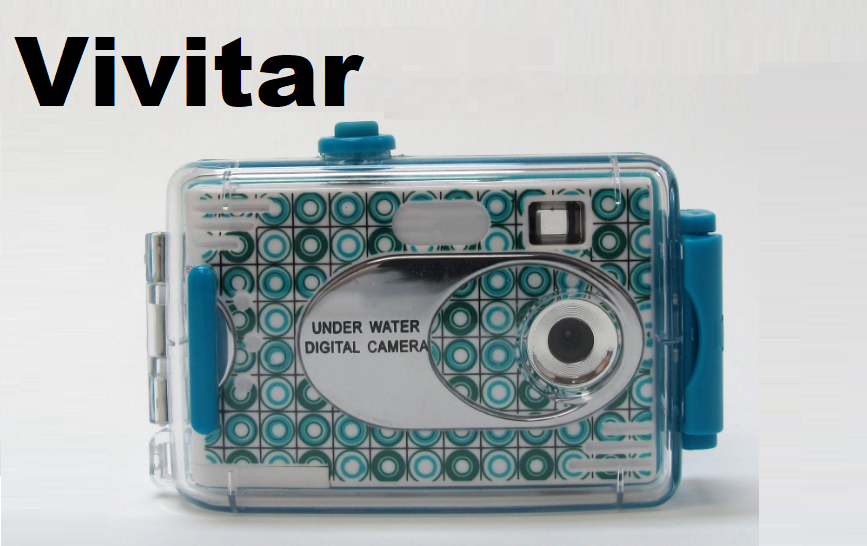
Vivitar AquaShot Underwater Camera 26693 Introduction
Capable of producing high-quality images and movies in both underwater and on-land environments, the Vivitar AquaShot Underwater Camera 26693 is a compact and robust digital camera. This camera has a 2.0-inch LCD screen for simple viewing, a 12-megapixel resolution, and 720p HD video recording. It is waterproof up to 10 feet (3 meters). For plenty of capacity, it accepts microSD cards up to 32GB in size and runs on two AAA batteries. The AquaShot is perfect for both adventurous and casual photographers because it has an integrated flash for low light situations and comes with necessary accessories like a wrist strap and USB cable.
Technical Specifications
| Image Sensor | CMOS Sensor | ||
| Memory | 16 MB SDRAM | ||
| Photo Resolution | 640 x 480 (VGA), 320 x 240 (QVGA) | ||
| Video Resolution | 320 x 240 pixels | ||
| Frame Rate | 12 frames per second | ||
| Video Frame Rate | 6 – 8 frames per second in d8 mode | ||
| File Format | Photos – JPG ; Videos - AVI | ||
Number of pictures | Resolution | Low Compression | High Compression |
|
26 photos |
52 photos | |
| 104 photos | 208 photos – approx. | |
| Lens | ¼ inch Fixed Lens: f=3.9mm/F2.8 | ||
| Focus Range | 1m to Infinity | ||
Shutter Speed Range | 1/60 ~1/15000 second | ||
| LCD display | Numeric – 2 digit display | ||
| Self-Timer | Timer with 10 second delay | ||
| White Balance | Auto | ||
| Light Exposure | Auto | ||
| Power Source | 2 X 1.5V AAA alkaline / USB 5V | ||
| Auto Power Off | 30 sec. | ||
| PC interface | USB 1.1 | ||
| Operating Systems | Windows XP (SP3), Vista (SP1), Windows 7; MAC X v10.5.x or higher | ||
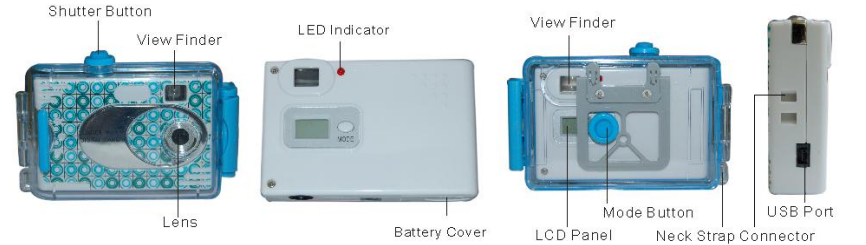
Parts of Your Digital Camera
A Quick Look at your Digital Camera and Water Resistant Case
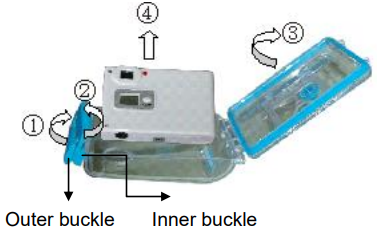
The Water Resistant Case
To open the water resistant case and take out the camera, please follow the steps below:
- Release the outer buckle by pulling up from the arc edge under the arrow mark, as illustrated in the figure.
- Repeat Step 1 to release the inner buckle.
- Open the cover.
Take out the camera.
To close the water resistant case, please follow the steps below:
- Place the camera properly into the water resistant case.
- Close the cover.
- Rest securely the movable end of the inner buckle upon the buckle stops (on the back of the case and near the buckles).
- Press down on the outside surface of the outer buckle to shut the case.
What’s Included

- Digital Camera with Water Resistant Casing
- USB cable
- Neck Strap
- Vivitar Experience Image Manager software Installation CD
Note:
- User Manual included.
- Batteries not included.
Important Notice: Please do not plug the camera into the USB port of your computer until you have installed the Vivitar Experience Image Manager software and the camera’s driver. Plugging in your camera at this stage will cause the device to not be recognized by the computer and no images will be downloaded.
Key Features
- Water resistant removable cover up to 30 feet / 10 meters
- Vivitar Experience Image Manager Software for uploading and managing photos and videos to or from the most popular photo sharing and social network websites.
- Works as a Webcam on Windows and Macintosh computers
Computer System Requirements
To be able to download photos and videos to your computer, you will need the following minimum configuration:
WINDOWS OS
- MICROSOFT WINDOWS XP SP3, Vista SP1 and Windows 7
- Pentium 4 processor (or above)
- 250 MB available hard disk space
- 1 GB of RAM
- 16-bit Color display, 1024 X 768 pixels CD-ROM Drive
- QuickTime 6 or higher
- MICROSOFT Internet Explorer 7 or higher
- Windows Media Player 10 or higher
MAC OS
- MACINTOSH with Intel Processor running Mac OS X v10.5.x or later
- 250 MB available hard disk space
- 1 GB of RAM Display: 1024 x 768 or higher-resolution monitor
- CD-ROM Drive
- QuickTime 6 or higher
Note: Make sure the latest compatible Adobe Flash Player is installed on your computer. Internet Connection required for access to Social Networks.
Description
The Vivitar AquaShot Underwater Camera 26693's 2.4-inch LCD screen and 5-megapixel sensor make it easy to frame and view your images. The camera is easy to take on all of your underwater adventures because of its compact size and light weight. The camera also features an integrated flash, which is perfect for dim lighting. Additionally, the camera has a 16x digital zoom that allows you to go up close to subjects without getting too close.
Installing the Batteries
Your camera requires 2 AAA batteries (not included). Insert the batteries into the camera as shown:
- Open the battery compartment cover.
- Insert the batteries in accordance with the polarity (+/-) as shown on the inside of the battery cover.
Close the battery compartment cover.

Important: Before installing the batteries make sure you are not near water and that your hands are dry.
The LCD will flash ![]() when your batteries are running low and then will automatically switch off in which case you will need to replace the batteries before taking more photos. Please download any photos or videos you have on the camera before opening the battery compartment.
when your batteries are running low and then will automatically switch off in which case you will need to replace the batteries before taking more photos. Please download any photos or videos you have on the camera before opening the battery compartment.
WARNING
- Images will be lost when the batteries run low or when the batteries are replaced.
- Reminder: Please download any photos or videos you have on the camera before opening the battery compartment.
- Do not remove the batteries before downloading the photos and videos from the camera.
- Opening the battery compartment and/or removing and replacing the batteries will permanently erase the images currently stored in the camera.
Note
- If you do not intend to use your camera for an extended period, first download your images you would like to save, and then remove the batteries to avoid battery leakage and corrosion.
- It is recommended to download and save your photos and videos often in order not to lose your images if the battery power becomes too low.
Starting Your Camera
Important: In order to download the photos and videos captured with this camera you need to install the Vivitar Experience Image Manager Software and camera specific driver for your camera. See the “Installing the Vivitar Experience Image Manager Software and Camera Driver” section of this manual to learn how to install the software before connecting the camera to your computer.
To begin using your camera please follow the steps below:
- Press the MODE button to start the camera.
- The camera emits a beep to confirm that your camera is ready for use.
- The red LED next to the View Finder lights up to confirm that your camera is on and ready for use.
- The current camera resolution briefly appears on the LCD
 for High Resolution (640 x 480 pixels) and
  for Low Resolution (320 x 240 pixels).
Energy Saving Feature
To conserve battery power, if the camera is not in use for 30 seconds, it automatically switches off.
Taking Photos
To begin capturing images with your camera, please follow the steps below:
- Compose your shot using the view finder. The optimal distance between the camera and the subject is approximately 5 feet.
- Hold the camera steady and press the Shutter button to take the photo.
- The camera beeps when a photo is taken.
- The photo is saved as a JPEG file in the camera’s memory
- The LCD screen then displays the number of photos that can be still taken.
Note: If there are more than 99 photos left to take, the hundreds digit appears on the LCD for a split second when you take the photo. Thereafter the last two digits appear.
How to Proceed When Your Camera Memory is Full
If the camera beeps twice continuously or if 00 a appears on the LCD, this is an indication that the memory is full. When the camera memory is full no further photos can be taken until the existing photos have been downloaded and cleared from the camera’s memory.
In order to continue taking photos you will need to:
- Download all the photos and videos from your camera to your computer.
- After the photos have been downloaded and appear on your computer you should delete all the photos from your camera.
- Once your camera memory is empty you are now ready to take more photos and videos.
Note: See the ‘Getting Photos and Videos from Your Camera to Your Computer’ section of this manual to learn how to download your camera’s captured images to your computer.
Important: Before using your camera underwater please ensure that the water resistant casing is correctly positioned over the camera and is tightly closed and locked.
Camera Modes
You can change the mode of the camera by pressing the MODE button and within 5 seconds pressing the Shutter button to confirm and save your selected setting. The camera modes and settings include the following options:
MODE / SETTING
| Mode | LCD Display Icon |
|---|---|
| Power Off |  |
| Self-Timer Mode |  |
| Continuous Shot Mode (Video) |  |
| 3 Shot Mode |  |
| Delete/Clear All |  |
| Delete/Clear Last Photo |  |
| Photo Resolution Setting | |
| Compression Setting | |
| Frequency Setting |
Power Off
To power off the camera:
- Press the MODE button until the ‘Power Off’ icon appears on the LCD screen.
- Press the Shutter button and the camera switches off.
Self-Timer
To use the Self-Timer camera feature:
- Press the MODE button until the ‘Self-Timer’ icon appears on the LCD screen.
- Press the Shutter button.
- A 10 second countdown begins (the camera beeps once a second).
- After the countdown a photo is taken.
Continuous Shot Mode (Video)
To capture a video
- Press the MODE button until the ‘Continuous Shot/Video Mode’ icon appears on the LCD screen.
- Press and hold the Shutter button down to begin the video capture.
- While the video is being recorded, the camera beeps as the countdown digits appear.
- Lift your finger off the Shutter button to stop capturing the video.
- The video is saved as an AVI file in your camera’s memory.
Note: Images taken in Continuous Shot Mode may fail under poor lighting conditions.
3 Shot Mode
To take 3 continuous photos:
- Press the MODE button until the ‘3 Shot Mode’ icon appears on the LCD screen.
- Press the Shutter button once to immediately capture 3 continuous jpeg photos.
Note: The 3 photos taken in this mode are saved individually.
Delete/Clear All
To delete all captured images on the camera:
- Press the MODE button until the ‘Delete/Clear All’ icon appears on the LCD screen.
- Press the Shutter button and the photo counter flashes.
- Press the Shutter button again within 5 seconds and all images in the camera are permanently deleted.
- The LCD counter is reset to show the maximum number of photos that can be taken at the current resolution and compression.
Delete/Clear Last Photo
To delete the last photo taken:
- Press the MODE button until the ‘Delete/Clear Last’ icon appears on the LCD screen.
- Press the Shutter button within 5 seconds to delete the last captured photo.
- The LCD counter then displays the updated number of photos that can be taken at the current resolution and compression.
 Photo Resolution
The Photo Resolution includes the following options:
- High Resolution VGA (640 x 480)
- Low Resolution – QVGA (320 x 240)
To set the camera photo resolution:
- Press the MODE button until the or icon appears on the LCD screen.
- If the LCD displays this means the present resolution is ‘Low Resolution’ , and in order to change to ‘High Resolution’ press the Shutter button.
- If the LCD displays this means the present resolution is ‘High Resolution’ , and in order to change to ‘Low Resolution’ press the Shutter button.
- All photos captured after changing the resolution setting are taken at the new resolution.
- The resolution setting can be changed at any time.
Note: Photos taken at higher resolution take up more of the camera’s memory and therefore fewer photos can be taken at high resolution than that with low resolution.
 Compression
The Photo Compression includes the following options:
 High Compression/Density -
 Low Compression/Density -
To set the camera photo compression:
- Press the MODE button until the or icon appears on the LCD screen.
- If the LCD displays this means the present compression is ‘Low Compression’, and in order to change to ‘High Compression’ press the Shutter button.
- If the LCD displays this means the present compression is ‘High Compression’ , and in order to change to ‘Low Compression’ press the Shutter button.
- All photos taken after changing compression are captured at the new compression.
- The compression setting can be changed at any time.
Note: Photos taken at lower compression take up more of the camera’s memory and therefore fewer photos can be taken at lower compression than with high compression.
The photo resolution and compression settings determine the number of photos that can be taken and the amount of memory required for each photo. The following table tells you how many photos can be taken based on the image resolution and compression:
| Resolution | Compression | Number of Photos |
|---|---|---|
VGA (640x480)
| Low Compression
| 26 photos |
VGA (640x480)
| High Compression
| 52 photos |
QVGA (320x240)
| Low Compression
| 104 photos |
QVGA (320x240)
| High Compression
| About 208 photos |
 Frequency
The Frequency feature includes the following options:
 50HZ - suitable for the United States, Canada, South America
 60HZ - suitable for Europe, Asia, Australia
To set the camera for the correct frequency:
- Press the MODE button until the or icon appears on the LCD screen.
- If the LCD displays this means the present frequency is ‘60HZ’ , and in order to change to ‘50HZ’ press the Shutter button.
- If the LCD displays this means the present frequency is ‘50HZ’ , and in order to change to ‘60HZ’ press the Shutter button.
- All photos taken after changing frequency are captured at the new frequency.
- The frequency setting can be changed at any time.
Installing the Vivitar Experience Image Manager Software and Camera Driver
WARNING: Do not plug your camera into the computer until the Vivitar Experience Image Manager Software installation is complete.
- Insert the installation CD into your CD-ROM drive.
- WINDOWS OS: The “Vivitar Experience Image Manager” will begin to install.
- MAC OS: Click icon to begin installation then click “Continue”.
- Please review the license terms.
- WINDOWS OS: Click the “I accept the terms of this license agreement” and then click “Next” to continue.
- MAC OS: Click “Continue” to accept the license agreement.
- WINDOWS OS: Let the “Vivitar Experience Image Manager” installer create the folder to where the program will be installed, and then click “Install”.
- MAC OS: Click “Install”.
- Please wait while the application continues the installation process on your computer. Follow all instructions.
- MAC OS: If needed, please follow instructions to install the Adobe® Flash® Player. This requires Internet connection.
- WINDOWS OS: Click the “Close” button when the installation is complete. The application automatically opens.
- MAC OS: After the installation is complete, the application automatically opens.
- If you closed the application, click on the “Vivitar Experience Image Manager” desktop icon or open and run the application from the Programs menu on your computer.
Connecting your Camera to the Computer
- Use the supplied USB cable to connect your camera to your computer.
- Plug one end of the USB cable into the camera’s USB slot and plug the other end into an available USB port on your computer.
- Your camera automatically powers on.
- The first time you connect the device to the computer you may have to wait a few moments until the computer recognizes the device.
Getting Photos and Videos from Your Camera to Your Computer
Important: Do not disconnect the cable during transfer. Doing so will cancel the transfer of any files on their way to your computer. The camera can also be used without batteries while connected to the computer with the provided USB cable. However, the images need to be downloaded before disconnecting the camera as they will not be stored in the camera’s memory without batteries.
Select the “Get Images” button from the Main menu.
- The “Get media from device” window opens.
- You can select to download photos, videos or both.
- Select your camera (removable disk) from the device window. If your camera is the only USB device connected then it will be selected automatically.
- Select a location on the computer where to place the new photo and video files.
- Add the new photo and video files to albums if desired.
- Select to remove the media files from the selected device (removable disk) after the import.
- Click the “Get Media” button to transfer the photos and videos from your camera to your computer.
- A media download progress bar appears on the bottom left showing the number of media files downloading to your computer. A message appears when the download is complete.
- The photo and video files that you selected are now downloaded to your computer to the selected folder and albums ready for your use.
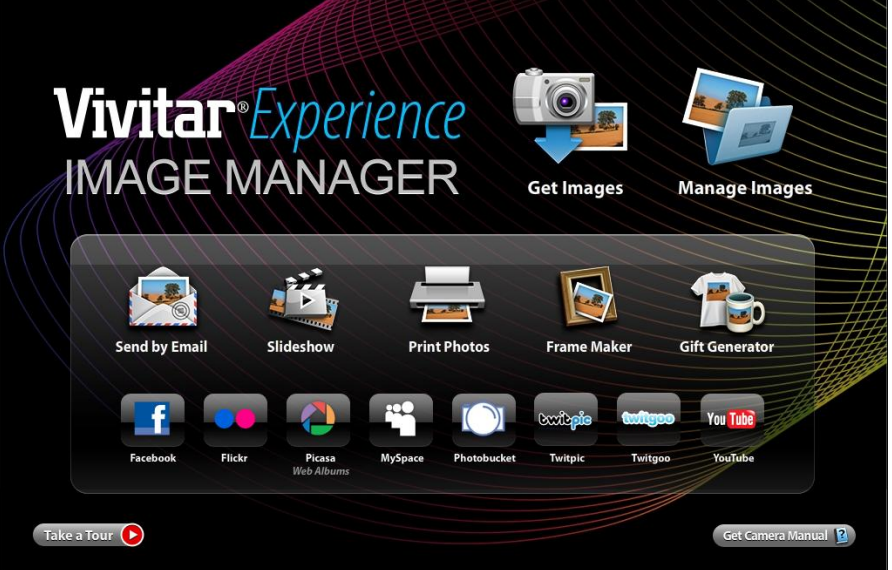
Getting Started!
Using the Vivitar Experience Image Manager, you can:
- Upload and manage photos and videos to and from the most popular photo sharing and social networking sites - Facebook, Flickr, Picasa, MySpace, Photobucket, Twitpic, Twitgoo and YouTube
- Seamlessly transfer photos and videos from one social network to another
- Organize your images by creating offline and online albums
- Edit images using automatic and manual tools
- Use automatic “Geotagging” with built in Google Maps
For more details on how to use the Vivitar Experience Image Manager open the Help file or click the “Take a Tour” button on the application’s Home screen.
Using Your Camera as a Webcam
Your camera when plugged into your computer can also be used as a Webcam with most instant messenger and web conferencing applications that support video.
Note: Once you have connected your camera to your computer, the camera remains on while it is plugged into the USB port. On disconnecting the USB cable the camera automatically switches off.
WINDOWS OS: The webcam driver is installed on your computer when you install the Vivitar Experience Image Manager Software for this device.
- Open your web conferencing application to activate the video camera option.
- Rotating lines will appear on the LCD screen to show that it is active and in webcam mode.
- Place your camera and begin to use.
Note
- Use the settings option of your web conferencing application to change the settings if needed.
- If you have a built-in camera on your computer, use the settings option of your web conferencing application to choose this ‘Dual Mode Camera’.
- The camera does not have a microphone.
MAC OS: The webcam driver is installed on your computer when you install Vivitar Experience Image Manager Software for this device.
To activate the Webcam feature please follow these instructions:
- Click the “Macintosh HD” icon on the desktop
- Click the “Library” folder
- Click the “QuickTime” folder
- Click the “*_pccam” to open the Webcam application for Mac.
- Once you see the object appearing in the Webcam application window, you can now openthe instant messenger and web conferencing application that you use to begin using thiscamera as a webcam on your computer.
Note
- Use the Control menu / Video settings option of this web conferencing application tochange the settings if needed.
- If you have a built-in camera on your computer, use the settings option of your webconferencing application to choose this ‘Dual Mode Camera’.
- The camera does not have a microphone.
Setup Guide
To start configuring the Vivitar AquaShot Underwater Camera 26693, first place the memory card and batteries inside. Next, switch on the camera by pressing the power button. Next, use the menu button to select the settings menu. From there, you may adjust your camera's resolution, white balance, and color mode, among other settings. Press the shutter button halfway to focus the shot, then completely depress it to capture the image. By using the menu button, users can also access the camera's video recording mode.
Maintenance of Your Digital Camera
The Digital Camera is a delicate instrument, please handle it with care.
After using your camera under water please dry the casing with a dry towel first before removing the camera from the water resistant casing.
- The camera must not be used near water without the water resistant casing.
- Dry your hands well before using the camera.
- If water enters the camera or the battery compartment, this will ruin the camera and cause the camera to stop working.
Troubleshooting
- If the camera isn’t turning on, make sure the batteries are in correctly and fully charged. In the event that the LCD screen is blank or displays an error message, try resetting the camera by removing and replacing the batteries.
- If the camera is not focusing, try adjusting the distance between the camera and your subject. Make sure the camera is properly sealed before submerging it to prevent any water damage.
Sakar Warranty Card
This warranty covers the original consumer purchaser only and is not transferable. Products that fail to function properly UNDER NORMAL USAGE, due to defects in material or workmanship. Your product will be repaired at no charge for parts or labor for a period of one year.
What Is Not Covered By Warranty:
- Damages or malfunctions not resulting from defects in material or workmanship.
- Damages or malfunctions from other than normal use, including but not limited to, repair by unauthorized parties, tampering, modification, or accident.
Pros & Cons
Pros
- Affordable price point
- Can be used down to 10 feet underwater
- 5-megapixel sensor for good image quality
- 16x digital zoom
- Built-in flash
Cons
- Only 2.4-inch LCD screen
- No manual focus option
- No optical zoom
- No viewfinder
Customer Reviews
The Vivitar AquaShot Underwater Camera 26693 has received positive reviews from customers for its good image quality and reasonable price. Numerous people have also mentioned how user-friendly the camera is and how well it works for shallow underwater photography. The small LCD screen and absence of optical zoom and manual focus are common criticisms. The majority of consumers have expressed satisfaction with their purchases despite these small issues, and they would suggest the camera to anyone else searching for an inexpensive underwater camera.
Faqs
What is the deepest depth that you can use the Vivitar AquaShot Underwater Camera 26693?
I have taken photos, but my computer says "No photos in camera." What do I do?
What is the resolution of the pictures that the Vivitar AquaShot can capture?
Does the AquaShot from Vivitar record videos? If yes, what is the resolution of the video?
How do I make sure I don't lose important pictures?
What kind of storage does the Vivitar AquaShot Underwater Camera 26693 operate with, and what is the highest capacity that it can support?
What can I do if the webcam does not work?
Exists an accessory kit for the Vivitar AquaShot Underwater Camera 26693?
If I have a MAC, will the camera work?
What is the Vivitar AquaShot Underwater Camera 26693 warranty period?
Leave a Comment